本帖最后由 zoey不种土豆 于 2024-10-16 15:03 编辑
一、Mediapipe介绍
MediaPipe Solutions 提供了一套库和工具,可帮助您在您的应用中快速应用人工智能 (AI) 和机器学习 (ML) 技术。您可以立即将这些解决方案插入到您的应用中,根据需要对其进行自定义,并在多个开发平台上使用。MediaPipe Solutions 是 MediaPipe 开源项目的一部分,因此您可以进一步自定义解决方案代码以满足您的应用需求。
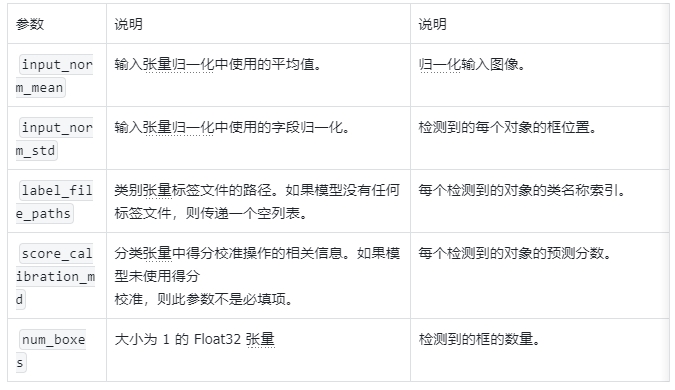
借助 MediaPipe Object Detector 任务,您可以检测图片或视频中多类对象的存在和位置。例如,对象检测器可以定位图片中的狗。此任务使用机器学习 (ML) 模型对图片数据执行操作,接受静态数据或连续视频串流作为输入并输出检测结果列表。每个检测结果代表图片或视频中出现的一个对象。
Mediapipe所用模型介绍
①EfficientDet-Lite0 模型介绍
EfficientDet-Lite0 模型使用具有 320x320 输入大小和 BiFPN 特征网络的 EfficientNet-Lite0 骨干网络。该模型是使用 COCO 数据集训练的,COCO 数据集是一种大型对象检测数据集,其中包含 150 万个对象实例和 80 个对象标签。请参阅支持的标签的完整列表。EfficientDet-Lite0 提供 int8、float16 或 float32。推荐使用此模型,因为它能够在延迟时间和准确率之间取得平衡。它既准确又轻量,对于许多使用场景来说都足够。
②EfficientDet-Lite2 模型介绍
EfficientDet-Lite2 模型使用具有 448x448 输入大小和 BiFPN 特征网络的 EfficientNet-Lite2 骨干网络。该模型是使用 COCO 数据集训练的,COCO 数据集是一种大型对象检测数据集,其中包含 150 万个对象实例和 80 个对象标签。请参阅支持的标签的完整列表。EfficientDet-Lite2 作为 int8、float16 或 float32 模型提供。此模型通常比 EfficientDet-Lite0 更准确,但速度也更慢且内存占用量更大。此模型适用于准确性比速度和规模更重要的用例。
③SSD MobileNetV2 模型介绍
SSD MobileNetV2 模型使用具有 256x256 输入大小和 SSD 功能网络的 MobileNetV2 骨干网络。该模型是使用 COCO 数据集训练的,COCO 数据集是一种大型对象检测数据集,其中包含 150 万个对象实例和 80 个对象标签。请参阅支持的标签的完整列表。SSD MobileNetV2 提供 int8 和 float 32 模式。此模型比 EfficientDet-Lite0 更快、更轻量,但通常也不太准确。此模型适用于需要快速、轻量级模型(牺牲一定程度的准确度)的用例。
④自定义模型
如果您决定构建用于此任务的模型,本部分介绍了自定义模型的要求。自定义模型必须采用 TensorFlow Lite 格式,并且必须包含描述模型操作参数的元数据。
行空板硬件介绍
行空板是一款专为Python学习和使用设计的新一代国产开源硬件,采用单板计算机架构,集成LCD彩屏、WiFi蓝牙、多种常用传感器和丰富的拓展接口。同时,其自带Linux操作系统和Python环境,还预装了常用的Python库,让广大师生只需两步就能进行Python教学。
行空板是一款基于RK3308 Arm 64位四核处理器的开发板,主频达到1.2GHz,配备512MB DDR3内存和16GB eMMC硬盘,运行Debian 10操作系统。此外,它支持2.4G Wi-Fi和蓝牙4.0,采用RTL8723DS芯片。行空板还集成了GD32VF103C8T6 RISC-V协处理器,主频108MHz,具备64KB Flash和32KB SRAM。
行空板拥有多种板载元件,包括Home按键、A/B按键,2.8英寸可触控彩色屏幕,分辨率为240x320。设备还配备了电容式硅麦克风、PT0603光敏三极管光线传感器、无源蜂鸣器和蓝色LED。此外,它还内置了ICM20689六轴传感器,包括三轴加速度和三轴陀螺仪。
在接口方面,行空板提供了多种连接选项。具有USB Type-C接口,用于将CPU与PC连接进行编程或为主板供电。还有USB TYPE-A接口,用于连接外部USB设备。此外,板上还有microSD卡接口用于扩展存储空间,3Pin I/O支持3路10位PWM和2路12位ADC,独立的4Pin I2C接口,以及与micro:bit兼容的19路独立I/O金手指,支持多种通信协议和功能。
在行空板上运行Mediapipe
在行空板上运行MediaPipe的尝试具有重要意义,主要体现在以下几个方面:
1.教育与实践:行空板是一款专为Python学习和使用设计的国产开源硬件,预装了常用的Python库,适合广大师生进行Python教学和实践。通过在行空板上运行MediaPipe,可以让学生和开发者更直观地理解和应用人工智能和机器学习技术。
2.高效开发:MediaPipe提供了一套高效的库和工具,能够快速实现AI和ML应用的开发。行空板集成了LCD彩屏、WiFi、蓝牙和多种传感器,提供了丰富的开发环境和硬件支持,使得在其上运行MediaPipe可以快速验证和展示AI应用。
3.硬件性能:行空板基于RK3308 Arm 64位四核处理器,配备512MB DDR3内存和16GB eMMC硬盘,性能足以支持MediaPipe的简单模型运行。其内置的六轴传感器、麦克风和其他传感器也为AI应用提供了丰富的数据输入源。
4.开源和定制化:MediaPipe作为开源项目,允许用户根据需求进行深度定制。而行空板的开源硬件设计也支持用户进行硬件和软件的定制和扩展,两者结合可以满足不同应用场景的需求。
5.便携性和集成度:行空板体积小巧,功能齐全,适合便携式AI应用开发和展示。在其上运行MediaPipe,可以实现实时的对象检测和其他AI功能,适用于物联网设备、智能家居、教育机器人等多种场景。
通过在行空板上运行MediaPipe,可以充分利用其硬件资源和软件环境,快速实现和展示AI应用,为教育、研究和开发提供强有力的支持。
本文将演示如何在行空板上部署Mediapipe三个小型物体检测模型,主要分为以下几部分:
- 行空板上运行Mediapipe的环境准备;
- 进行行空板上使用Mediapipe物体检测的代码运行;
- 使用int8量化版本的模型对运行速度进行加速;
- 测试不同分辨率图片对这几个模型性能的影响。
二、准备:运行Mediapipe的环境配置
step 1 下载mini conda
在终端输入:wget https://github.com/conda-forge/m ... e3-Linux-aarch64.sh
下载完后终端显示:已保存 “Miniforge3-Linux-aarch64.sh”
step 2 安装mini conda
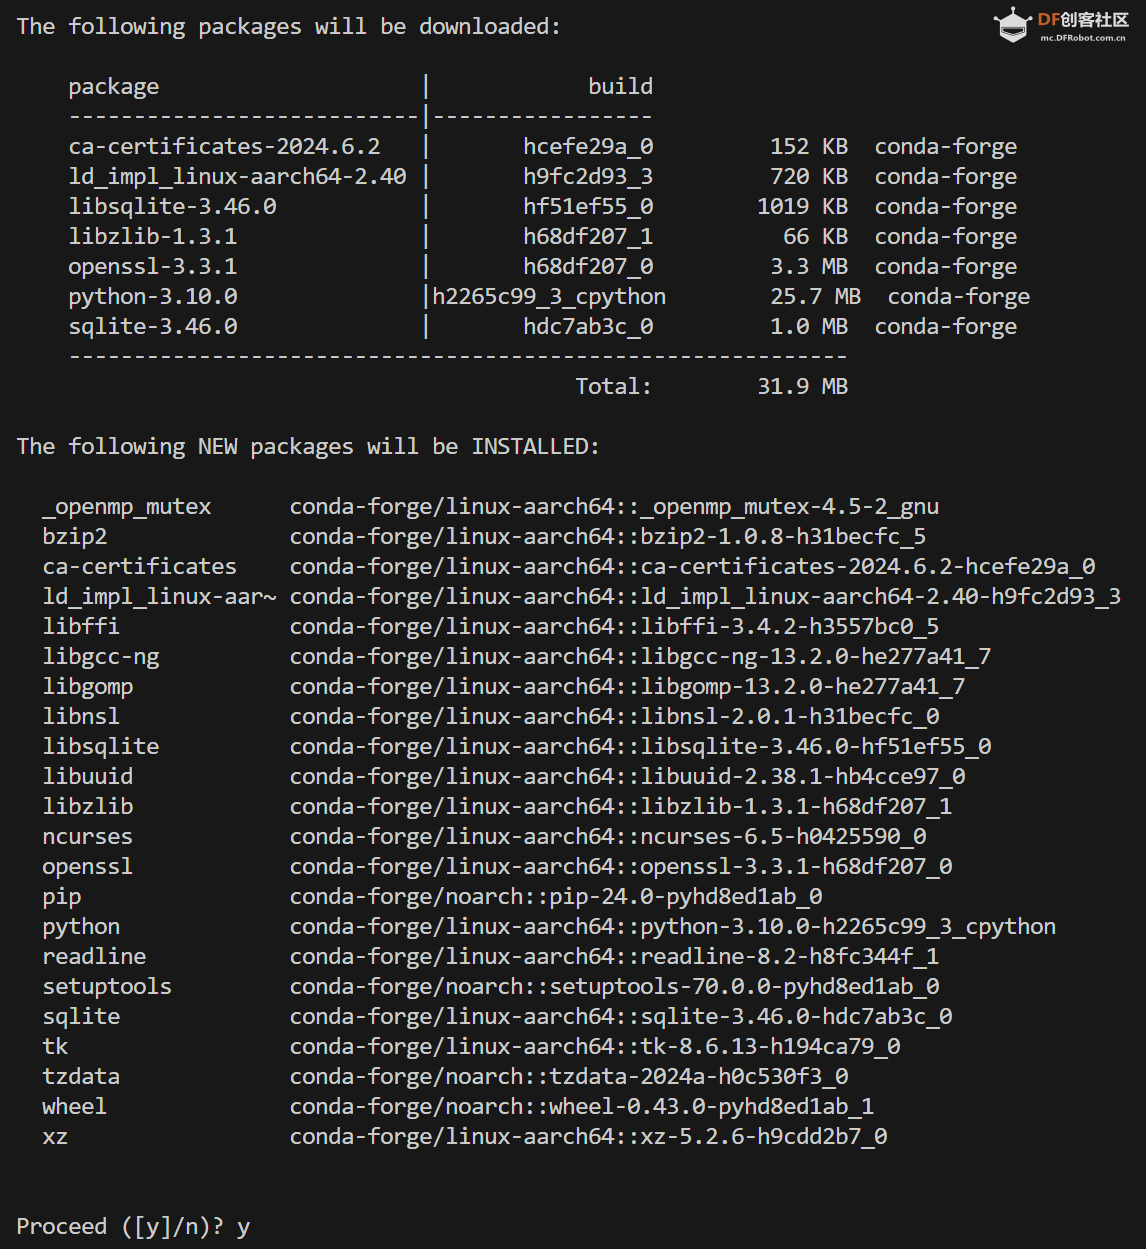
在终端输入:
sudo bash Miniforge3-Linux-aarch64.sh 过程中遇到需要输入ENTER键或者yes键的照做。最后终端显示:Added mamba to /root/.bashrc
==> For changes to take effect, close and re-open your current shell. <==
Thank you for installing Miniforge3! 
在终端输入:
source ~/.bashrc
安装完成,在终端输入:conda
终端显示:
Step 3 激活conda
在终端输入:conda activate 可以看到终端的显示由
变成

说明已经成功激活了conda
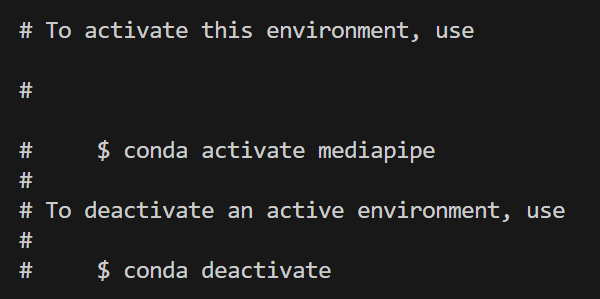
Step 4 在conda中建立MediaPipe环境
名字叫yolo,python版本选择3.10。在终端输入:conda create -n mediap python==3.10 过程中显示:
输入y
环境建立完终端显示:
Step 5 激活mediapipe环境
在终端中输入:conda activate mediapipe 
可以看到终端显示由

变成

说明激活mediapipe环境成功
Step 6 安装mediapipe
在终端输入:pip install mediapipe 
完成后终端显示:

三、快速开始:Mediapipe模型的运行
Step 1 激活mediapipe环境
在终端中输入:conda activate mediapipe 
可以看到终端显示由

变成

说明激活mediapipe环境成功
Step 2 创建目录mediapipe
在终端输入:
mkdir mediapipe
创建mediapipe目录,然后终端输入:
cd mediapipe
进入目录。
Step 3 下载模型文件
可以在下面网址下载所要运行的模型:
https://ai.google.dev/edge/mediapipe/solutions/vision/object_detector/index?hl=zh-cn#models
如Introduction中所介绍,官方提供了三个物体检测模型
EfficientDet-Lite0
EfficientDet-Lite2
SSDMobileNet-V2
可以分别下载这三个模型进行运行。
Step 4 准备图片
这里仍然使用bus.jpg如果想下载,可以在终端输入:


Step 5 编写代码
新建文件test_pic.py,并编写以下代码:
- import numpy as np
- import mediapipe as mp
- from mediapipe.tasks import python
- from mediapipe.tasks.python import vision
- import cv2
- import time
-
- # Define color mappings
- COLORS = [(255, 0, 0), (0, 255, 0), (0, 0, 255)] # Red, Green, Blue
- DEFAULT_COLOR = (255, 255, 255) # White for other categories
-
- def visualize(original_image, detection_result, scale_ratio) -> np.ndarray:
- """Draws bounding boxes on the input image and return it.
- Args:
- original_image: The original input RGB image.
- detection_result: The list of all "Detection" entities to be visualized.
- scale_ratio: The ratio of the resized image size to the original image size.
- Returns:
- Image with bounding boxes.
- """
- # Dictionary to store category-color mappings
- category_color_map = {}
-
- for detection in detection_result.detections:
- # Get the category of the object
- category = detection.categories[0]
- category_name = category.category_name
-
- # Assign a color to the category if not already assigned
- if category_name not in category_color_map:
- if len(category_color_map) < len(COLORS):
- category_color_map[category_name] = COLORS[len(category_color_map)]
- else:
- category_color_map[category_name] = DEFAULT_COLOR
-
- color = category_color_map[category_name]
-
- # Draw bounding box
- bbox = detection.bounding_box
- start_point = int(bbox.origin_x / scale_ratio), int(bbox.origin_y / scale_ratio)
- end_point = int((bbox.origin_x + bbox.width) / scale_ratio), int((bbox.origin_y + bbox.height) / scale_ratio)
- cv2.rectangle(original_image, start_point, end_point, color, 3)
-
- # Draw label and score
- probability = round(category.score, 2)
- result_text = category_name + ' (' + str(probability) + ')'
- text_location = (int((MARGIN + bbox.origin_x) / scale_ratio),
- int((MARGIN + ROW_SIZE + bbox.origin_y) / scale_ratio))
- cv2.putText(original_image, result_text, text_location, cv2.FONT_HERSHEY_PLAIN,
- FONT_SIZE, color, FONT_THICKNESS)
-
- return original_image
-
- def detect_objects(model_path, image_path, target_width, output_path, show_image):
- """Detect objects in an image and save/display the result.
- Args:
- model_path: Path to the model file.
- image_path: Path to the input image file.
- target_width: The width to resize the image for inference.
- output_path: Path to save the annotated image.
- show_image: Boolean flag to display the image after processing.
- """
- # STEP 1: Import the necessary modules.
- base_options = python.BaseOptions(model_asset_path=model_path)
- options = vision.ObjectDetectorOptions(base_options=base_options,
- score_threshold=0.5)
- detector = vision.ObjectDetector.create_from_options(options)
-
- # STEP 2: Create an ObjectDetector object.
- global MARGIN, ROW_SIZE, FONT_SIZE, FONT_THICKNESS
- MARGIN = 10 # pixels
- ROW_SIZE = 10 # pixels
- FONT_SIZE = 1
- FONT_THICKNESS = 1
-
- # STEP 3: Read the local image
- original_image = cv2.imread(image_path)
- if original_image is None:
- print("Error: Could not read image.")
- return
-
- # Resize the image to a smaller size to speed up inference
- scale_ratio = target_width / original_image.shape[1]
- target_height = int(original_image.shape[0] * scale_ratio)
- resized_image = cv2.resize(original_image, (target_width, target_height))
-
- # Convert the image to the format required by MediaPipe.
- mp_image = mp.Image(image_format=mp.ImageFormat.SRGB, data=resized_image)
-
- # STEP 4: Detect objects in the image.
- start_time = time.time()
- detection_result = detector.detect(mp_image)
- end_time = time.time()
-
- # Print inference time
- inference_time = end_time - start_time
- print(f'Inference time: {inference_time:.2f} seconds')
-
- # STEP 5: Process the detection result. In this case, visualize it.
- annotated_image = visualize(original_image, detection_result, scale_ratio)
-
- # Save the result
- cv2.imwrite(output_path, annotated_image)
- print(f'Result saved to {output_path}')
-
- # Display the result if needed
- if show_image:
- cv2.imshow('Object Detection', annotated_image)
- cv2.waitKey(0)
- cv2.destroyAllWindows()
-
- # Example call
- detect_objects(
- model_path='efficientdet_lite0.tflite',
- image_path='bus.jpg',
- target_width=640,
- output_path='bus_640.jpg',
- show_image=False
- )
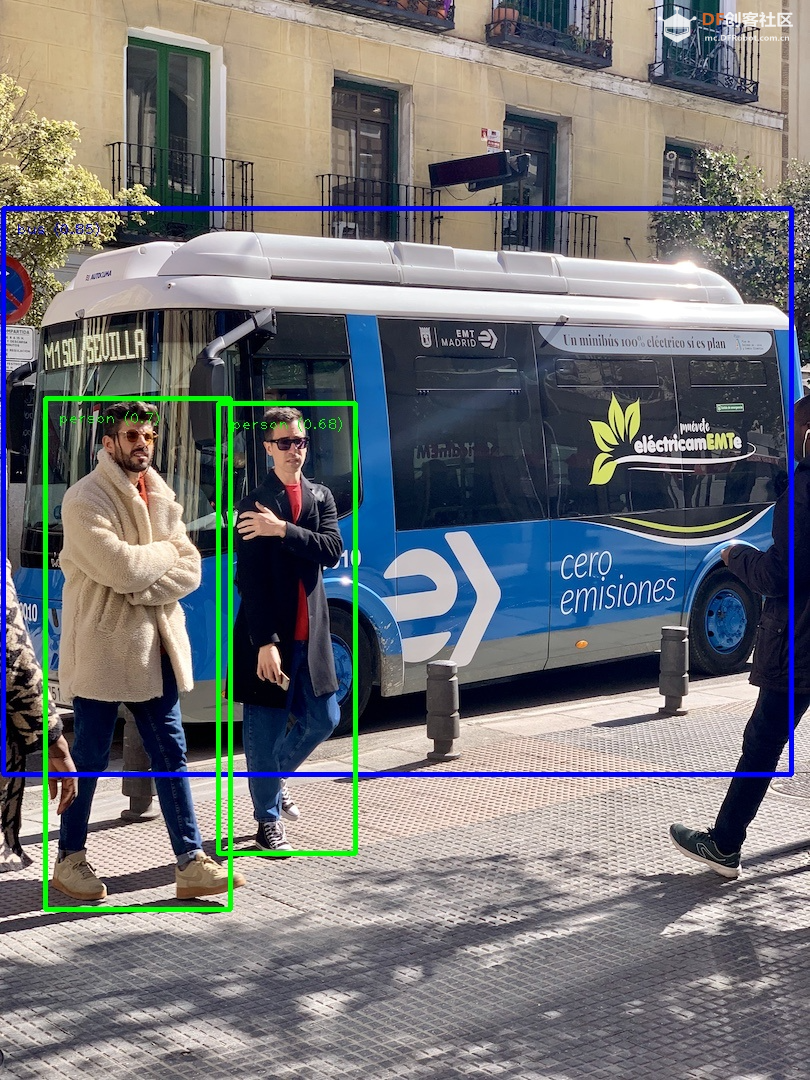
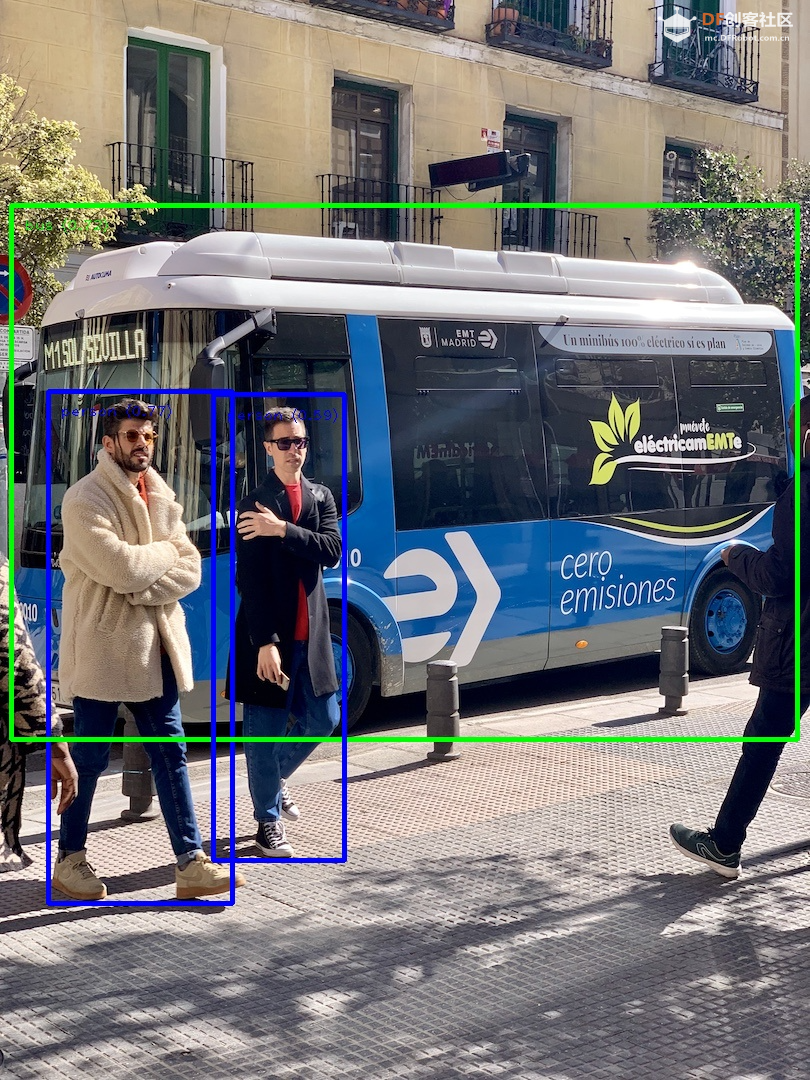
这里使用上一步下载的 efficientdet_lite0.tflite 模型
Step 6 运行代码并查看结果
运行后终端显示:

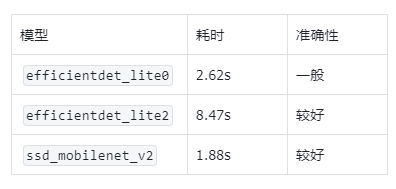
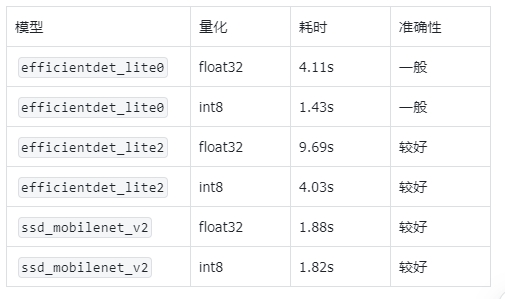
可以看出,efficientdet_lite0 模型处理640分辨率的图片时间为2.62s。
处理后的图片结果如下
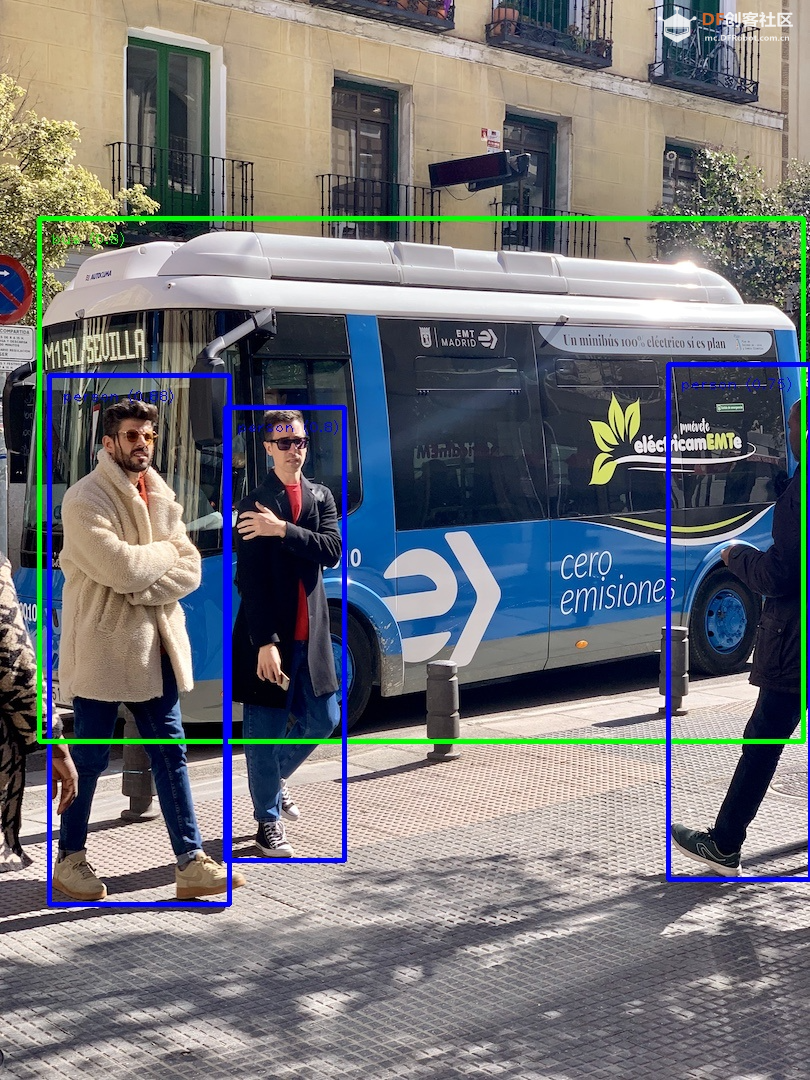
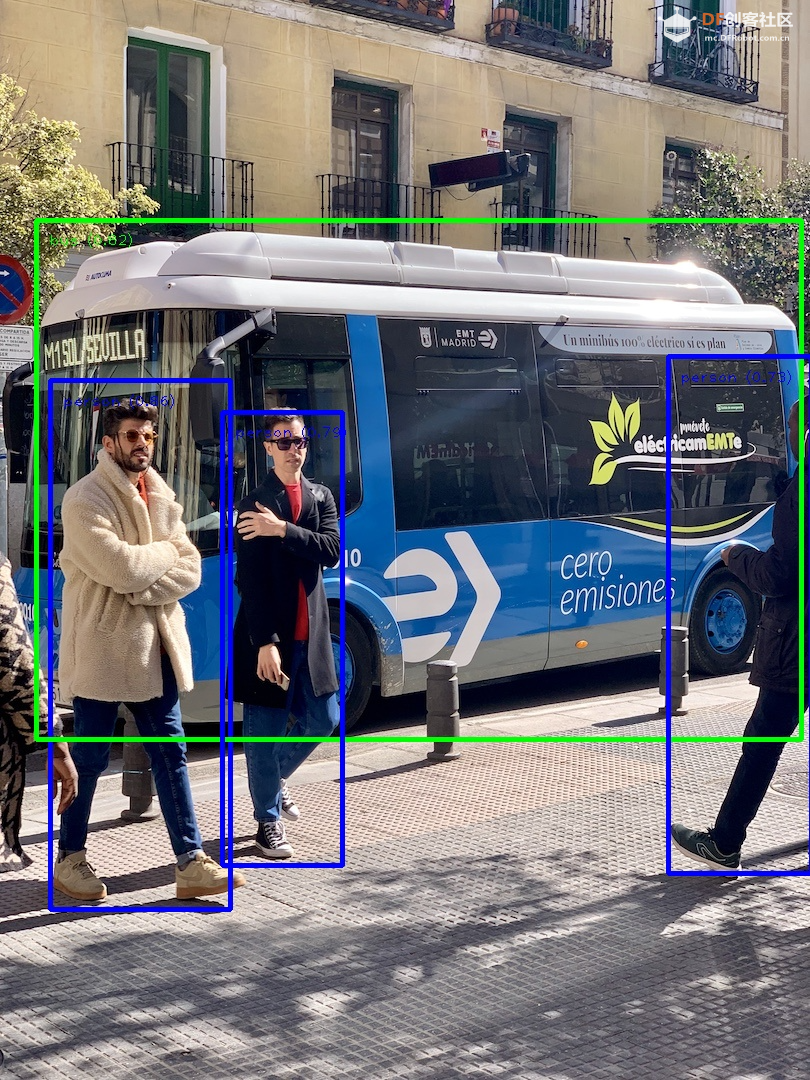
再使用efficientdet_lite2模型,耗时为8.47秒:

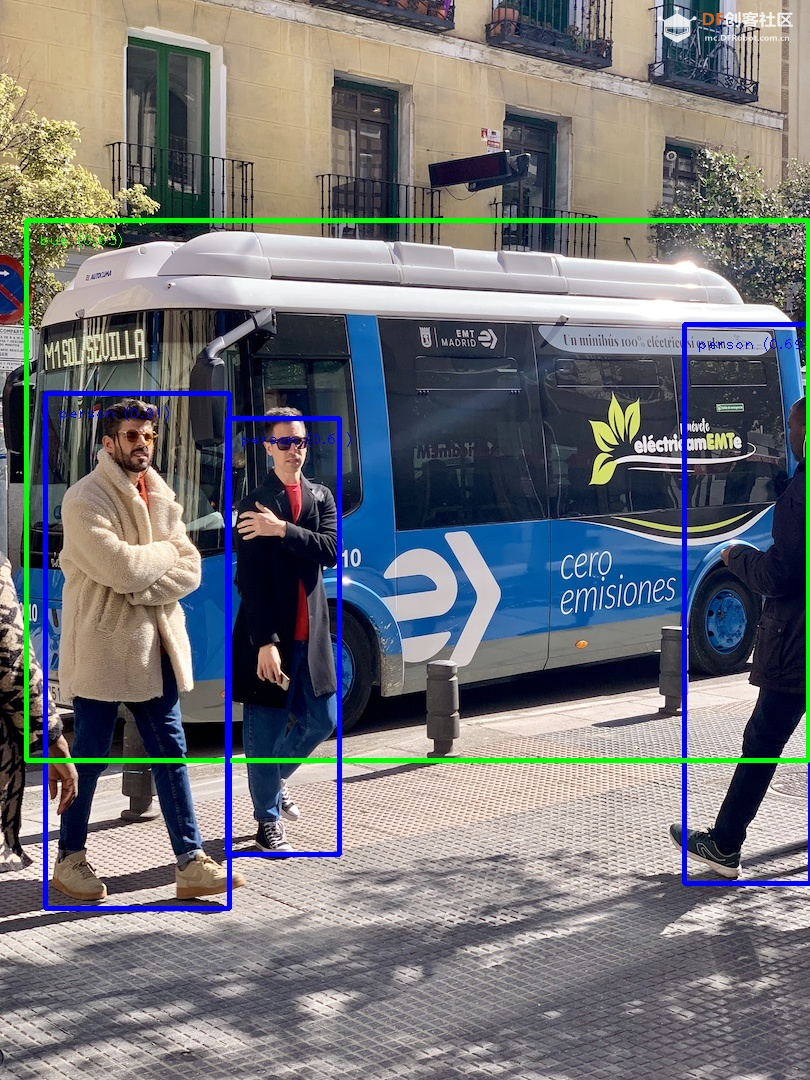
再使用 ssd_mobilenet_v2 运行,耗时为1.88秒:

小结
不同的模型效果和速度有所不同:
efficientdet_lite0 的准确性一般;
ssd_mobilenet_v2 的速度和准确性都较好。
四、优化:使用int8量化的模型
我们可以使用官方提供的int8模型进行加速。步骤如下:
Step 1 下载官方int8模型
直接到下载官方的int8模型即可。地址如下:
EfficientDet-Lite0 (int8)
EfficientDet-Lite2 (int8)
SSDMobileNet-V2 (int8)
分别保存为:
efficientdet_lite0_int8.tflite
efficientdet_lite2_int8.tflite
ssd_mobilenet_v2_int8.tflite
Step 2 修改代码
将上一步中的代码中的模型替换成上面下载的int8模型,如:- import numpy as np
- import mediapipe as mp
- from mediapipe.tasks import python
- from mediapipe.tasks.python import vision
- import cv2
- import time
-
- # Define color mappings
- COLORS = [(255, 0, 0), (0, 255, 0), (0, 0, 255)] # Red, Green, Blue
- DEFAULT_COLOR = (255, 255, 255) # White for other categories
-
- def visualize(original_image, detection_result, scale_ratio) -> np.ndarray:
- (... ...)
-
- def detect_objects(model_path, image_path, target_width, output_path, show_image):
- (... ...)
-
- # Example call
- detect_objects(
- model_path='efficientdet_lite0_int8.tflite',
- image_path='bus.jpg',
- target_width=640,
- output_path='bus_640.jpg',
- show_image=False
- )
Step 3 运行代码并查看结果
efficientdet_lite0_int8.tflite 模型运行耗时1.43秒:

efficientdet_lite2_int8.tflite 模型运行耗时4.03秒:

ssd_mobilenet_v2_int8.tflite 模型运行耗时1.82秒:


小结
量化后,det两个模型速度有明显提升,mobilenet变化不大;准确性都保持的很好。
五、进一步测试:不同的输入图片尺寸
为了进一步加快速度,我们还可以缩小推理图片的尺寸。步骤如下:
Step 1 修改代码
修改上面代码的Example call部分,例如对于efficientdet_lite0_int8.tflite 模型:
- import numpy as np
- import mediapipe as mp
- from mediapipe.tasks import python
- from mediapipe.tasks.python import vision
- import cv2
- import time
-
- <strong># Define color mappings</strong>
- COLORS = [(255, 0, 0), (0, 255, 0), (0, 0, 255)] # Red, Green, Blue
- DEFAULT_COLOR = (255, 255, 255) # White for other categories
-
- def visualize(original_image, detection_result, scale_ratio) -> np.ndarray:
- (... ...)
-
- def detect_objects(model_path, image_path, target_width, output_path, show_image):
- (... ...)
-
- <strong># Example call</strong>
-
- for r in [640, 448, 320, 256, 128, 64]:
- print(r)
- detect_objects(
- model_path='efficientdet_lite0_int8.tflite',
- image_path='bus.jpg',
- target_width=r,
- output_path=f'bus_det_l2_{r}_int8.jpg',
- show_image=False)</code></pre></div><span data-lark-record-data="{"rootId":"H1QFdiICyo9ed2xHbeBcNUr5nxf","text":{"initialAttributedTexts":{"text":{"0":"import numpy as np\nimport mediapipe as mp\nfrom mediapipe.tasks import python\nfrom mediapipe.tasks.python import vision\nimport cv2\nimport time\n\n# Define color mappings\nCOLORS = [(255, 0, 0), (0, 255, 0), (0, 0, 255)] # Red, Green, Blue\nDEFAULT_COLOR = (255, 255, 255) # White for other categories\n\ndef visualize(original_image, detection_result, scale_ratio) -> np.ndarray:\n (... ...)\n\ndef detect_objects(model_path, image_path, target_width, output_path, show_image):\n (... ...)\n\n# Example call\n\nfor r in [640, 448, 320, 256, 128, 64]:\n print(r) \n detect_objects(\n model_path='efficientdet_lite0_int8.tflite', \n image_path='bus.jpg', \n target_width=r, \n output_path=f'bus_det_l2_{r}_int8.jpg', \n show_image=False)"},"attribs":{"0":"*0|7+3z*0*1+n*0|a+8y*0*1+e*0|9+63*0+l"}},"apool":{"numToAttrib":{"0":["author","7360571945601384452"],"1":["bold","true"]},"nextNum":2}},"type":"text","referenceRecordMap":{},"extra":{"channel":"saas","pasteRandomId":"6d2e8d82-caef-41a8-9a3d-95f5b148996c","mention_page_title":{},"external_mention_url":{}},"isKeepQuoteContainer":false,"isFromCode":true,"selection":[{"id":210,"type":"text","selection":{"start":0,"end":742},"recordId":"QgWRdUfmsoKwLgxNoADcO3kNnmh"}],"payloadMap":{},"isCut":false}" data-lark-record-format="docx/text" class="lark-record-clipboard"></span>
Step 2 运行代码并查看结果
对于 efficientdet_lite0.tflite 模型:
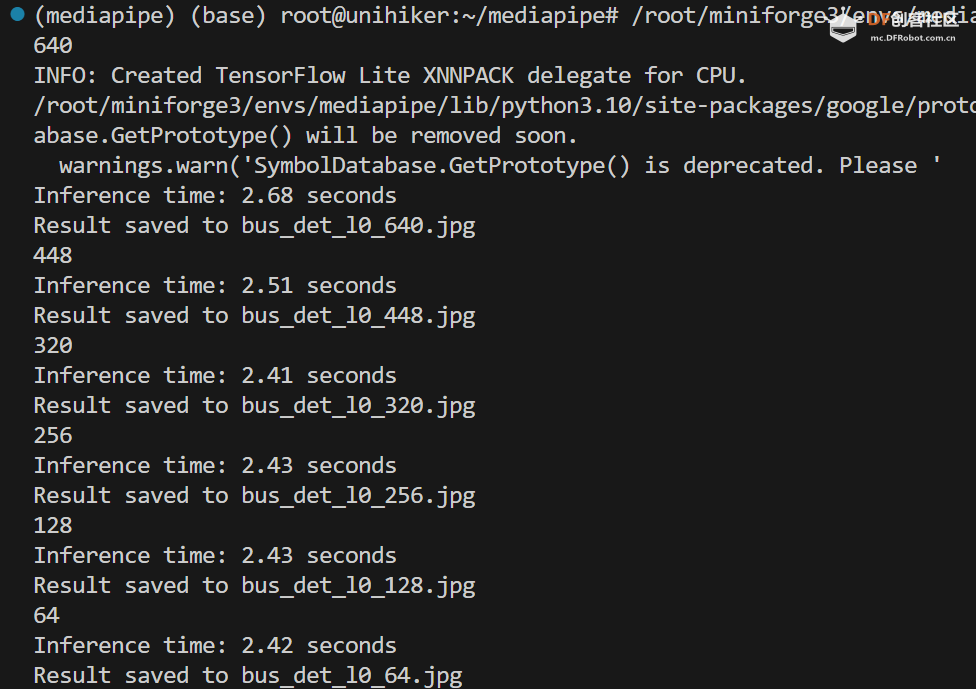 
对于 efficientdet_lite0_int8.tflite 模型:
 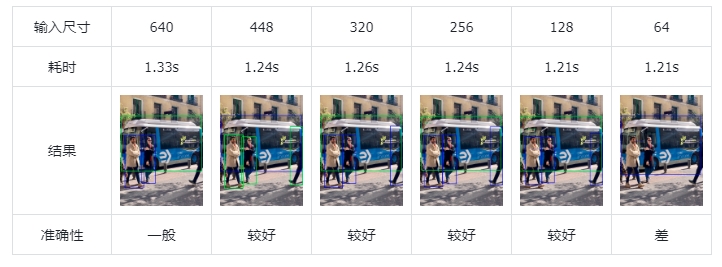
对于 efficientdet_lite2.tflite 模型:
 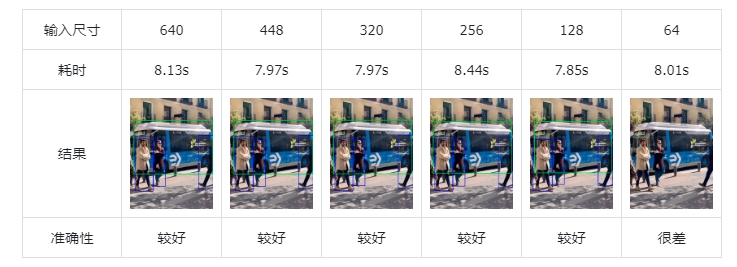
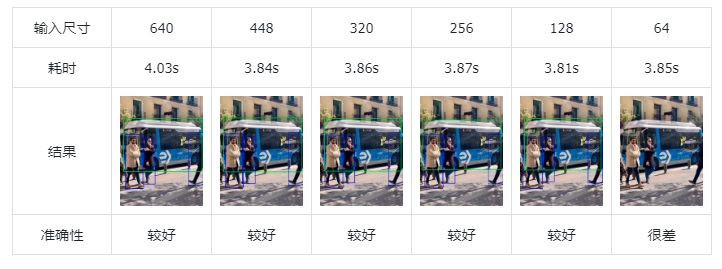
对于 efficientdet_lite2_int8.tflite 模型:
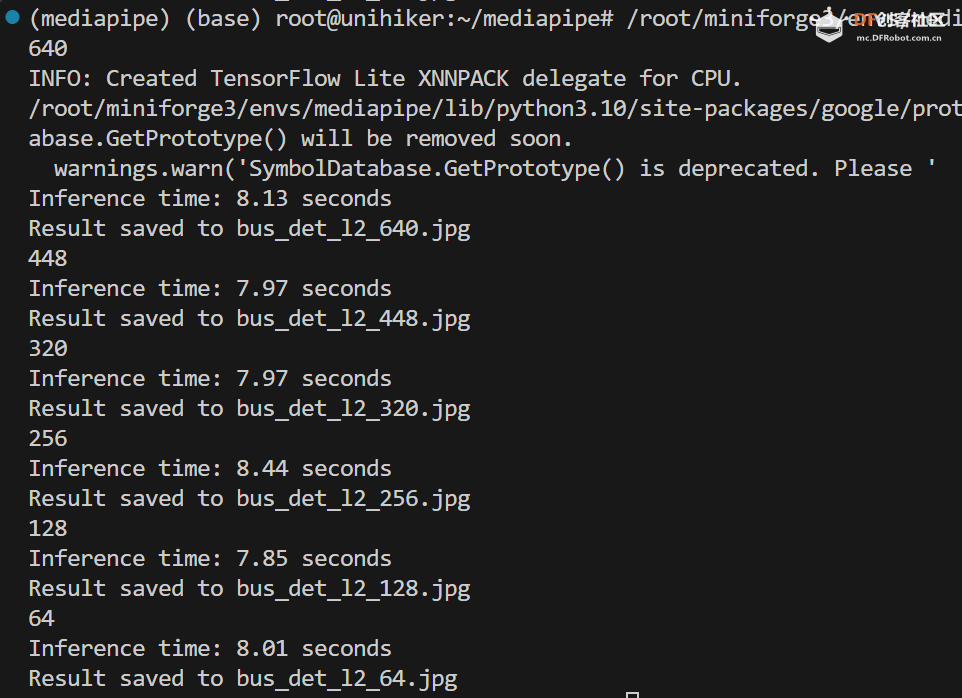
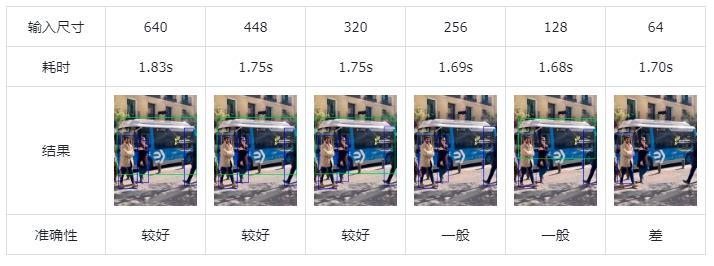
对于 ssd_mobilenet_v2.tflite 模型:
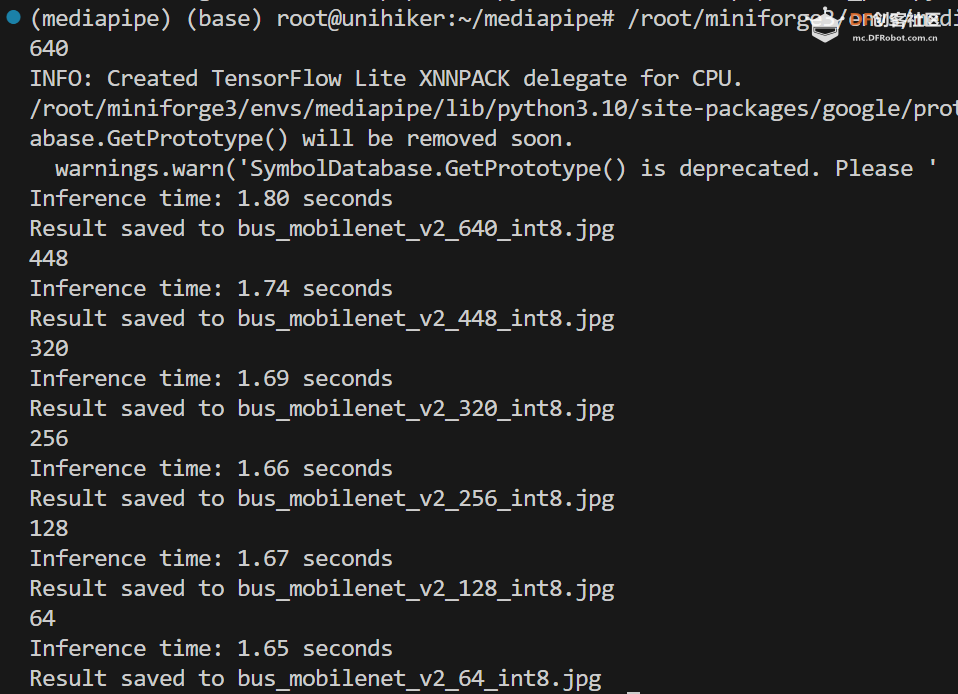
对于 ssd_mobilenet_v2_int8.tflite 模型:
小结
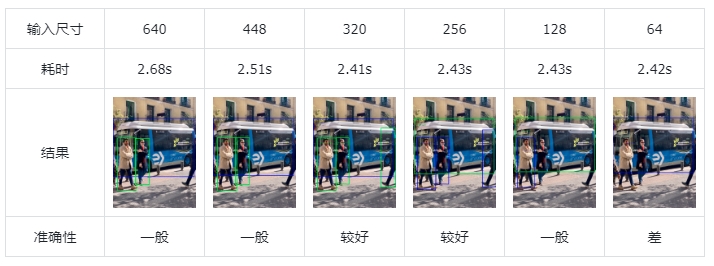
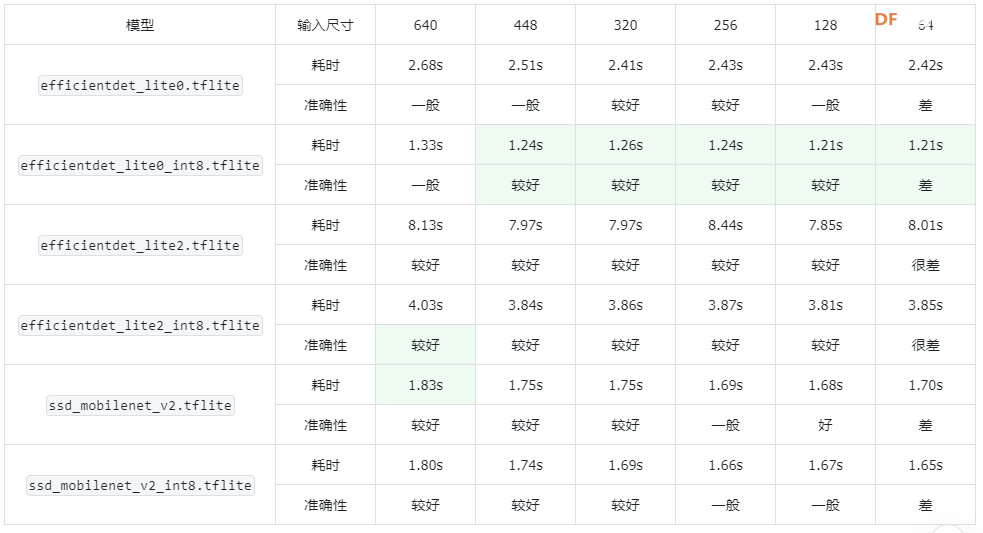
可以看到,随着输入尺寸的减小,模型的速度并没有明显变快。
并且,这三个模型训练的分辨率是固定的:
efficientdet_lite0.tflite:320
efficientdet_lite2.tflite:448
ssd_mobilenet_v2.tflite:256
输入的图片尺寸大反而对准确性有一定降低。
这儿有点反常的是,虽然 ssd_mobilenet_v2.tflite 的训练分辨率最低,但是其对于高分辨率图片的适应力还是较好的。
六、结论
1.可以在行空板运行Mediapipe的目标检测模型
本文详细介绍了如何在行空板上部署Mediapipe,并对几个常见模型进行了测试。
2.在行空板上,两个模型的int8量化可以带来显著的速度提升
对于 efficientdet_lite0 和 efficientdet_lite2 模型,int8量化有显著的速度提升,而且精度表现没有明显下降;对于 ssd_mobilenet_v2 模型,int8量化并没有带来速度提升(不确定官方的模型是否正确)。
3.在行空板上使用Mediapipe进行目标检测时的模型推荐
随着输入尺寸的减小,模型的速度并没有明显变快;有的模型,随着输入图片尺寸变大,性能反而下降。对于中小分辨率的图片(128-448),推荐使用 efficientdet_lite0_int8.tflite 模型;对于较大分辨率的图片(>448),推荐使用 ssd_mobilenet_v2.tflite 模型。
4.较小分辨率时,模型 efficientdet_lite0_int8.tflite 准确率最好;较大分辨率时,模型 efficientdet_lite2_int8.tflite 准确率较好。
5.接下来会有更多测试,请持续关注!
|


 萌萌哒新人
萌萌哒新人
 活跃会员
活跃会员
 编辑选择奖
编辑选择奖


 沪公网安备31011502402448

 置顶卡
置顶卡 变色卡
变色卡 千斤顶
千斤顶


