介绍
随着物联网和嵌入式系统的日益普及,在资源受限的硬件上实现高效的机器学习推理已成为一项关键挑战。K10 AI 硬件和 TensorFlow Lite Micro (TFLM)为嵌入式设备上的TinyML开发提供了轻量级解决方案。本文将提供使用 行空板K10 硬件和Arduino IDE开发环境快速实现嵌入式机器学习应用程序的详细指南,从模型训练到部署。本教程也适用于类似的硬件平台,例如ESP32 S3 AI设备。
在本文中,我们将使用DFRobot行空板K10硬件和TensorFlow Lite Micro Arduino 库,介绍从模型训练到部署的整个 TinyML 开发过程。本指南旨在帮助开发人员在资源受限的设备上快速开始机器学习。代码:https://github.com/polamaxu/TFLM
行空板K10
一款专为信息技术课程中的编程教育、物联网和人工智能项目设计的开发板。
核心:
MCU: ESP32-S3,32位双核处理器,时钟速度为240MHz。
无线通信:
Wi-Fi: 支持2.4G Wi-Fi。
蓝牙: 支持蓝牙5.0。
显示模块:
屏幕: 2.8英寸LCD。
板载组件:
摄像头: 集成摄像头用于图像捕捉和检测,适用于面部识别和物体检测等AI应用。
麦克风: 配备两个麦克风以捕捉声音信号,支持语音识别和语音交互功能。
扬声器: 内置扬声器用于音频播放,用于语音提示和音乐播放。
传感器: 包括数字环境光传感器、温湿度传感器和加速度计,能够检测环境和运动参数,为物联网应用提供数据。
RGB灯: 三个RGB灯能够显示多种颜色。
按钮: 两个按钮用于输入和控制操作。
TensorFlow 与 TensorFlow Lite Micro 对比
TensorFlow 是一个开源的机器学习框架,提供了丰富的 API,使开发者能够轻松构建、训练和部署机器学习模型。
TensorFlow Lite Micro 是 TensorFlow 的一个子集,专门为资源受限的设备(如微控制器)设计。它允许开发者在这些设备上部署机器学习模型,使其能够在无需依赖云计算的情况下进行本地数据处理和推理。
TensorFlow:适用于桌面或服务器环境中的复杂模型训练和开发,支持高度定制化和复杂的操作。
TensorFlow Lite for Microcontrollers (TFLM):专为嵌入式设备设计,优化了存储和计算效率,非常适合在资源受限的环境中快速运行机器学习模型。
TinyML 开发流程(软件:Arduino IDE,硬件:行空板K10)
数据收集:
-
创建一个 Arduino 草图以从传感器或其他输入设备收集数据,形成模型训练所需的数据集。
定义并训练模型:
-
在 TensorFlow 开发环境(例如 Google Colab)中,定义深度神经网络(DNN)模型并使用收集的数据对其进行训练。
模型转换和保存:
-
将训练好的模型转换为 TensorFlow Lite 格式并保存为model.h文件,其中包含 Flat Buffer 格式的模型的二进制表示。
部署:
-
在Arduino IDE中准备推理代码,包括以下步骤:
测试和优化:
特征:
-
Arduino 风格的 API: MicroTFLite 提供了典型的 Arduino 风格的 API,避免在 Arduino 代码中使用指针或其他 C++ 语法构造,从而对于 Arduino 开发人员来说更加友好。
*支持量化和浮点数据:*该库可以处理量化数据和原始浮点值,并根据模型的元数据自动检测适当的处理方法。
调试功能:**它提供多种功能来帮助开发人员了解模型部署过程并协助调试模型问题。
目标平台:
MicroTFLite 兼容多种嵌入式设备,包括:
-
Arduino Nano 系列(例如 Nano 33 BLE、Nano ESP32)
-
Arduino Nicla、Portenta 系列
-
ESP32 和 Arduino Giga R1 WiFi
MicroTFLite 中支持的操作符:
-
MicroTFLite 支持一系列常见的机器学习运算符:
-
卷积和池化:
-
全连接层: FULLY_CONNECTED
-
激活函数:
MicroTFLite API 概述:
模型初始化和部署:
- 初始化模型:使用该ModelInit()函数初始化 TensorFlow Lite 模型和解释器。这包括加载模型数据和分配必要的内存空间(例如tensorArena)。
- 加载模型文件:支持从二进制文件(例如model.h)加载预先训练的 TensorFlow Lite 模型,使其能够在 Arduino 设备上运行。
输入和输出处理:
- 设置输入数据:使用该ModelSetInput()函数将输入数据设置到模型的输入张量中。此函数还支持量化,根据模型的量化参数自动调整输入值。
- 获取输出结果:该ModelGetOutput()函数允许您读取推理后的模型输出,使开发人员能够检索预测或分类结果。
推理和调试:
- 运行推理:该ModelRunInference()函数启动模型的推理过程。它执行前向传递并生成输出。
- 打印张量信息:有多个函数可用于打印张量信息,例如ModelPrintInputTensorDimensions()和ModelPrintOutputTensorDimensions(),可帮助开发人员了解输入和输出张量的维度。
- 调试和调试信息:该ModelPrintTensorQuantizationParams()函数打印输入和输出张量的量化参数,有助于调试量化模型。该ModelPrintMetadata()函数显示模型的元数据,例如描述和版本,帮助开发人员了解模型的基本信息。
安装 MicroTFLite
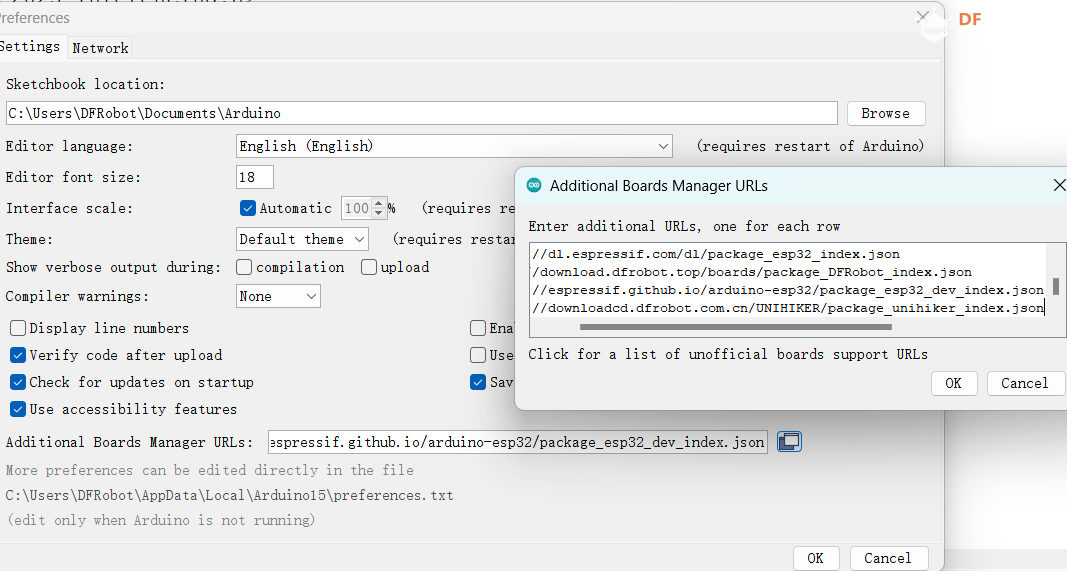
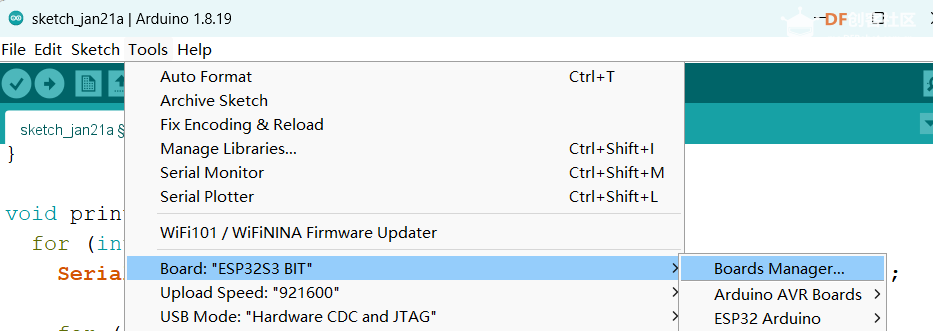
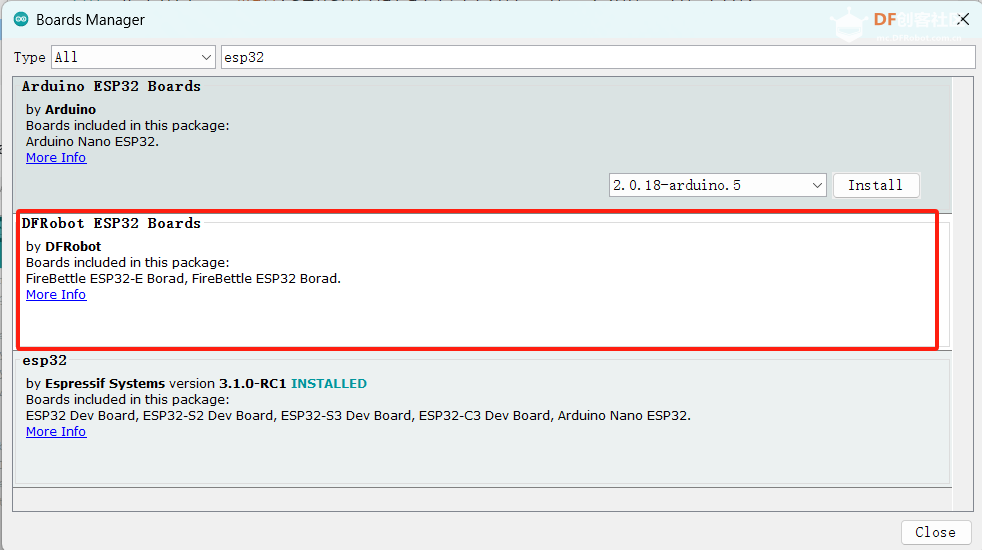
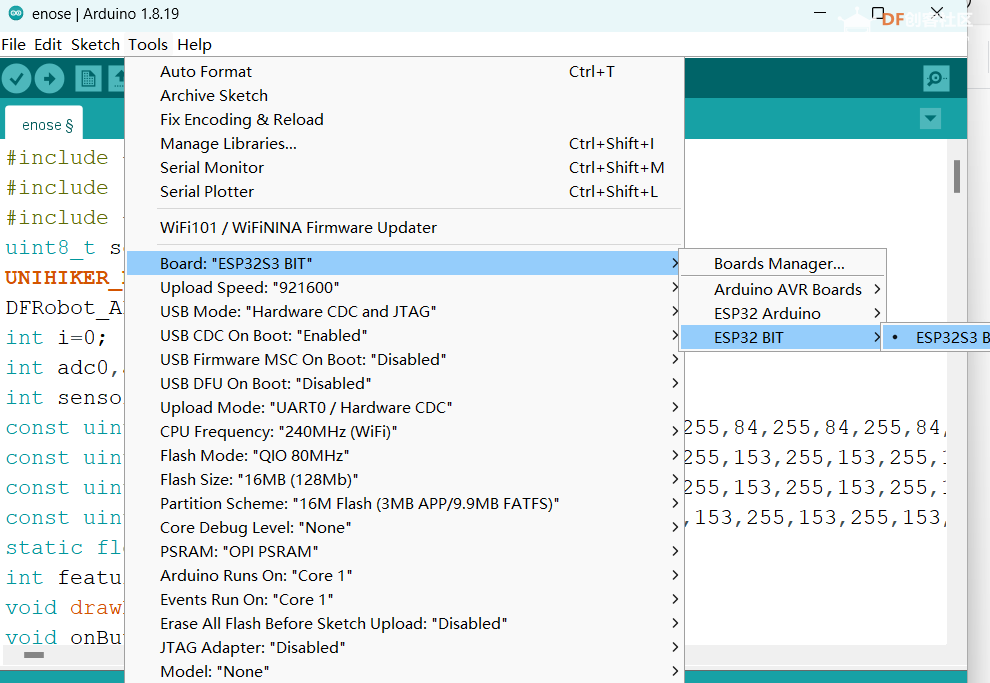
1. 在 Arduino IDE 1.8.19 中安装 K10 开发板
偏好设置 -> 附加 Boards Manager URL:
https://downloadcd.dfrobot.com.cn/UNIHIKER/package_unihiker_index.json
编译器警告:无
工具 -> 论坛管理器
搜索 esp32 并安装
完毕
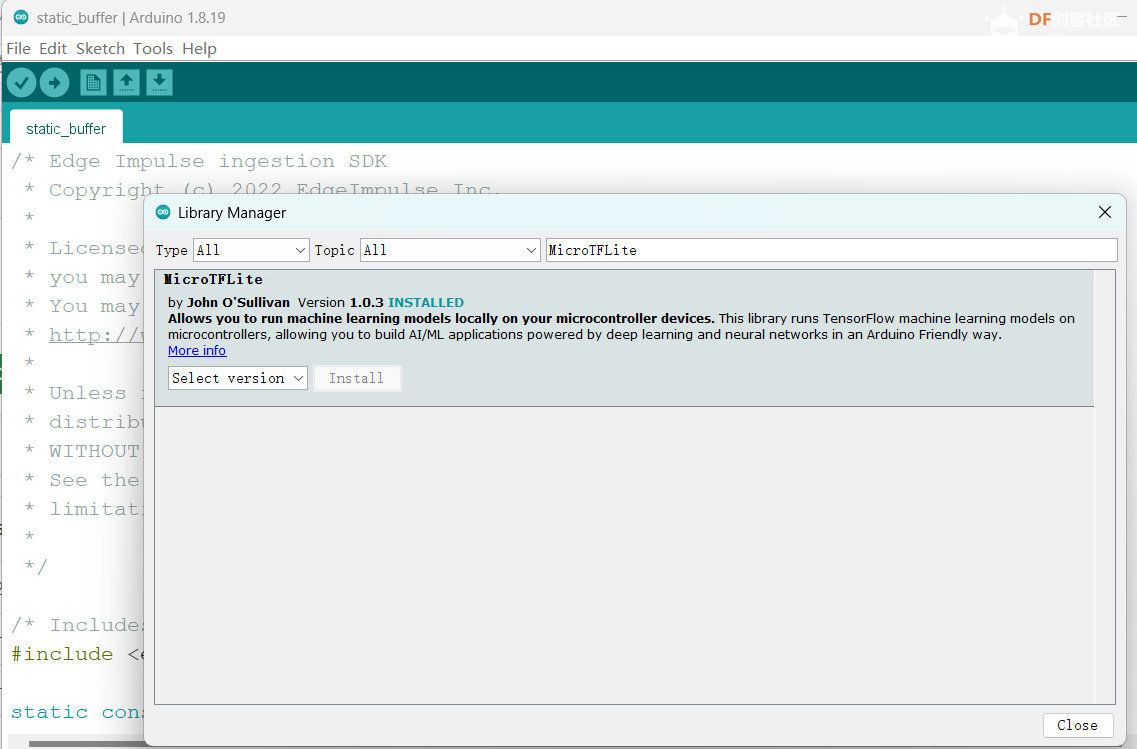
2. 库管理器搜索“MicroTFLite”并安装它。
1.示例测试:使用传感器数据进行实时工业设备故障预测
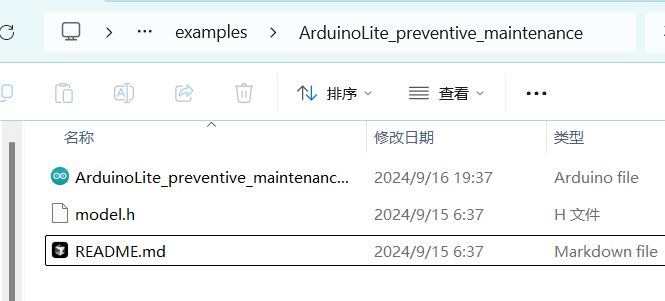
ArduinoLite_preventive_maintenance项目使用由一个输入层、两个 dropout 层、一个隐藏层和一个输出层组成的前馈神经网络架构来处理二分类任务。它使用 binary_crossentropy 作为损失函数,并使用 Adam 优化器进行训练,支持类别权重调整和提前停止回调,以确保即使在类别不平衡的情况下也能有效训练。该示例使用由随机数模拟的传感器数据(例如速度、温度、振动和电流)。为了减小模型大小,模型被量化为 int8。
该程序的主要功能是:
- 模拟各种设备参数(速度、温度、振动、电流)的采集。
- 利用这些参数进行故障预测。
- 根据预定义的阈值做出实际故障判断。
- 将预测结果与实际故障进行比较,计算预测精度。
量化的效果和影响:
微控制器版 TensorFlow Lite (TFLM)中的量化是将模型数据从浮点数 (float32) 转换为整数 (int8) 的过程。
- 减少模型尺寸:量化将浮点数转换为整数,从而显著减少模型的存储要求。
- 提高计算效率:在资源受限的设备上,整数计算通常比浮点计算更高效。整数处理器(例如 ARM Cortex-M 中的 DSP 扩展)可以更快地执行整数乘法和加法等运算,从而提高模型的推理速度。
- 精度损失:量化会造成一定程度的精度损失,因为整数表示无法完全精确地表示浮点数。但是,通过适当的量化策略和模型优化,可以在保持相对较高的精度的同时实现显着的性能提升。
代码
        /* Copyright 2024 John O'Sullivan, TensorFlow Authors. All Rights Reserved.

This is an example program that runs TensorFlow Lite models using the MicroTFLite library.
It is mainly used for preventive maintenance of equipment by predicting potential failures from sensor data.

For more information, refer to the library documentation:
https://github.com/johnosbb/MicroTFLite

Licensed under the Apache License, Version 2.0 (the "License");
... License Information ...
==============================================================================*/

#include <MicroTFLite.h>
#include "model.h"

// Statistics of feature data (before scaling and balancing):
// RPM - Mean: 1603.866, Standard Deviation: 195.843
// Temperature (°C) - Mean: 24.354, Standard Deviation: 4.987
// Vibration (g) - Mean: 0.120, Standard Deviation: 0.020
// Current (A) - Mean: 3.494, Standard Deviation: 0.308
constexpr float tMean = 24.354f;      // Temperature mean value
constexpr float rpmMean = 1603.866f;  // RPM mean value
constexpr float vMean = 0.120f;       // Vibration mean value
constexpr float cMean = 3.494f;       // Current mean value
constexpr float tStd = 4.987f;        // Temperature standard deviation
constexpr float rpmStd = 195.843f;    // RPM standard deviation
constexpr float vStd = 0.020f;        // Vibration standard deviation
constexpr float cStd = 0.308f;        // Current standard deviation

// Thresholds for failure conditions
const float highTempThreshold = 30.0f;            // High temperature threshold (Celsius)
const float lowRpmThreshold = 1500.0f;            // Low RPM threshold
const float highVibrationThreshold = 0.60f;       // High vibration threshold (g)
const float abnormalCurrentLowThreshold = 0.2f;   // Low current threshold (Amps)
const float abnormalCurrentHighThreshold = 10.8f; // High current threshold (Amps)

// Prediction statistics counters
int totalPredictions = 0;
int truePositives = 0;
int falsePositives = 0;
int trueNegatives = 0;
int falseNegatives = 0;
float rollingAccuracy = 0.0f; // Rolling accuracy calculation
bool showStatistics = false; // Whether to display statistics

// Allocate memory for TensorFlow Lite
constexpr int kTensorArenaSize = 4 * 1024;
alignas(16) uint8_t tensorArena[kTensorArenaSize];

void setup() {
    // Initialize serial communication and wait for the serial monitor to open
    Serial.begin(115200);
    while (!Serial);
    delay(5000);
    Serial.println("Preventive Maintenance Example.");
    Serial.println("Initializing TensorFlow Lite Micro Interpreter...");

    // Initialize TensorFlow Lite model
    if (!ModelInit(model, tensorArena, kTensorArenaSize)) {
        Serial.println("Model initialization failed!");
        while (true);
    }
    Serial.println("Model initialization done.");
    ModelPrintMetadata();
    ModelPrintTensorQuantizationParams();
    ModelPrintTensorInfo();
}

// Generate normally distributed random values using Box-Muller transform
float GenerateRandomValue(float mean, float stddev) {
    float u1 = random(0, 10000) / 10000.0f;
    float u2 = random(0, 10000) / 10000.0f;
    // Box-Muller transform to generate normally distributed values
    float z0 = sqrt(-2.0f * log(u1)) * cos(2.0f * PI * u2);
    float value = mean + z0 * stddev;
    return value;
}

// Simulated function to read sensor data
float ReadRpm() {
    return GenerateRandomValue(rpmMean, rpmStd);
}

float ReadVibration() {
    return GenerateRandomValue(vMean, vStd);
}

float ReadTemperature() {
    return GenerateRandomValue(tMean, tStd);
}

float ReadCurrent() {
    return GenerateRandomValue(cMean, cStd);
}

// Check for failure conditions
bool CheckFailureConditions(float temperature, float rpm, float vibration, float current) {
    bool conditionMet = false;
    String failureReason = "";

    // Check if any parameter exceeds thresholds
    if (temperature > highTempThreshold) {
        conditionMet = true;
        failureReason += "High temperature; ";
    }
    if (rpm < lowRpmThreshold) {
        conditionMet = true;
        failureReason += "Low RPM; ";
    }
    if (vibration > highVibrationThreshold) {
        conditionMet = true;
        failureReason += "High vibration; ";
    }
    if (current < abnormalCurrentLowThreshold) {
        conditionMet = true;
        failureReason += "Low current; ";
    }
    if (current > abnormalCurrentHighThreshold) {
        conditionMet = true;
        failureReason += "High current; ";
    }

    if (conditionMet) {
        Serial.print("Warning: Sensor readings indicate potential failure. Cause: ");
        Serial.println(failureReason);
    }

    return conditionMet;
}

void loop() {
    // Read sensor data (simulated values)
    float rpm = ReadRpm();
    float temperature = ReadTemperature();
    float current = ReadCurrent();
    float vibration = ReadVibration();
    bool inputSetFailed = false;

    // Check actual failure conditions
    bool actualFailure = CheckFailureConditions(temperature, rpm, vibration, current);

    // Data normalization
    float temperatureN = (temperature - tMean) / tStd;
    float rpmN = (rpm - rpmMean) / rpmStd;
    float currentN = (current - cMean) / cStd;
    float vibrationN = (vibration - vMean) / vStd;

    // Input data into the model
    if (!ModelSetInput(temperatureN, 0))
        inputSetFailed = true;
    if (!ModelSetInput(rpmN, 1))
        inputSetFailed = true;
    if (!ModelSetInput(currentN, 2))
        inputSetFailed = true;
    if (!ModelSetInput(vibrationN, 3))
        inputSetFailed = true;

    // Run model inference
    if (!ModelRunInference()) {
        Serial.println("Model inference failed!");
        return;
    }

    // Get model output results
    float prediction = ModelGetOutput(0);
    bool predictedFailure = (prediction > 0.50f); // Predicted failure if value > 0.5

    // Update prediction statistics
    if (predictedFailure && actualFailure) {
        truePositives++;
    } else if (predictedFailure && !actualFailure) {
        falsePositives++;
        showStatistics = true;
    } else if (!predictedFailure && actualFailure) {
        falseNegatives++;
        showStatistics = true;
    } else if (!predictedFailure && !actualFailure) {
        trueNegatives++;
    }

    totalPredictions++;

    // Calculate rolling accuracy
    rollingAccuracy = (float)(truePositives + trueNegatives) / totalPredictions * 100.0f;

    // Display statistics when false positives or false negatives occur
    if (showStatistics) {
        Serial.println("-----------------------------");
        Serial.print("Prediction Confidence: ");
        Serial.println(prediction);
        Serial.print("Predicted failure: ");
        Serial.println(predictedFailure);
        Serial.print("Actual failure: ");
        Serial.println(actualFailure);
        Serial.print("RPM: ");
        Serial.print(rpm);
        Serial.print(" | Temperature: ");
        Serial.print(temperature);
        Serial.print(" °C");
        Serial.print(" | Current: ");
        Serial.print(current);
        Serial.print(" A");
        Serial.print(" | Vibration: ");
        Serial.print(vibration);
        Serial.print(" m/s^2\n");
        Serial.println("Total predictions: " + String(totalPredictions) +
                      ", True Positives: " + String(truePositives) +
                      ", False Positives: " + String(falsePositives) +
                      ", True Negatives: " + String(trueNegatives) +
                      ", False Negatives: " + String(falseNegatives) +
                      ", Accuracy (%): " + String(rollingAccuracy));

        showStatistics = false;
    }

    delay(10000); // Wait for 10 seconds before the next check
}
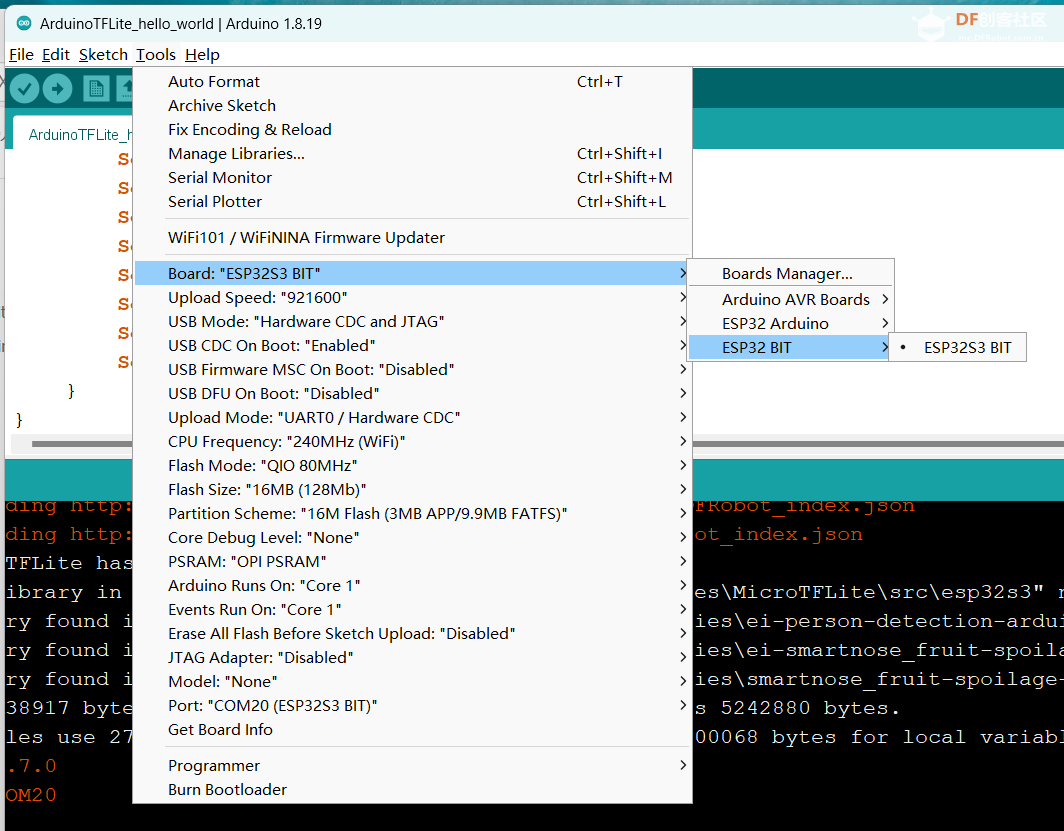
2.连接PC和K10,上传程序:
3、K10编译结果:程序占用的存储空间和动态内存非常小。
Sketch 使用了 539913 字节 (10%) 的程序存储空间。最大为 5242880 字节。
全局变量使用 29740 字节(9%)的动态内存,剩下 297940 字节用于局部变量。
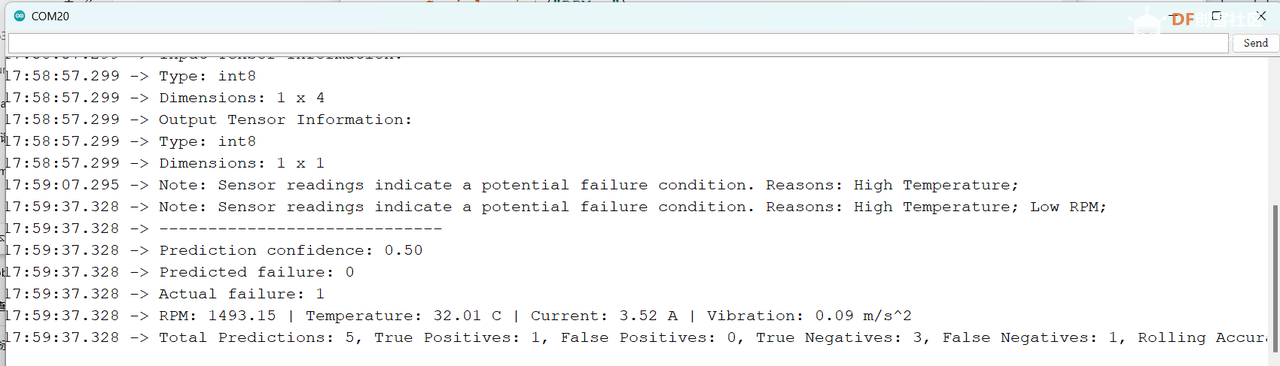
4.串行监视器输出:
2.安装 TensorFlow 和 NumPy
打开终端(Windows 上为命令提示符,macOS 或 Linux 上为终端),然后运行以下命令来安装所需的库:
代码
# TensorFlow 2.x
pip install tensorflow
# NumPy
pip install numpy
3.定义一个简单的回归网络
输入是 1 到 5 之间的数字,输出是其平方值。
在终端中运行test.py文件:
代码
python test.py
代码
        """
Environment requirements:
- Python 3.6+
- TensorFlow 2.x
- NumPy

Function description:
This program demonstrates a simple regression model for predicting the square of a number.
It includes three main steps: model training, saving, converting to TFLite format, and generating a C array.
"""

import tensorflow as tf
import numpy as np

# 1. Prepare training data
# Create a simple dataset: input numbers from 1 to 5, output their square values
x_train = np.array([[1], [2], [3], [4], [5]], dtype=np.float32)
y_train = np.square(x_train)  # Calculate the square values as target output

# 2. Define the model
# Use the Sequential API to create a simple model
# The Lambda layer directly implements the square operation without the need for trainable parameters
model = tf.keras.Sequential([
    tf.keras.layers.Input(shape=(1,), name='input_layer'),
    tf.keras.layers.Lambda(lambda x: x ** 2, name='square_layer')
])

# 3. Compile the model
# Note: Since the Lambda layer directly computes the square, no actual training is needed
model.compile(optimizer='sgd', loss='mean_squared_error')

# 4. Test model performance
print("Test results:")
for x in x_train:
    y_pred = model.predict([x])
    print(f"Input: {x[0]}, Predicted output: {y_pred[0][0]}")

# 5. Save the model
# Save the model in HDF5 format
model.save('./saved_model.h5')

# 6. Convert to TFLite format
# TFLite format is better suited for running on embedded devices
converter = tf.lite.TFLiteConverter.from_keras_model(model)
tflite_model = converter.convert()

# Save the TFLite model
with open('./model.tflite', 'wb') as f:
    f.write(tflite_model)

# 7. Convert the TFLite model to a C array
def convert_tflite_to_c_array(tflite_model_path, c_file_path):
    """
    Convert a TFLite model file to a C array format

    Parameters:
        tflite_model_path: Path to the TFLite model file
        c_file_path: Output C header file path
    """
    with open(tflite_model_path, 'rb') as file:
        content = file.read()

    with open(c_file_path, 'w') as file:
        file.write('const unsigned char model_data[] = {')
        for i, val in enumerate(content):
            if i % 12 == 0:  # Insert a newline every 12 numbers to improve readability
                file.write('\n  ')
            file.write('0x{:02x}, '.format(val))
        file.write('\n};\n')
        file.write('const int model_data_len = {};\n'.format(len(content)))

if __name__ == '__main__':
    convert_tflite_to_c_array('./model.tflite', './model_data.h')
4. 将 C 模型文件上传到 K10 并使用 MicroTFLite 库
将模型文件(model.h)和.ino文件放在同一文件夹中,然后使用Arduino IDE软件上传程序。
代码
        #include <MicroTFLite.h>
#include "model.h" // Import model data

// Define memory area for storing intermediate tensors
constexpr int kTensorArenaSize = 2 * 1024; // Adjust based on model size
alignas(16) uint8_t tensorArena[kTensorArenaSize];

void setup() {
  // Initialize serial communication
  Serial.begin(9600);

  // Initialize model
  if (!ModelInit(model, tensorArena, kTensorArenaSize)) {
    Serial.println("Model initialization failed!");
    while (true); // Stop execution if initialization fails
  }

  Serial.println("Model initialization done.");
  ModelPrintMetadata();
  ModelPrintTensorInfo();
  ModelPrintInputTensorDimensions(); // Print input tensor dimensions
  ModelPrintOutputTensorDimensions(); // Print output tensor dimensions
}

void loop() {
  float input_value = 3.0; // Test input value

  // Display the input value
  Serial.print("Input value: ");
  Serial.println(input_value);

  // Set input value to the model
  if (!ModelSetInput(input_value, 0)) { // Set the first input
    Serial.println("Failed to set input value!");
    return;
  }

  // Run inference
  if (!ModelRunInference()) {
    Serial.println("Inference failed!");
    return;
  }

  // Get the model's output
  float prediction = ModelGetOutput(0);

  // Print the output result (predicted square value)
  Serial.print("Predicted output: ");
  Serial.println(prediction);

  delay(2000); // Run every 2 seconds
5、K10编译结果:程序占用的存储空间和动态内存非常小。
Sketch 使用了 530373 字节 (10%) 的程序存储空间。最大为 5242880 字节。
全局变量使用 28492 字节 (8%) 的动态内存,为局部变量留出 299188 字节。最大值为 327680 字节。
6.串口监控输出:
15:42:46.823 -> 输出张量信息:
15:42:46.823 -> 类型:float32
15:42:46.823 -> 尺寸:1 x 1
15:42:46.823 -> 输入张量维度:2
15:42:46.823 -> 维度 0: 1
15:42:46.823 -> 尺寸输入值:3.00
15:42:46.823 -> 预测输出:9.00
参考
- https://github.com/tensorflow/tflite-micro
- https://github.com/johnosbb/MicroTFLite
- https://github.com/polamaxu/TFLM


 沪公网安备31011502402448

 置顶卡
置顶卡 变色卡
变色卡 千斤顶
千斤顶
 萌萌哒新人
萌萌哒新人
 活跃会员
活跃会员
 宣传大使
宣传大使
 志“童”道合
 编辑选择奖
编辑选择奖


