|
17938| 37
|
[MP动手做] MicroPython动手做(24)——掌控板之拓展掌控宝 |
|
5、按键控制小车前进、后退与旋转 #MicroPython动手做(24)——掌控板之拓展掌控宝 #按键控制小车前进、后退与旋转 [mw_shl_code=python,false]#MicroPython动手做(24)——掌控板之拓展掌控宝 #按键控制小车前进、后退与旋转 import parrot from mpython import * def forward(): parrot.set_speed(parrot.MOTOR_1, 80) parrot.set_speed(parrot.MOTOR_2, 80) oled.fill(0) oled.blit(image_picture.load('face/Information/Forward.pbm', 0), 32, 0) oled.show() def retreat(): parrot.set_speed(parrot.MOTOR_1, -80) parrot.set_speed(parrot.MOTOR_2, -80) oled.fill(0) oled.blit(image_picture.load('face/Information/Backward.pbm', 0), 32, 0) oled.show() def right(): parrot.set_speed(parrot.MOTOR_1, 80) parrot.set_speed(parrot.MOTOR_2, -80) oled.fill(0) oled.blit(image_picture.load('face/Information/Right.pbm', 0), 32, 0) oled.show() import time def on_button_a_down(_): global aaa time.sleep_ms(10) if button_a.value() == 1: return rgb.fill((int(0), int(102), int(0))) rgb.write() time.sleep_ms(1) forward() time.sleep(2) Left() time.sleep(1) retreat() time.sleep(2) right() time.sleep(1) oled.fill(0) parrot.set_speed(parrot.MOTOR_1, 0) parrot.set_speed(parrot.MOTOR_2, 0) rgb.fill( (0, 0, 0) ) rgb.write() time.sleep_ms(1) oled.show() def Left(): parrot.set_speed(parrot.MOTOR_1, -80) parrot.set_speed(parrot.MOTOR_2, 80) oled.fill(0) oled.blit(image_picture.load('face/Information/Left.pbm', 0), 32, 0) oled.show() image_picture = Image() button_a.irq(trigger=Pin.IRQ_FALLING, handler=on_button_a_down)[/mw_shl_code] |
|
3、拓展掌控宝驱动电机函数 拓展板支持2路的PWM电机驱动,可以使用直流电机马达,如TT马达、N20等。 (1)首先导入parrot模块: import parrot (2)M1、M2,正转速度设为80: import parrot # 导入parrot 模块 parrot.set_speed(parrot.MOTOR_1,80) # 设置M1正转,速度为80 parrot.set_speed(parrot.MOTOR_2,80) # 设置M2正转,速度为80 (3)反转: parrot.set_speed(parrot.MOTOR_1,-80) # 设置M1反转,速度为80 parrot.set_speed(parrot.MOTOR_2,-80) # 设置M2反转,速度为80 (4)停止: parrot.set_speed(parrot.MOTOR_1,0) # 停止 parrot.set_speed(parrot.MOTOR_2,0) # 停止 控制电机速度使用到函数 set_speed(motor_no, speed) 。motor_no 参数为电机编号,可选编号常量有 MOTOR_1 、MOTOR_2 。 speed 参数为速度,范围-100~100,正值表示正转,负值时表示负转。 当某些时候需要知道当前设置的速度值时,你可以用 get_speed(motor_no) 返回当前电机速度。 |
|
1、通过音频模块播放网络歌曲 #MicroPython动手做(24)——掌控板之拓展掌控宝 #通过音频模块播放网络歌曲(掌控宝内置喇叭) [mw_shl_code=applescript,false]#MicroPython动手做(24)——掌控板之拓展掌控宝 #通过音频模块播放网络歌曲(掌控宝内置喇叭) from mpython import * import network import audio import time my_wifi = wifi() my_wifi.connectWiFi("zh", "zy1567") audio.player_init() audio.set_volume(70) audio.play("http://wiki.labplus.cn/images/4/4e/Music_test.mp3") while True: oled.fill(0) oled.DispChar("播放网络歌曲", 30, 16, 1) oled.DispChar("春天在哪里", 35, 32, 1) oled.show() rgb[1] = (int(0), int(51), int(0)) rgb.write() time.sleep_ms(1)[/mw_shl_code] 播放网络音频 要播放网络上mp3音频文件,需要知道音频的URL地址。目前,大部分的音乐网受版权保护,并不直接提供音乐的URL,你可以通过一些插件爬取音频的URL地址。 注解 掌控板需要确保连接网络通畅。URL必须是完整的网络地址,否则无法解析。音频解码功能使用到 audio 模块的 audio.play(url) 函数, url 参数可以为音源的本地文件系统的路径或网络URL地址。 |
|
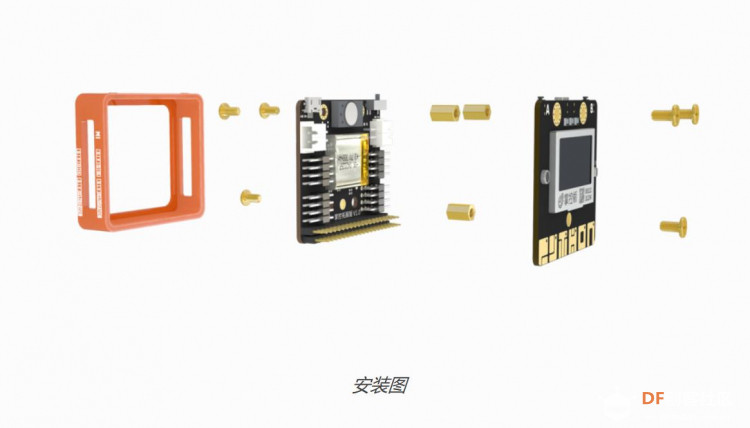
电源指示灯状态: v1版本 电源输出指示功能: 3.3V输出,指示灯亮;无输出则灭。 v2版本 电源输出指示功能: 3.3V输出,指示灯亮;无输出则灭。 电池电量指示功能: 通过闪烁次数反馈电量,4档电量显示。 充电指示灯状态: v1版本 注意:只能在电源开关打开下,才能指示充电放电状态。 充电指示功能: 充电中,指示灯亮;充满,指示灯熄灭; 放电指示功能: 通过指示灯闪烁次数来反馈电池电量。频率越快电量越低,电量满时,常亮。 v2版本 充电指示功能: 充电中,指示灯闪烁;充满,指示灯熄灭; VCC: VCC电源区别与其他3.3V电压电源。提供3.3V以上更高的电压和更大的电流驱动。用于应付较大的驱动需求。电源路径管理,当没接USB充电时,VCC由电池电压直接提供;接上USB充电时,VCC由USB提供电源。 安装说明 掌控板和掌控拓展板都有3个孔,通过3个铜柱将两板连接连接,拧上螺丝固定,套入软质外壳即可,如图所示。  |
|
掌控宝功能说明
电机驱动 掌控拓展板支持2路的PWM电机驱动(掌控拓展板背面标记M1和M2),你可以接入直流电机马达(如TT马达、N20)和LED灯(满天星灯带)
I/O 掌控拓展板左右两侧扩展出12路I/O接口、2路I2C接口。可以通过这些接口接入经典的传感器输入模块,输出模块。例如:按键、人体红外、超声波、LED、马达、蜂鸣器、数码管...... 拓展板扩展引脚有P0、P1、P2、P3、P5、P6、P7、P11、P13、P14、P15、P16、P19(SCL)、P20(SDA) 重要 由于P5、P11是掌控板的按键A、B的IO引脚,为避免冲突,限定拓展板的P5、P11引脚只能用于数字电平输入,且拓展板会对输入电平进行翻转。在使用时,须重点注意!
喇叭—音频播放 掌控拓展板内置喇叭,支持音频播放。
语音合成(TTS) 将文本转化为文字,让机器能够说话。这样就可以给掌控板添上“嘴巴”。比如在程序内输入你想要说话的内容,让它说给你听。
Python库 parrot 模块 : 用于电机驱动功能 audio 模块 : 用于音频播放功能 |
|
#MicroPython动手做(24)——掌控板之拓展掌控宝 #按键控制TT电机 [mw_shl_code=python,false]#MicroPython动手做(24)——掌控板之拓展掌控宝 #按键控制TT电机 from mpython import * import time import parrot def on_button_a_down(_): global aaa time.sleep_ms(10) if button_a.value() == 1: return parrot.set_speed(parrot.MOTOR_1, 80) time.sleep(1) parrot.set_speed(parrot.MOTOR_1, 0) parrot.set_speed(parrot.MOTOR_2, 0) time.sleep(1) button_a.irq(trigger=Pin.IRQ_FALLING, handler=on_button_a_down) [/mw_shl_code] |
 沪公网安备31011502402448
© 2013-2026 Comsenz Inc. Powered by Discuz! X3.4 Licensed