|
5763| 6
|
[用户分享] 【TinkerNode NB-IoT 物联网开发板】测评(三)MQTT控制LED灯开关 |

|
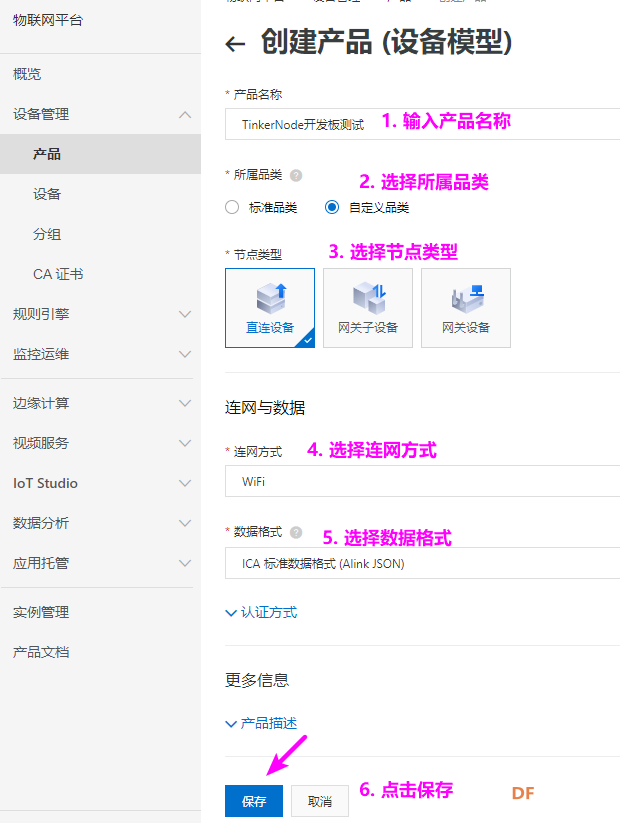
【TinkerNode NB-IoT 物联网开发板】测评(三)MQTT控制LED灯开关 【TinkerNode NB-IoT 物联网开发板】测评(一)开箱验机 【TinkerNode NB-IoT 物联网开发板】测评(二)运行出厂默认程序 【TinkerNode NB-IoT 物联网开发板】测评(三)MQTT控制板载LED灯开关 【TinkerNode NB-IoT 物联网开发板】测评(四)移动应用开发 这次测评不太顺利,阿里云MQTT一直连接不成功,和赵工沟通多次,最后给出的解决方案还是没有解决。直到后来固件更新到1.03才算是解决问题。但是前面浪费了太多时间,后来一直巨忙,所以后续的测评就搁置了。 今天的测评是建立阿里云MQTT连接并控制板载LED灯开关。 一、新建产品和设备 1. 创建产品

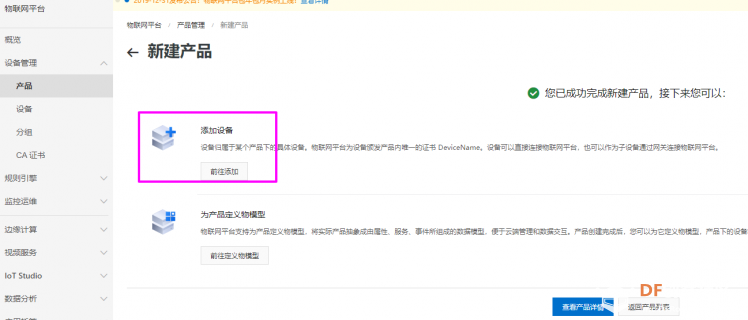
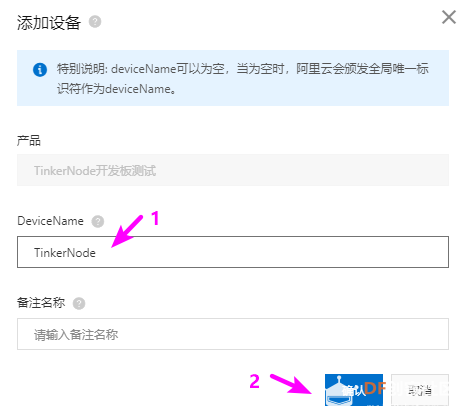
 2. 添加设备

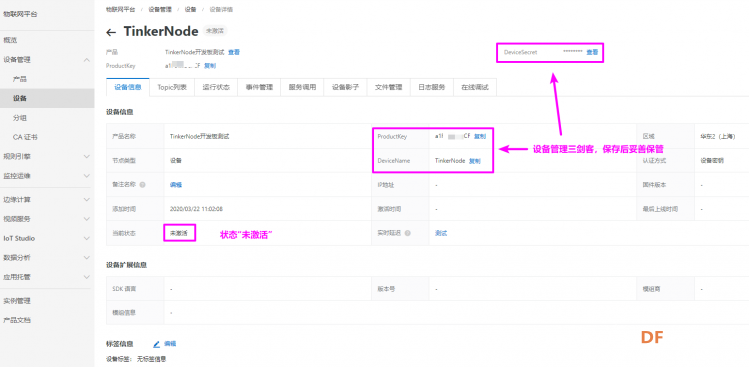
 3. 查看设备
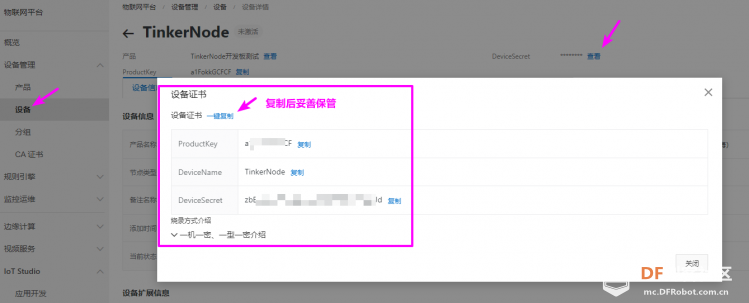 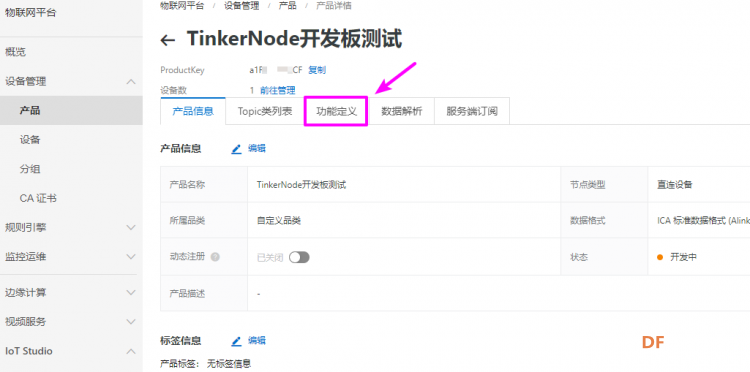 4. 添加自定义功能
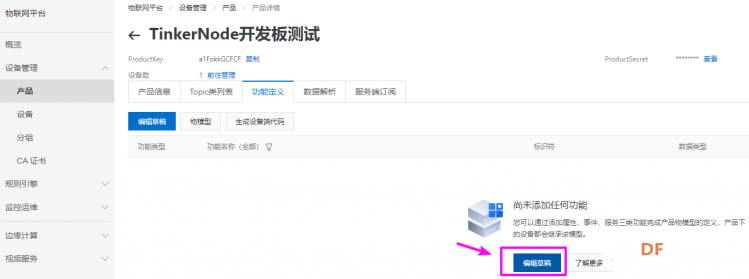


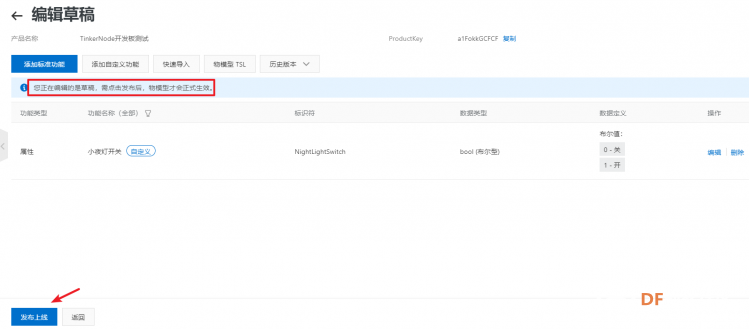
 二、配置并运行Arduino程序 1. 点击设备-->物模型通信Topice,复制set和post 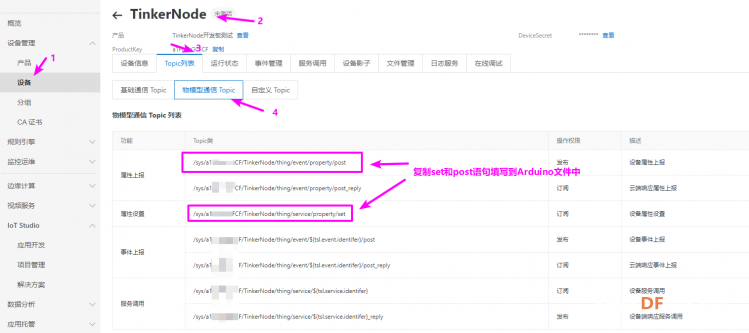 2. 运行IDE,打开文件TinkerNode_Bedroom_Light.ino 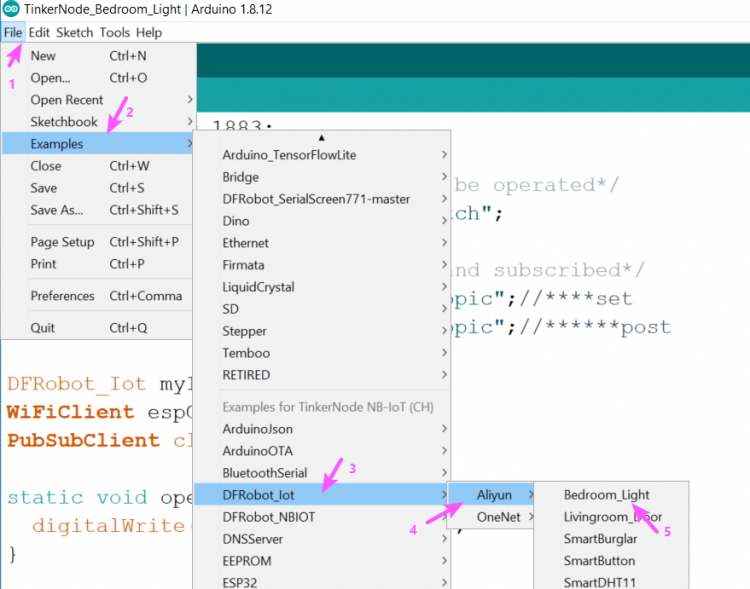 3. 将对应的信息复制到文件中: 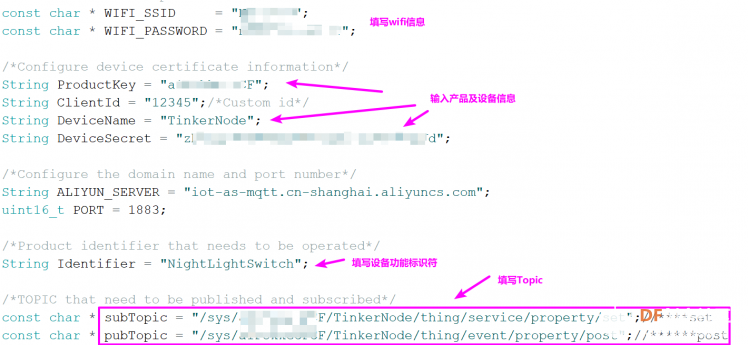 [mw_shl_code=cpp,false]/*! * @file Bedroom_Light.ino * * @brief Simulate esp32 as a bedroom light and use Aliyun as a cloud platform. * @n Subscribe to the switch status theme to enable remote switch control bedroom lights * * @copyright Copyright (c) 2010 DFRobot Co.Ltd (http://www.dfrobot.com) * @licence The MIT License (MIT) * @author [Wuxiao](xiao.wu@dfrobot.com) * @version V1.0 * @date 2019-02-10 * @get from https://www.dfrobot.com */ #include <WiFi.h> #include <PubSubClient.h> #include <ArduinoJson.h> #include "DFRobot_Iot.h" #define BEDROOD_LIGHT D4 /*Set WIFI name and password*/ const char * WIFI_SSID = "WIFI_SSID"; const char * WIFI_PASSWORD = "WIFI_PASSWORD"; /*Configure device certificate information*/ String ProductKey = "you_Product_Key"; String ClientId = "12345";/*Custom id*/ String DeviceName = "you_Device_Name"; String DeviceSecret = "you_Device_Secret"; /*Configure the domain name and port number*/ String ALIYUN_SERVER = "iot-as-mqtt.cn-shanghai.aliyuncs.com"; uint16_t PORT = 1883; /*Product identifier that needs to be operated*/ String Identifier = "you_Identifier"; /*TOPIC that need to be published and subscribed*/ const char * subTopic = "you_sub_Topic";//****set const char * pubTopic = "you_pub_Topic";//******post DFRobot_Iot myIot; WiFiClient espClient; PubSubClient client(espClient); static void openLight(){ digitalWrite(BEDROOD_LIGHT, HIGH); } static void closeLight(){ digitalWrite(BEDROOD_LIGHT, LOW); } void connectWiFi(){ Serial.print("Connecting to "); Serial.println(WIFI_SSID); WiFi.begin(WIFI_SSID,WIFI_PASSWORD); while(WiFi.status() != WL_CONNECTED){ delay(500); Serial.print("."); } Serial.println(); Serial.println("WiFi connected"); Serial.print("IP Adderss: "); Serial.println(WiFi.localIP()); } void callback(char * topic, byte * payload, unsigned int len){ Serial.print("Recevice ["); Serial.print(topic); Serial.print("] "); for (int i = 0; i < len; i++){ Serial.print((char)payload); } Serial.println(); StaticJsonBuffer<300> jsonBuffer; JsonObject& root = jsonBuffer.parseObject((const char *)payload); if(!root.success()){ Serial.println("parseObject() failed"); return; } const uint16_t LightStatus = root["params"][Identifier]; if(LightStatus == 1){ openLight(); }else{ closeLight(); } String tempMseg = "{\"id\":"+ClientId+",\"params\":{\""+Identifier+"\":"+(String)LightStatus+"},\"method\":\"thing.event.property.post\"}"; char sendMseg[tempMseg.length()]; strcpy(sendMseg,tempMseg.c_str()); client.publish(pubTopic,sendMseg); } void ConnectCloud(){ while(!client.connected()){ Serial.print("Attempting MQTT connection..."); /*A device connected to the cloud platform based on an automatically calculated username and password*/ if(client.connect(myIot._clientId,myIot._username,myIot._password)){ Serial.println("connected"); client.subscribe(subTopic); }else{ Serial.print("failed, rc="); Serial.print(client.state()); Serial.println(" try again in 5 seconds"); delay(5000); } } } void setup(){ Serial.begin(115200); pinMode(BEDROOD_LIGHT,OUTPUT); /*Connect to WIFI*/ connectWiFi(); /*Initialize the configuration of Aliyun*/ myIot.init(ALIYUN_SERVER,ProductKey,ClientId,DeviceName,DeviceSecret); client.setServer(myIot._mqttServer,PORT); /*Set the callback function to execute the callback function when receiving the subscription information*/ client.setCallback(callback); /*Connect to the cloud platform*/ ConnectCloud(); /*Turn off the lights first*/ closeLight(); /*Publish information about turning off the lights*/ client.publish(pubTopic,("{\"id\":"+ClientId+",\"params\":{\""+Identifier+"\":0},\"method\":\"thing.event.property.post\"}").c_str()); } void loop(){ if(!client.connected()){ ConnectCloud(); } client.loop(); }[/mw_shl_code] 4. 建立MQTT连接


 三、在线调试 1. 在控制台中按下图对设备进行调试  2. 上图中设置的值为1时,开灯 { "NightLightSwitch": 1 }  3. 设置的值为0时,关灯 { "NightLightSwitch": 0 }  |
 沪公网安备31011502402448
© 2013-2026 Comsenz Inc. Powered by Discuz! X3.4 Licensed