|
4640| 0
|
[用户分享] 【TinkerNode NB-IoT 物联网开发板】测评(二)运行出厂默认... |
|
【TinkerNode NB-IoT 物联网开发板】测评(二)运行出厂默认程序 【TinkerNode NB-IoT 物联网开发板】测评(一)开箱验机 【TinkerNode NB-IoT 物联网开发板】测评(二)运行出厂默认程序 【TinkerNode NB-IoT 物联网开发板】测评(三)MQTT控制板载LED灯开关 【TinkerNode NB-IoT 物联网开发板】测评(四)移动应用开发 出厂默认程序真是个好东西,里面有七大功能,涵盖了TinkerNoder的主要功能。运行默认程序能够很快上手并了解设备,进而做进一步开发。 [mw_shl_code=cpp,false]/*! * @file Default_run.ino * @brief This code is TinkerNode NB-IoT Dev Board(CH) quick start demo * * @n Short press SET to switch different modes. * @n Long press SET for over 1 sec to turn on/off a specific mode. * @n Mode cycle: 1->2->3->4->5->6->7->1... * @n 1. Default mode. (rainbow); * @n 2. NB-IoT signal detection mode. (White) * @n 3. NB-IoT AT command mode. (Purple) * @n 4. WiFi scan mode. (Yellow) * @n 5. WiFi connection mode. (Green) * @n 6. Bluetooth mode. (Blue) * @n 7. GNSS mode. (Cyan) * * @n AT commands can be sent to the BC20 module via USB Serial.(NB-IoT AT command mode) * @n Commonly used AT commands: * @n AT - AT command test * @n AT+QRST=1 - Reset BC20 * @n ATI - Revision of the firmware release * @n AT+CSQ - Signal quality report * @n 0 - <=-113 dBm * @n 1 - -111 dBm * @n 2 - -109 dBm * @n 3 - -107 dBm * @n ... * @n 30 - -53 dBm * @n 31 - >-51 dBm * @n 99 - Not known or not detectable * @n AT+CGATT? - PS attach or detach. Query network connection state. * @n 0 - Disconnected from the network * @n 1 - Connected to the network * @n AT+CGATT=1 - Connect to the network * @n AT+CGATT=0 - Disconnected from the network * @n AT+CIMI - Query the IMSI number of BC20 * @n AT+CGSN=1 - Query the IMEI of the BC20. * @n AT+CGSN=0 - Query the SN(Serial Number) of the BC20. * @n AT+QCCID - USIM Card Identification(ICCID). This is usually used to check SIM card state. * @n AT+CCLK? - Return current date and time * @n AT+QPOWD=0 - Power off the module.(use "myBC20.powerOn()" to power on the module) * * @n The following AT commands are for GNSS: * @n AT+QGNSSC? - Query GNSS power state * @n 0 - GNSS power off * @n 1 - GNSS power on * @n AT+QGNSSC=1 - power on GNSS * @n AT+QGNSSC=0 - power off GNSS * @n AT+QGNSSRD? - Obtain all GNSS info * * @n For more details please refer to the "Quectel BC20 AT Commands Manual" * @n or the "BC20 GNSS AT Commands Manual" * * @Copyright Copyright (c) 2010 DFRobot Co.Ltd (http://www.dfrobot.com) * @licence The MIT License (MIT) * @author Wuxiao(xiao.wu@dfrobot.com) * @version V1.0 * @date 2019-10-29 * @get from https://www.dfrobot.com */ #include <DFRobot_NeoPixel.h> #include <WiFi.h> #include <DFRobot_BC20.h> #include "DFRobot_LED.h" #include "DFRobot_BLESerial.h" #include "time.h" /*Functions definition*/ //Buttom SET connected to ESP32 pin13 pulled up with a 10K Ohm resistor #define ButtonPin 13 #define Default 0 #define NB_SIGNAL 1 #define NB_SERIAL 2 #define WIFI_SCAN 3 #define WIFI_CONNECT 4 #define BLE 5 #define GNSS 6 DFRobot_BC20 myBC20; DFRobot_LED LED; DFRobot_BLESerial SerialBLE; static uint8_t SysMode = 0; bool ModeStatus = false; static bool WaitingStart(uint8_t status) { //Serial.println("standing by..."); while (!ModeStatus) { if (SysMode == status) { RGB_LED.Breathing(); } else { return false; } } return true; } static void Default_Fun() { //Introduction: start the default mode, standby state //Flash 5 times in white. No error, rainbow change, standby state. There are errors, red indicates various errors. Serial.println("Default mode. Standing by..."); RGB_LED.clear(); RGB_LED.setColor(WHITE); for (int i = 0; i < 5; i++) { RGB_LED.FastFlash(); } while (1) { if (SysMode == Default) { RGB_LED.rainbow(5); } else { break; } } } static void NB_Signal_Fun() { /* * Introduction: * Turn on the BC20 and automatically connect to the network, * print the signal strength through the serial port, * and indicate the signal strength (high, medium, low) by the blinking frequency of the RGB or L indicator. * RGB: * Off - breathing light. * When NB is connected, the signal strength is indicated by the frequency of the flashing light, * which divided into three steps: * Strong signal - fast flash * Medium signal - slow flash * Weak signal - burst flash. */ Serial.println("NB-IoT signal detection mode."); Serial.println("Long press SET for over 1 sec to start..."); RGB_LED.clear(); RGB_LED.setColor(WHITE); if (!WaitingStart(NB_SIGNAL)) return; // Power on NB-IoT module BC20 Serial.print("Starting the BC20. Please wait... "); while (!myBC20.powerOn()) { RGB_LED.BurstFlash(); Serial.print("."); } Serial.println("BC20 started successfully !"); //Check whether a NB-IoT SIM card is available. while (!myBC20.checkNBCard()) { Serial.println("Please insert the NB SIM card !"); delay(1000); } myBC20.getGSN(IMEI); Serial.print("BC20 IMEI: "); Serial.println(sGSN.imei); Serial.print("SIM card ICCID:"); Serial.println(myBC20.getQCCID()); Serial.print("SIM card IMSI: "); Serial.println((char *)myBC20.getIMI()); Serial.println("Connecting network "); //Check whether it is attached to the network //BC20 will automatically connect and register on network after power on while (myBC20.getGATT() == 0) { Serial.print("."); delay(1000); } Serial.println("Network connected!"); while (1) { /* * The RGB indicator is ONLY available when powered by USB or VIN(6-24V external) * Uncomment the "led" related sentences and comment the "RGB" to use L(blue) indicator * The blue LED can be used when RGB indicator is not available (i.e. powered by battery or solar) */ if (SysMode == NB_SIGNAL && ModeStatus == true) { myBC20.getSQ(); //Signal quality RSSI<10, weak signal strength if (sSQ.rssi < 10 || sSQ.rssi == 99) { RGB_LED.BurstFlash(); //led.BurstFlash(); if (sSQ.rssi == 99) { Serial.println("Signal not detectable"); } else if (sSQ.rssi == 0) { Serial.println("Signal Strength: -113 dBm or less"); } else { Serial.print("Signal Strength: "); Serial.print((sSQ.rssi - 2) * 2 - 109); Serial.println(" dBm Weak"); } } //Signal quality 10<=RSSI<25, medium signal strength else if (sSQ.rssi >= 10 && sSQ.rssi < 25) { RGB_LED.SlowFlash(); //led.SlowFlash(); Serial.print("Signal Strength: "); Serial.print((sSQ.rssi - 2) * 2 - 109); Serial.println(" dBm Medium"); } //Signal quality RSSI>=25, strong signal strength else if (sSQ.rssi >= 25) { if (sSQ.rssi < 31) { for (int i = 0; i < 5 ; i++) { RGB_LED.FastFlash(); //led.FastFlash(); } Serial.print("Signal Strength: "); Serial.print((sSQ.rssi - 2) * 2 - 109); Serial.println(" dBm Strong"); } else if (sSQ.rssi == 31) { Serial.print("Signal Strength: -51 dBm or greater"); } } } else { break; } } } static void NB_Serial_Fun() { /* * Introduction: * Open BC20 and transparently transmit the serial data of PC (host computer) to BC20 * RGB: * Off - breathing light * NB module starting - slow flash * Start complete - constantly Bright */ Serial.println("NB-IoT AT command mode."); Serial.println("Long press SET for over 1 sec to start..."); RGB_LED.clear(); RGB_LED.setColor(PURPLE); if (!WaitingStart(NB_SERIAL)) return; Serial.print("Starting the BC20. Powering on"); while (!myBC20.powerOn()) { if (SysMode == NB_SERIAL && ModeStatus == true) { RGB_LED.SlowFlash(); Serial.print("."); } else { break; } } RGB_LED.ConstantlyBright(); myBC20.ConfigSleepMode(eSleepMode_Disable); Serial.println(); Serial.println("Configure the serial monitor as \"Carriage return\" before sending the AT commands"); Serial.println("For AT commands, please refer to \"Quectel BC20 AT commands Manual\""); Serial.println("Send AT commands to configure:"); while (1) { if (SysMode == NB_SERIAL && ModeStatus == true) { if (Serial.available()) { BC20Serial.write((char)Serial.read()); } if (BC20Serial.available()) { Serial.write((char)BC20Serial.read()); } } else { break; } } } static void WiFiScan() { //Wifi scan function WIFI_Scan_Fun () subroutine Serial.println("Scan starts."); // WiFi.scanNetworks will return the number of networks found int n = WiFi.scanNetworks(); Serial.println("scan done"); if (n == 0) { Serial.println("no networks found"); } else { Serial.print(n); Serial.println(" networks found"); for (int i = 0; i < n; ++i) { // Print SSID and RSSI for each network found Serial.print(i + 1); Serial.print(": "); Serial.print(WiFi.SSID(i)); Serial.print(" ("); Serial.print(WiFi.RSSI(i)); Serial.print(" dBm )"); Serial.println((WiFi.encryptionType(i) == WIFI_AUTH_OPEN) ? " " : "*"); delay(10); } } Serial.println(""); } static void WIFI_Scan_Fun() { /* * Introduction: * Scan the current wifi signal and print the wifi name and model strength through the serial port * RGB: * Off - breathing light * WiFi scan starting - constantly Bright * Scanned wifi - fast flash 5 times */ Serial.println("WiFi scan mode."); Serial.println("Long press SET for over 1 sec to start..."); RGB_LED.clear(); RGB_LED.setColor(YELLOW); if (!WaitingStart(WIFI_SCAN)) return; RGB_LED.ConstantlyBright(); WiFi.mode(WIFI_STA); WiFi.disconnect(); delay(100); while (1) { if (SysMode == WIFI_SCAN && ModeStatus == true) { WiFiScan(); for (int i = 0; i < 5 ; i++) { RGB_LED.FastFlash(); } } else { break; } } } const char* ntpServer = "pool.ntp.org"; const long gmtOffset_sec = 8 * 3600; const int daylightOffset_sec = 0; void printLocalTime(){ struct tm timeinfo; if (!getLocalTime(&timeinfo)) { Serial.println("Failed to obtain time"); return; } AnalysisTime(&timeinfo); //Print the current time format as "YYYY/MM/DD, week, hh:mm:ss" Serial.printf("%04d/%02d/%02d,", timeinfo.tm_year, timeinfo.tm_mon, timeinfo.tm_mday); Serial.print(&timeinfo, "%A,"); Serial.printf("%02d:%02d:%02d GMT+8\r\n", timeinfo.tm_hour, timeinfo.tm_min, timeinfo.tm_sec); } static void WIFI_Connect_Fun() { /* Introduction: * User is required to enter the WiFi SSID and password to be connected. * If it is unable to connect within 10s(timeout), It will require to enter the correct SSID and password again. * After the WiFi is connected, current date and time will be calibrated through the Internet and printed * every 1s. * RGB: * Off - breathing light. * Enter SSID and password - slow flash . * Connecting WiFi device - fast flash. * Connected WiFi - constantly Bright. */ char str_temp; uint8_t timeout_cnt = 0; uint32_t timeStamp; Serial.println("WiFi connection mode."); Serial.println("Long press SET for over 1 sec to start..."); RGB_LED.clear(); RGB_LED.setColor(GREEN); if (!WaitingStart(WIFI_CONNECT)) return; String WiFi_SSID = ""; String WiFi_Password = ""; while (WiFi.status() != WL_CONNECTED) { if (SysMode != WIFI_CONNECT || ModeStatus == false) return; //Enter WiFi SSID and Password in serial monitor. //End with "Newline" or "Carriage return" Serial.print("Enter WiFi SSID: "); while (1) { if (Serial.available()) { str_temp = (char)Serial.read(); if ( str_temp != '\n' && str_temp != '\r') { WiFi_SSID = String(WiFi_SSID + str_temp); } else { break; } } } Serial.println(WiFi_SSID.c_str()); RGB_LED.SlowFlash(); while (Serial.available()) Serial.read(); Serial.print("Enter WiFi Password: "); while (1) { if (Serial.available()) { str_temp = (char)Serial.read(); if (str_temp != '\n' && str_temp != '\r') { WiFi_Password = String(WiFi_Password + str_temp); } else { break; } } } Serial.println(WiFi_Password.c_str()); RGB_LED.SlowFlash(); while (Serial.available()) Serial.read(); WiFi.begin(WiFi_SSID.c_str(), WiFi_Password.c_str()); WiFi_SSID = ""; WiFi_Password = ""; timeStamp = millis(); Serial.print("Connecting"); while (WiFi.status() != WL_CONNECTED) { RGB_LED.FastFlash(); Serial.print("."); if (millis() - timeStamp > 10000) { Serial.println("Connection timeout!"); break; } } } RGB_LED.ConstantlyBright(); Serial.println(); Serial.println("WiFi connected."); Serial.print("IP Adderss: "); Serial.println(WiFi.localIP()); //Init and get the time configTime(gmtOffset_sec, daylightOffset_sec, ntpServer); while (1) { if (SysMode == WIFI_CONNECT && ModeStatus == true) { //Print current time every second printLocalTime(); delay(1000); } else { WiFi.disconnect(true); WiFi.mode(WIFI_OFF); break; } } } /*BLE configuration*/ String BLE_Name = String("TinkerNode NB-IoT(0x" + String(random(0xFFFF), HEX) + ")"); uint8_t ble_first = 1; static void BLE_Fun() { /* * Introduction: * Creates a bridge between Serial and Classical Bluetooth (SPP) * RGB: * Off - breathing light. */ char strTemp; Serial.println("Bluetooth mode."); Serial.println("Long press SET for over 1 sec to start..."); RGB_LED.clear(); RGB_LED.setColor(BLUE); if (!WaitingStart(BLE)) return; if (ble_first) { SerialBLE.begin(BLE_Name.c_str()); ble_first = 0; } else { } Serial.println("The device started, now you can pair it with bluetooth!"); Serial.print("BLE device name: "); Serial.println(BLE_Name); while (1) { if (SysMode == BLE && ModeStatus == true) { if (Serial.available()) { SerialBLE.write(Serial.read()); } //Send character "0" to turn off L, "1" to turn on L and "1" to blink L if (SerialBLE.available()) { strTemp = SerialBLE.read(); if ( strTemp == '0') { led.off(); Serial.println("L is OFF."); } else if ( strTemp == '1') { led.on(); Serial.println("L is ON."); } else{ Serial.write(strTemp); } } } else { break; } } } void Display_Location_Information() { Serial.print("Time:\t\t"); Serial.print(sCLK.Year); Serial.print("/"); Serial.printf("%02d", sCLK.Month); Serial.print("/"); Serial.printf("%02d ", sCLK.Day); Serial.printf(" %02d", sCLK.Hour); Serial.printf(":%02d", sCLK.Minute); Serial.printf(":%02d\r\n", sCLK.Second); Serial.print("Latitude:\t"); Serial.print(sGGNS.LatitudeVal, 6); Serial.print(" "); Serial.println(sRMC.LatitudeDir); Serial.print("Longitude:\t"); Serial.print(sGGNS.LongitudeVal, 6); Serial.print(" "); Serial.println(sRMC.LongitudeDir); Serial.print("Altitude:\t"); Serial.print(sGGNS.Altitude, 1); Serial.println(" m"); Serial.print("Speed:\t\t"); Serial.print(sGGNS.Speed); Serial.println(" km/h"); Serial.print("Heading:\t"); Serial.print(sGGNS.Heading); Serial.println(" deg"); Serial.print("Status:\t\t"); Serial.println(sGGNS.FixStatus); Serial.print("PDOP:\t\t"); Serial.println(sGGNS.PDOP); Serial.print("HDOP:\t\t"); Serial.println(sGGNS.HDOP); Serial.print("VDOP:\t\t"); Serial.println(sGGNS.VDOP); Serial.println(); } void Display_Satellite_Information() { Serial.print(sSAT.NUM); Serial.println(" in view."); Serial.print(sSAT.USE); Serial.println(" in used."); Serial.print("PRN:\t"); Serial.print("Elev:\t"); Serial.print("Azim:\t"); Serial.print("SNR:\t"); Serial.print("SYS:\t"); Serial.println("Used:"); for (uint8_t i = 0; i < sSAT.NUM; i++) { Serial.print(sSAT.data.PRN); Serial.print("\t"); Serial.print(sSAT.data.Elev); Serial.print("\t"); Serial.print(sSAT.data.Azim); Serial.print("\t"); Serial.print(sSAT.data.SNR); Serial.print("\t"); Serial.print(sSAT.data.SYS); Serial.print("\t"); Serial.println(sSAT.data.Status); } } static void GNSS_Fun() { /* * Introduction: * Open GNSS BCSS to obtain positioning related information * RGB: * Off - breathing light. * Open (search star) - fast flash. * Connected (positioning via satellite) - Constantly Bright. */ Serial.println("GNSS mode."); Serial.println("Long press SET for over 1 sec to start..."); RGB_LED.clear(); RGB_LED.setColor(CYAN); WaitingStart(GNSS); if (!WaitingStart(GNSS)) return; Serial.print("Starting the BC20.Please wait. . . "); while (!myBC20.powerOn()) { delay(1000); Serial.print("."); } Serial.println(); Serial.println("BC20 started successfully !"); Serial.println("check OK"); if (myBC20.getQGNSSC() == OFF) { Serial.println("GNSS is ON"); myBC20.setQGNSSC(ON); } while (1) { if (SysMode == GNSS && ModeStatus == true) { myBC20.getQGNSSRD(); //Dispaly basic info of GNSS Display_Location_Information(); //Dispaly satellite info of GNSS Display_Satellite_Information(); Serial.println(""); if (!sRMC.PositioningMode.equals("N")) { for (int i = 0; i < 5 ; i++) RGB_LED.FastFlash(); } else { RGB_LED.SlowFlash(); } } else { break; } } } void setup() { Serial.begin(115200); RGB_LED.begin(); RGB_LED.setBrightness(MIDDLE); pinMode(ButtonPin, INPUT); attachInterrupt(ButtonPin, IntFun, CHANGE); //Print info. and instructions Serial.println(); Serial.println("------------------------------------------------------------"); Serial.println("Welcome to TinkerNode NB-IoT Dev Board(CH) quick start demo."); Serial.println("------------------------------------------------------------"); Serial.println("Short press SET to switch different modes"); Serial.println("Long press SET for over 1 sec to turn on/off a specific mode"); Serial.println("Mode cycle: 1->2->3->4->5->6->7->1..."); Serial.println("1. Default mode. (rainbow)"); Serial.println("2. NB-IoT signal detection mode. (White)"); Serial.println("3. NB-IoT AT command mode. (Purple)"); Serial.println("4. WiFi scan mode. (Yellow)"); Serial.println("5. WiFi connection mode. (Green)"); Serial.println("6. Bluetooth mode. (Blue)"); Serial.println("7. GNSS mode. (Cyan)"); } void loop() { switch (SysMode) { case NB_SIGNAL: NB_Signal_Fun(); break; case NB_SERIAL: NB_Serial_Fun(); break; case WIFI_SCAN: WIFI_Scan_Fun(); break; case WIFI_CONNECT: WIFI_Connect_Fun(); break; case BLE: BLE_Fun(); break; case GNSS: GNSS_Fun(); break; default: Default_Fun(); break; } } static uint32_t nextTime = 0; void IntFun() { if (digitalRead(ButtonPin) == HIGH) { //long press: hold over 1 sec if (millis() - nextTime > 1000) { if ( ModeStatus == false) { ModeStatus = true; Serial.println("Starting..."); } else { ModeStatus = false; Serial.println("Turning off..."); } } //short press: 100 ms debounce else if (millis() - nextTime > 100) { ModeStatus = false; SysMode++; if (SysMode > 6) { SysMode = 0; } Serial.println("Switching mode..."); } } else { } nextTime = millis(); }[/mw_shl_code] 因为板子写过其他程序,所以需要重新烧录出厂默认程序。 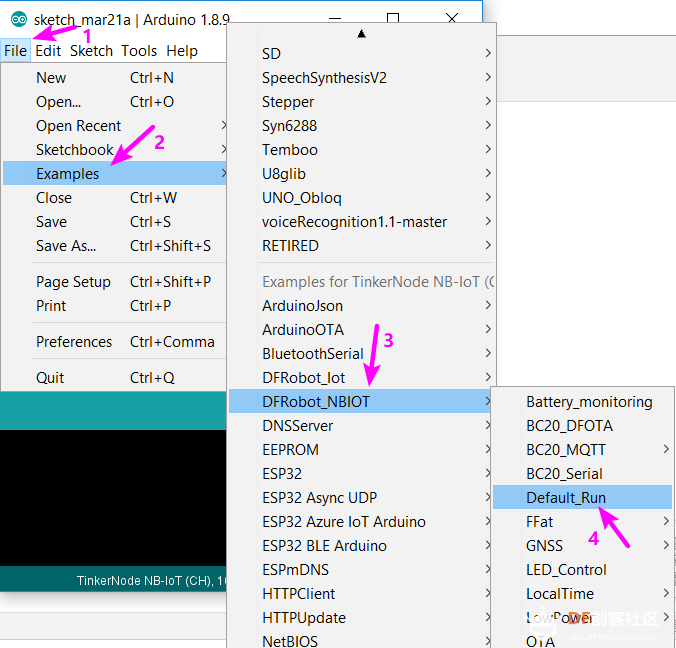 开发板在出厂前已烧录程序,便于用户体验与验证开发板的主要功能。程序包括下面7个功能,短按SET在7种功能中循环切换,长按SET打开/关闭该功能: "每次按SET切换到下一个功能,该功能都默认处于关闭状态(无论之前是否打开过),需要再长按SET才能开启该功能。" [mw_shl_code=cpp,false] * @n Short press SET to switch different modes. * @n Long press SET for over 1 sec to turn on/off a specific mode. * @n Mode cycle: 1->2->3->4->5->6->7->1... * @n 1. Default mode. (rainbow); * @n 2. NB-IoT signal detection mode. (White) * @n 3. NB-IoT AT command mode. (Purple) * @n 4. WiFi scan mode. (Yellow) * @n 5. WiFi connection mode. (Green) * @n 6. Bluetooth mode. (Blue) * @n 7. GNSS mode. (Cyan)[/mw_shl_code] 1.RGB七彩变换:上电默认运行。板载RGB灯进行七彩变换,可验证RGB灯是否正常显示。 这个模式无需长按,上电后自动运行。 2.NB-IoT信号测试:RGB指示灯白色。
我测试的时候是慢闪,1秒亮,1秒灭。 下面的动图可以看到模式的切换。  在NB IOT模式下从串口监视器可以看到IMIE、SIM卡的UUID和IMSI 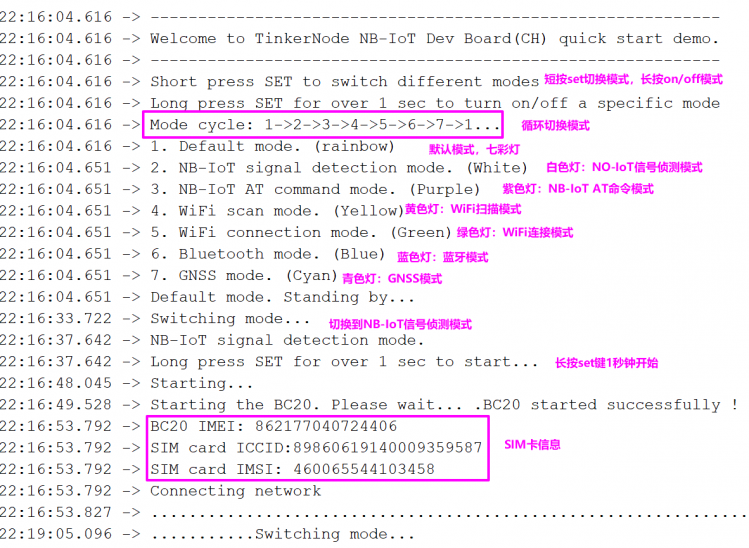 3.NB-IoT AT指令串口透传:RGB指示灯紫色。 [mw_shl_code=cpp,false] * @n AT commands can be sent to the BC20 module via USB Serial.(NB-IoT AT command mode) * @n Commonly used AT commands: * @n AT - AT command test * @n AT+QRST=1 - Reset BC20 * @n ATI - Revision of the firmware release * @n AT+CSQ - Signal quality report[/mw_shl_code]  4.WiFi信号扫描:RGB指示灯黄色。  会扫描wifi信号,最后显示所有扫描到的wifi的SSID及信号强度。 5.WiFi连接:RGB指示灯绿色。  输入SSID和密码登录wifi,注意大小写。连接成功后会显示IP地址、时间、时区。 6.蓝牙BLE透传:RGB指示灯蓝色。 手机上运行nRF Connect,扫描蓝牙,在发现的设备中找到TinkerNode NB-IoT(0xXXXX),其中XXXX为随机的十六进制数,我这里是0XAA55。 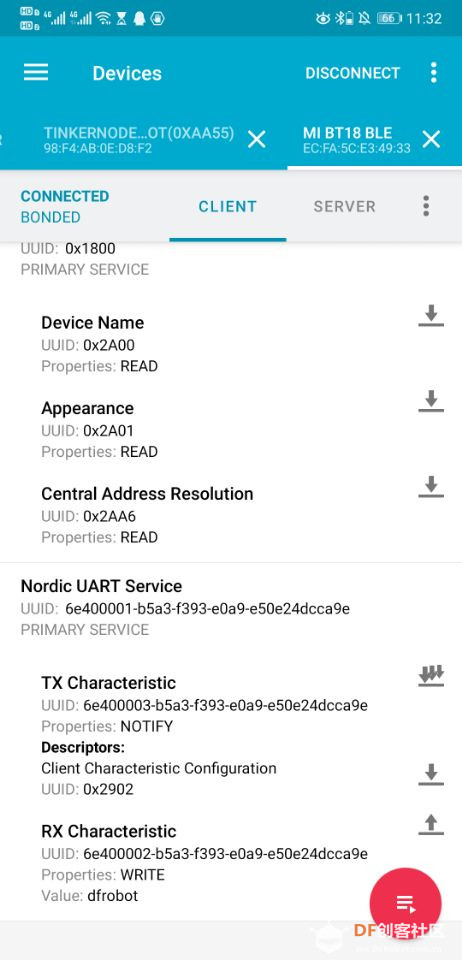 发送0,关闭板载LED灯,发送1,点亮板载LED灯。  串口监视器接收到相应内容;  如果在串口监视器发送信息,手机上会接受到相应信息。 下面为演示视频: 7.GNSS定位:RGB指示灯青色。 下面的动图可以看到模式刚启动时各参数都显示不出来,随着信号的稳定,参数慢慢出现。  |


 沪公网安备31011502402448
© 2013-2026 Comsenz Inc. Powered by Discuz! X3.4 Licensed


 置顶卡
置顶卡 变色卡
变色卡 千斤顶
千斤顶
 版主限定
版主限定
 创作达人
创作达人
 编辑选择奖
编辑选择奖
 ARD DAY
 编辑选择奖
编辑选择奖
 星球译员
星球译员
 编辑选择奖
编辑选择奖
 编辑选择奖
编辑选择奖
 编辑选择奖
编辑选择奖
 编辑选择奖
编辑选择奖
 编辑选择奖
编辑选择奖


