前言
原创文章,转载引用请务必注明链接,水平有限,如有疏漏,欢迎指正交流。由于个人时间精力有限,系列文章仅做个人记录,不做 “保姆级” 教程。
文章如有更新请访问 原文链接。
欢迎对 Klipper 固件感兴趣,以及对改版 CNC 加工的 Voron 三叉戟、v0、v2.4 感兴趣的朋友加群交流(QQ Group:490111638)
本文介绍如何让 Klipper 读取 U 盘里的 Gcode 切片文件,实现类似 Marlin 固件的脱机打印功能。
那么有朋友要说了,我 Fluidd/Mainsail 网页界面无线上传并打印爽得很,并没有必要插 U 盘。而且官方文档并没有提供相关文档也不认为这个功能有什么意义。我起初也是这么认为,但是帮别人调试 Klipper 过程中,遇到了相关需求:
- 在没有网络的情况下使用 Klipper 进行打印
- 支持完全使用彩色触摸屏进行操作,降低用户从 Marlin 迁移至 Klipper 的学习成本
- 用户认为脱机打印更稳定
- 目前认为彩色触摸屏极大降低上手难度,优于 LCD12864 等字符屏,后者不支持中文显示(Klipper 字母是画出来的)和中文 Gcode文件
既然决定实现此功能,那我们撸起袖子去思考如何实现,实际过程中遇到如下问题:
- 自动挂载 U 盘至
gcode_files 文件夹
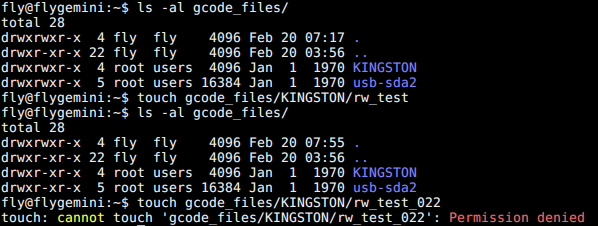
- 正确配置 U 盘挂载点的读写权限
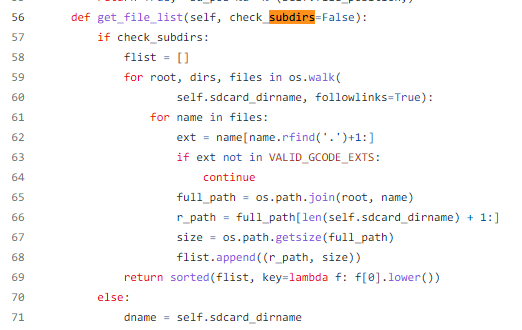
- 允许 Klipper 读取子目录
- 支持安全弹出 U 盘
1、自动挂载 U 盘
首先我们知道,如果使用 Octoprint,它会创建一个目录 ~/.octoprint/uploads/ 用于存放 gcode 文件,但是由于大多数人使用 Fluidd 这个简化高效的网页前端,我们需要如下配置,指定一个目录:
[virtual_sdcard]
path:
#   此目录只读,通常设置为 ~/gcode_files
那么简单了,我们把 U 盘挂载到此目录下,岂不是就可以也读取 U 盘文件并进行打印了?有以下问题:
- 需要插入后自动挂载,并在 gcode_files 目录下创建对应的目录
- 目录可以固定,也可以不固定,如果不固定则需要卸载后自动删除
- Klipper 默认不支持读取子目录,需要修改源码。(注:新版 Klipper 默认支持了)
- 由于此目录只读,设置一下挂载参数,聪明的小伙伴已经知道如何偷懒不卸载了
1.1 创建 udev 规则自动挂载 U 盘
我们参考 udev rule for Home Assistant OS (hassio) to mount USB drives into the Supervisor Media directory 为基础进行修改:
# /etc/udev/rules.d/70-mount-usb-to-gcode-folder-by-label.rules
#
# udev rule
#   Mount USB drive to the media directory using the partition name as mount point
#
# Description:
#   Created for Home Assistant OS, this rule mounts any USB drives
#   into the Hassio media directory (/mnt/data/supervisor/media).
#   When a USB drive is connected to the board, the rule creates one directory
#   per partition under the media directory. The newly created partition is named
#   as the partition name. If the partition does not have a name, then the following
#   name format is used: "usb-{block-name}" where the block name is sd[a-z][0-9].
#
# Note 1:
#   The rule name is always prefixed with a number. In this case, the rule uses 80.
#   This represents the order of the rule when multiple rules exists in udev.
#   Low numbers run first, high numbers run last. However, low numbers do not have all
#   the facilities than high numbers may have.
#   For this rule to run properly, use numbers equal or greater than 80.
#
# Note 2:
#   This rule will skip mounting the 'CONFIG' USB key.
#   https://github.com/home-assistant/operating-system/blob/dev/Documentation/configuration.md
#
# Note 3:
#   This rule will mount the OS partitions if the OS is sorted on a USB drive (i.e. USB booting).
#   To prevent this issue from happening, update the rule to skip the booting USB drive.
#   See the CAUTION message below.
#
# Source of inspiration:
#   https://www.axllent.org/docs/auto-mounting-usb-storage/
#
# Useful links:
#   https://wiki.archlinux.org/index.php/Udev
#
# udev commands:
#   - Restart udev to reload new rules:
#       udevadm control --reload-rules
#   - List device attributes of sdb1:
#       udevadm info --attribute-walk --name=/dev/sdb1
#   - List environment variables of sdb1:
#       udevadm info /dev/sdb1
#   - Trigger add/remove event for sdb1:
#       udevadm trigger --verbose --action=add --sysname-match=sdb1
#       udevadm trigger --verbose --action=remove --sysname-match=sdb1
#

# Filter on block devices, exit otherwise
# CAUTION: Change to 'sd[b-z][0-9]' if booting from a USB drive (e.g.: sda)
KERNEL!="sd[a-z][0-9]", GROUP="disk", GOTO="abort_rule"

# Skip none USB devices (e.g.: internal SATA drive)
ENV{ID_PATH}!="*-usb-*", GOTO="abort_rule"

# Import the partition info into the environment variables
IMPORT{program}="/usr/sbin/blkid -o udev -p %N"

# Exit if partition is not a filesystem
ENV{ID_FS_USAGE}!="filesystem", GOTO="abort_rule"

# Exit if this is the 'CONFIG' USB key
ENV{ID_FS_LABEL}=="CONFIG", GOTO="abort_rule"

# Get the partition name if present, otherwise create one
ENV{ID_FS_LABEL}!="", ENV{dir_name}="%E{ID_FS_LABEL}"
ENV{ID_FS_LABEL}=="", ENV{dir_name}="usb-%k"

# Determine the mount point
# CAUTION: 请注意更改目录
ENV{mount_point}="/home/pi/gcode_files/%E{dir_name}"

# Mount the device on 'add' action (a.k.a. plug the USB drive)
ACTION=="add", ENV{mount_options}="relatime,sync"

# Filesystem-specific mount options
ACTION=="add", ENV{ID_FS_TYPE}=="vfat|ntfs", ENV{mount_options}="$env{mount_options},utf8,gid=100,umask=002"

# Mount the device
ACTION=="add", RUN{program}+="/usr/bin/mkdir -p %E{mount_point}", RUN{program}+="/usr/bin/systemd-mount --no-block --automount=no --collect -o %E{mount_options} $devnode %E{mount_point}"

# Umount the device on 'remove' action (a.k.a unplug or eject the USB drive)
ACTION=="remove", ENV{dir_name}!="", RUN{program}+="/usr/bin/systemd-umount %E{mount_point}", RUN{program}+="/usr/bin/rmdir %E{mount_point}"

# Exit
LABEL="abort_rule"
注意:
-
[Line 57] | 由于 blkid 默认不支持会导致乱码,U 盘的名称标签请不要使用中文,或者自行修改 blkid 源码
-
[Line 71] | 请根据当前用户名修改挂载目录(默认为 pi )
-
[Line 74] | 设置挂载选项,及时 sync 避免数据丢失(只读挂载时可以不设置)
-
[Line 77] | 设置挂载权限,可读写此目录
-
[Line 81] | remove 操作仅在拔除 U 盘后生效,并不包含主动安全弹出 U 盘 的操作
-
udev 生效优先级为:数字越低优先级越高
-
在udev中调用 mount 命令时会工作不正常,可以使用 systemd-mount 代替。
-
sudo udevadm control --reload 命令可以强制重载生效 udev 规则
-
卸载 U 盘之前,Fluidd 不要打开其目录
-
即使挂载为读写权限,在 Fluidd 页面也是无法执行写操作,会报错,但是可以在命令行执行度写操作。

参考文章
番外:Fluidd Gcode 目录提示 "root 不可用"
一般两种原因:
virtual_sdcard 设置的目录没有读权限,使用 ls -al ~/gcode_files 查看- 首次安装完毕 Klipper 全家桶,Moonraker 需要连接一次 Klipper,读取其
printer.cfg 文件里关于 virtual_sdcard 的配置,如果还没连接则会报此错误,后续不存在此问题。
When Moonraker (the backend) initially starts it does not know where the gcode path is located. It retreives that information from Klipper on the initial connection after Klippy enters the "ready" state. Once Moonraker has that path it will retain it regardless of Klipper's state until Moonraker is restated.
——Source:github.com
1.2 正确设置挂载权限
由于参考 udev 规则挂载出来的为 root 权限,当前用户无法读取 U 盘内容,需要修改挂载参数。因为以前挂载都是使用 mount 命令,这里使用 systemd-mount 来进行挂载,有些不熟悉,此外还有使用 udiskctl 工具进行挂载的,但是此方法不支持自定义挂载点,故放弃。最后测试使用上述 77 行设置,成功读写挂载。
我们设置默认创建的挂载文件夹参数为:utf8,gid=100,umask=002,意为:
- 使用 utf-8 编码,不容易产生乱码,支持中文
- 默认用户组为 100,即
users,这里选择一个当前用户所在的组即可(使用 id 命令查看),也可以直接设置所属用户
- 默认创建文件权限为 umask=002,亦即
666 - 002 = 664,rw-rw-r--,顺序为 所属用户-用户组-其他 ,对于目录则是777,这里 7=4r+2w+1x。也就是默认拥有读写权限,其他用户只读。
- 想要设置只读的话,则为 umask=222
参考文章
1.3 使能 Klipper 读取子目录(新版默认启用)
默认 Klipper 不支持读取子目录,例如我们使用 M20 命令无法看到 U 盘内的文件, 思索后修改相关代码 klipper/klippy/extras/virtual_sdcard.py:

搜索 subdirs 相关代码,修改部分后面设置为 True 即可。
2、安全弹出 U 盘
我们在 Windows 下使用 U 盘后,都有一个安全弹出 U 盘的选项,原因是你修改 U 盘内的文件后,为了提高操作流畅性与速度,其实相关修改会先在缓存中,然后后台慢慢实际写入,如果想要强制立即将缓存写入,可以使用 sync 命令,而 Windows 下的 安全弹出 包括以下操作:写入缓存内容 -> 删除挂载节点 -> 断开 U 盘电源。
如果不这样操作,可能会小概率损坏 U盘,丢失修改内容等。那么在 Linux 下我们如何卸载 U 盘挂载点呢?这里提供两种思路

 沪公网安备31011502402448