20浏览
查看: 20|回复: 2

[项目] 【Arduino 动手做】使用 ESP32 的自设置大时钟构建

[复制链接]
得益于 Nano ESP32 和 Micro-Python,从极其简单的硬件构建了一个令人印象深刻的自设置时钟。

该时钟使用 ESP32 的内置 WIFI 从 Internet 获取时间,并设置内置实时时钟。它在 8 x 32 RGB LED 大矩阵上显示时间。

两年前,我使用 Adafruit HUZZAH32 - ESP32 Feather 构建了这个时钟。我在 Arduino C 中对其进行了编程。我使用外部 DS3231 实时时钟和小型 DC-DC 转换器为 ESP32 提供 3.3 伏电压,以 5 伏电压为显示器供电。

这个新版本使用 Arduino 的新 Nano ESP32,并使用 Python 编程。但这并不是唯一的变化。我使用的是 Nano ESP32 上的内置 RTC,并且我直接使用 Nano 的 3.3 伏电源运行显示器。这是可能的,因为 1) 令我惊讶的是,5 伏显示器在 3.3 伏电压下运行似乎非常愉快。2) 面板的 LED 在任何时候都只有少数亮起,而且我以不到其全亮度的 10% 为它们供电,因此显示屏仅消耗几毫安。

这个新时钟是用 Micro-Python 编程的!我使用了新的 Arduino Lab for Micro-Python,它仍处于 Beta 版。我不精通 Python,所以我认为尝试新事物会很有趣。它还给了我一个机会,对原始设计进行一些小的改进。

关于 Micro-Python 实验室,我应该说的一句话是,当您运行程序时,它不会保存程序更改。我使用 Arduino 的常规 IDE 自动保存我的工作,以至于我因为忘记 SAVE 而多次丢失更改。

硬件
这个项目中的硬件非常简单!9 伏砖型电源为 Nano ESP32 供电。Neopixel 显示器有三个引脚:电源、数据和接地。电源由 Nano 3.3 伏引脚提供,数据来自 ESP 引脚 9 (Arduino D6)。就是这样!!

软件
如果您构建了这个时钟,则需要在软件中输入一些自己的项目。它需要您的 WiFi 凭证以及您与 GMT 的时区偏移量。此外,还有几行代码将 24 小时制转换为 12 小时制。如果您想要 24 小时制,只需注释掉这 2 行即可。

这个项目实际上是关于软件的。发生了很多事情。作为一名 Python 程序员新手,我惊喜地发现,将我以前的 C 软件转换为适当的 Python 代码相当容易。用于 network、time、ntptime 和 neopixel 的 Python 库产生了巨大的影响。他们使所有困难的任务都变得相对容易 - 例如连接到 Internet、设置 RTC 和控制 LED 显示屏。

这个时钟的一个很好的功能是它自己设置并保持非常准确。网络库有助于建立 Internet 连接。ntptime 库从 NTP 服务器获取 NTP 时间,并使用它来设置内置的实时时钟。时间库读取 RTC 并提供小时、分钟、秒。

通过我们的 Python 代码通过 Arduino 的 Micro-Python 实验室运行,该程序将确认其与 Internet 的连接,并每秒打印一次时间。此输出对于调试非常有用,甚至可以演示大部分功能,甚至不需要 LED 显示屏。

我对这个 RTC 的质量或准确性了解不多。它似乎可以将完美的时间保持几个小时,但我没有对其进行长期测试。相反,我构建了每 24 小时重新设置为 NTP 时间。所以在每晚的 02:02:02,我的时钟再次获得 NTP 时间。这应该可以使其始终精确到几毫秒以内!

为了在我们的 LED 显示屏上显示时间,我们需要合适的字体。我们的 5x8 像素字体,数字 0-9 包含在一个名为 num 的数组中。在两年前的原始设计中,我在 RAM 的缓冲区中设置了显示器的内容,然后定期将缓冲区的内容传输到显示器。但是 Neopixel 显示器本身完全能够存储自己的内容,所以这次我将数字(和闪烁的冒号)直接写入显示器。执行此作的软件有点棘手,因为显示器是一条线性 LED 条,在显示器表面上下缠绕。neopixel 库本身不支持通过 x、y 坐标对 LED 进行寻址。我们需要在软件中执行此作,以便将我们的字体显示在显示器上。

我们的显示屏只有足够的空间容纳小时和分钟,但我想用秒做点什么,所以有一个闪烁的冒号显示秒。此外,显示屏会在一分钟内改变颜色,从绿色开始,然后过渡到蓝色,然后变成红色,然后在分钟变化时恢复为绿色。颜色每 5 秒更改一次。

其他信息
这里值得注意 Python 特有的几件事。尽管 Nano ESP32 是一个 Arduino,并且引脚的分配和标记与所有 Arduino 一样,即 D2、A0 等,但 Python 通过其 ESP32 GPIO 编号来指代引脚。所以引脚 D6 称为引脚 9,如 Pinout 表所示。

此外,我们需要我们的 clock 程序在启动时运行。在 Python 中,这是通过将程序命名为 main.py 并将其存储在 ESP32 上 boot.py 文件旁边的来实现的。Arduino Lab for Micro-Python 有两个文件目录 - 一个用于用户计算机上的程序,另一个用于 Nano 的闪存,因此将其设置为在启动时运行非常简单。只需复制程序并将其作为 main.py 存储在 Nano 上

我希望我的 Python 代码清晰易懂。经验丰富的 Python 程序员可能会指出一种更好的方法来做一些事情。我很高兴听到他们的意见。
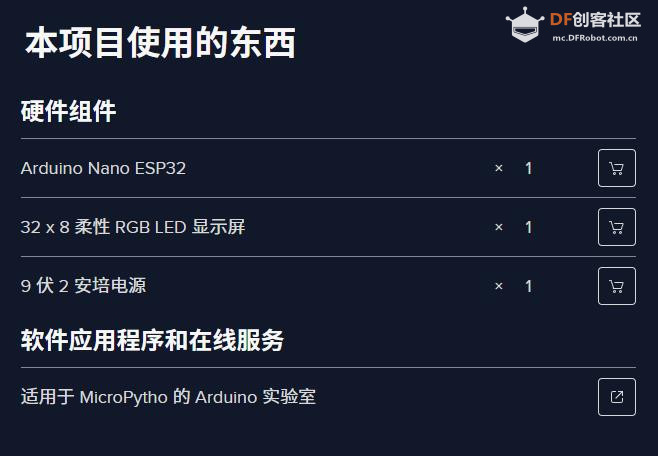
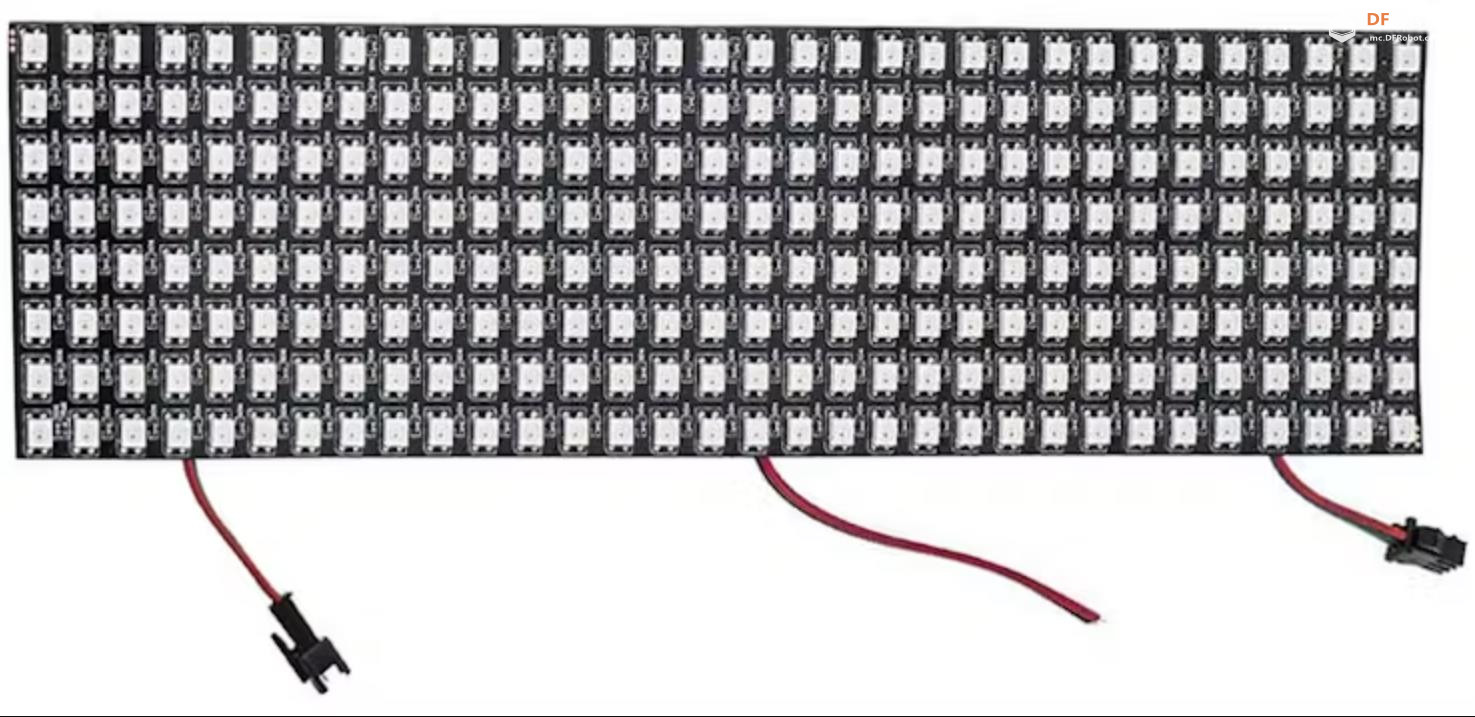
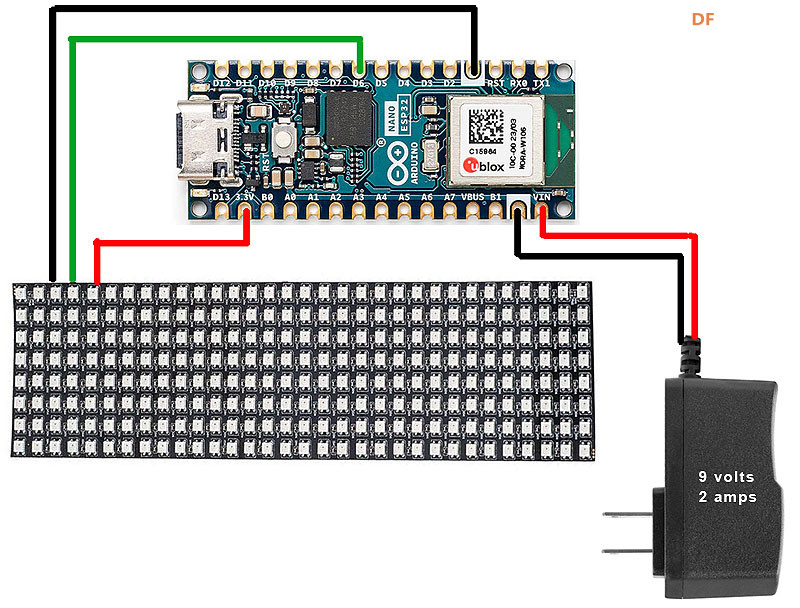
【Arduino 动手做】使用 ESP32 的自设置大时钟构建图1

【Arduino 动手做】使用 ESP32 的自设置大时钟构建图2

【Arduino 动手做】使用 ESP32 的自设置大时钟构建图3

驴友花雕  中级技神
 楼主|

发表于 5 小时前

【Arduino 动手做】使用 ESP32 的自设置大时钟构建

项目代码

  1. import time, ntptime, network, neopixel
  2. from machine import Pin
  3. WIFI_NETWORK = 'NetworkName'
  4. WIFI_PASSWORD = 'NetworkPassword'
  5. GMT_OFFSET = -7  # time zone adjustment here
  6. # create instance of neopixel strip attached to ESP32 pin 9 (Arduino D6)
  7. num_pixels = 256
  8. panel = neopixel.NeoPixel(Pin(9), num_pixels)   
  9. # Define colors
  10. myColor = (0, 0, 15)  #starts out blue
  11. black = (0, 0, 0)
  12. # twelve colors that gradually transistion from green thhrough blue to red; changes occur every 5 seconds
  13. colors = [(0,12,0),(0,12,3),(0,9,6),(0,7,7),(0,5,9),(0,4,12),(0,0,15),(4,0,14),(6,0,10),(8,0,7),(10,0,3),(12,0,0)]
  14. timezone = GMT_OFFSET * 60 * 60   # change timezone offset to seconds
  15. num = [  # our font for numbers 0-9
  16.   [ 0x38,  # 001110   number 0  
  17.     0x44,  # 010001  
  18.     0x4C,  # 010011  
  19.     0x54,  # 010101  
  20.     0x64,  # 011001  
  21.     0x44,  # 010001  
  22.     0x38,  # 001110  
  23.     0x00], # 000000        
  24.   [ 0x10,  # 000100   number 1  
  25.     0x30,  # 001100  
  26.     0x10,  # 000100  
  27.     0x10,  # 000100  
  28.     0x10,  # 000100  
  29.     0x10,  # 000100  
  30.     0x38,  # 001110  
  31.     0x00], # 000000  
  32.   [ 0x38,  # 001110   number 2   
  33.     0x44,  # 010001  
  34.     0x04,  # 000001  
  35.     0x18,  # 000110  
  36.     0x20,  # 001000  
  37.     0x40,  # 010000  
  38.     0x7C,  # 011111  
  39.     0x00], # 000000  
  40.   [ 0x38,  # 001110   number 3   
  41.     0x44,  # 010001  
  42.     0x04,  # 000001  
  43.     0x38,  # 001110  
  44.     0x04,  # 000001  
  45.     0x44,  # 010001  
  46.     0x38,  # 001110  
  47.     0x00], # 000000  
  48.   [ 0x08,  # 000010   number 4   
  49.     0x18,  # 000110  
  50.     0x28,  # 001010  
  51.     0x48,  # 010010  
  52.     0x7C,  # 011111  
  53.     0x08,  # 000010  
  54.     0x08,  # 000010  
  55.     0x00], # 000000  
  56.   [ 0x7C,  # 011111   number 5   
  57.     0x40,  # 010000  
  58.     0x40,  # 010000  
  59.     0x78,  # 011110  
  60.     0x04,  # 000001  
  61.     0x44,  # 010001  
  62.     0x38,  # 001110  
  63.     0x00], # 000000  
  64.   [ 0x18,  # 000110   number 6   
  65.     0x20,  # 001000  
  66.     0x40,  # 010000  
  67.     0x78,  # 011110  
  68.     0x44,  # 010001  
  69.     0x44,  # 010001  
  70.     0x38,  # 001110  
  71.     0x00], # 000000  
  72.   [ 0x7C,  # 011111   number 7   
  73.     0x04,  # 000001  
  74.     0x08,  # 000010  
  75.     0x10,  # 000100  
  76.     0x20,  # 001000  
  77.     0x20,  # 001000  
  78.     0x20,  # 001000  
  79.     0x00], # 000000  
  80.   [ 0x38,  # 001110   number 8   
  81.     0x44,  # 010001  
  82.     0x44,  # 010001  
  83.     0x38,  # 001110  
  84.     0x44,  # 010001  
  85.     0x44,  # 010001  
  86.     0x38,  # 001110  
  87.     0x00], # 000000  
  88.   [ 0x38,  # 001110   number 9   
  89.     0x44,  # 010001  
  90.     0x44,  # 010001  
  91.     0x3C,  # 001111  
  92.     0x04,  # 000001  
  93.     0x08,  # 000010  
  94.     0x30,  # 001100  
  95.     0x00]  # 000000  
  96. ]
  97. # turn a specific LED at position x,y to off (0) or on (1)
  98. def SetLED(y,x,onOff):
  99.     if (x%2==0):
  100.         LEDnum = 8*x + y
  101.     else:
  102.         LEDnum = 8*x + 7 - y
  103.     if (onOff==1):
  104.         panel[LEDnum] = myColor
  105.     else:
  106.         panel[LEDnum] = black
  107.     # note that we haven't written this change to the panel yet
  108.    
  109. # put numbers onto the display using our font in positions 0-3.
  110. # positions 0 and 1 are for hours, while 2 and 3 are seconds
  111. def setNum(number, myPos):
  112.     if (myPos==0): pos = 2   # change pos to the real location in the array
  113.     elif (myPos==1): pos = 8
  114.     elif (myPos==2): pos = 18
  115.     elif (myPos==3): pos = 24
  116.     for x in range(0,6):  # now place the digit's 6x8 font on the display
  117.         for y in range(0,8):
  118.             if (x%2==0):  # the LEDs in the strip zigzag up and down across the display
  119.                 LEDnum = 8*(x + pos) + y
  120.             else:
  121.                 LEDnum = 8*(x + pos) + 7 - y
  122.             if (num[number][y] & (0b01000000 >> x)):
  123.                 panel[LEDnum] = myColor
  124.             else:
  125.                 panel[LEDnum] = black
  126.     panel.write()
  127.             
  128. def setColon(onOff):  # turn the colon on (1) or off (0)
  129.   SetLED(2,16,onOff)
  130.   SetLED(1,16,onOff)
  131.   SetLED(5,16,onOff)
  132.   SetLED(4,16,onOff)
  133.   SetLED(2,15,onOff)
  134.   SetLED(1,15,onOff)
  135.   SetLED(5,15,onOff)
  136.   SetLED(4,15,onOff)
  137.   panel.write()
  138.   
  139. # Make panel black
  140. def clearPanel():
  141.     panel.fill(black)   
  142.     panel.write()   
  143. #connect to WiFi and set the RTC
  144. def getNTPtime():
  145.     myWiFi = network.WLAN(network.STA_IF)
  146.     myWiFi.active(True)
  147.     myWiFi.connect(WIFI_NETWORK, WIFI_PASSWORD)
  148.     # this 3 second delay worked 100% of the time for me, but you might need longer.
  149.     time.sleep(3) # wait for connection before trying to set the time
  150.     print()
  151.     print("Connected to", WIFI_NETWORK)
  152.     ntptime.settime()        # this queries the time from an NTP server and sets RTC
  153.     myWiFi.disconnect
  154.    
  155. # program start
  156. getNTPtime() # set the RTC
  157. mytime = time.localtime(time.time() + timezone) # get time from RTC
  158. clearPanel()
  159. # Main loop
  160. while(1):
  161.     myhours = mytime[3] # store the current hour, so it can be converted to 12 hour time
  162.     if myhours>12:  # converting to 12 hour clock; remove these 2 line if you want 24
  163.         myhours= myhours-12  
  164.     myseconds = mytime[5]  # store the current second so we can tell when it changes
  165.     print("The time is", myhours,":", mytime[4], ":", mytime[5])
  166.     if (mytime[5]%5==0): # every 5 seconds rewrite the time in a new color
  167.         myColor = colors[int(mytime[5]/5)] # change color as minute progresses
  168.         digit0 = int(myhours/10) # get the four individual numbers
  169.         digit1 = int(myhours%10)
  170.         digit2 = int(mytime[4]/10)
  171.         digit3 = int(mytime[4]%10)
  172.         setNum(digit0, 0)  # put them onto the display
  173.         setNum(digit1, 1)
  174.         setNum(digit2, 2)
  175.         setNum(digit3, 3)
  176.     setColon(1) # blink the colon on for 1/2 sec
  177.     time.sleep(0.5)
  178.     setColon(0) # blink colon off for the remaining 1/2 sec
  179.     while (mytime[5] == myseconds):  # wait here until the second changes
  180.         mytime = time.localtime(time.time() + timezone)
  181.     if (mytime[3] == 2 and mytime[4] == 2 and mytime[5] == 2): # i.e at 02:02:02 each day
  182.         getNTPtime() # get NTP time again and re-set the RTC
  183.         mytime = time.localtime(time.time() + timezone)
复制代码


回复

使用道具 举报

驴友花雕  中级技神
 楼主|

发表于 5 小时前

【Arduino 动手做】使用 ESP32 的自设置大时钟构建

【Arduino 动手做】使用 ESP32 的自设置大时钟构建
项目链接:https://www.hackster.io/doug-dom ... -micropython-45153e
项目作者:道格·多姆克

项目视频 :https://hackster.imgix.net/uploa ... ckmovie_16hKBtSY6W. gif?auto=format%2Ccompress&gifq=35&w=900&h=675&fit=min&fm=mp4
项目代码:https://www.hackster.io/code_files/645299/download
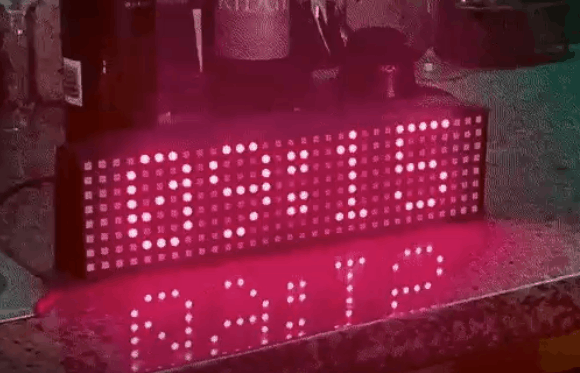
【Arduino 动手做】使用 ESP32 的自设置大时钟构建图1

回复

使用道具 举报

您需要登录后才可以回帖 登录 | 立即注册

本版积分规则

为本项目制作心愿单
购买心愿单
心愿单 编辑
[[wsData.name]]

硬件清单

  • [[d.name]]
btnicon
我也要做!
点击进入购买页面
上海智位机器人股份有限公司 沪ICP备09038501号-4 备案 沪公网安备31011502402448

© 2013-2025 Comsenz Inc. Powered by Discuz! X3.4 Licensed

mail