项目代码
- #include <SPI.h>
- #include <Adafruit_GFX.h>
- #include <Max72xxPanel.h>
- #include <Adafruit_BME280.h>
- #include "RTClib.h"
-
- RTC_DS1307 rtc;
-
- char daysOfTheWeek[7][12] = {"Sunday", "Monday", "Tuesday", "Wednesday", "Thursday", "Friday", "Saturday"};
-
- Adafruit_BME280 bme280;
- int mm;
-
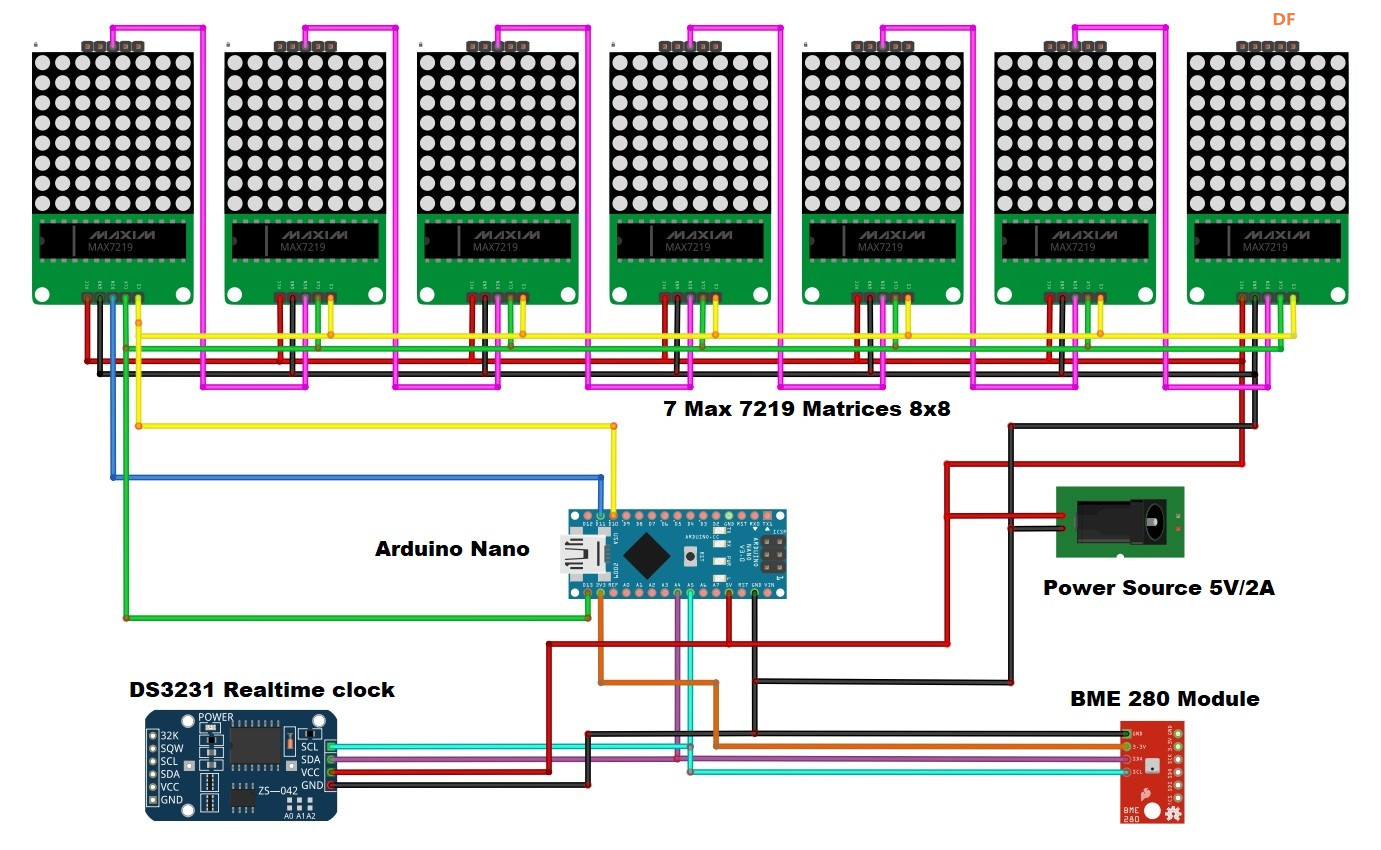
- int pinCS = 10; // Uno or Duemilanove DIN 11 (MOSI) CLK 13 (SCK)
- int numberOfHorizontalDisplays = 7;
- int numberOfVerticalDisplays = 1;
-
- Max72xxPanel matrix = Max72xxPanel(pinCS, numberOfHorizontalDisplays, numberOfVerticalDisplays);
-
- String tape = "";
- int wait = 25; // speed
-
- int spacer = 2; // Character spacing (points)
- int width = 5 + spacer; // Font width 5 pixels
-
- String utf8rus(String source)
- {
- int i,k;
- String target;
- unsigned char n;
- char m[2] = { '0', '\0' };
-
- k = source.length(); i = 0;
- while (i < k) {
- n = source[i]; i++;
- if (n >= 0xC0) {
- switch (n) {
- case 0xD0: {
- n = source[i]; i++;
- if (n == 0x81) { n = 0xA8; break; }
- if (n >= 0x90 && n <= 0xBF) n = n + 0x2F;
- break;
- }
- case 0xD1: {
- n = source[i]; i++;
- if (n == 0x91) { n = 0xB7; break; }
- if (n >= 0x80 && n <= 0x8F) n = n + 0x6F;
- break;
- }
- }
- }
- m[0] = n; target = target + String(m);
- }
- return target;
- }
-
- String Serial_Read() {
- unsigned char c; // variable port for reading series
- String Serial_string = ""; // Forming from a character string
- while (Serial.available() > 0) { // If there are symbols in the series
- c = Serial.read(); // We read a symbol
- //Serial.print(c,HEX); Serial.print(" "); Serial.print(c);
- if (c == '\n') { //If this is a string of lines
- return Serial_string; // We return the line
- }
- if (c == 0xB8) c = c - 0x01;
- if (c >= 0xBF && c <= 0xFF) c = c - 0x01;
- Serial_string = Serial_string + String(char(c)); //Add symbol to line
- }
- return Serial_string;
- }
- String chas;
- String myn;
- //String mesyc = "";
-
- void setup() {
-
- Serial.begin(9600);
- Serial.println(F("bme280"));
- //==================================== hours
- if (! rtc.begin()) {
- Serial.println("Couldn't find RTC");
- Serial.flush();
- abort();
- }
- if (! rtc.isrunning()) {
- Serial.println("RTC is NOT running, let's set the time!");
- // When time needs to be set on a new device, or after a power loss, the
- // following line sets the RTC to the date & time this sketch was compiled
- rtc.adjust(DateTime(F(__DATE__), F(__TIME__)));
- // This line sets the RTC with an explicit date & time, for example to set
- // January 21, 2014 at 3am you would call:
- // rtc.adjust(DateTime(2014, 1, 21, 3, 0, 0));
- }
- //====================================
- while (!bme280.begin(BME280_ADDRESS - 1)) {
- Serial.println(F("Could not find a valid bme280 sensor, check wiring!"));
- delay(2000);
- }
-
-
-
- matrix.setIntensity(3); // Use a value between 0 and 15 for brightness
- matrix.setRotation(matrix.getRotation()+0); //1 - 90 2 - 180 3 - 270
- //a=a+1;
- }
- void loop() {
- DateTime now = rtc.now();
- float temperature = bme280.readTemperature();
- float pressure = bme280.readPressure()/100.0F;
- float altitude = bme280.readAltitude(1013.2);
- float humidity = bme280.readHumidity();
- pressure = pressure + 78.5 ; //Relative pressure for 700m above sea level, comment this row for relative atmospheric pressure
- //======================================= correction digit time zero before the number
- chas ="";
- myn = "";
- if (now.hour() < 10) {
- chas = '0';
- }
-
- if (now.minute() < 10) {
- myn = ('0');
- }
-
- //=======================================
- tape = utf8rus((String)+daysOfTheWeek[now.dayOfTheWeek()]+" Time "+chas +now.hour()+":"+myn+now.minute()+" h Temperature = "+temperature +" degree C Humidity = " + humidity + " % Pressure = "+ pressure +" Hpa");
- if (Serial.available()){
- tape=Serial_Read();
- }
- for ( int i = 0 ; i < width * tape.length() + matrix.width() - 1 - spacer; i++ )
- {
- matrix.fillScreen(LOW);
-
- int letter = i / width; // number of symbols displayed on a matrix
-
- int y = (matrix.width() - 1) - i % width;
- int x = (matrix.height() - 8) / 2;
-
- while ( y + width - spacer >= 0 && letter >= 0 ) {
- if ( letter < tape.length() ) {
- matrix.drawChar(y, x, tape[letter], HIGH, LOW,1);
- }
- letter--;
- y -= width;
- }
- matrix.write(); // Send a picture for display
- delay(wait);
- }
- }
| 


 沪公网安备31011502402448
 置顶卡
置顶卡 变色卡
变色卡 千斤顶
千斤顶
 萌萌哒新人
萌萌哒新人
 活跃会员
活跃会员
 宣传大使
宣传大使
 牛X认证
牛X认证
 创作达人
创作达人
 ARD DAY
 摸鱼团员
摸鱼团员
 志“童”道合
 编辑选择奖
编辑选择奖


