主要就是用processing对获取的六轴数据进行可视化处理。
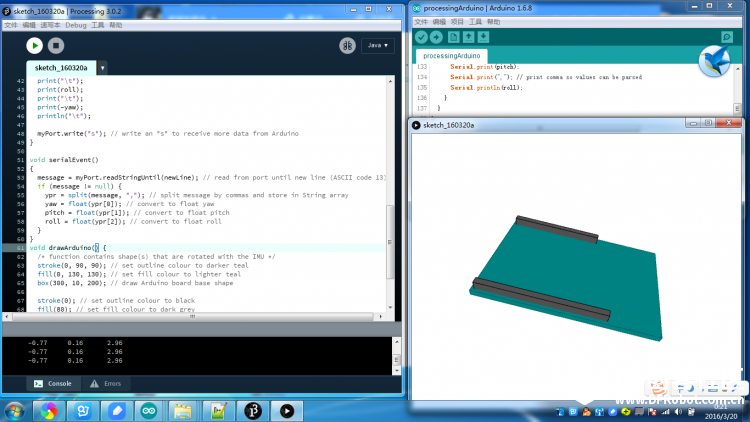
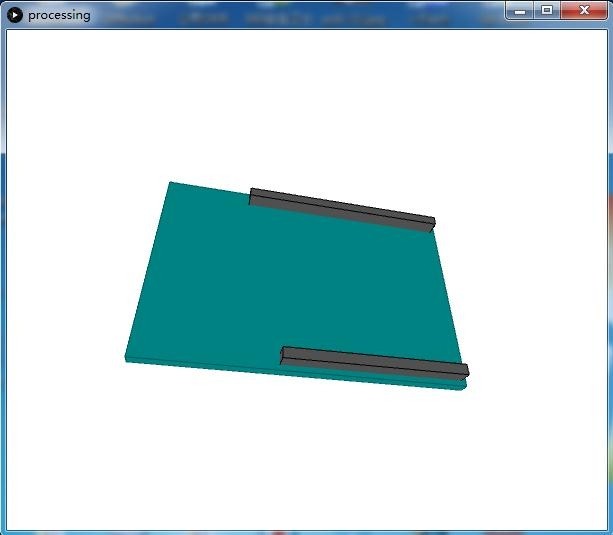
先看下效果:软件在电脑桌面虚拟化一个Arduino 101模型,当你转动手中的实体Arduino 101开发板的时候,桌面的模型也会跟着转动。(因为Yaw的数据没有电子罗盘的修正,模型会飘,这里注释掉对Yaw数据的读取会得到一个较好的体验,期待拿到DFRobot集成了电子罗盘的Inter Curie开发板)
【产品链接】: Arduino 101
操作步骤:
1.下载必要的软件,Processing (我下载的是Windows64位版本的)
下载地址:https://pan.baidu.com/s/1o6Taziy
官网下载地址(需翻墙):https://processing.org/
2.下载Arduino IDE 的代码到开发板,这里注释了对Yaw数据的获取:
- /*
- ===============================================
- Example sketch for CurieIMU library for Intel(R) Curie(TM) devices.
- Copyright (c) 2015 Intel Corporation. All rights reserved.
-
- Based on I2C device class (I2Cdev) demonstration Arduino sketch for MPU6050
- class by Jeff Rowberg: https://github.com/jrowberg/i2cdevlib
-
- ===============================================
- I2Cdev device library code is placed under the MIT license
- Copyright (c) 2011 Jeff Rowberg
-
- Permission is hereby granted, free of charge, to any person obtaining a copy
- of this software and associated documentation files (the "Software"), to deal
- in the Software without restriction, including without limitation the rights
- to use, copy, modify, merge, publish, distribute, sublicense, and/or sell
- copies of the Software, and to permit persons to whom the Software is
- furnished to do so, subject to the following conditions:
-
- The above copyright notice and this permission notice shall be included in
- all copies or substantial portions of the Software.
-
- THE SOFTWARE IS PROVIDED "AS IS", WITHOUT WARRANTY OF ANY KIND, EXPRESS OR
- IMPLIED, INCLUDING BUT NOT LIMITED TO THE WARRANTIES OF MERCHANTABILITY,
- FITNESS FOR A PARTICULAR PURPOSE AND NONINFRINGEMENT. IN NO EVENT SHALL THE
- AUTHORS OR COPYRIGHT HOLDERS BE LIABLE FOR ANY CLAIM, DAMAGES OR OTHER
- LIABILITY, WHETHER IN AN ACTION OF CONTRACT, TORT OR OTHERWISE, ARISING FROM,
- OUT OF OR IN CONNECTION WITH THE SOFTWARE OR THE USE OR OTHER DEALINGS IN
- THE SOFTWARE.
- ===============================================
-
- Genuino 101 CurieIMU Orientation Visualiser
- Hardware Required:
- * Arduino/Genuino 101
-
- Modified Nov 2015
- by Helena Bisby <support@arduino.cc>
- This example code is in the public domain
- https://arduino.cc/en/Tutorial/Genuino101CurieIMUOrientationVisualiser
- */
-
- #include <CurieIMU.h>
- #include <MadgwickAHRS.h>
-
- Madgwick filter; // initialise Madgwick object
- int ax, ay, az;
- int gx, gy, gz;
- float yaw = 0.0;
- float pitch;
- float roll;
- int factor = 800; // variable by which to divide gyroscope values, used to control sensitivity
- // note that an increased baud rate requires an increase in value of factor
-
- int calibrateOffsets = 1; // int to determine whether calibration takes place or not
-
-
- void setup() {
- // initialize Serial communication
- Serial.begin(9600);
-
- // initialize device
- CurieIMU.begin();
-
- if (calibrateOffsets == 1) {
- // use the code below to calibrate accel/gyro offset values
- Serial.println("Internal sensor offsets BEFORE calibration...");
- Serial.print(CurieIMU.getAccelerometerOffset(X_AXIS)); Serial.print("\t");
- Serial.print(CurieIMU.getAccelerometerOffset(Y_AXIS)); Serial.print("\t");
- Serial.print(CurieIMU.getAccelerometerOffset(Z_AXIS)); Serial.print("\t");
- Serial.print(CurieIMU.getGyroOffset(X_AXIS)); Serial.print("\t");
- Serial.print(CurieIMU.getGyroOffset(Y_AXIS)); Serial.print("\t");
- Serial.print(CurieIMU.getGyroOffset(Z_AXIS)); Serial.print("\t");
- Serial.println("");
-
- // To manually configure offset compensation values, use the following methods instead of the autoCalibrate...() methods below
- // CurieIMU.setGyroOffset(X_AXIS, 220);
- // CurieIMU.setGyroOffset(Y_AXIS, 76);
- // CurieIMU.setGyroOffset(Z_AXIS, -85);
- // CurieIMU.setAccelerometerOffset(X_AXIS, -76);
- // CurieIMU.setAccelerometerOffset(Y_AXIS, -235);
- // CurieIMU.setAccelerometerOffset(Z_AXIS, 168);
-
- //IMU device must be resting in a horizontal position for the following calibration procedure to work correctly!
-
- Serial.print("Starting Gyroscope calibration...");
- CurieIMU.autoCalibrateGyroOffset();
- Serial.println(" Done");
- Serial.print("Starting Acceleration calibration...");
- CurieIMU.autoCalibrateAccelerometerOffset(X_AXIS, 0);
- CurieIMU.autoCalibrateAccelerometerOffset(Y_AXIS, 0);
- CurieIMU.autoCalibrateAccelerometerOffset(Z_AXIS, 1);
- Serial.println(" Done");
-
- Serial.println("Internal sensor offsets AFTER calibration...");
- Serial.print(CurieIMU.getAccelerometerOffset(X_AXIS)); Serial.print("\t");
- Serial.print(CurieIMU.getAccelerometerOffset(Y_AXIS)); Serial.print("\t");
- Serial.print(CurieIMU.getAccelerometerOffset(Z_AXIS)); Serial.print("\t");
- Serial.print(CurieIMU.getAccelerometerOffset(X_AXIS)); Serial.print("\t");
- Serial.print(CurieIMU.getAccelerometerOffset(Y_AXIS)); Serial.print("\t");
- Serial.print(CurieIMU.getAccelerometerOffset(Z_AXIS)); Serial.print("\t");
- Serial.println("");
- }
- }
-
- void loop() {
- // read raw accel/gyro measurements from device
- CurieIMU.readMotionSensor(ax, ay, az, gx, gy, gz);
-
- // use function from MagdwickAHRS.h to return quaternions
- filter.updateIMU(gx / factor, gy / factor, gz / factor, ax, ay, az);
-
- // functions to find yaw roll and pitch from quaternions
- //yaw = filter.getYaw();
- roll = filter.getRoll();
- pitch = filter.getPitch();
-
- // print gyro and accel values for debugging only, comment out when running Processing
- /*
- Serial.print(ax); Serial.print("\t");
- Serial.print(ay); Serial.print("\t");
- Serial.print(az); Serial.print("\t");
- Serial.print(gx); Serial.print("\t");
- Serial.print(gy); Serial.print("\t");
- Serial.print(gz); Serial.print("\t");
- Serial.println("");
- */
-
- if (Serial.available() > 0) {
- int val = Serial.read();
- if (val == 's') { // if incoming serial is "s"
- Serial.print(yaw);
- Serial.print(","); // print comma so values can be parsed
- Serial.print(pitch);
- Serial.print(","); // print comma so values can be parsed
- Serial.println(roll);
- }
- }
- }
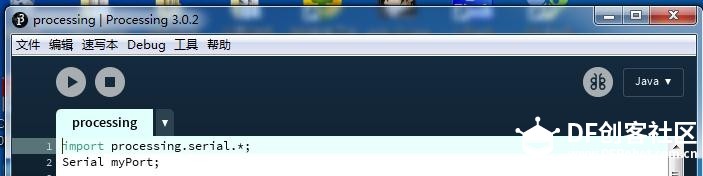
3.打开Processing软件:解压下载的Processing软件包,里面有个exe文件,双击运行,添加Processing程序:
- import processing.serial.*;
- Serial myPort;
-
- int newLine = 13; // new line character in ASCII
- float yaw;
- float pitch;
- float roll;
- String message;
- String [] ypr = new String [3];
-
- void setup()
- {
- size(600, 500, P3D);
-
- /*Set my serial port to same as Arduino, baud rate 9600*/
- myPort = new Serial(this, Serial.list()[0], 9600); // if you have only ONE COM port active
- //myPort = new Serial(this, "COM5", 9600); // if you know the 101 COM port
-
- textSize(16); // set text size
- textMode(SHAPE); // set text mode to shape
- }
-
- void draw()
- {
- serialEvent(); // read and parse incoming serial message
- background(255); // set background to white
-
- translate(width/2, height/2); // set position to centre
-
- pushMatrix(); // begin object
-
- rotateX(pitch); // RotateX pitch value
- rotateY(-yaw); // yaw
- rotateZ(-roll); // roll
-
- drawArduino(); // function to draw rough Arduino shape
-
- popMatrix(); // end of object
-
- // Print values to console
- print(pitch);
- print("\t");
- print(roll);
- print("\t");
- print(-yaw);
- println("\t");
-
- myPort.write("s"); // write an "s" to receive more data from Arduino
- }
-
- void serialEvent()
- {
- message = myPort.readStringUntil(newLine); // read from port until new line (ASCII code 13)
- if (message != null) {
- ypr = split(message, ","); // split message by commas and store in String array
- yaw = float(ypr[0]); // convert to float yaw
- pitch = float(ypr[1]); // convert to float pitch
- roll = float(ypr[2]); // convert to float roll
- }
- }
- void drawArduino() {
- /* function contains shape(s) that are rotated with the IMU */
- stroke(0, 90, 90); // set outline colour to darker teal
- fill(0, 130, 130); // set fill colour to lighter teal
- box(300, 10, 200); // draw Arduino board base shape
-
- stroke(0); // set outline colour to black
- fill(80); // set fill colour to dark grey
-
- translate(60, -10, 90); // set position to edge of Arduino box
- box(170, 20, 10); // draw pin header as box
-
- translate(-20, 0, -180); // set position to other edge of Arduino box
- box(210, 20, 10); // draw other pin header as box
- }
4.保持数据线与101开发板的连接,打开软件左上角的三角形按钮,稍等片刻,模型就出来了,后面就可以自己转着玩了。
OK,操作完毕,很简单吧,试试看!
我再来转一会玩玩 : :
看累了没,开心一刻:
一大学生被敌人抓了,敌人把他绑在了电线杆上,然后问他:说,你是哪里的?不说就电死你!大学生回了敌人一句话,结果被电死了,他说:我是电大的!
【Arduino/Genuino 101 入门教程】
* DF创客社区版权所有,欢迎转载。
转载请务必标注来源: DF创客社区+作者姓名+原文网址。
|
|


 沪公网安备31011502402448
 置顶卡
置顶卡 变色卡
变色卡 千斤顶
千斤顶


