|
|
[MP动手做] MicroPython动手做(13)——掌控板之RGB三色灯 |
|
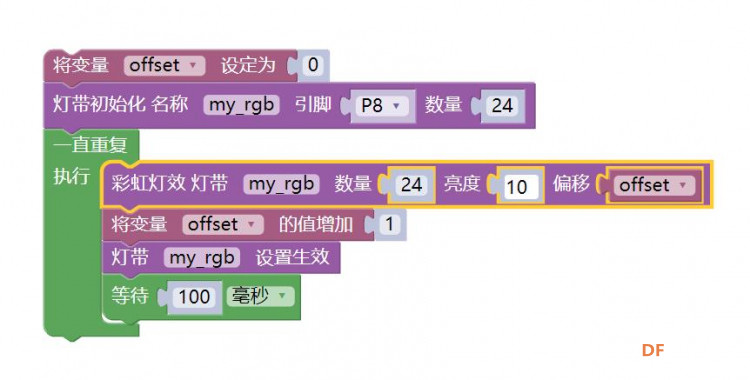
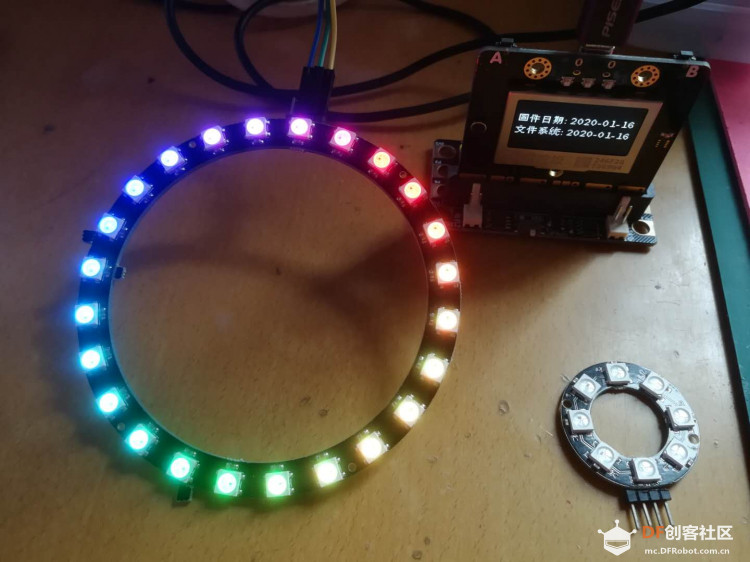
9、24位流动RGB彩虹灯环 [mw_shl_code=applescript,false]#MicroPython动手做(13)——掌控板之RGB三色灯 #24位流动RGB彩虹灯环 from mpython import * import neopixel import time my_rgb = neopixel.NeoPixel(Pin(Pin.P8), n=24, bpp=3, timing=1) def make_rainbow(_neopixel, _num, _bright, _offset): _rgb = ((255,0,0), (255,127,0), (255,255,0), (0,255,0), (0,255,255), (0,0,255), (136,0,255), (255,0,0)) for i in range(_num): t = 7 * i / _num t0 = int(t) r = round((_rgb[t0][0] + (t-t0)*(_rgb[t0+1][0]-_rgb[t0][0]))*_bright)>>8 g = round((_rgb[t0][1] + (t-t0)*(_rgb[t0+1][1]-_rgb[t0][1]))*_bright)>>8 b = round((_rgb[t0][2] + (t-t0)*(_rgb[t0+1][2]-_rgb[t0][2]))*_bright)>>8 _neopixel[(i + _offset) % _num] = (r, g, b) offset = 0 while True: make_rainbow(my_rgb, 24, 10, offset) offset = offset + 1 my_rgb.write() time.sleep_ms(100)[/mw_shl_code] |
|
10、neopixel --- WS2812 灯(环)带 NeoPixels也被称为WS2812 LED彩带(环),是连接在一起的全彩色led灯串。你可以设置他它们的红色,绿色和蓝色值, 在0到255之间。neopixel模块可通过精确的时间控制,生成WS2812控制信号。 构建对象 class NeoPixel(pin, n, bpp=3, timing=0, brightness=1.0) pin :输出引脚,可使用引脚见下文 n :LED灯的个数 bpp: 3:默认为3元组RGB 4:对于具有3种以上颜色的LED,例如RGBW像素或RGBY像素,采用4元组RGBY或RGBY像素 timing:默认等于0,为400KHz速率;等于1,为800KHz速率 brightness:亮度调节,范围0~1,默认为1.0 注意 NeoPixel可使用的pin引脚有掌控板的P5,P6,P7(板上RGB),P8,P9,P11,P13,P14,P15,P16,P19,P20,--实验接在P8 方法 NeoPixel.write(), 把数据写入LED中。 示例: np[0] = (255, 255, 255) # 设置第一个LED像素为白色 np.write() NeoPixel.fill(rgb_buf) 填充所有LED像素。 rgb_buf :rgb 颜色 示例: np.fill( (255, 255, 255) ) NeoPixel.brightness(brightness) 亮度调节,范围0~1.0 |
|
11、24位弹跳RGB彩虹灯环程序之二 [mw_shl_code=applescript,false]#MicroPython动手做(13)——掌控板之RGB三色灯 #24位弹跳RGB彩虹灯环程序之二 from mpython import * import neopixel np = neopixel.NeoPixel(Pin(Pin.P8), n=24,bpp=3,timing=1) def wheel(pos): # 通过改变在0和255之间的每个颜色参数产生彩虹色光谱 # Input a value 0 to 255 to get a color value. # The colours are a transition r - g - b - back to r. if pos < 0 or pos > 255: r = g = b = 0 elif pos < 85: r = int(pos * 3) g = int(255 - pos*3) b = 0 elif pos < 170: pos -= 85 r = int(255 - pos*3) g = 0 b = int(pos*3) else: pos -= 170 r = 0 g = int(pos*3) b = int(255 - pos*3) return (r, g, b) def cycle(np,r,g,b,wait=20): # 循环效果,有一个像素在所有灯带位置上运行,而其他像素关闭。 for i in range(4 * np.n): for j in range(np.n): np[j] = (0, 0, 0) np[i % np.n] = (r, g, b) np.write() sleep_ms(wait) def bounce(np,r,g,b,wait=20): # 弹跳效果,等待时间决定了弹跳效果的速度 n=np.n for i in range(4 * n): for j in range(n): np[j] = (r, g, b) if (i // n) % 2 == 0: np[i % n] = (0, 0, 0) else: np[n - 1 - (i % n)] = (0, 0, 0) np.write() sleep_ms(wait) def rainbow_cycle(np,wait_us): # 彩虹效果 n=np.n for j in range(255): for i in range(n): pixel_index = (i * 256 // n) + j np = wheel(pixel_index & 255) np.write() sleep_us(wait_us) while True: cycle(np,50,50,50,wait=20) bounce(np,50,0,0,wait=20) rainbow_cycle(np,20)[/mw_shl_code] |
|
外部RGB 外部RGB灯带灯环控制类指令 class NeoPixel(pin, n, bpp=3, timing=0) 描述: 构建对象  参数: pin - 输出引脚 n - LED灯的个数 bpp - bpp=3,默认为3元组RGB;bpp=4,对于具有3种以上颜色的LED,例如RGBW像素或RGBY像素,采用4元组RGBY或RGBY像素 timing - 默认等于0,为400KHz速率;等于1,为800KHz速率 NeoPixel.write() 描述: 把数据写入RGB灯珠中 NeoPixel.fill( (r, g, b) ) 描述: 填充所有灯珠颜色及亮度, r、g、b 为颜色亮度值,范围值为0~255 |
|
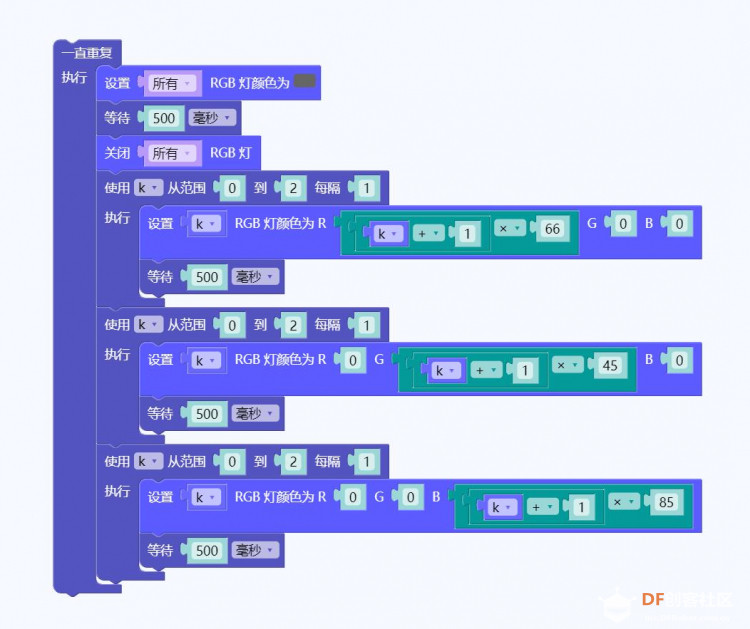
13、依次点亮更亮的流水灯 #MicroPython动手做(13)——掌控板之RGB三色灯 #依次点亮更亮的流水灯 [mw_shl_code=applescript,false]#MicroPython动手做(13)——掌控板之RGB三色灯 #依次点亮更亮的流水灯 from mpython import * import time while True: rgb.fill((int(102), int(102), int(102))) rgb.write() time.sleep_ms(1) time.sleep_ms(500) rgb.fill( (0, 0, 0) ) rgb.write() time.sleep_ms(1) for k in range(3): rgb[k] = (int(((k + 1) * 66)), int(0), int(0)) rgb.write() time.sleep_ms(1) time.sleep_ms(500) for k in range(3): rgb[k] = (int(0), int(((k + 1) * 45)), int(0)) rgb.write() time.sleep_ms(1) time.sleep_ms(500) for k in range(3): rgb[k] = (int(0), int(0), int(((k + 1) * 85))) rgb.write() time.sleep_ms(1) time.sleep_ms(500)[/mw_shl_code] |
|
14、P24灯环4色流水钟摆灯 #MicroPython动手做(13)——掌控板之RGB三色灯 #P24灯环4色流水钟摆灯 [mw_shl_code=python,false]#MicroPython动手做(13)——掌控板之RGB三色灯 #P24灯环4色流水钟摆灯 from mpython import * import neopixel import time my_rgb = neopixel.NeoPixel(Pin(Pin.P8), n=24, bpp=3, timing=1) while True: for i in range(23, -1, -1): my_rgb = (30, 30, 30) my_rgb.write() time.sleep_ms(30) my_rgb.fill( (0, 0, 0) ) my_rgb.write() for i in range(24): my_rgb = (0, 30, 0) my_rgb.write() time.sleep_ms(30) my_rgb.fill( (0, 0, 0) ) my_rgb.write() for i in range(23, -1, -1): my_rgb = (50, 0, 0) my_rgb.write() time.sleep_ms(30) my_rgb.fill( (0, 0, 0) ) my_rgb.write() for i in range(24): my_rgb = (0, 0, 180) my_rgb.write() time.sleep_ms(30) my_rgb.fill( (0, 0, 0) ) my_rgb.write()[/mw_shl_code] |
|
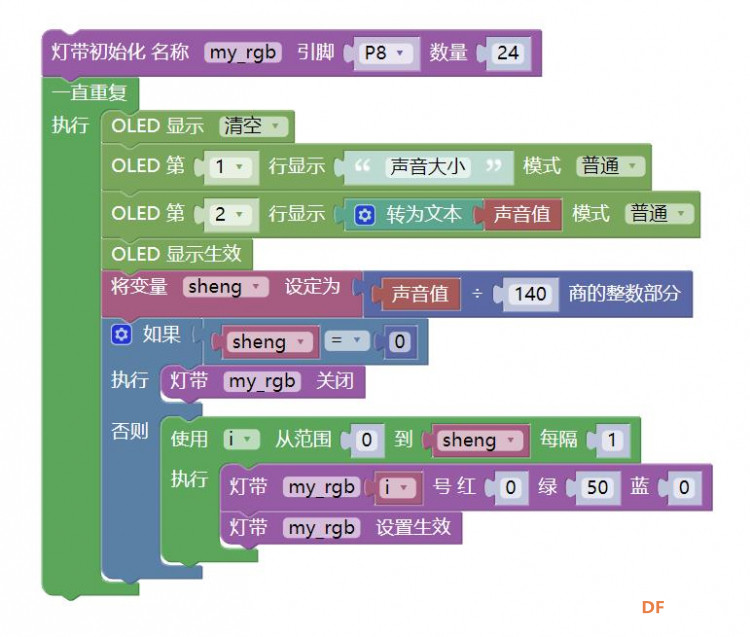
15、声控RGB灯环 通过声音传感器检测到音乐声音的大小,并将其转换为亮灯的数量。 [mw_shl_code=applescript,false]#MicroPython动手做(13)——掌控板之RGB三色灯 #声控RGB灯环 from mpython import * import neopixel my_rgb = neopixel.NeoPixel(Pin(Pin.P8), n=24, bpp=3, timing=1) def upRange(start, stop, step): while start <= stop: yield start start += abs(step) def downRange(start, stop, step): while start >= stop: yield start start -= abs(step) while True: oled.fill(0) oled.DispChar("声音大小", 0, 0, 1) oled.DispChar((str(sound.read())), 0, 16, 1) oled.show() sheng = sound.read() // 140 if sheng == 0: my_rgb.fill( (0, 0, 0) ) my_rgb.write() else: for i in (0 <= int(sheng)) and upRange(0, int(sheng), 1) or downRange(0, int(sheng), 1): my_rgb = (0, 50, 0) my_rgb.write()[/mw_shl_code] |


 沪公网安备31011502402448
© 2013-2026 Comsenz Inc. Powered by Discuz! X3.4 Licensed


 萌萌哒新人
萌萌哒新人
 活跃会员
活跃会员
 宣传大使
宣传大使
 牛X认证
牛X认证
 创作达人
创作达人
 ARD DAY
 摸鱼团员
摸鱼团员
 志“童”道合
 编辑选择奖
编辑选择奖


