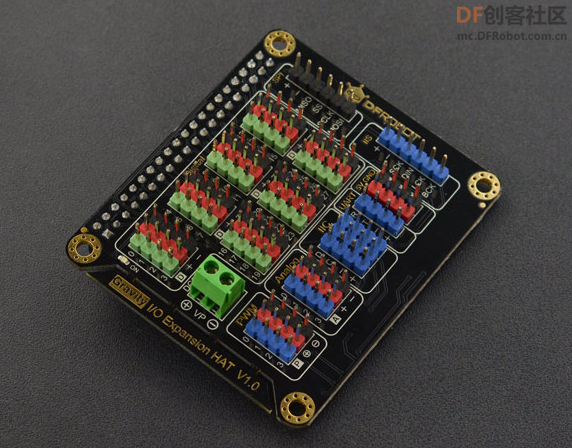
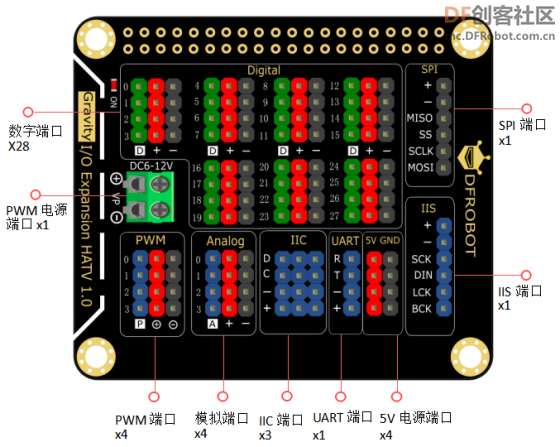
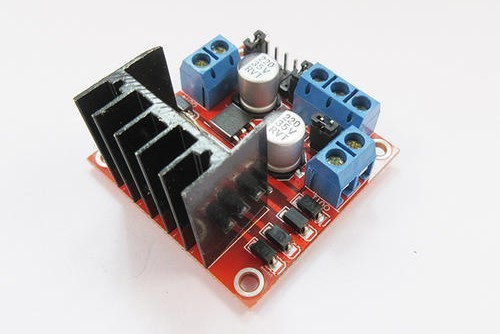
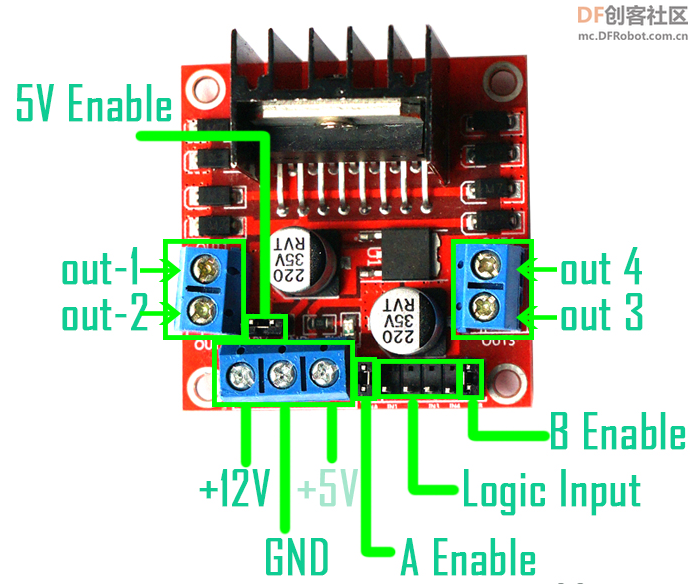
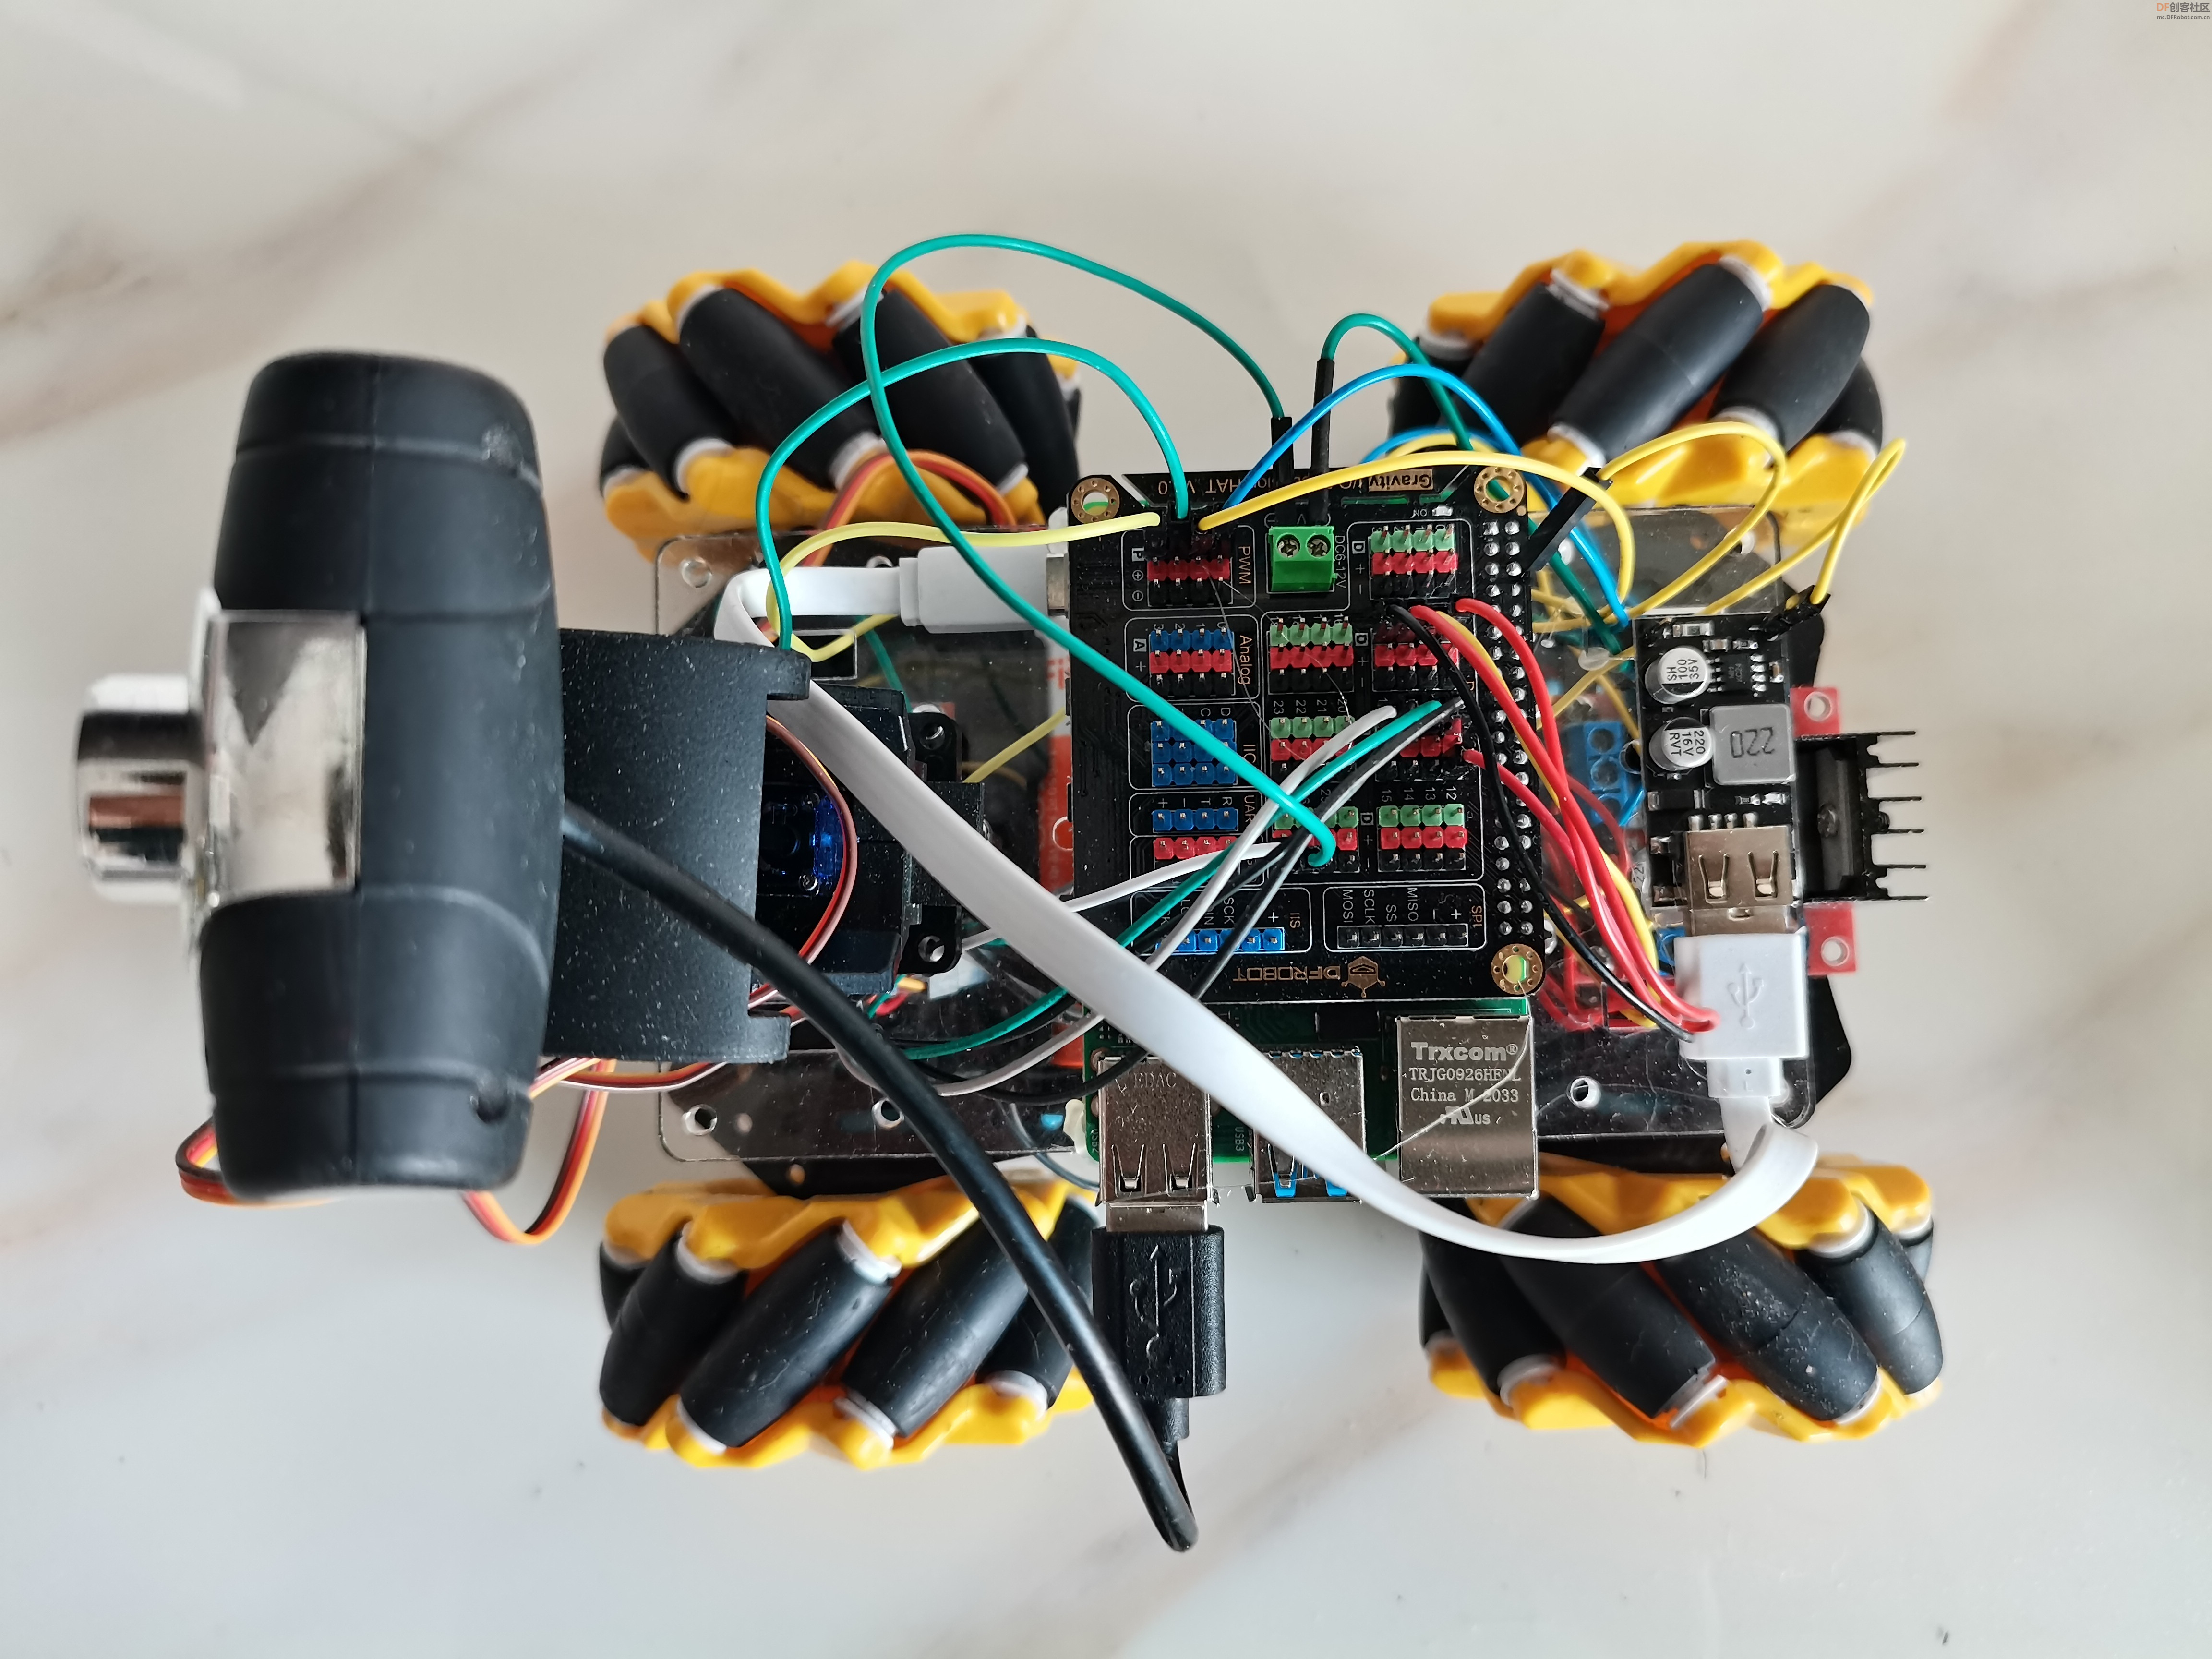
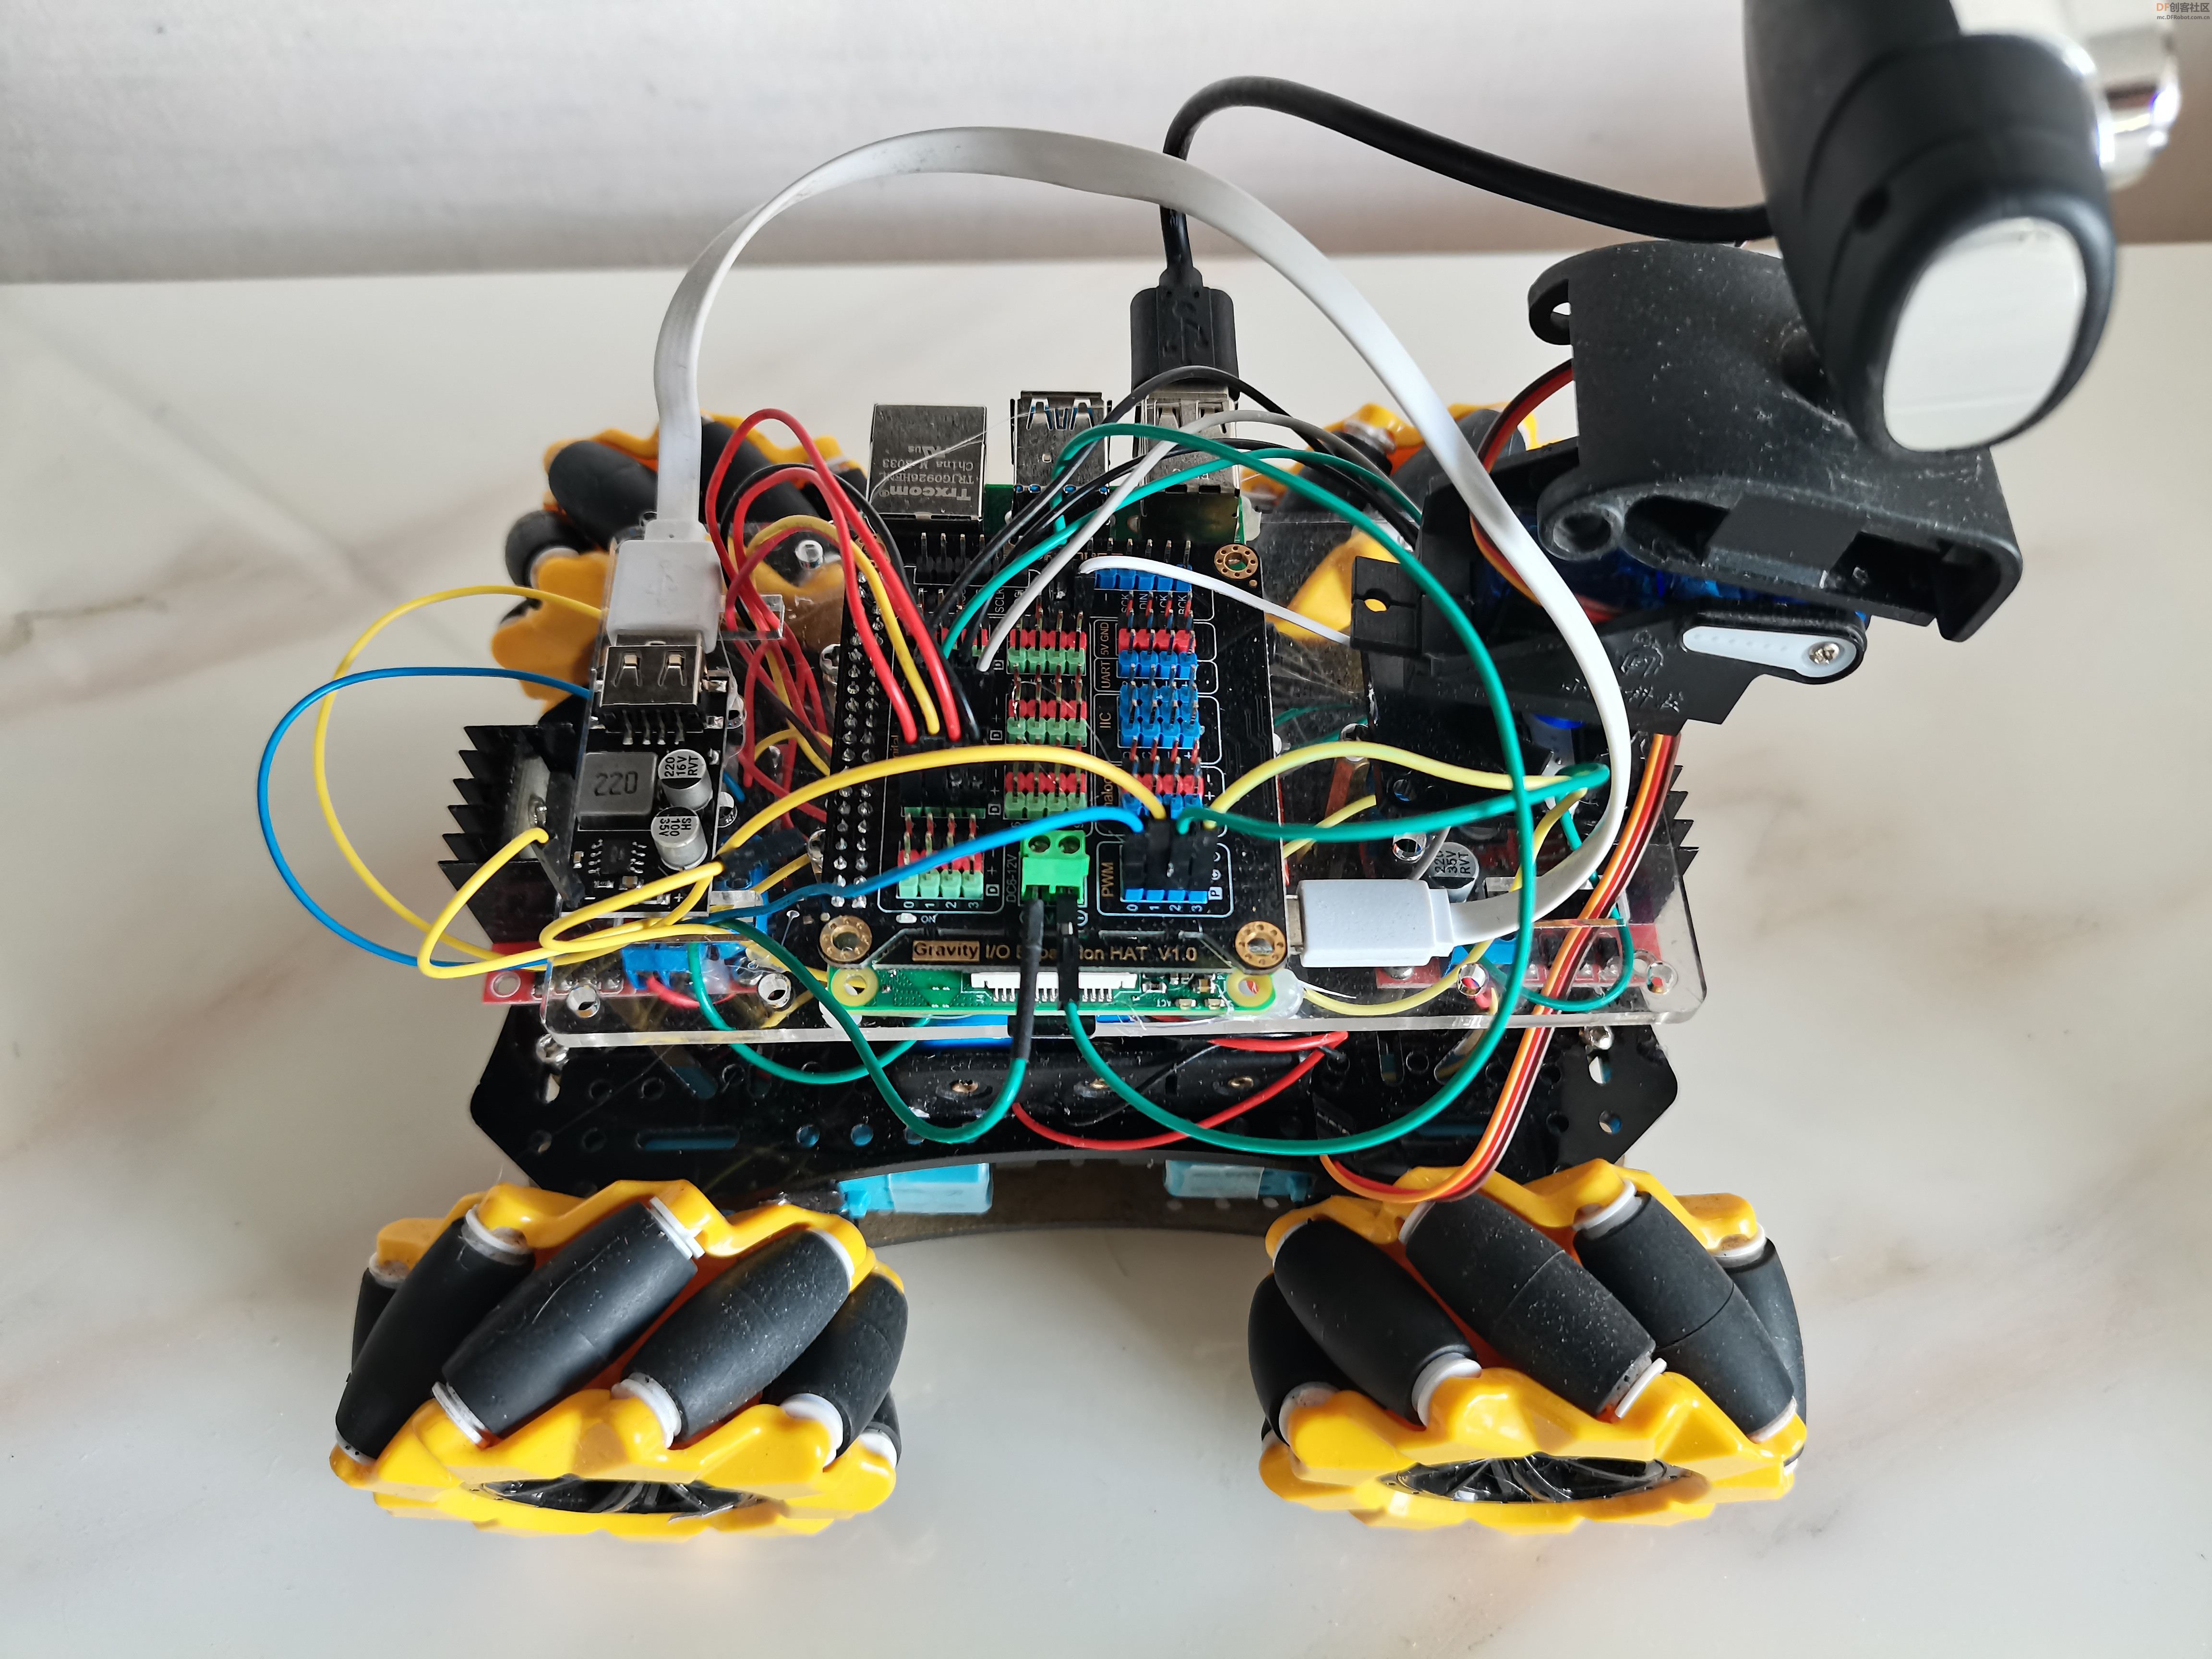
【PWM端口 PWM端口:IO扩展板提供了四组PWM端口,连接到STM32的PWM端,树莓派通过I2C通讯将数据发送给STM32实现控制。 BOARD.py
# -*- coding:utf-8 -*-

'''!
  @file DFRobot_RaspberryPi_Expansion_Board.py
  @brief This RaspberryPi expansion board can communicate with RaspberryPi via I2C. It has 10 GPIOs, 1 SPI, 4 I2Cs and 1 uart.
  @copyright   Copyright (c) 2010 DFRobot Co.Ltd (http://www.dfrobot.com)
  @license     The MIT License (MIT)
  @author      Frank(jiehan.guo@dfrobot.com)
  @version     V1.0
  @date        2019-3-28
  @url https://github.com/DFRobot/DFRobot_RaspberryPi_Expansion_Board
'''

import time

_PWM_CHAN_COUNT = 4
_ADC_CHAN_COUNT = 4

class DFRobot_Expansion_Board:

  _REG_SLAVE_ADDR = 0x00
  _REG_PID = 0x01
  _REG_VID = 0x02
  _REG_PWM_CONTROL = 0x03
  _REG_PWM_FREQ = 0x04
  _REG_PWM_DUTY1 = 0x06
  _REG_PWM_DUTY2 = 0x08
  _REG_PWM_DUTY3 = 0x0a
  _REG_PWM_DUTY4 = 0x0c
  _REG_ADC_CTRL = 0x0e
  _REG_ADC_VAL1 = 0x0f
  _REG_ADC_VAL2 = 0x11
  _REG_ADC_VAL3 = 0x13
  _REG_ADC_VAL4 = 0x15

  _REG_DEF_PID = 0xdf
  _REG_DEF_VID = 0x10

  ''' Enum board Analog channels '''
  A0 = 0x00
  A1 = 0x01
  A2 = 0x02
  A3 = 0x03

  ''' Board status '''
  STA_OK = 0x00
  STA_ERR = 0x01
  STA_ERR_DEVICE_NOT_DETECTED = 0x02
  STA_ERR_SOFT_VERSION = 0x03
  STA_ERR_PARAMETER = 0x04

  ''' last operate status, users can use this variable to determine the result of a function call. '''
  last_operate_status = STA_OK

  ''' Global variables '''
  ALL = 0xffffffff

  def _write_bytes(self, reg, buf):
    pass

  def _read_bytes(self, reg, len):
    pass

  def __init__(self, addr):
    self._addr = addr
    self._is_pwm_enable = False

  def begin(self):
    '''
      @brief    Board begin
      @return   Board status
    '''
    pid = self._read_bytes(self._REG_PID, 1)
    vid = self._read_bytes(self._REG_VID, 1)
    if self.last_operate_status == self.STA_OK:
      if pid[0] != self._REG_DEF_PID:
        self.last_operate_status = self.STA_ERR_DEVICE_NOT_DETECTED
      elif vid[0] != self._REG_DEF_VID:
        self.last_operate_status = self.STA_ERR_SOFT_VERSION
      else:
        self.set_pwm_disable()
        self.set_pwm_duty(self.ALL, 0)
        self.set_adc_disable()
    return self.last_operate_status

  def set_addr(self, addr):
    '''
      @brief    Set board controler address, reboot module to make it effective
      @param address: int    Address to set, range in 1 to 127
    '''
    if addr < 1 or addr > 127:
      self.last_operate_status = self.STA_ERR_PARAMETER
      return
    self._write_bytes(self._REG_SLAVE_ADDR, [addr])

  def _parse_id(self, limit, id):
    ld = []
    if isinstance(id, list) == False:
      id = id + 1
      ld.append(id)
    else:
      ld = [i + 1 for i in id]
    if ld == self.ALL:
      return range(1, limit + 1)
    for i in ld:
      if i < 1 or i > limit:
        self.last_operate_status = self.STA_ERR_PARAMETER
        return []
    return ld

  def set_pwm_enable(self):
    '''
      @brief    Set pwm enable, pwm channel need external power
    '''
    self._write_bytes(self._REG_PWM_CONTROL, [0x01])
    if self.last_operate_status == self.STA_OK:
      self._is_pwm_enable = True
    time.sleep(0.01)

  def set_pwm_disable(self):
    '''
      @brief    Set pwm disable
    '''
    self._write_bytes(self._REG_PWM_CONTROL, [0x00])
    if self.last_operate_status == self.STA_OK:
      self._is_pwm_enable = False
    time.sleep(0.01)

  def set_pwm_frequency(self, freq):
    '''
      @brief    Set pwm frequency
      @param freq: int    Frequency to set, in range 1 - 1000
    '''
    if freq < 1 or freq > 1000:
      self.last_operate_status = self.STA_ERR_PARAMETER
      return
    is_pwm_enable = self._is_pwm_enable
    self.set_pwm_disable()
    self._write_bytes(self._REG_PWM_FREQ, [freq >> 8, freq & 0xff])
    time.sleep(0.01)
    if is_pwm_enable:
      self.set_pwm_enable()

  def set_pwm_duty(self, chan, duty):
    '''
      @brief    Set selected channel duty
      @param chan: list     One or more channels to set, items in range 1 to 4, or chan = self.ALL
      @param duty: float    Duty to set, in range 0.0 to 100.0
    '''
    if duty < 0 or duty > 100:
      self.last_operate_status = self.STA_ERR_PARAMETER
      return
    for i in self._parse_id(_PWM_CHAN_COUNT, chan):
      self._write_bytes(self._REG_PWM_DUTY1 + (i - 1) * 2, [int(duty), int((duty * 10) % 10)])

  def set_adc_enable(self):
    '''
      @brief    Set adc enable
    '''
    self._write_bytes(self._REG_ADC_CTRL, [0x01])

  def set_adc_disable(self):
    '''
      @brief    Set adc disable
    '''
    self._write_bytes(self._REG_ADC_CTRL, [0x00])

  def get_adc_value(self, chan):
    '''
      @brief    Get adc value
      @param chan: int    Channel to get, in range 1 to 4, or self.ALL
      @return :list       List of value
    '''
    for i in self._parse_id(_ADC_CHAN_COUNT, chan):
      rslt = self._read_bytes(self._REG_ADC_VAL1 + (i - 1) * 2, 2)
    return ((rslt[0] << 8) | rslt[1])

  def detecte(self):
    '''
      @brief    If you forget address you had set, use this to detecte them, must have class instance
      @return   Board list conformed
    '''
    l = []
    back = self._addr
    for i in range(1, 127):
      self._addr = i
      if self.begin() == self.STA_OK:
        l.append(i)
    for i in range(0, len(l)):
      l[i] = hex(l[i])
    self._addr = back
    self.last_operate_status = self.STA_OK
    return l

class DFRobot_Epansion_Board_Digital_RGB_LED():

  def __init__(self, board):
    '''
      @param board: DFRobot_Expansion_Board   Board instance to operate digital rgb led, test LED: https://www.dfrobot.com/product-1829.html
                                              Warning: LED must connect to pwm channel, otherwise may destory Pi IO
    '''
    self._board = board
    self._chan_r = 0
    self._chan_g = 0
    self._chan_b = 0

  def begin(self, chan_r, chan_g, chan_b):
    '''
      @brief    Set digital rgb led color channel, these parameters not repeat
      @param chan_r: int    Set color red channel id, in range 1 to 4
      @param chan_g: int    Set color green channel id, in range 1 to 4
      @param chan_b: int    Set color blue channel id, in range 1 to 4
    '''
    if chan_r == chan_g or chan_r == chan_b or chan_g == chan_b:
      return
    if chan_r < _PWM_CHAN_COUNT and chan_g < _PWM_CHAN_COUNT and chan_b < _PWM_CHAN_COUNT:
      self._chan_r = chan_r
      self._chan_g = chan_g
      self._chan_b = chan_b
      self._board.set_pwm_enable()
      self._board.set_pwm_frequency(1000)
      self._board.set_pwm_duty(self._board.ALL, 100)

  def color888(self, r, g, b):
    '''
      @brief    Set LED to true-color
      @param r: int   Color components red
      @param g: int   Color components green
      @param b: int   Color components blue
    '''
    self._board.set_pwm_duty([self._chan_r], 100 - (r & 0xff) * 100 // 255)
    self._board.set_pwm_duty([self._chan_g], 100 - (g & 0xff) * 100 // 255)
    self._board.set_pwm_duty([self._chan_b], 100 - (b & 0xff) * 100 // 255)

  def color24(self, color):
    '''
      @brief    Set LED to 24-bits color
      @param color: int   24-bits color
    '''
    color &= 0xffffff
    self.color888(color >> 16, (color >> 8) & 0xff, color & 0xff)

  def color565(self, color):
    '''
      @brief    Set LED to 16-bits color
      @param color: int   16-bits color
    '''
    color &= 0xffff
    self.color888((color & 0xf800) >> 8, (color & 0x7e0) >> 3, (color & 0x1f) << 3)

class DFRobot_Expansion_Board_Servo():

  def __init__(self, board):
    '''
      @param board: DFRobot_Expansion_Board   Board instance to operate servo, test servo: https://www.dfrobot.com/product-255.html
                                              Warning: servo must connect to pwm channel, otherwise may destory Pi IO
    '''
    self._board = board

  def begin(self):
    '''
      @brief    Board servo begin
    '''
    self._board.set_pwm_enable()
    self._board.set_pwm_frequency(50)
    self._board.set_pwm_duty(self._board.ALL, 0)

  def move(self, id, angle):
    '''
      @brief    Servos move
      @param id: list     One or more servos to set, items in range 1 to 4, or chan = self.ALL
      @param angle: int   Angle to move, in range 0 to 180
    '''
    if 0 <= angle <= 180:
      self._board.set_pwm_duty(id, (0.5 + (float(angle) / 90.0)) / 20 * 100)

import smbus

class DFRobot_Expansion_Board_IIC(DFRobot_Expansion_Board):

  def __init__(self, bus_id, addr):
    '''
      @param bus_id: int   Which bus to operate
      @oaram addr: int     Board controler address
    '''
    self._bus = smbus.SMBus(bus_id)
    DFRobot_Expansion_Board.__init__(self, addr)

  def _write_bytes(self, reg, buf):
    self.last_operate_status = self.STA_ERR_DEVICE_NOT_DETECTED
    try:
      self._bus.write_i2c_block_data(self._addr, reg, buf)
      self.last_operate_status = self.STA_OK
    except:
      pass

  def _read_bytes(self, reg, len):
    self.last_operate_status = self.STA_ERR_DEVICE_NOT_DETECTED
    try:
      rslt = self._bus.read_i2c_block_data(self._addr, reg, len)
      self.last_operate_status = self.STA_OK
      return rslt
    except:
      return [0] * len

复制代码
import time
import RPi.GPIO as GPIO
GPIO.setmode(GPIO.BCM)
GPIO.setup(4,GPIO.OUT)
GPIO.setup(5,GPIO.OUT)
GPIO.setup(6,GPIO.OUT)
GPIO.setup(7,GPIO.OUT)
GPIO.setup(8,GPIO.OUT)
GPIO.setup(9,GPIO.OUT)
GPIO.setup(10,GPIO.OUT)
GPIO.setup(11,GPIO.OUT)
from BOARD import DFRobot_Expansion_Board_IIC as Board
board = Board(1, 0x10) # Select i2c bus 1, set address to 0x10
def board_detect():
l = board.detecte()
print("Board list conform:")
print(l)
''' print last operate status, users can use this variable to determine the result of a function call. '''
def print_board_status():
if board.last_operate_status == board.STA_OK:
print("board status: everything ok")
elif board.last_operate_status == board.STA_ERR:
print("board status: unexpected error")
elif board.last_operate_status == board.STA_ERR_DEVICE_NOT_DETECTED:
print("board status: device not detected")
elif board.last_operate_status == board.STA_ERR_PARAMETER:
print("board status: parameter error")
elif board.last_operate_status == board.STA_ERR_SOFT_VERSION:
print("board status: unsupport board framware version")
if __name__ == "__main__":
board_detect() # If you forget address you had set, use this to detected them, must have class instance
# Set board controler address, use it carefully, reboot module to make it effective
while board.begin() != board.STA_OK: # Board begin and check board status
print_board_status()
print("board begin faild")
time.sleep(2)
print("board begin success")
board.set_pwm_enable() # Pwm channel need external power
# board.set_pwm_disable()
board.set_pwm_frequency(1000) # Set frequency to 1000HZ, Attention: PWM voltage depends on independent power supply
print("set part pwm channels duty to 60%")
board.set_pwm_duty(3, 60) # Set pwm0 channels duty
#board.set_pwm_duty(1, 70) # Set pwm1 channels duty
#board.set_pwm_duty(2, 80) # Set pwm2 channels duty
#board.set_pwm_duty(3, 90) # Set pwm3 channels duty
GPIO.output(8,GPIO.HIGH)#left 1()
GPIO.output(9,GPIO.LOW)
GPIO.output(6,GPIO.HIGH)#left 2(1)
GPIO.output(7,GPIO.LOW)
GPIO.output(10,GPIO.HIGH)#right 1(2)
GPIO.output(11,GPIO.LOW)
GPIO.output(4,GPIO.HIGH)#right 2(0)
GPIO.output(5,GPIO.LOW)
time.sleep(1)
GPIO.cleanup()
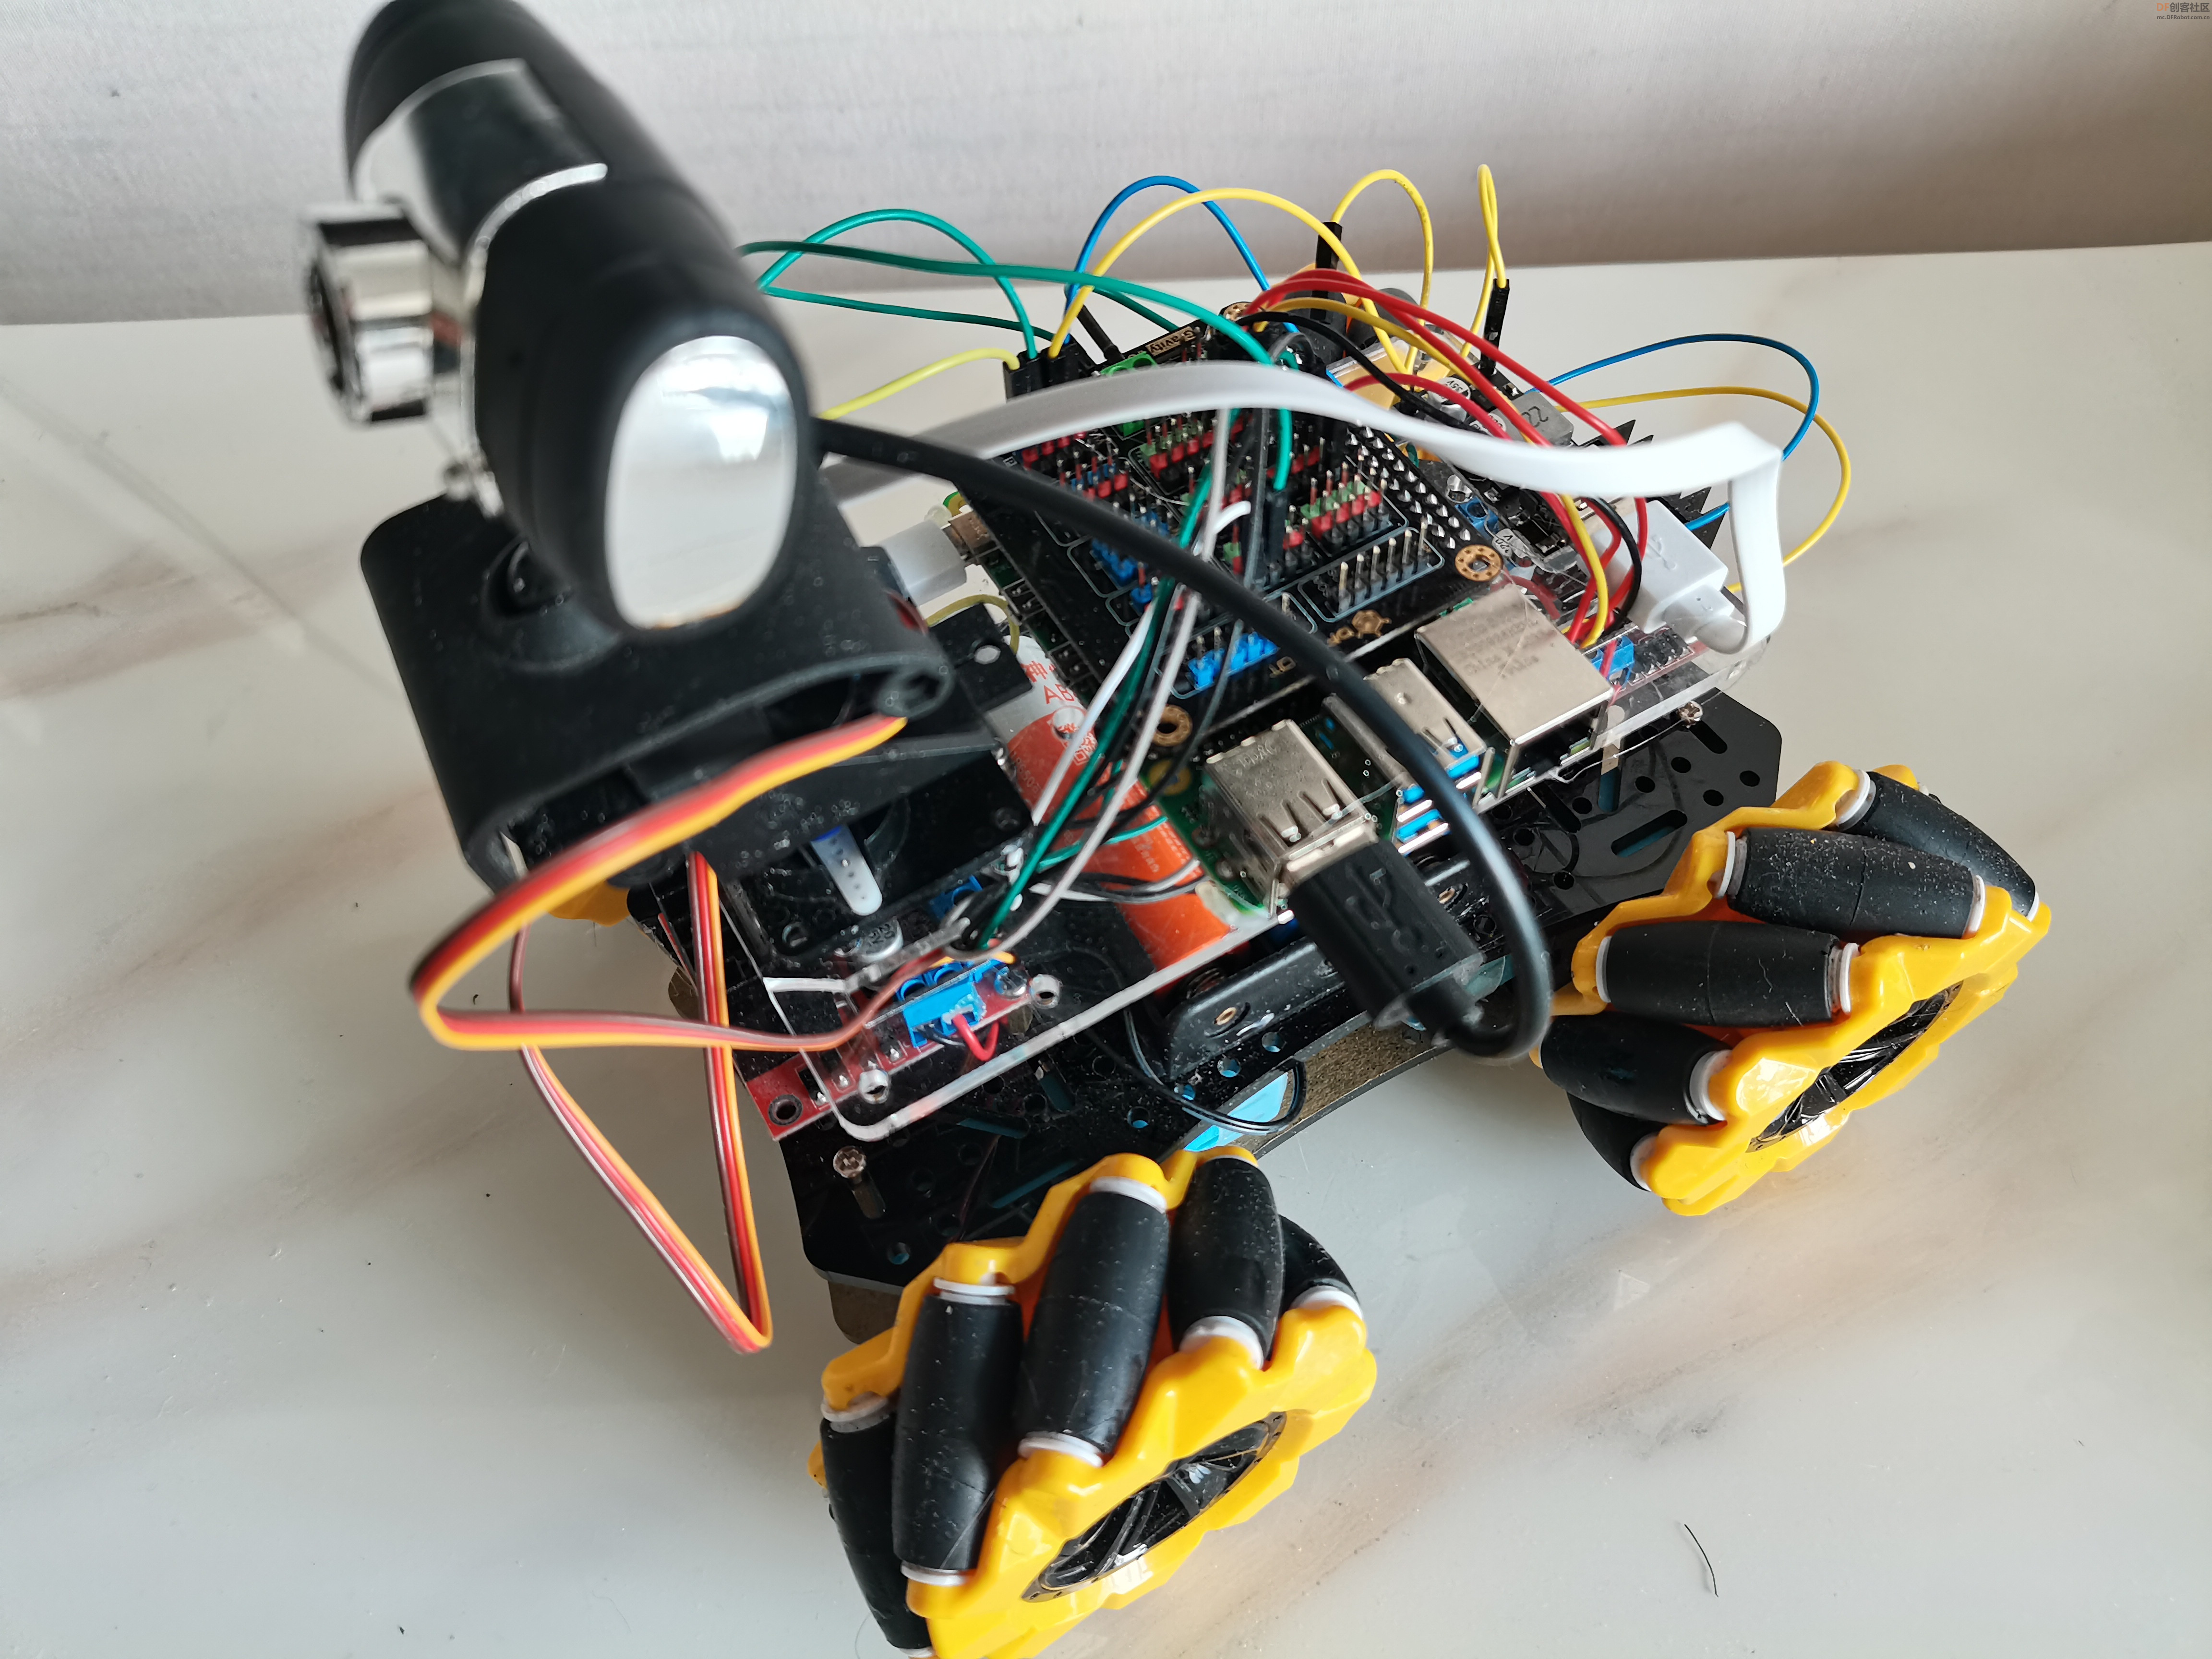
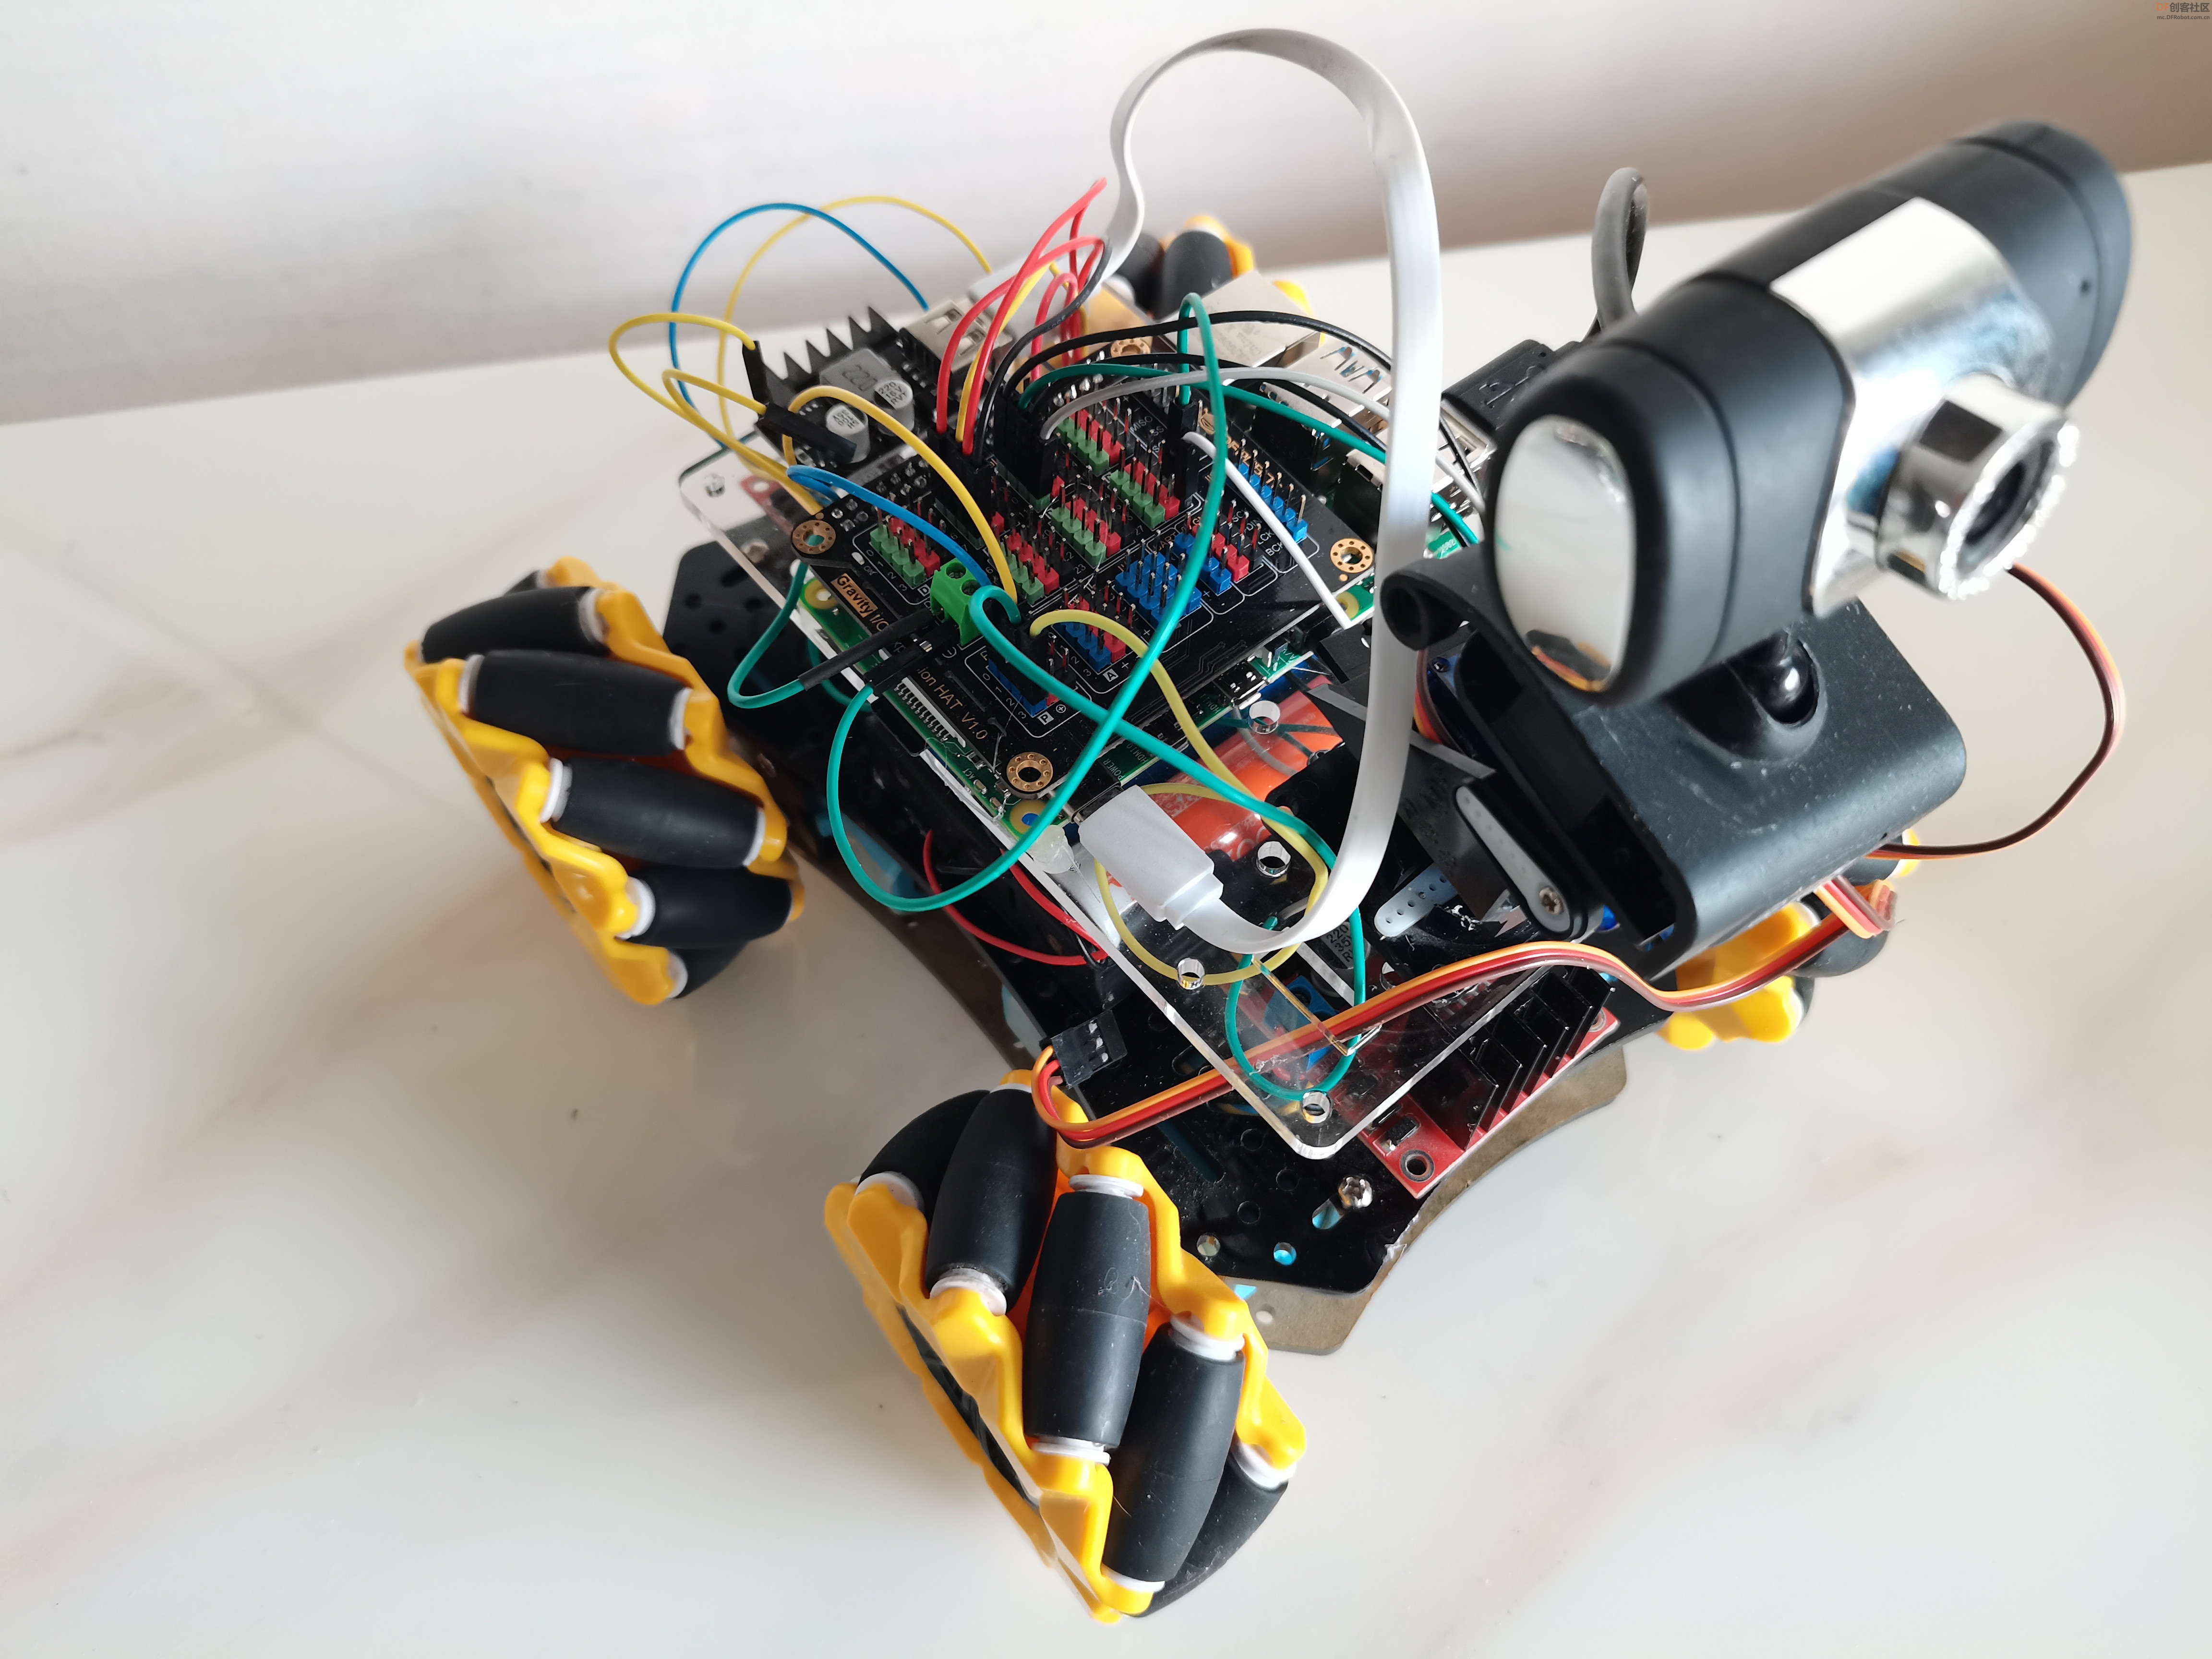
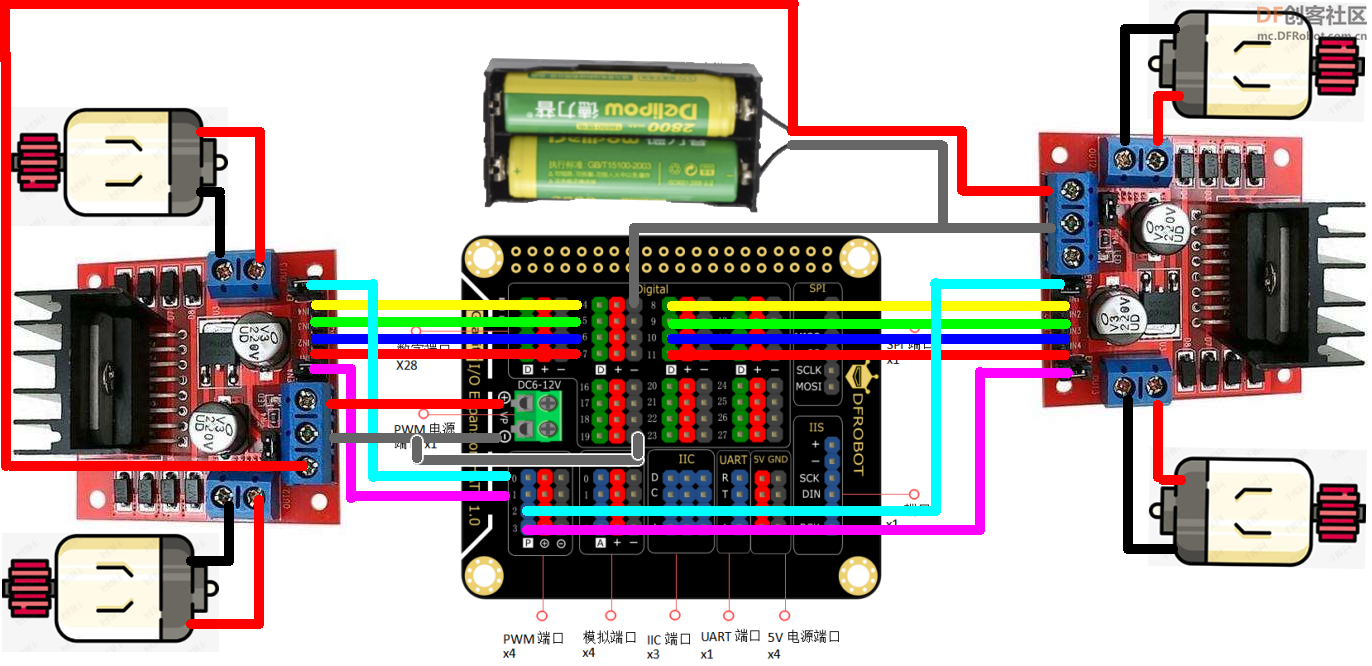
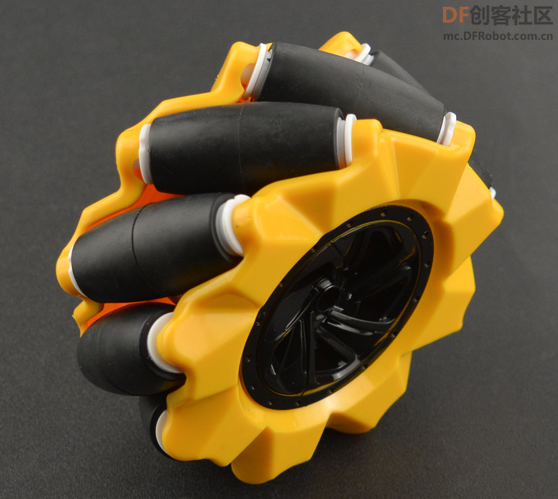
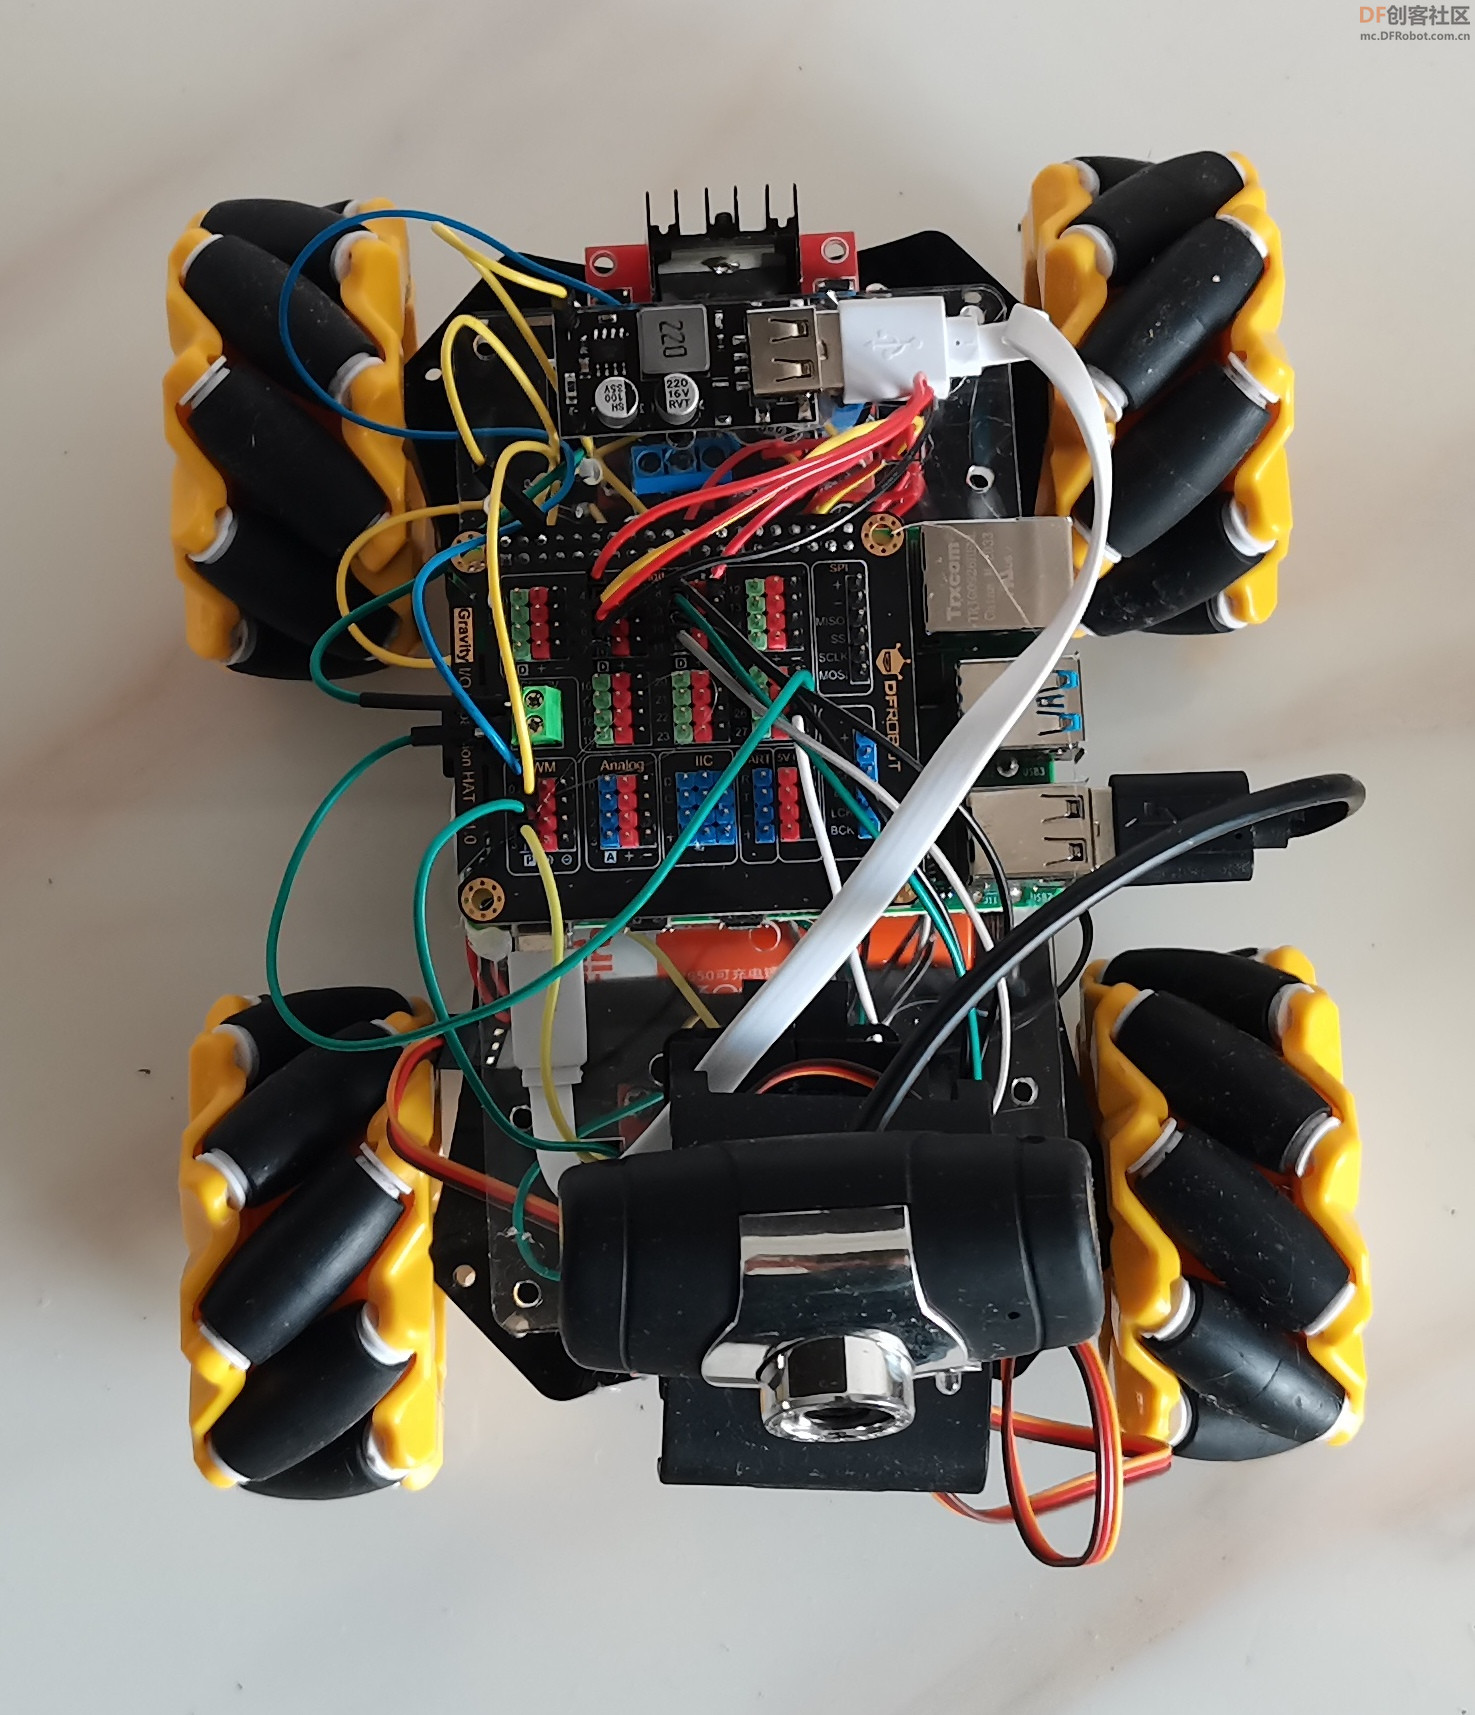
复制代码 【控制麦克纳姆轮】 麦克纳姆轮与普通轮子的区别在于麦克纳姆轮旋转时,由于存在斜向的从动轮,会同时产生一个斜向的力,当我们控制轮子旋转的速度与方向时,将斜向的力增强或抵消,从而实现小车的全向移动。可以完成横移、斜方向移动等普通小车无法完成的高难度动作,轮子的转动方向与小车的运动方向关系如下图:
import RPi.GPIO as GPIO
class mygpio():
GPIO.setmode(GPIO.BCM)
GPIO.setup(4,GPIO.OUT)
GPIO.setup(5,GPIO.OUT)
GPIO.setup(6,GPIO.OUT)
GPIO.setup(7,GPIO.OUT)
GPIO.setup(8,GPIO.OUT)
GPIO.setup(9,GPIO.OUT)
GPIO.setup(10,GPIO.OUT)
GPIO.setup(11,GPIO.OUT)
def forward(self):
GPIO.output(8,GPIO.HIGH)#left 1
GPIO.output(9,GPIO.LOW)
GPIO.output(6,GPIO.HIGH)#left 2
GPIO.output(7,GPIO.LOW)
GPIO.output(10,GPIO.HIGH)#right 1
GPIO.output(11,GPIO.LOW)
GPIO.output(4,GPIO.HIGH)#right 2
GPIO.output(5,GPIO.LOW)
def back(self):
GPIO.output(8,GPIO.LOW)#left 1
GPIO.output(9,GPIO.HIGH)
GPIO.output(6,GPIO.LOW)#left 2
GPIO.output(7,GPIO.HIGH)
GPIO.output(10,GPIO.LOW)#right 1
GPIO.output(11,GPIO.HIGH)
GPIO.output(4,GPIO.LOW)#right 2
GPIO.output(5,GPIO.HIGH)
def left(self):
GPIO.output(8,GPIO.LOW)#left 1
GPIO.output(9,GPIO.HIGH)
GPIO.output(6,GPIO.HIGH)#left 2
GPIO.output(7,GPIO.LOW)
GPIO.output(10,GPIO.HIGH)#right 1
GPIO.output(11,GPIO.LOW)
GPIO.output(4,GPIO.LOW)#right 2
GPIO.output(5,GPIO.HIGH)
def right(self):
GPIO.output(8,GPIO.HIGH)#left 1
GPIO.output(9,GPIO.LOW)
GPIO.output(6,GPIO.LOW)#left 2
GPIO.output(7,GPIO.HIGH)
GPIO.output(10,GPIO.LOW)#right 1
GPIO.output(11,GPIO.HIGH)
GPIO.output(4,GPIO.HIGH)#right 2
GPIO.output(5,GPIO.LOW)
def l_rotate(self):
GPIO.output(8,GPIO.LOW)#left 1
GPIO.output(9,GPIO.HIGH)
GPIO.output(6,GPIO.LOW)#left 2
GPIO.output(7,GPIO.HIGH)
GPIO.output(10,GPIO.HIGH)#right 1
GPIO.output(11,GPIO.LOW)
GPIO.output(4,GPIO.HIGH)#right 2
GPIO.output(5,GPIO.LOW)
def r_rotate(self):
GPIO.output(8,GPIO.HIGH)#left 1
GPIO.output(9,GPIO.LOW)
GPIO.output(6,GPIO.HIGH)#left 2
GPIO.output(7,GPIO.LOW)
GPIO.output(10,GPIO.LOW)#right 1
GPIO.output(11,GPIO.HIGH)
GPIO.output(4,GPIO.LOW)#right 2
GPIO.output(5,GPIO.HIGH)
def stop(self):
GPIO.output(4,GPIO.LOW)
GPIO.output(5,GPIO.LOW)
GPIO.output(6,GPIO.LOW)
GPIO.output(7,GPIO.LOW)
GPIO.output(8,GPIO.LOW)
GPIO.output(9,GPIO.LOW)
GPIO.output(10,GPIO.LOW)
GPIO.output(11,GPIO.LOW)
#GPIO.cleanup()
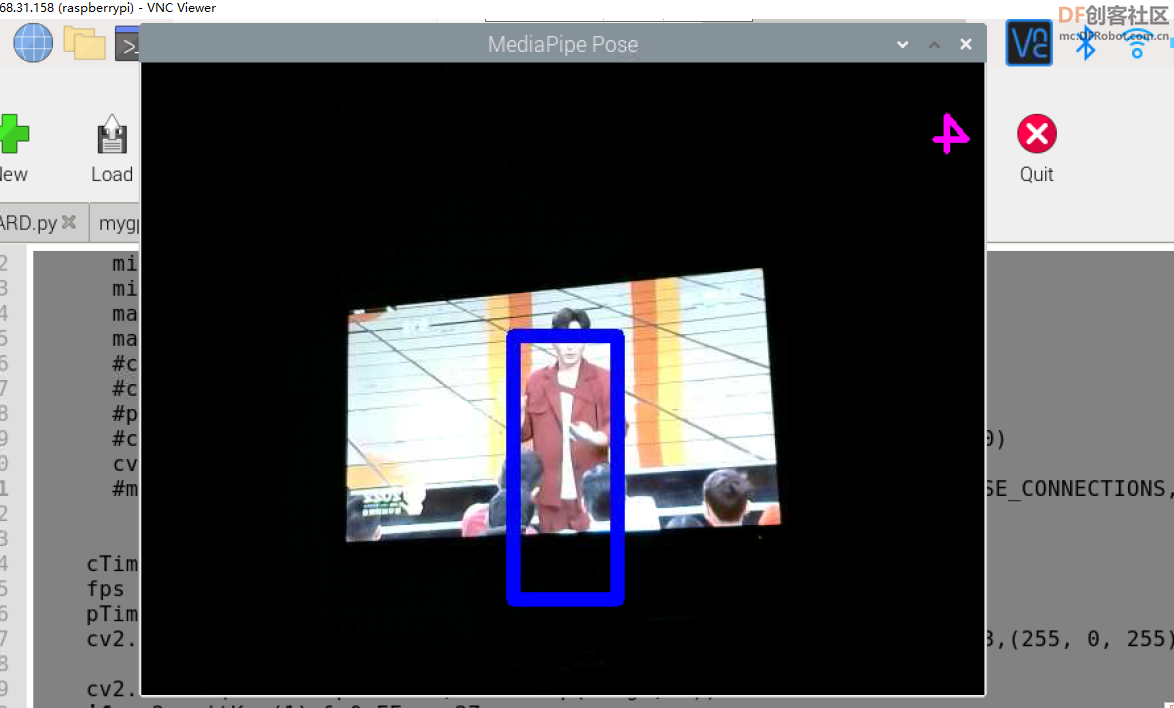
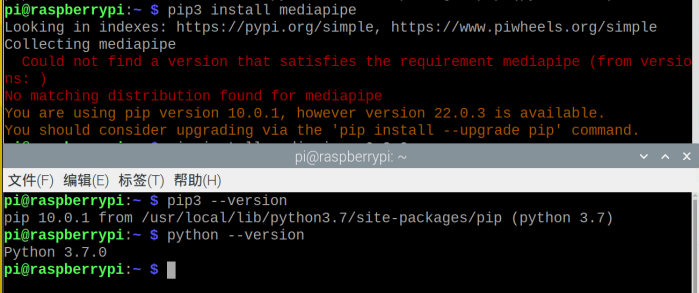
复制代码 【Mediapipe】 MediaPipe 是一款由 Google Research 开发并开源的多媒体机器学习模型应用框架。在谷歌,一系列重要产品,如 、Google Lens、ARCore、Google Home 以及 ,都已深度整合了 MediaPipe。 安装mediapipe库, 在终端中使用:pip3 install mediapipe-rpi4 人体姿态Mediapipe Pose,测试程序:
import cv2
import time
import mediapipe as mp
mp_drawing = mp.solutions.drawing_utils
mp_drawing_styles = mp.solutions.drawing_styles
mp_pose = mp.solutions.pose
pTime = 0
cTime = 0

# For webcam input:
cap = cv2.VideoCapture(0)

j=0
with mp_pose.Pose(min_detection_confidence=0.5,min_tracking_confidence=0.5) as pose:
 while cap.isOpened():
    success, image = cap.read()
    if not success:
      print("Ignoring empty camera frame.")
      # If loading a video, use 'break' instead of 'continue'.
      continue
    j=j+1
    if j<3:#丢帧
       continue
    else:
        j=0

    h,w,c=image.shape
    image.flags.writeable = False
    image = cv2.cvtColor(image, cv2.COLOR_BGR2RGB)
    results = pose.process(image)

    # Draw the pose annotation on the image.
    if results.pose_landmarks:
      list_x=[]
      list_y=[]
      image.flags.writeable = False
      image = cv2.cvtColor(image, cv2.COLOR_RGB2BGR)
      #print(results.pose_landmarks.landmark)
      for i in results.pose_landmarks.landmark:
        list_x.append(i.x)
        list_y.append(i.y)
      min_x=int(min(list_x)*w)
      min_y=int(min(list_y)*h)
      max_x=int(max(list_x)*w)
      max_y=int(max(list_y)*h)
      #cv2.circle(image,(min_x,min_y),10,(0,255,255),-1)
      #cv2.circle(image,(max_x,max_y),5,(0,0,255),-1)
      #print(min_x," ",min_y," ",max_x," ",max_y," ",w," ",h)
      #cv2.rectangle(img,(min_x*2,min_y*2),(max_x*2,max_y*2),(255,0,0),10)
      cv2.rectangle(image,(min_x,min_y),(max_x,max_y),(255,0,0),10)
      #mp_drawing.draw_landmarks(image,results.pose_landmarks,mp_pose.POSE_CONNECTIONS,landmark_drawing_spec=mp_drawing_styles.get_default_pose_landmarks_style())


    cTime = time.time()
    fps = 1 / (cTime - pTime)
    pTime = cTime
    cv2.putText(image, str(int(fps)), (10, 70), cv2.FONT_HERSHEY_PLAIN, 3,(255, 0, 255), 3)

    cv2.imshow('MediaPipe Pose', cv2.flip(image, 1))
    if cv2.waitKey(1) & 0xFF == 27:
      break
cap.release()

复制代码 【完整程序】
import sys
import os

import cv2
import time
import mediapipe as mp
import RPi.GPIO as GPIO
from mygpio import mygpio
sys.path.append(os.path.dirname(os.path.dirname(os.path.realpath(__file__))))

from BOARD import DFRobot_Expansion_Board_IIC as Board
board = Board(1, 0x10)    # Select i2c bus 1, set address to 0x10
def board_detect():
  l = board.detecte()
board_detect()
while board.begin() != board.STA_OK:    # Board begin and check board status

    print("board begin faild")
    time.sleep(2)
print("board begin success")
board.set_pwm_enable()                # Pwm channel need external power
# board.set_pwm_disable()
board.set_pwm_frequency(1000)
board.set_pwm_duty(0, 60)
board.set_pwm_duty(1, 60)
board.set_pwm_duty(2, 60)
board.set_pwm_duty(3, 60)

g=mygpio()

mp_drawing = mp.solutions.drawing_utils
mp_drawing_styles = mp.solutions.drawing_styles
mp_pose = mp.solutions.pose
pTime = 0
cTime = 0

# For webcam input:
cap = cv2.VideoCapture(0)

j=0
with mp_pose.Pose(min_detection_confidence=0.5,min_tracking_confidence=0.5) as pose:
 while cap.isOpened():
    success, image = cap.read()
    if not success:
      print("Ignoring empty camera frame.")
      # If loading a video, use 'break' instead of 'continue'.
      continue
    j=j+1
    if j<3:
       continue
    else:
        j=0

    h,w,c=image.shape
    image.flags.writeable = False
    image = cv2.cvtColor(image, cv2.COLOR_BGR2RGB)
    results = pose.process(image)

    # Draw the pose annotation on the image.
    if results.pose_landmarks:
      list_x=[]
      list_y=[]
      image.flags.writeable = False
      image = cv2.cvtColor(image, cv2.COLOR_RGB2BGR)
      #print(results.pose_landmarks.landmark)
      for i in results.pose_landmarks.landmark:
        list_x.append(i.x)
        list_y.append(i.y)
      min_x=int(min(list_x)*w)
      min_y=int(min(list_y)*h)
      max_x=int(max(list_x)*w)
      max_y=int(max(list_y)*h)
      #cv2.circle(image,(min_x,min_y),10,(0,255,255),-1)
      #cv2.circle(image,(max_x,max_y),5,(0,0,255),-1)
      #print(min_x," ",min_y," ",max_x," ",max_y," ",w," ",h)
      #cv2.rectangle(img,(min_x*2,min_y*2),(max_x*2,max_y*2),(255,0,0),10)
      cv2.rectangle(image,(min_x,min_y),(max_x,max_y),(255,0,0),10)
      #mp_drawing.draw_landmarks(image,results.pose_landmarks,mp_pose.POSE_CONNECTIONS,landmark_drawing_spec=mp_drawing_styles.get_default_pose_landmarks_style())
      mid=(min_x+max_x)/2
      dis_x=mid-w/2
      dis_w=max_x-min_x
      print(dis_x,"  ",dis_w)

      if dis_x>90:
          print("right")
          board.set_pwm_duty(0, 70)
          board.set_pwm_duty(1, 70)
          board.set_pwm_duty(2, 70)
          board.set_pwm_duty(3, 70)
          g.right()
      elif dis_x<-90:
          print("left")
          board.set_pwm_duty(0, 70)
          board.set_pwm_duty(1, 70)
          board.set_pwm_duty(2, 70)
          board.set_pwm_duty(3, 70)
          g.left()
      elif dis_w>350:
          print("back")
          board.set_pwm_duty(0, 60)
          board.set_pwm_duty(1, 60)
          board.set_pwm_duty(2, 60)
          board.set_pwm_duty(3, 60)
          g.back()
      elif dis_w<200:
          print("forward")
          board.set_pwm_duty(0, 63)
          board.set_pwm_duty(1, 60)
          board.set_pwm_duty(2, 63)
          board.set_pwm_duty(3, 60)
          g.forward()
      else:
          print("stop1")
          g.stop()
    else:
      print("stop2")
      g.stop()
    cTime = time.time()
    fps = 1 / (cTime - pTime)
    pTime = cTime
    cv2.putText(image, str(int(fps)), (10, 70), cv2.FONT_HERSHEY_PLAIN, 3,(255, 0, 255), 3)

    cv2.imshow('MediaPipe Pose', cv2.flip(image, 1))
    if cv2.waitKey(1) & 0xFF == 27:
      break
cap.release()
GPIO.cleanup()


复制代码


 沪公网安备31011502402448
 置顶卡
置顶卡 变色卡
变色卡 千斤顶
千斤顶


 活跃会员
活跃会员
 宣传大使
宣传大使
 牛X认证
牛X认证
 创客造
创客造
 编辑选择奖
编辑选择奖
 志“童”道合
 编辑选择奖
编辑选择奖
 编辑选择奖
编辑选择奖
 编辑选择奖
编辑选择奖
 编辑选择奖
编辑选择奖


