本帖最后由 云天 于 2022-2-8 16:06 编辑
美丽却危险 爆竹声声辞旧岁 焰火花里贺新年 过年燃放烟花爆竹 是我国一项历史悠久的传统 随着年味越来越浓 在人们燃放烟花爆竹时 被炸伤的新闻却时有发生 我们该如何避免悲剧发生?
过年燃放烟花爆竹寓意着幸福美好,但根据每年医院的报告,每年过年都有很多人因为燃放烟花爆竹而受伤,轻则受一些皮外伤之苦,重则炸断手指,炸伤眼睛,炸成耳聋等,造成终身性的残疾,更甚者可能造成死亡。
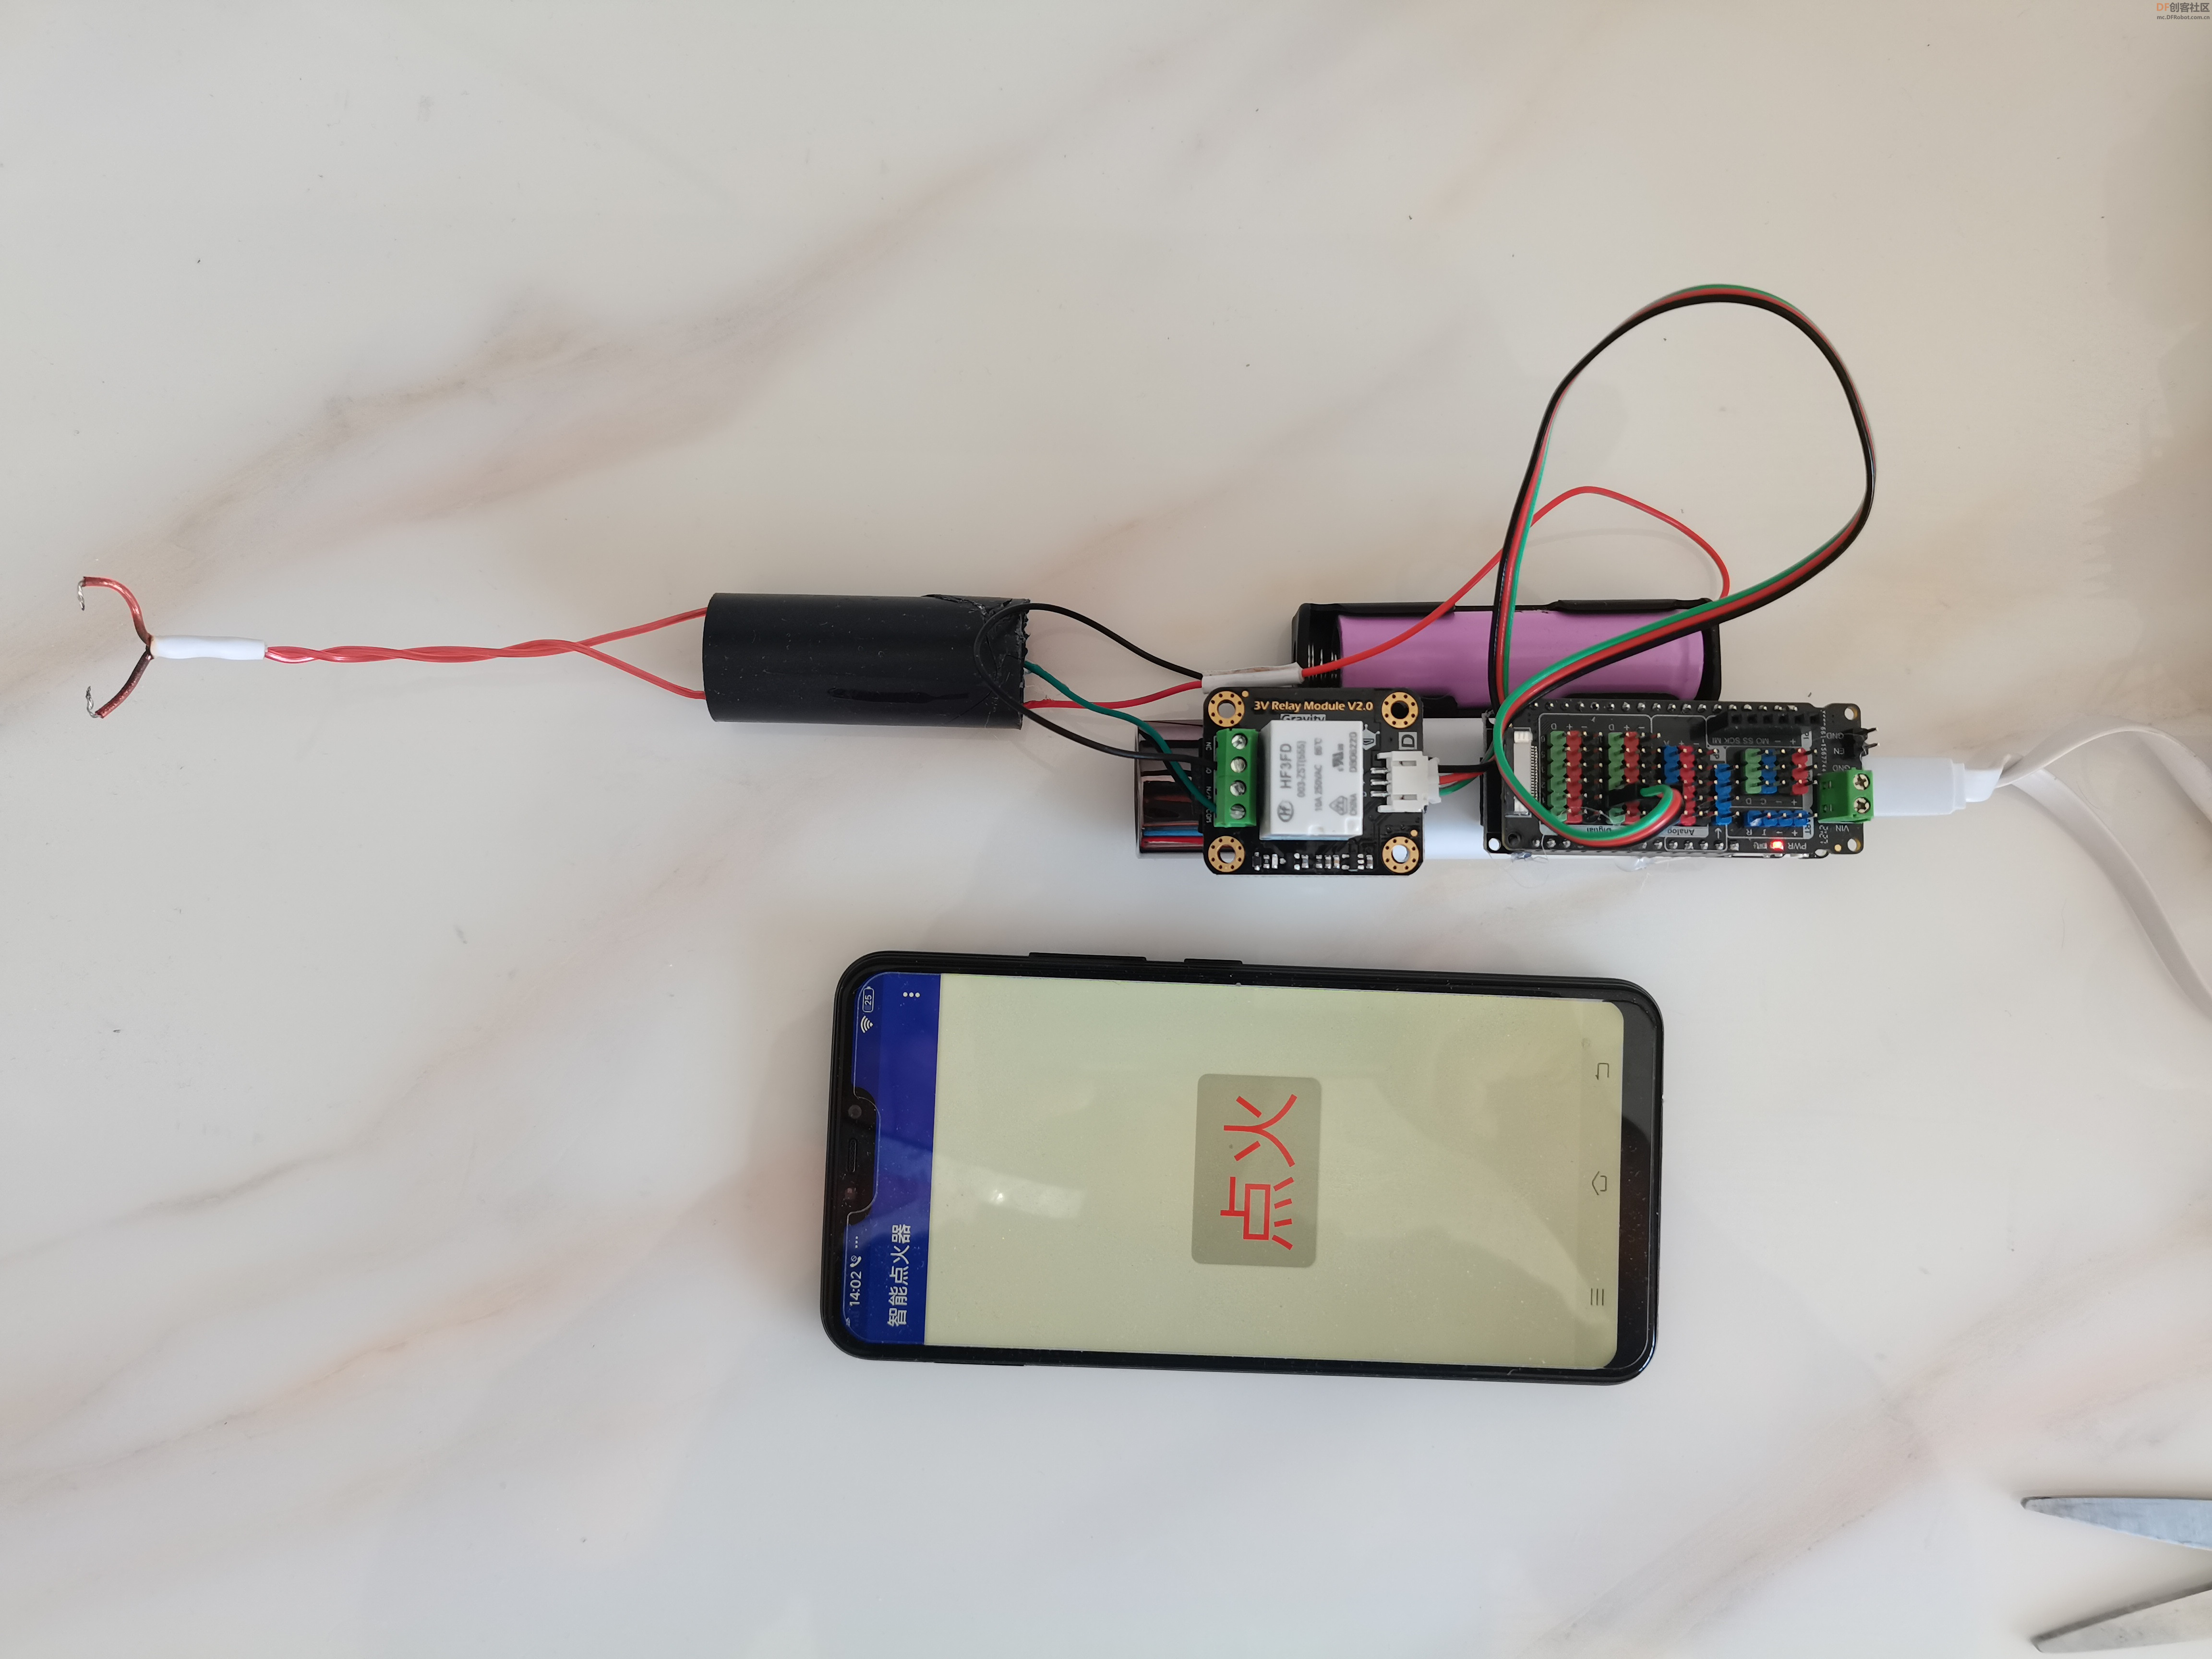
今天这个项目,智能点火器,可安全燃放烟花爆竹。实现手机遥控,远程点火。
【主控硬件】
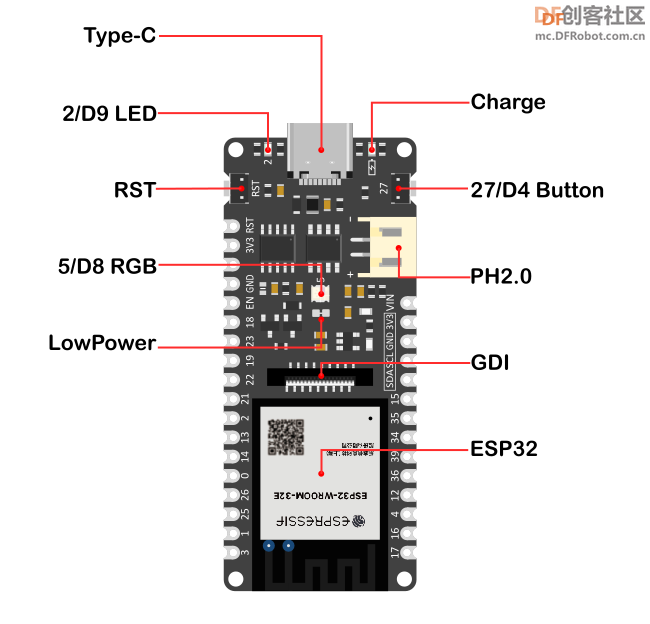
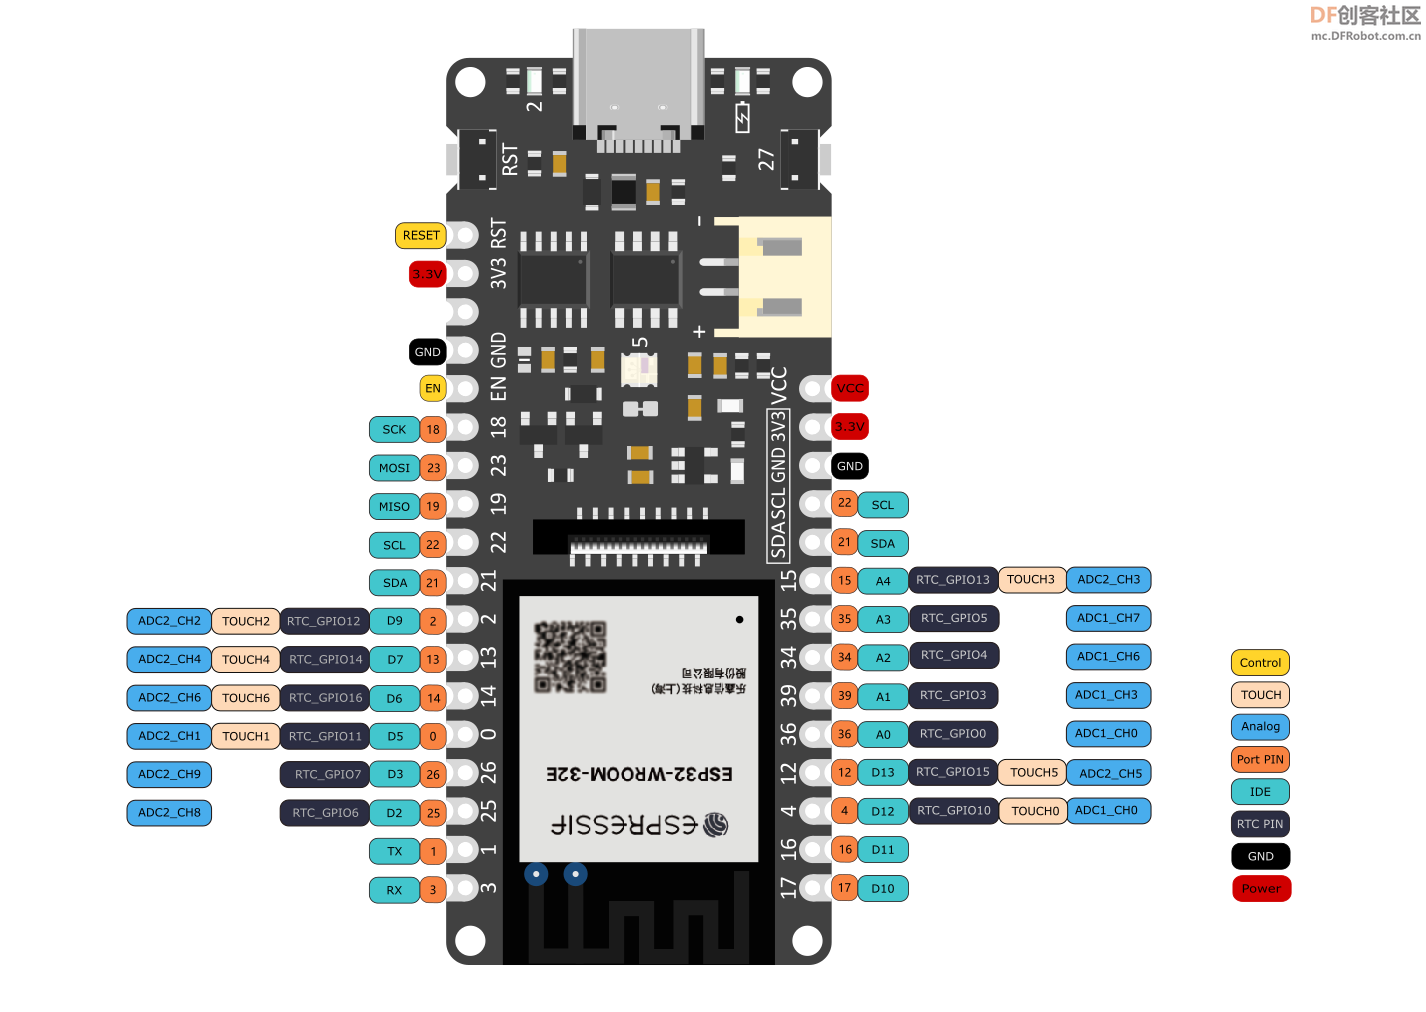
主控使用“FireBeetle Board ESP32-E(Arduino开发板)”,FireBeetle ESP32-E是一款基于ESP-WROOM-32E双核芯片的主控板,它专为IoT设计。
它支持WIFI和蓝牙双模通信并具有体积小巧、超低功耗、板载充电电路、接口易用等特性。可灵活的用于家庭物联网改装、工业物联网改装、可穿戴设备等等。
Arduino IDE 编译环境配置参考:DFR0654_FireBeetle_Board_ESP32_E (dfrobot.com.cn)
(引脚布局图)
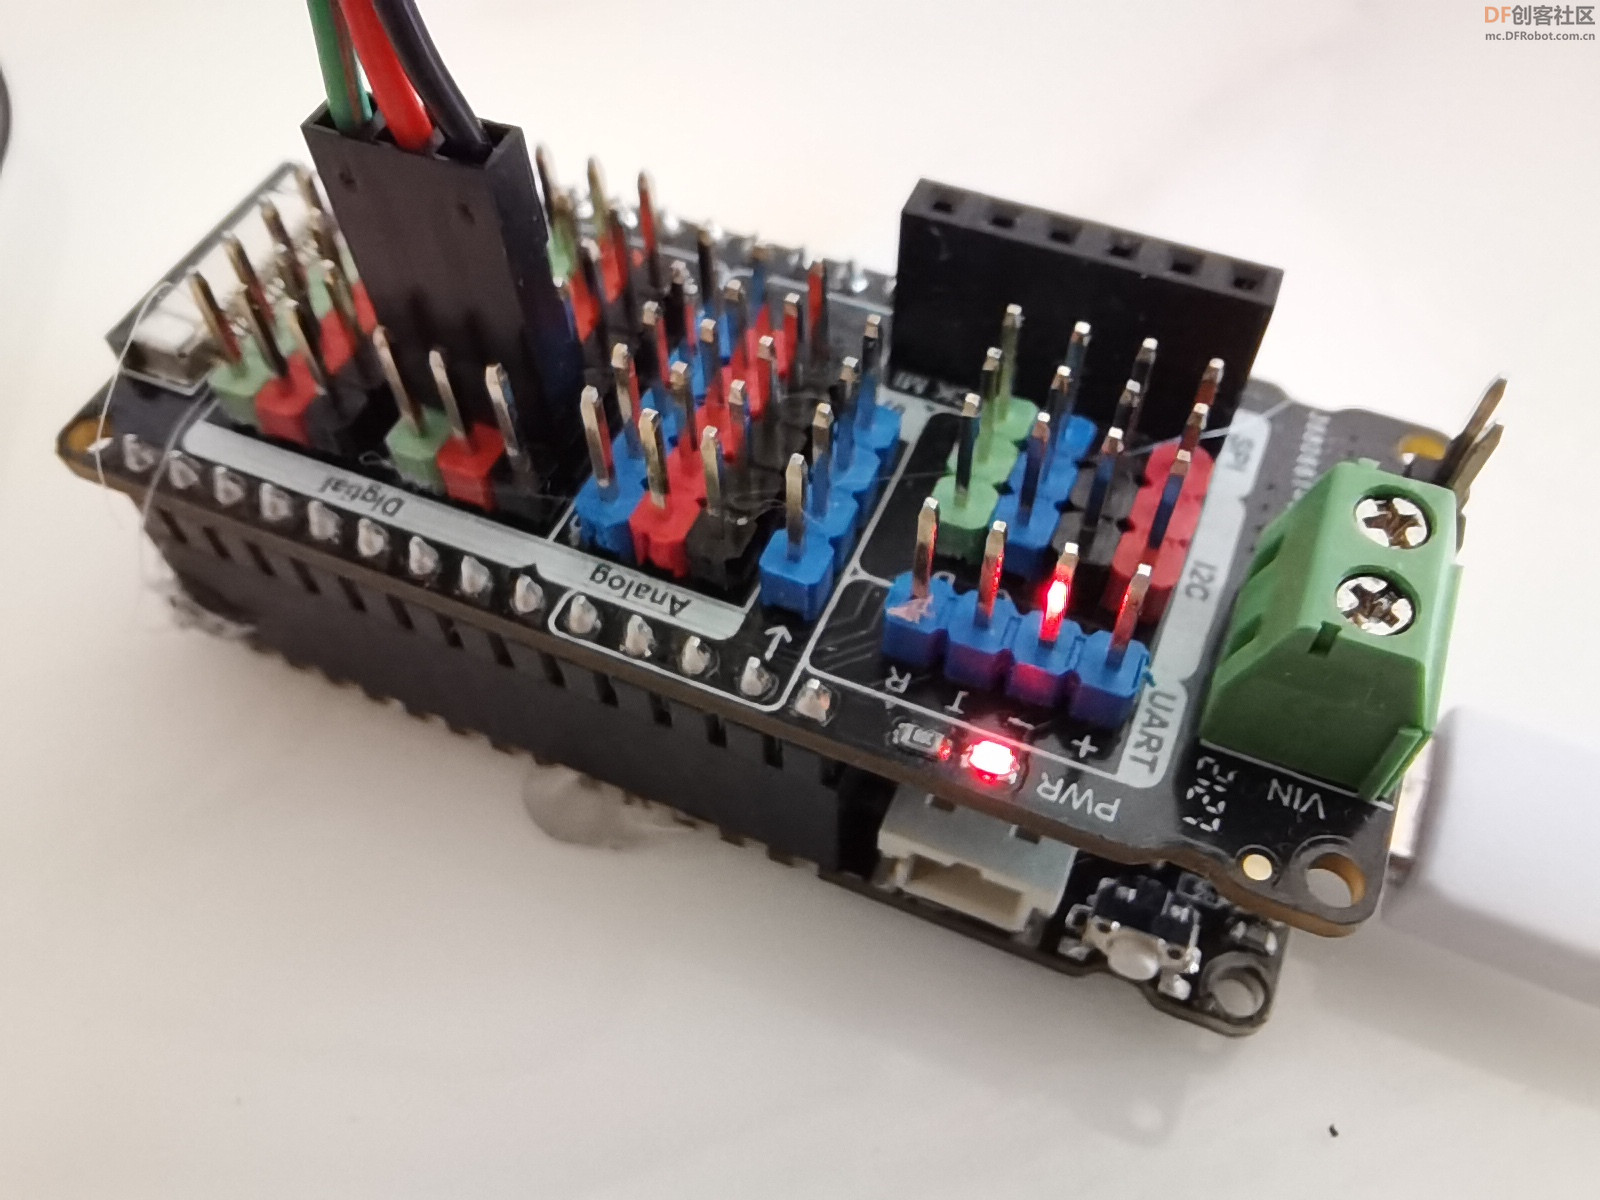
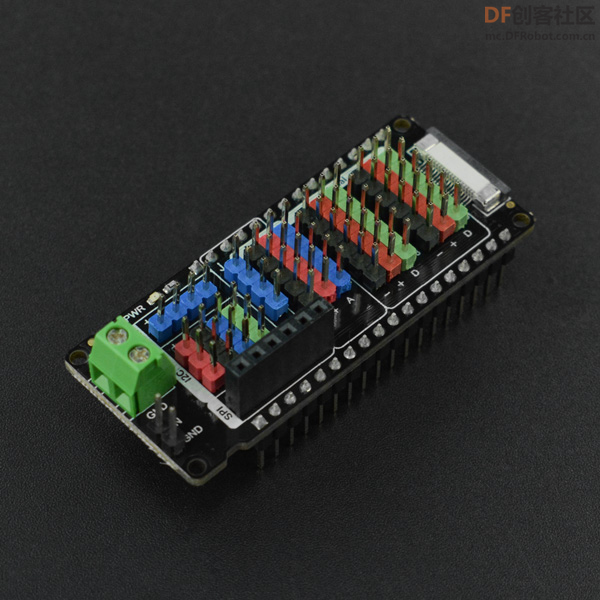
【FireBeetle 2:Gravity IO扩展板】
这是一款专为FireBeetle 2系列提供的Gravity IO扩展板,它提供数字端口、模拟端口、I2C端口、UART端口和SPI端口,并且提供了电源输入排线座方便接入外部电源 ,EN排针方便关闭主板供电,无需焊接,即可使用上千种Gravity模块。
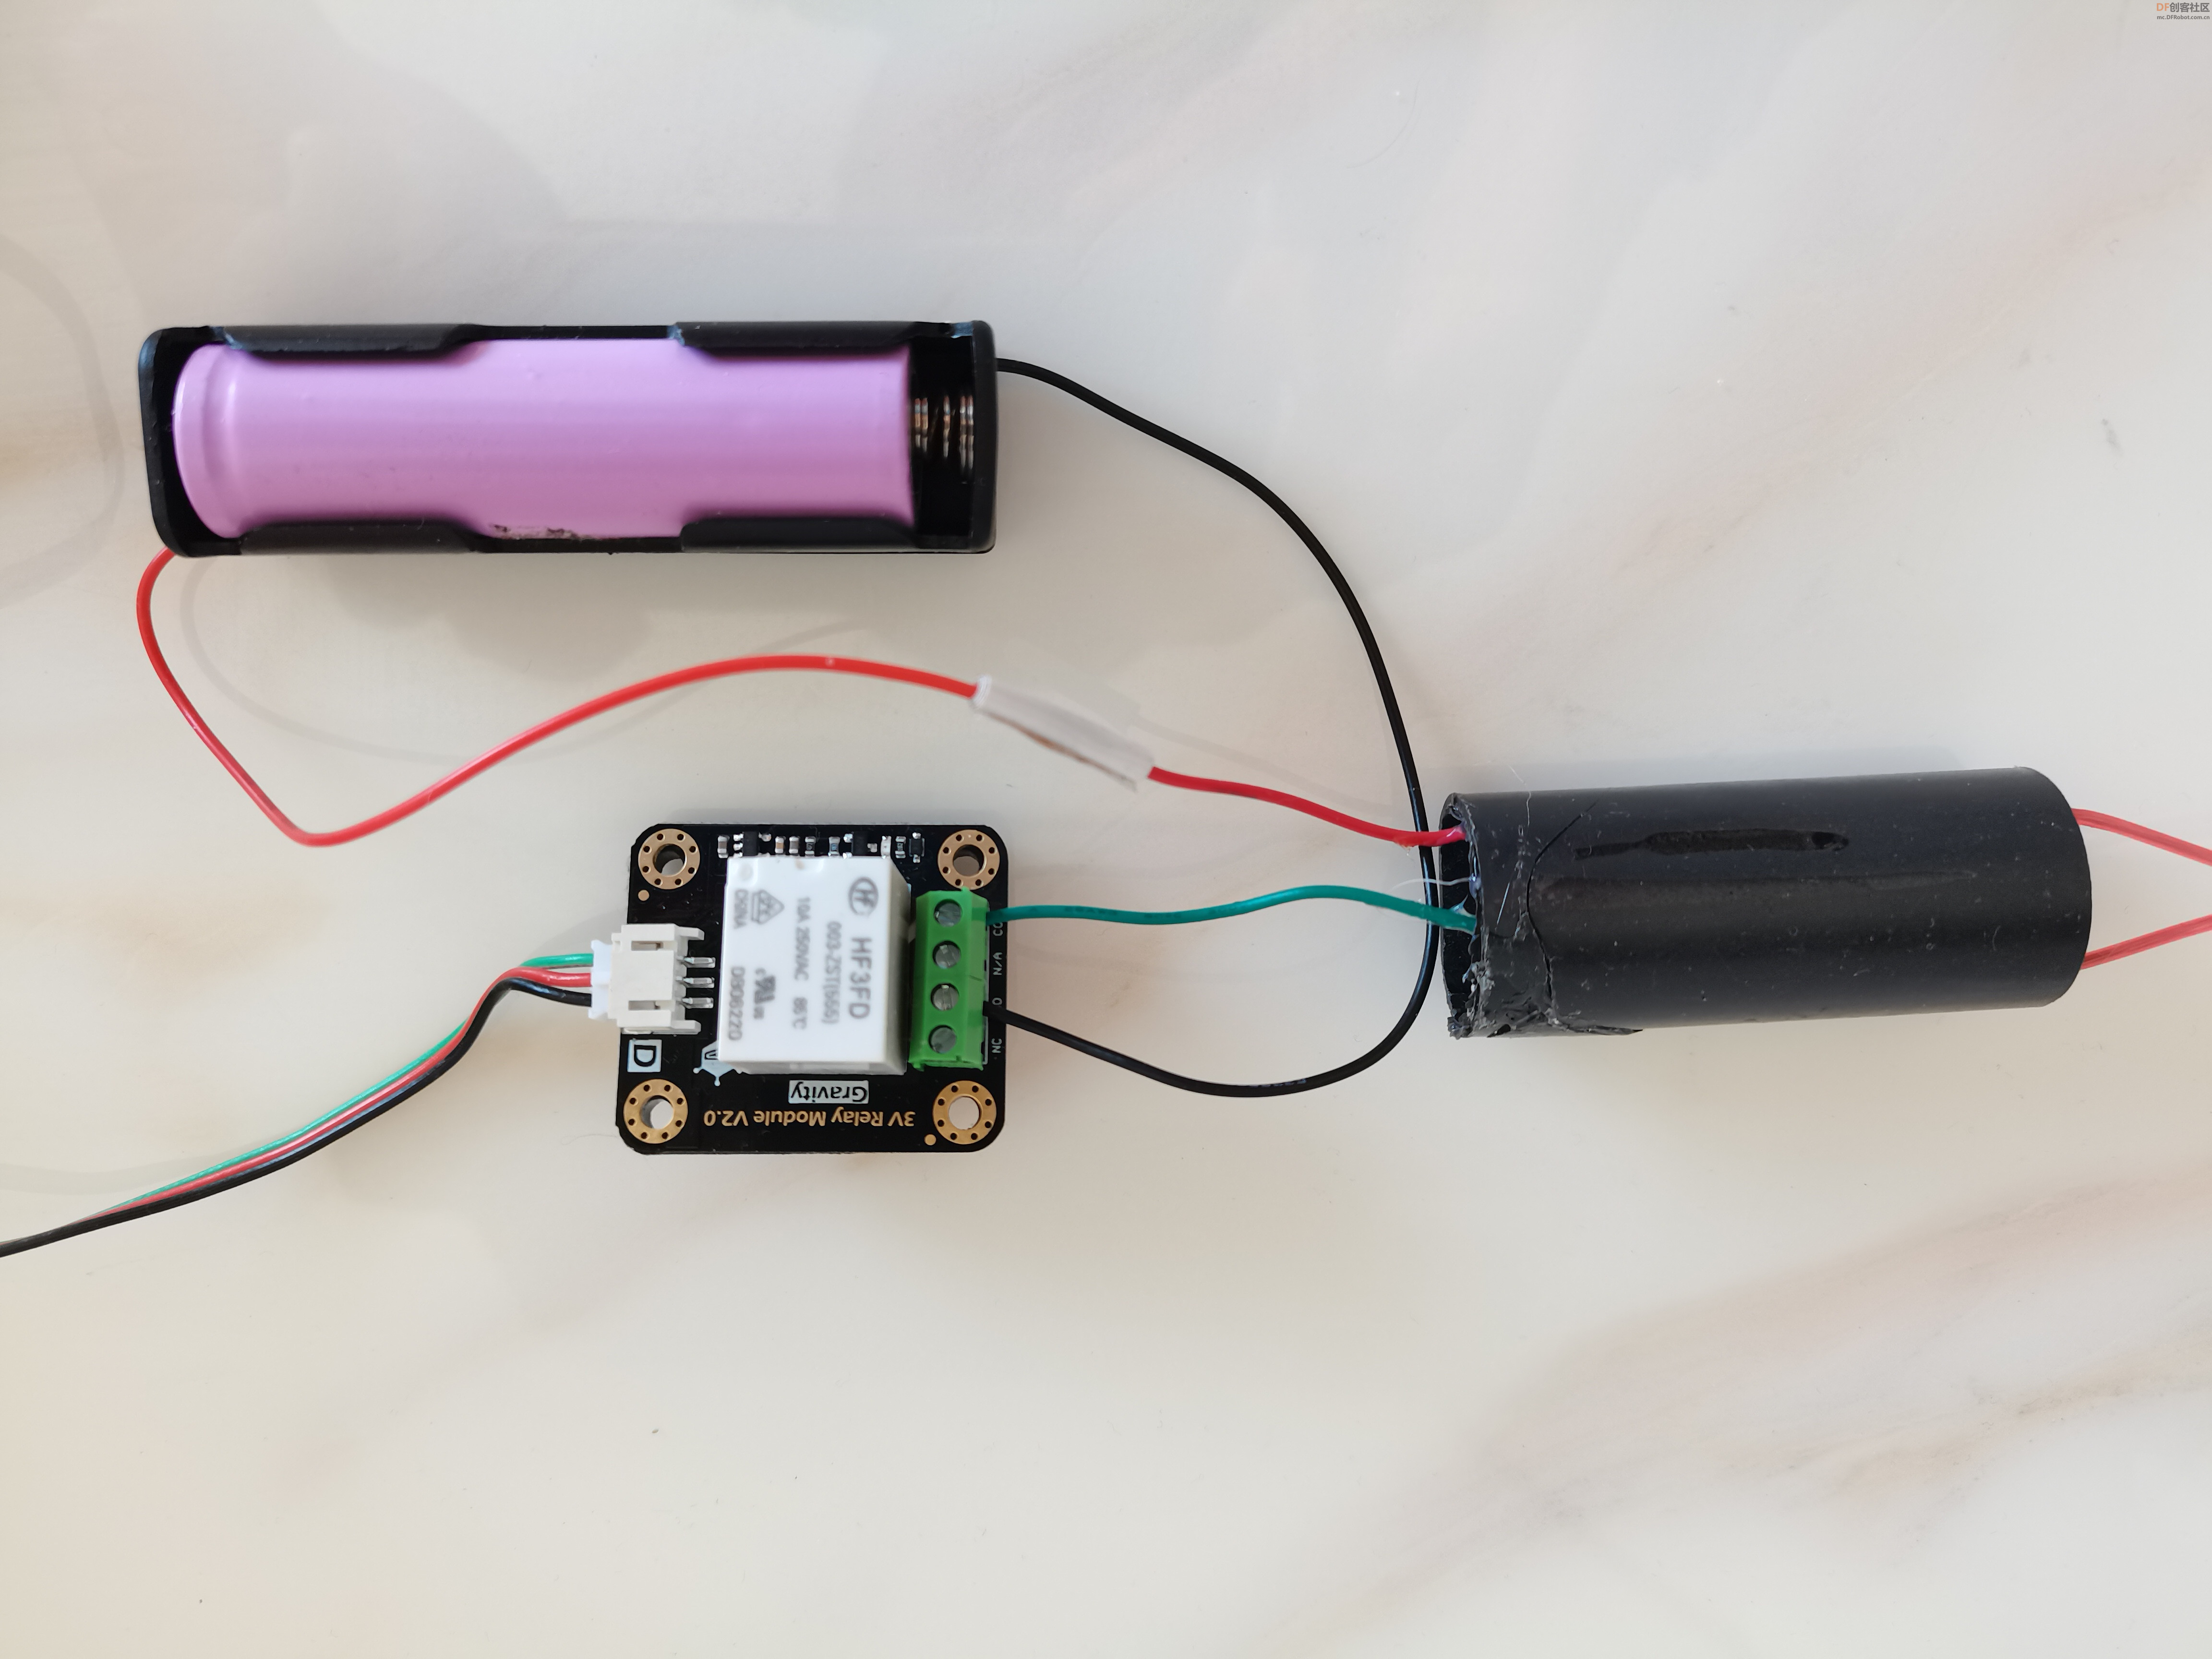
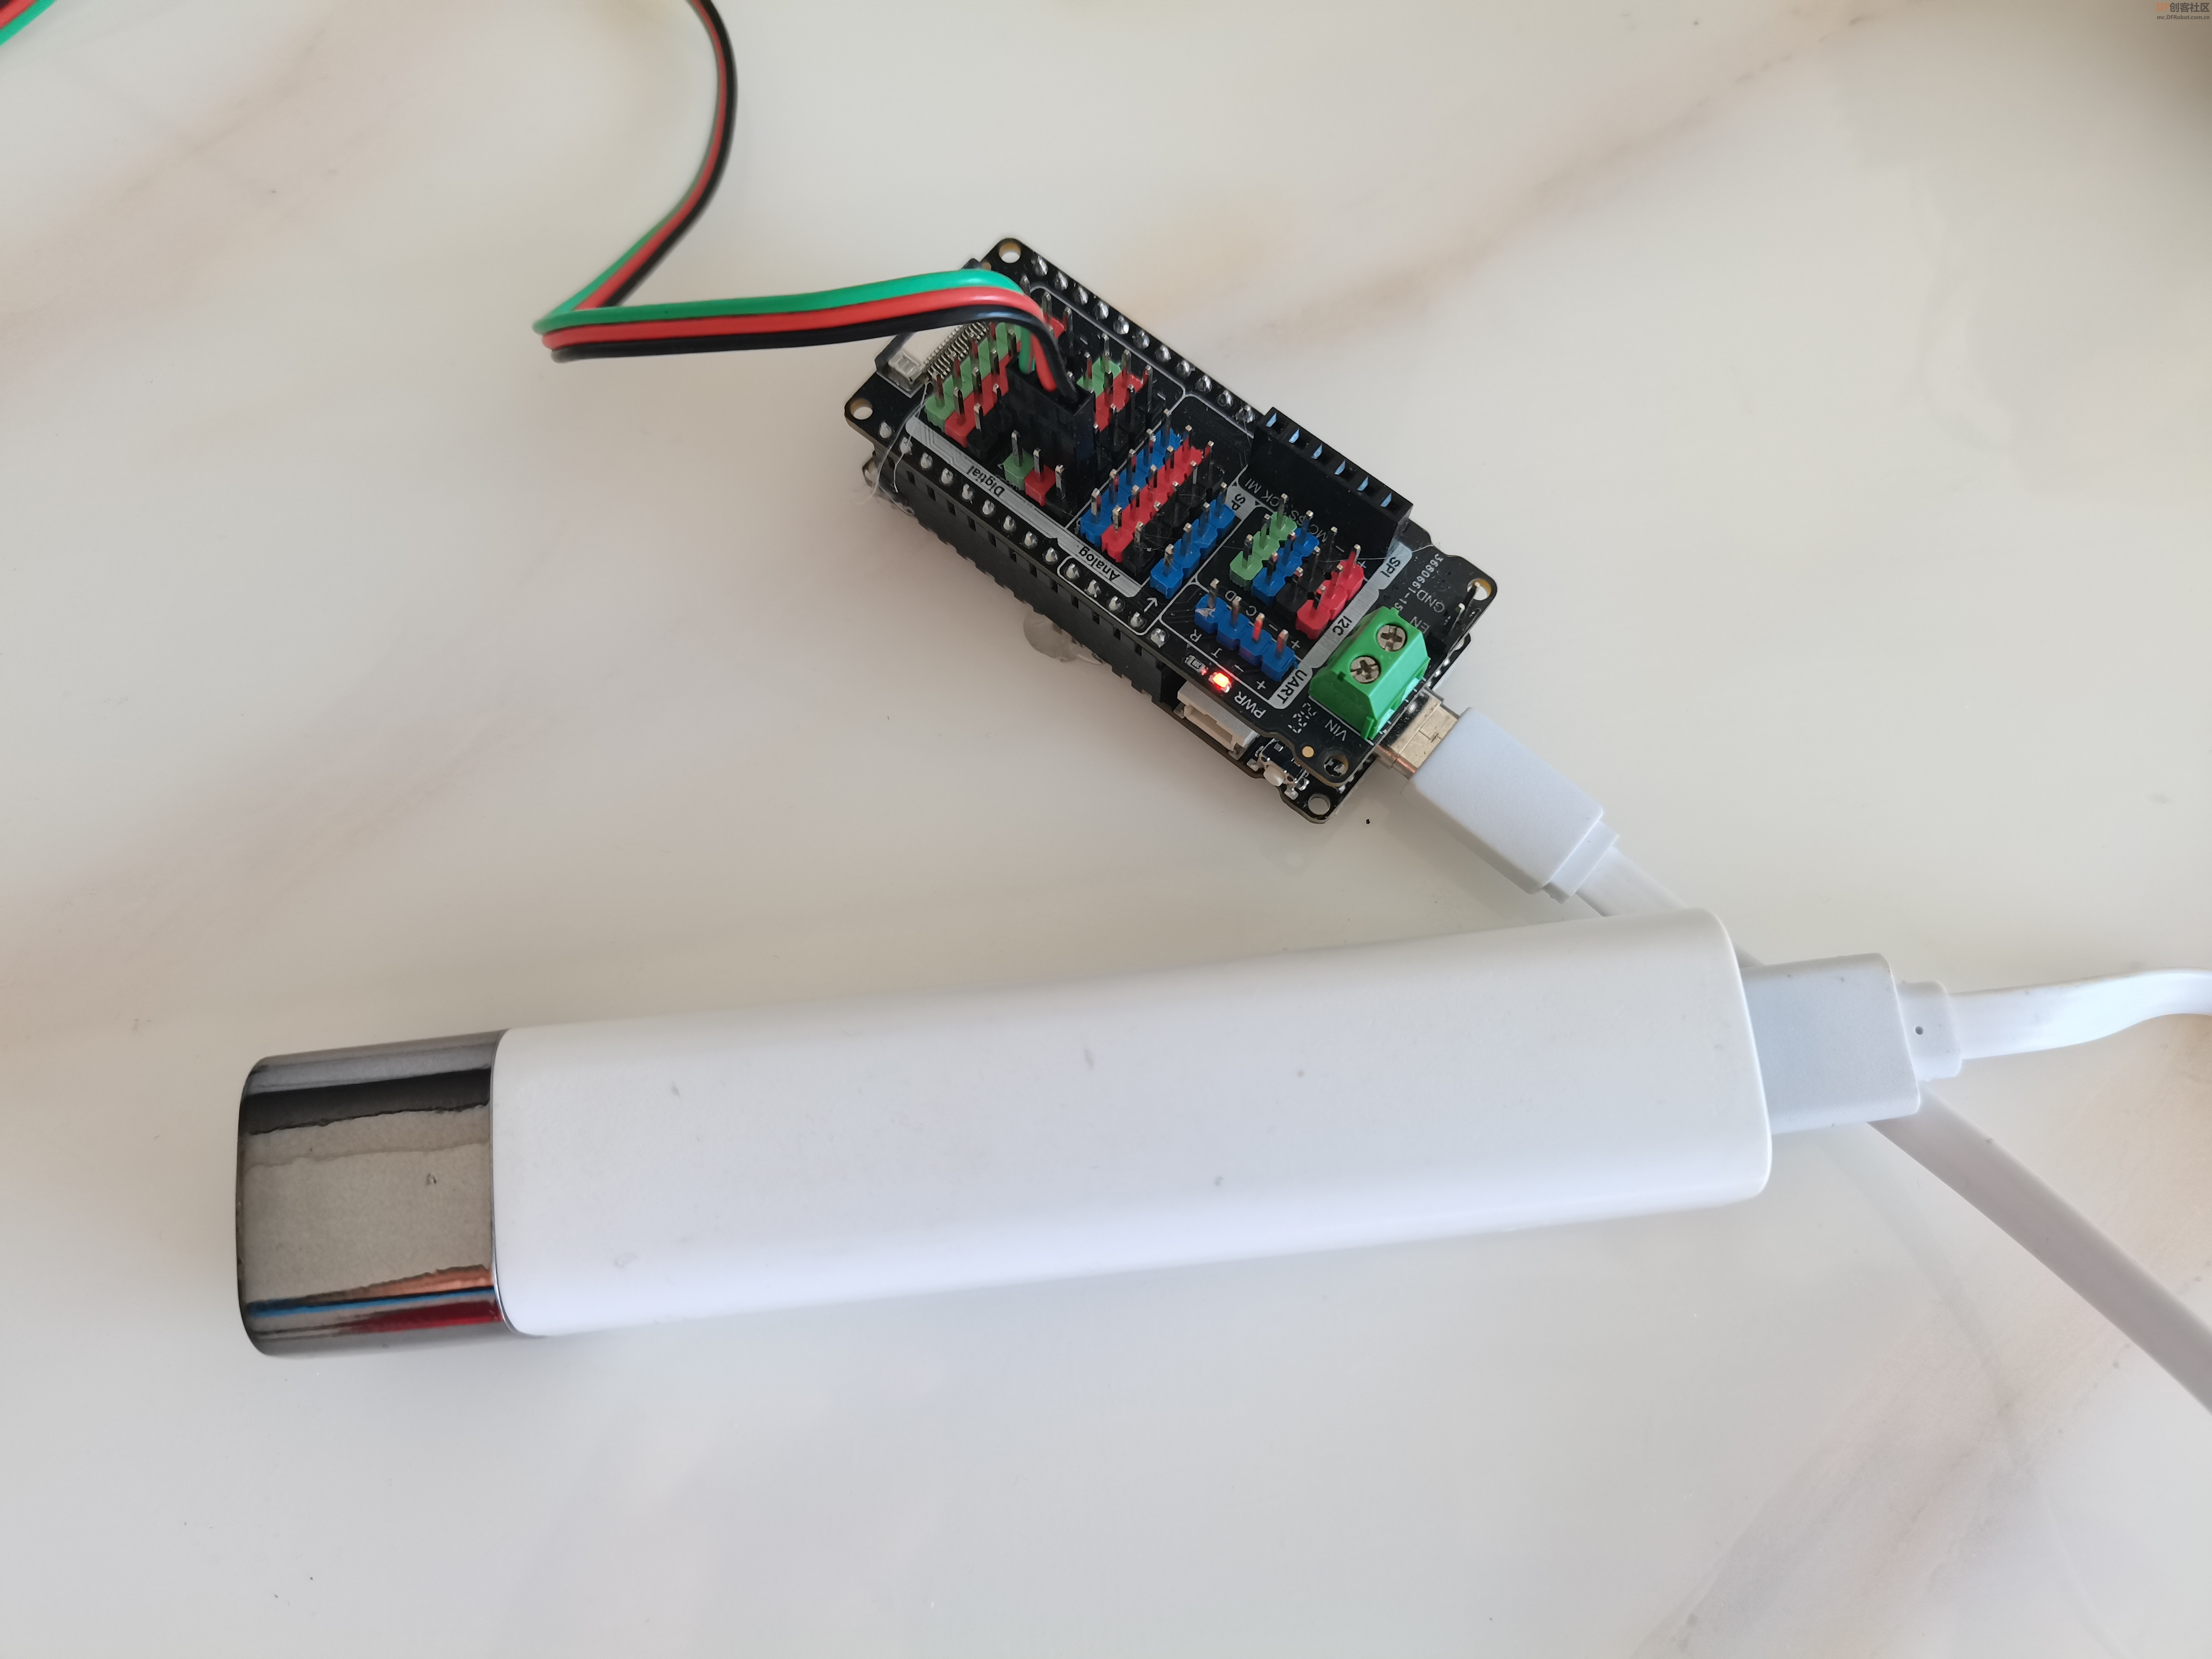
【脉冲高压包逆变器】
点火执行器:直流高压模块 电弧发生器
我用的这个(好像是,记不清了)是从强光手电上拆下来的,当时不知是什么,今天看了某宝的产品介绍,才知道。
1、输入端输入DC3.7V-6V电压后可在输出端得到几万伏左右的直流高压。因产生的不是高温电弧,点纸不行,但我认为点燃爆竹引信应该没问题。
2、模块分输入端和输出端,红绿线是输入端,红正绿负,输出端是两根一样颜色的高压线,输入端接电池就可以产生高压电弧。
3、输入电源:可以使用单节3.7V锂电池或两节并联,如18650电池,闲置的手机电池(要去掉保护板,建议容量在2000mAh以上)
4、高压模块应避免高压空载时通电使用,通电前必须调整好高压线端合适距离,高压线拉弧距离与使用的电池电压及容量成正比。
5、测试电弧距离时要由短向长实验,通电时严禁超出最长拉弧距离,由于高压能量无法释放,极易损坏模块。
6、模块的功率大,内部不宜散热,故不可长时间工作,一般10秒内是没问题的。
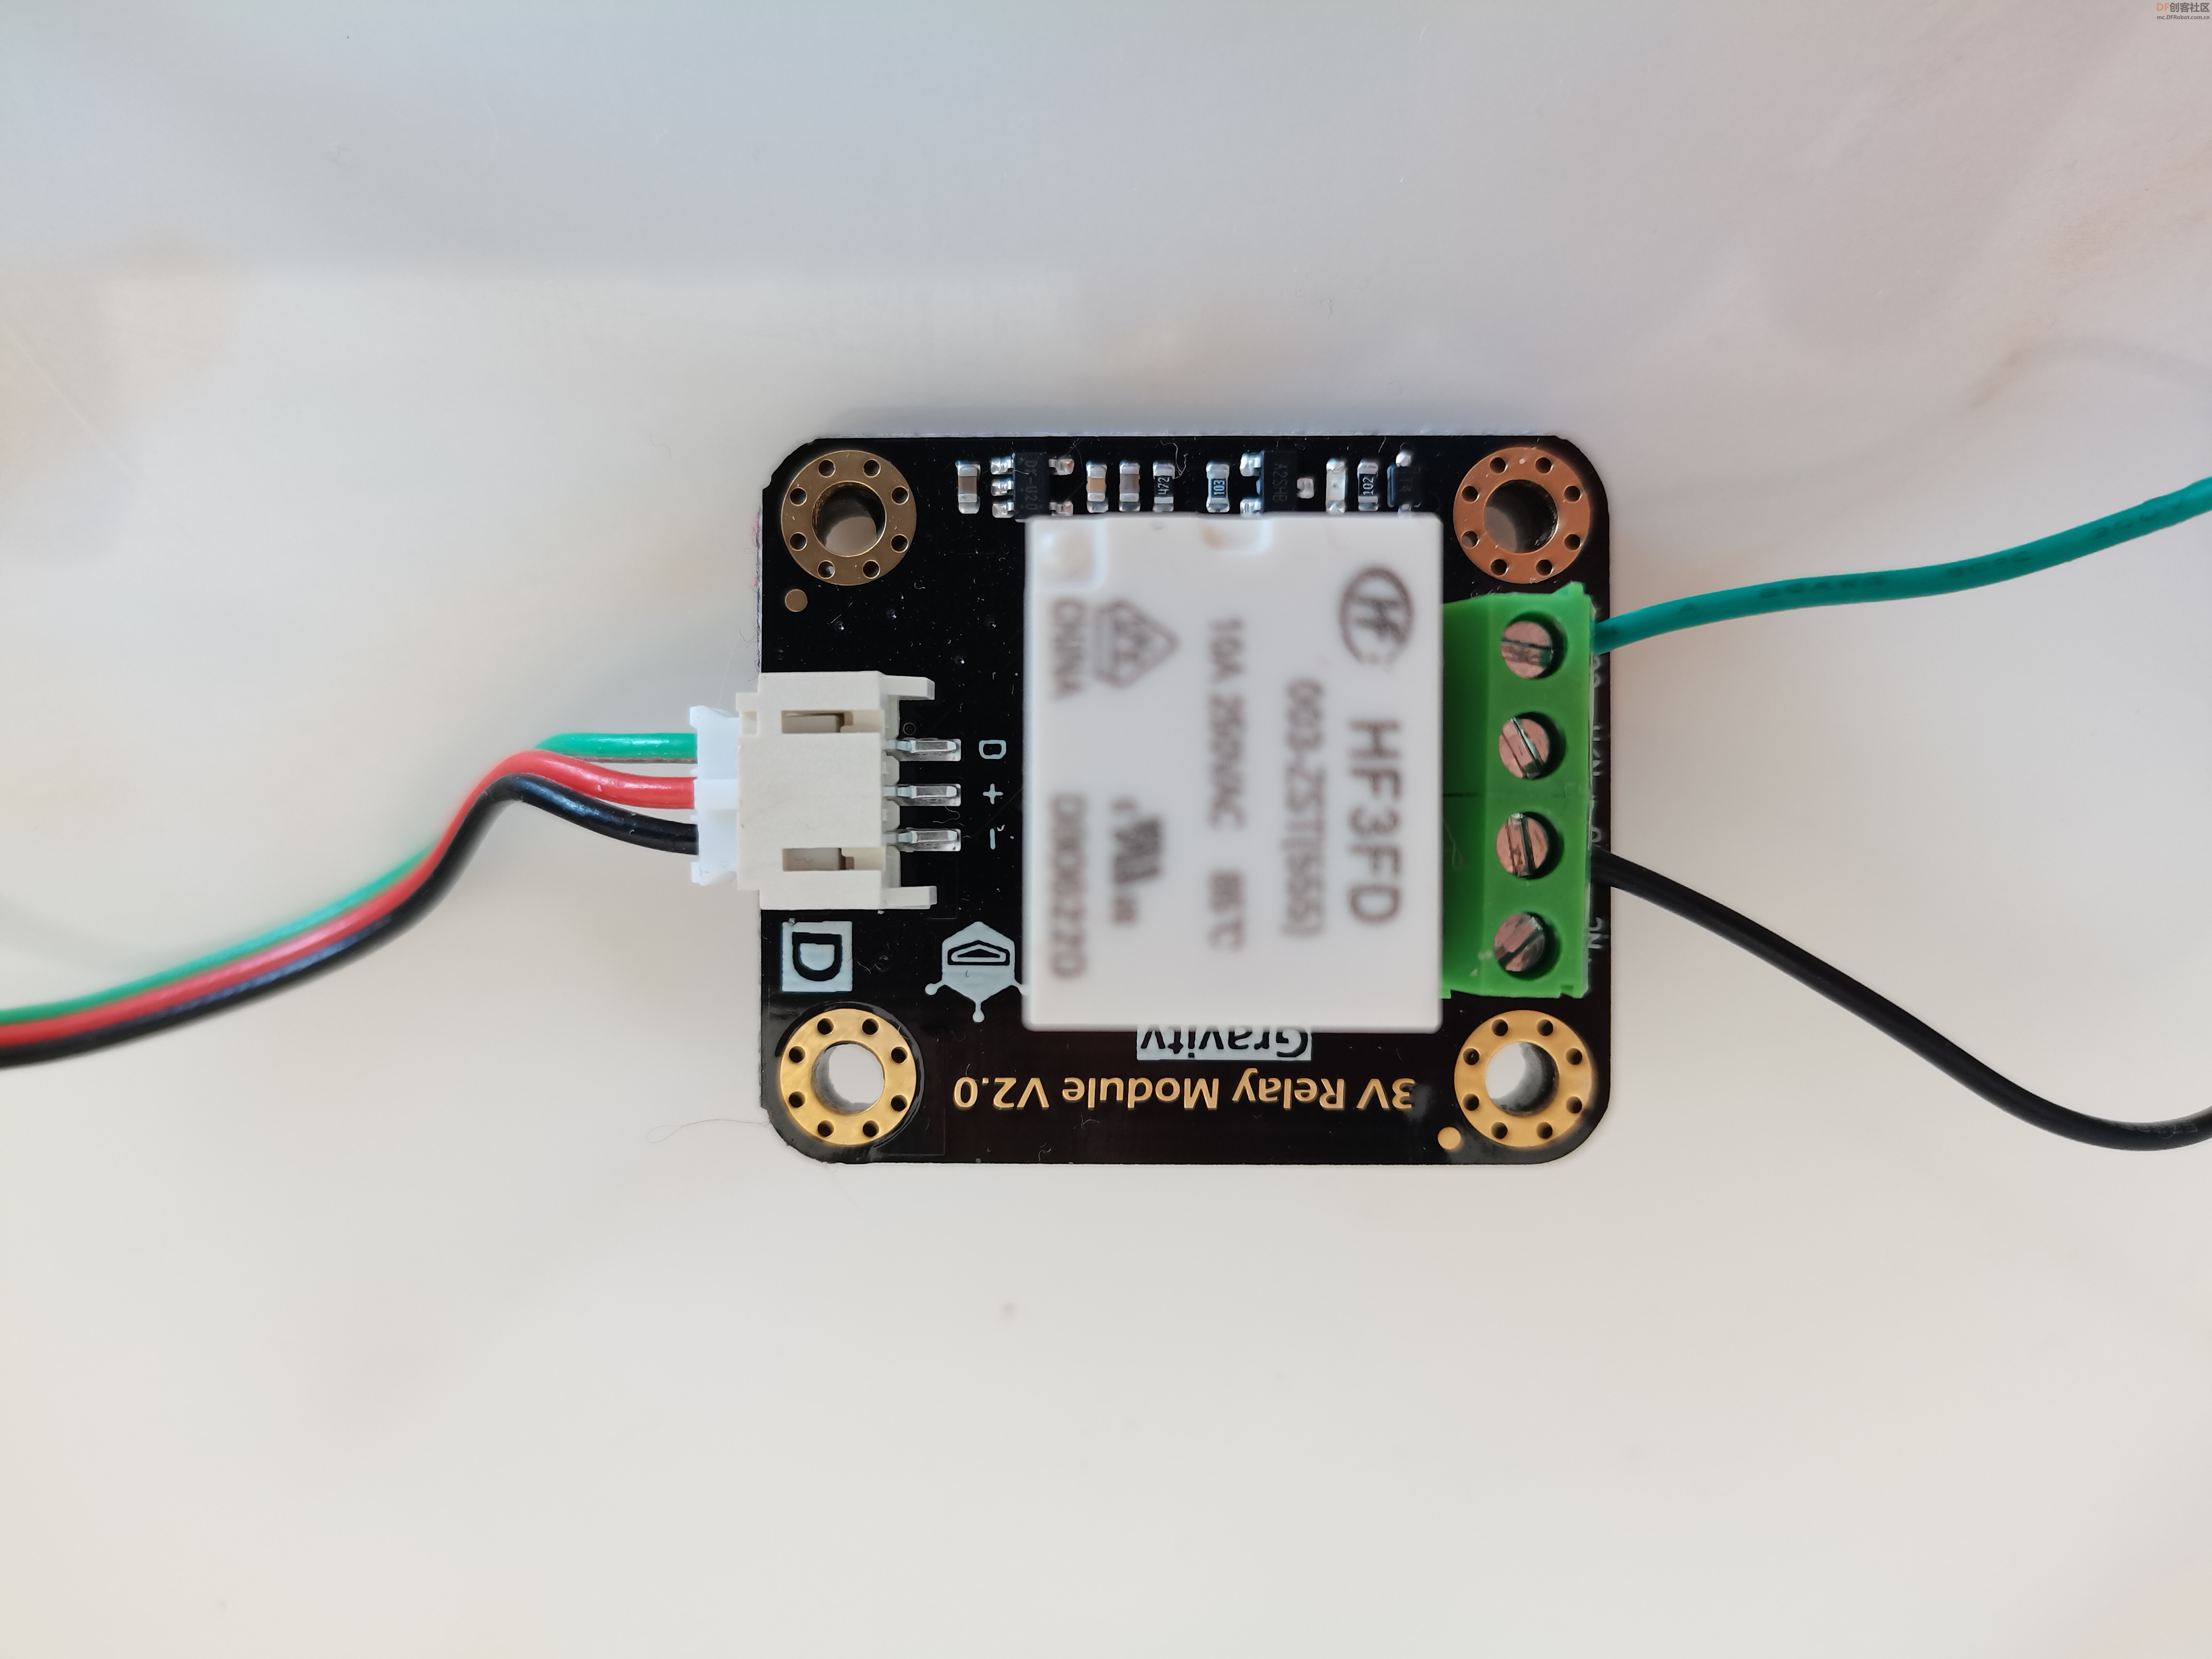
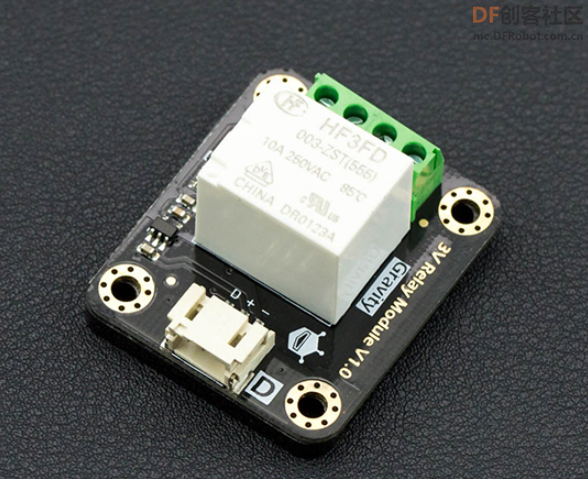
【电磁继电器】
电弧发生器通过一节3.7V锂电池供电,通过电磁继电器控制通电电路通断。
因FireBeetle ESP32-E物理GPIO引脚,所有的逻辑电平均为3.3V。所以我选的这个继电器模块专为低压主控器设计,可以稳定工作在3V供电场景下。
数字继电器模块采用优质继电器,最高可承受10A大电流,使用寿命可达100万次。板载一个红色的LED工作状态指示灯,当常开触点闭合时,LED点亮;常开触点断开时,LED熄灭。接线端设有常开触点接口 (NO) 和常闭触点接口 (NC),方便扩展使用。模块采用Gravity-3Pin接口,即插即用,无需焊接,非常方便。
【主控电源】
某宝5元红包免费购买(包邮),带手电功能,避免广告嫌疑,未拍商标。
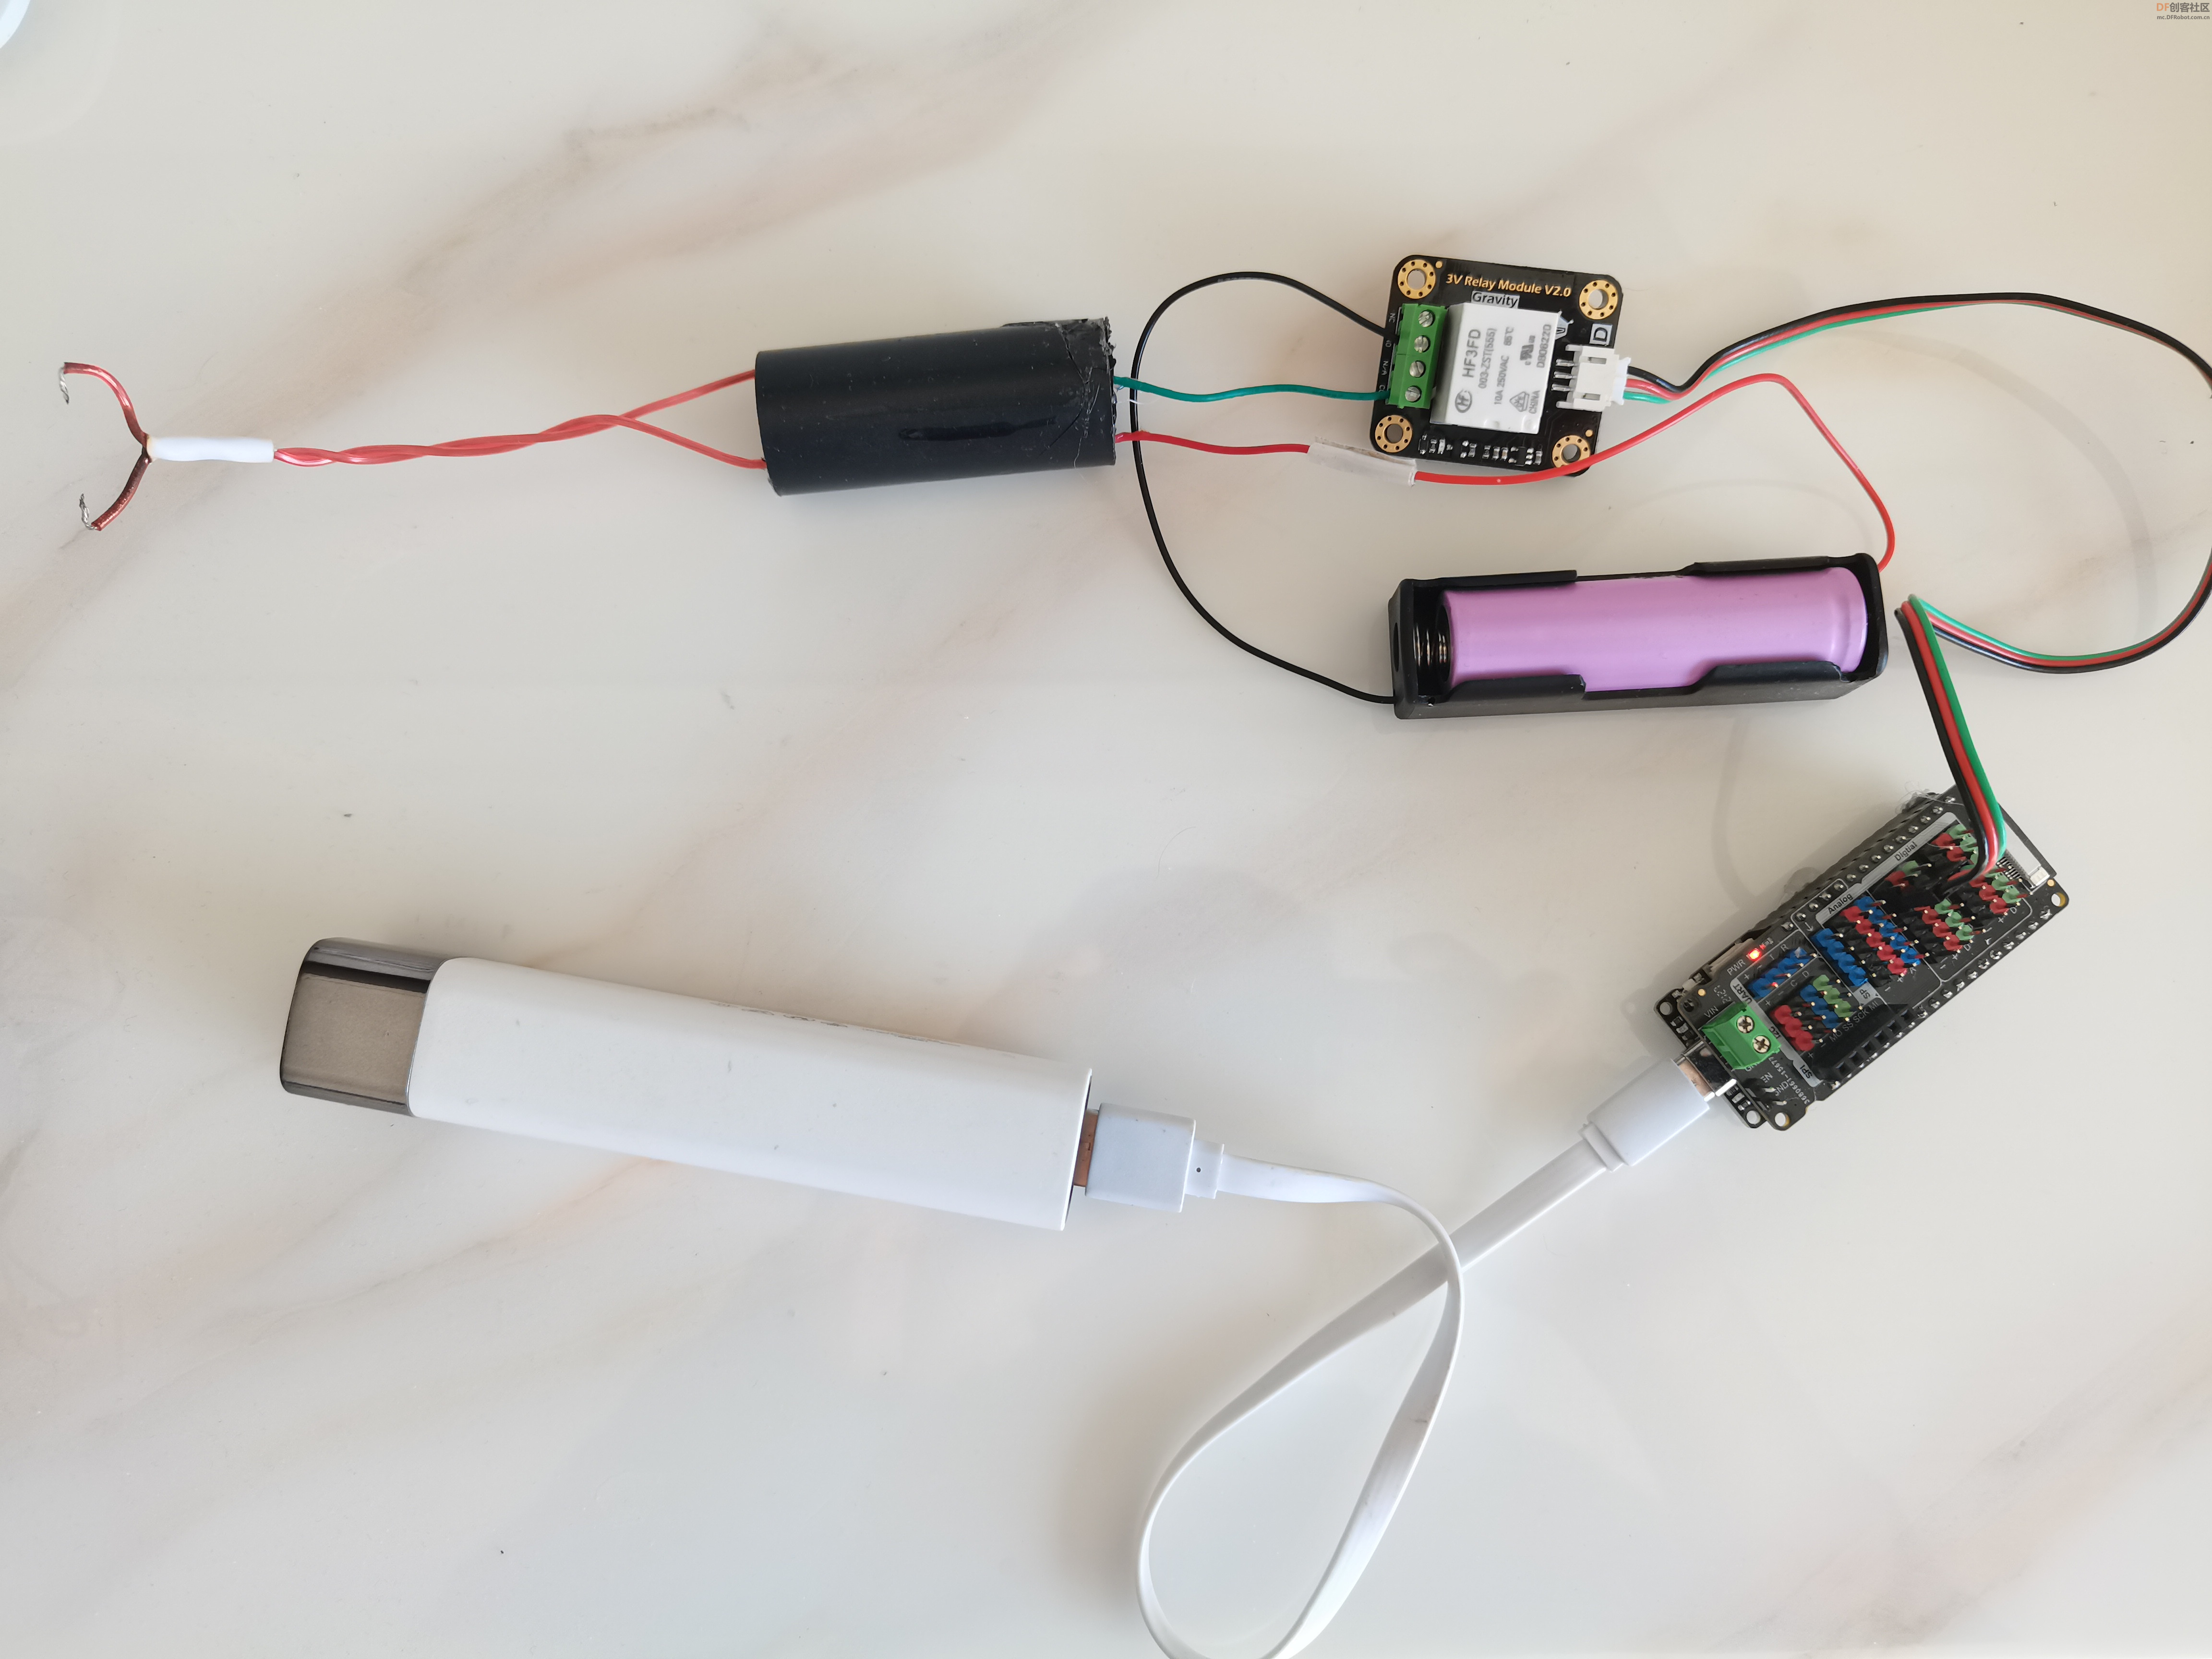
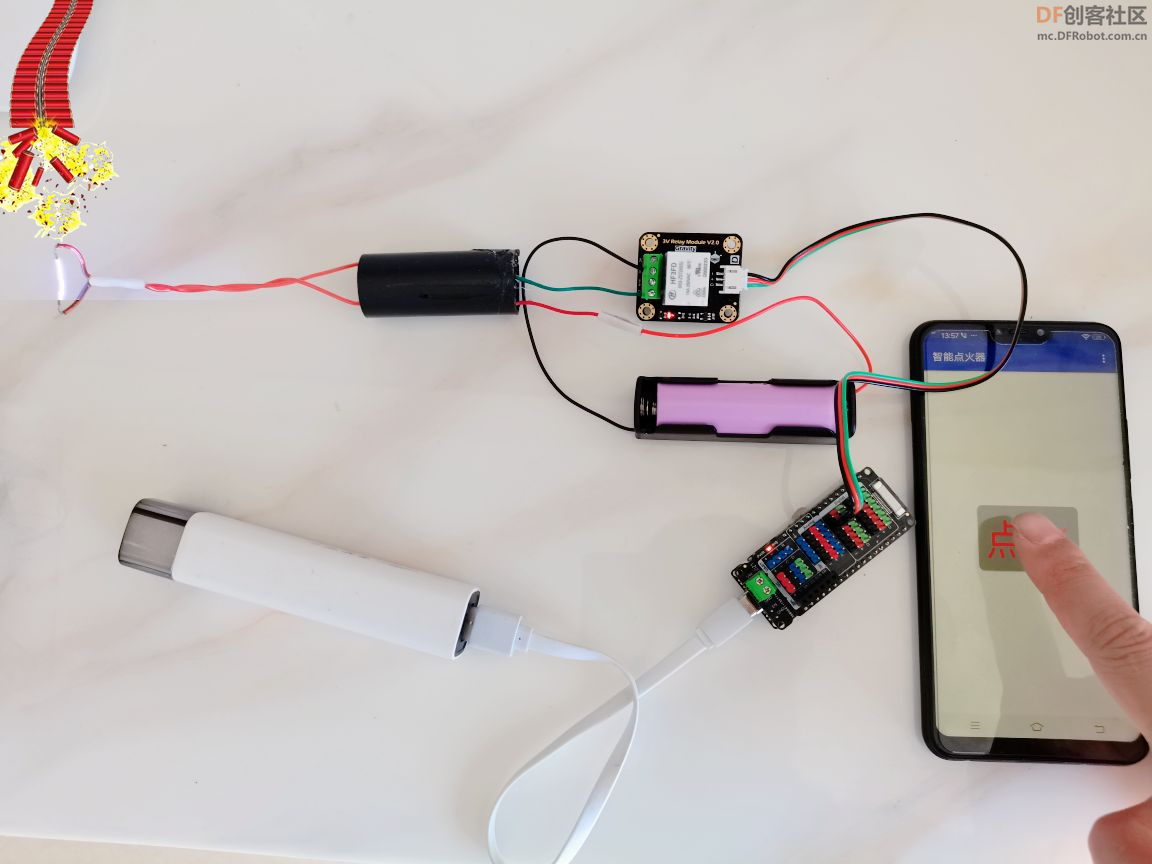
【全景图】
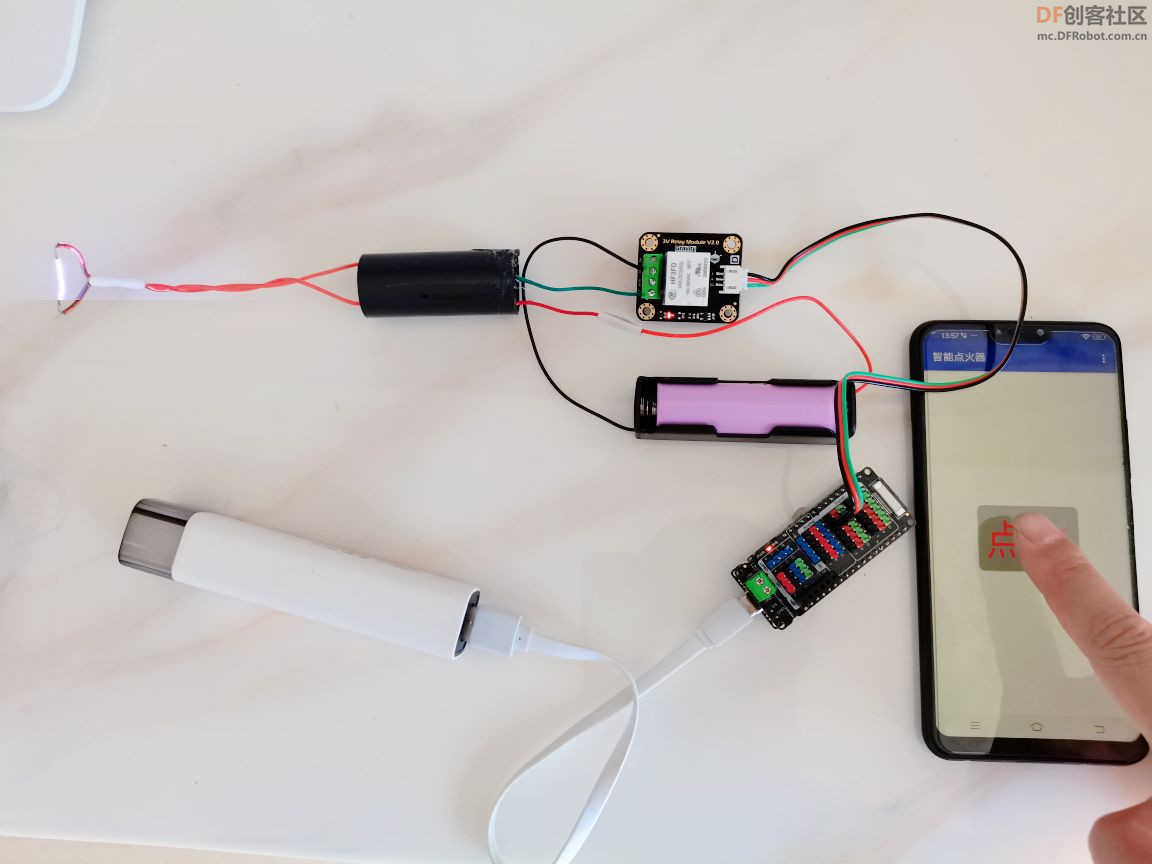
整理之后:
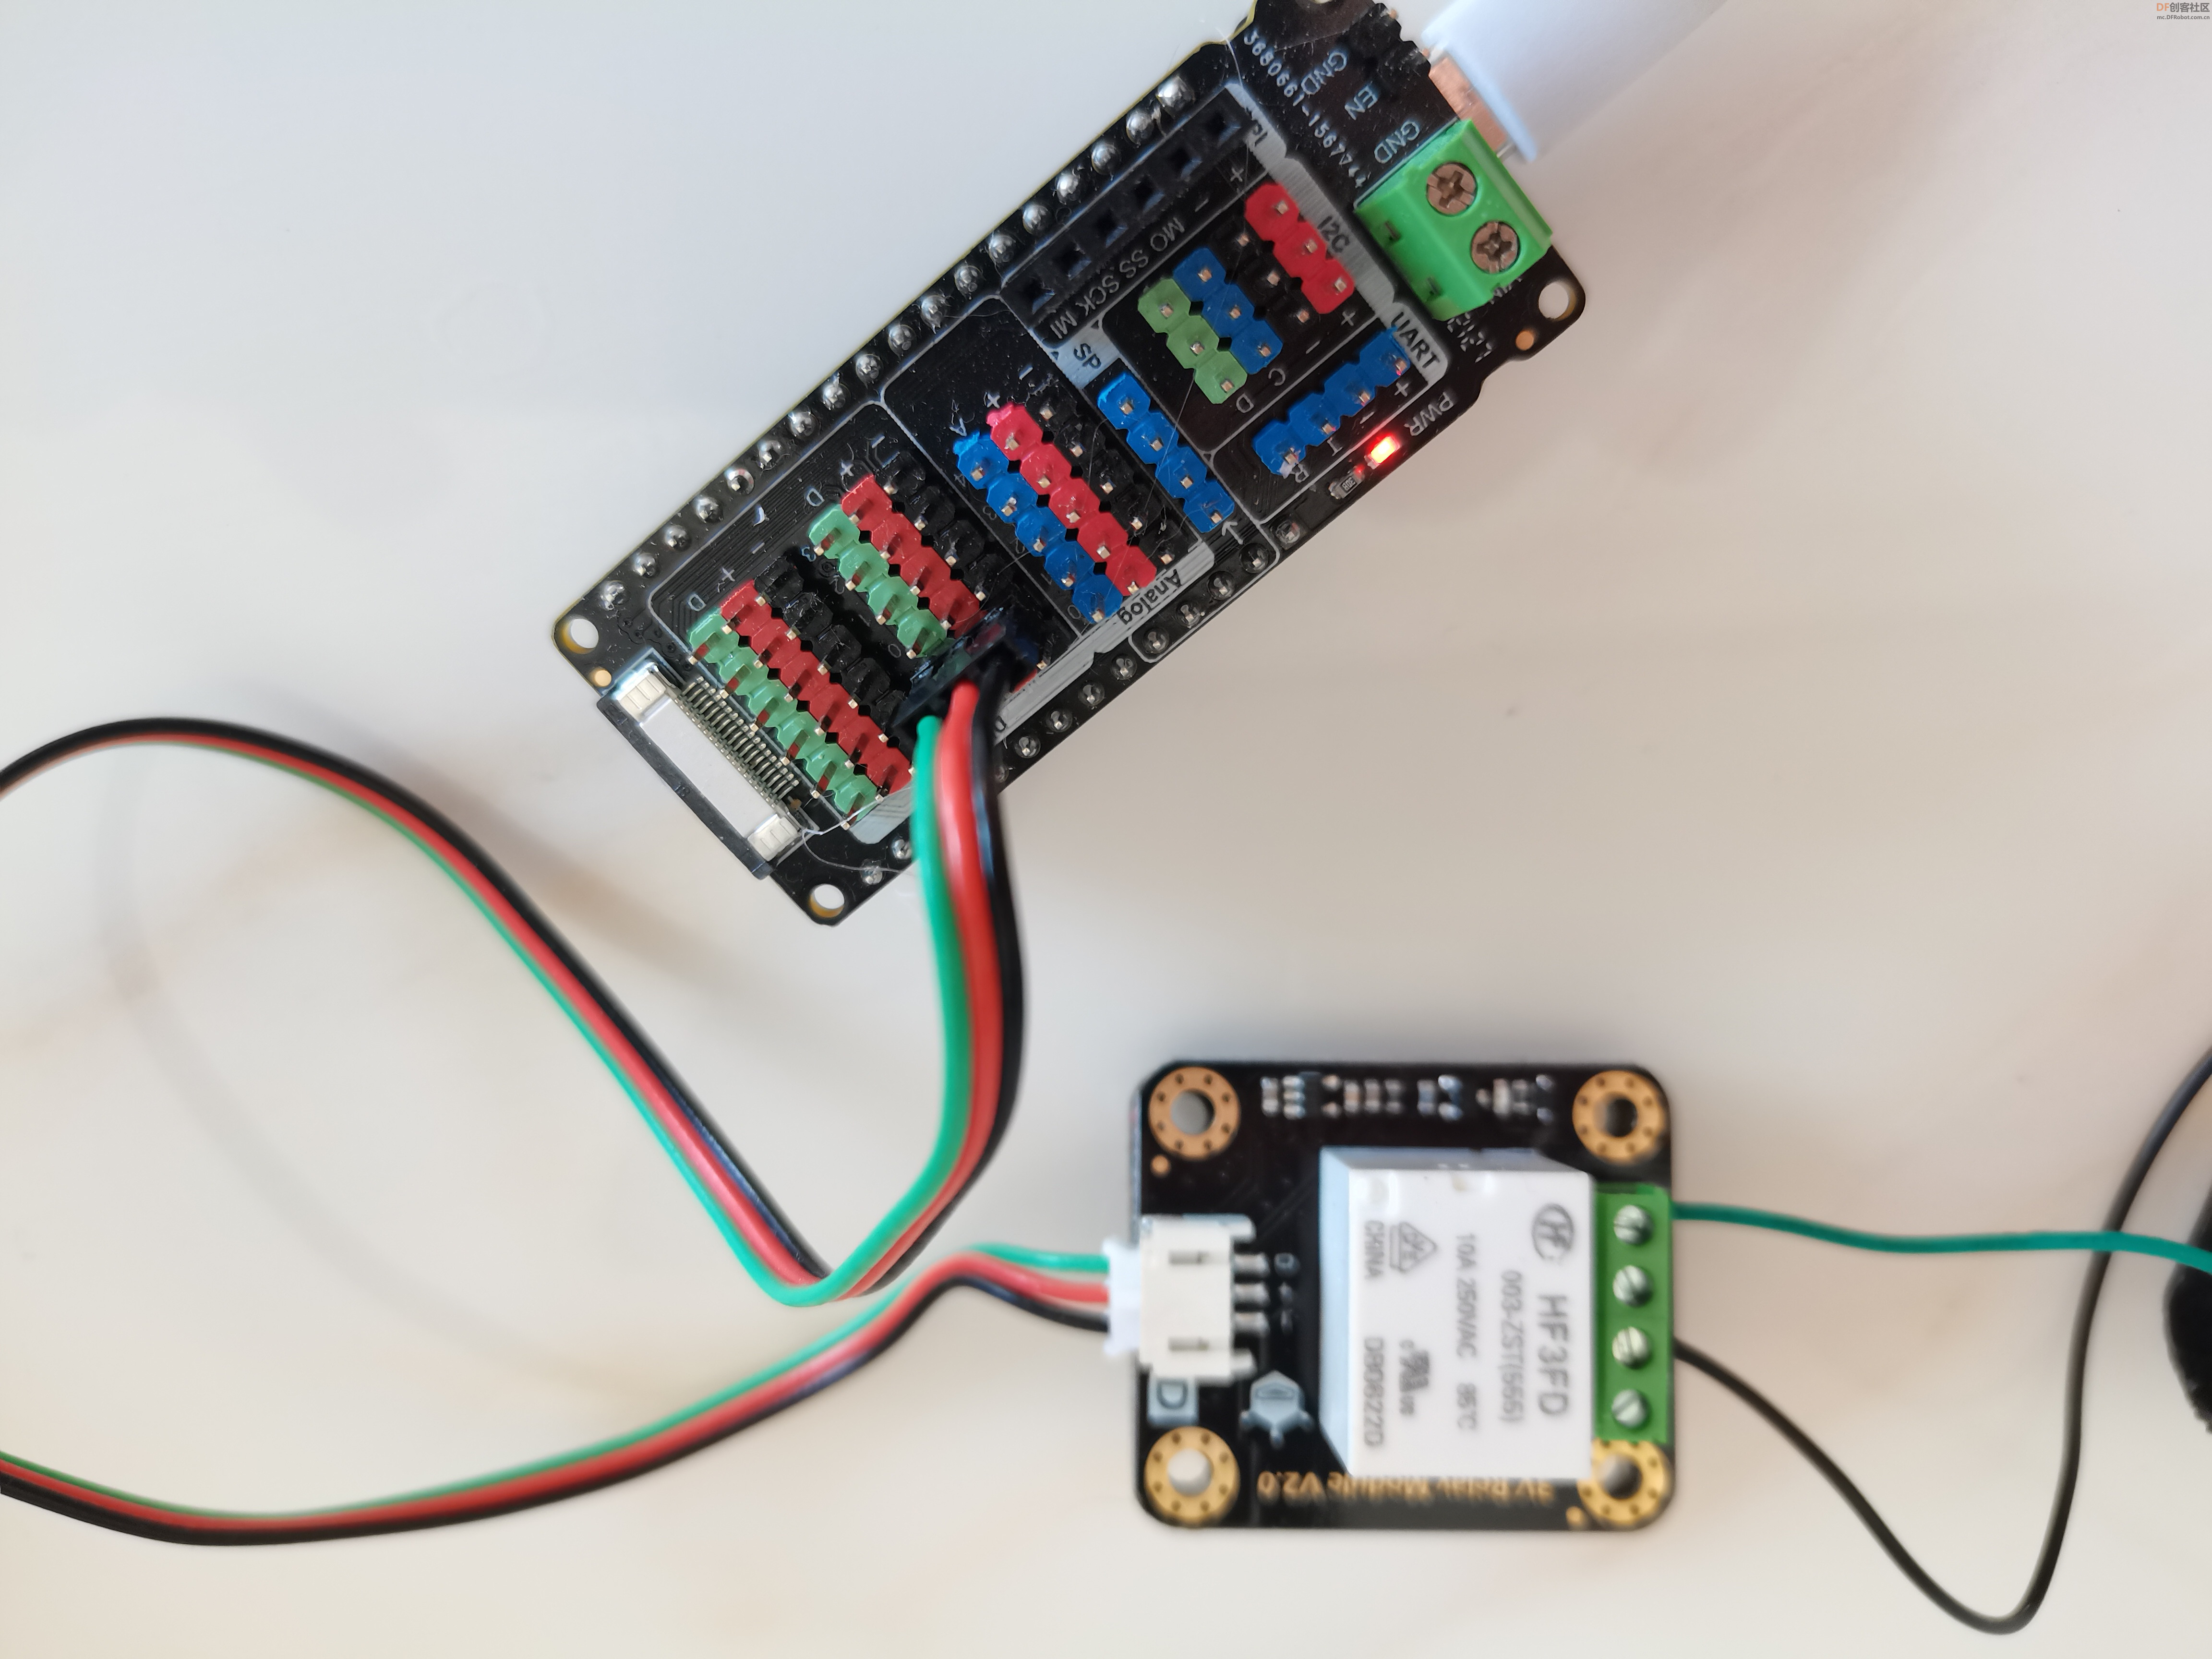
根据“引脚布局图”可知,程序中如使用 2引脚对应扩展板上的D9引脚,所以电磁继电器接在D9引脚上。
【主控程序】
程序中FireBeetle Board ESP32-E自开热点WIFI,供客户端连接。
-
- /*
- WiFiAccessPoint.ino creates a WiFi access point and provides a web server on it.
-
- Steps:
- 1. Connect to the access point "yourAp"
- 2. Point your web browser to http://192.168.4.1/H to turn the LED on or http://192.168.4.1/L to turn it off
- OR
- Run raw TCP "GET /H" and "GET /L" on PuTTY terminal with 192.168.4.1 as IP address and 80 as port
-
- Created for arduino-esp32 on 04 July, 2018
- by Elochukwu Ifediora (fedy0)
- */
-
- #include <WiFi.h>
- #include <WiFiClient.h>
- #include <WiFiAP.h>
-
- #define LED_BUILTIN 2 // Set the GPIO pin where you connected your test LED or comment this line out if your dev board has a built-in LED
-
- // Set these to your desired credentials.
- const char *ssid = "yuntian";
- const char *password = "yuntian123";
-
- WiFiServer server(80);
-
-
- void setup() {
- pinMode(LED_BUILTIN, OUTPUT);
-
- Serial.begin(115200);
- Serial.println();
- Serial.println("Configuring access point...");
-
- // You can remove the password parameter if you want the AP to be open.
- WiFi.softAP(ssid, password);
- IPAddress myIP = WiFi.softAPIP();
- Serial.print("AP IP address: ");
- Serial.println(myIP);
- server.begin();
-
- Serial.println("Server started");
- }
-
- void loop() {
- WiFiClient client = server.available(); // listen for incoming clients
-
- if (client) { // if you get a client,
- Serial.println("New Client."); // print a message out the serial port
- String currentLine = ""; // make a String to hold incoming data from the client
- while (client.connected()) { // loop while the client's connected
- if (client.available()) { // if there's bytes to read from the client,
- char c = client.read(); // read a byte, then
- Serial.write(c); // print it out the serial monitor
- if (c == '\n') { // if the byte is a newline character
-
- // if the current line is blank, you got two newline characters in a row.
- // that's the end of the client HTTP request, so send a response:
- if (currentLine.length() == 0) {
- // HTTP headers always start with a response code (e.g. HTTP/1.1 200 OK)
- // and a content-type so the client knows what's coming, then a blank line:
- client.println("HTTP/1.1 200 OK");
- client.println("Content-type:text/html");
- client.println();
-
- // the content of the HTTP response follows the header:
- client.print("Click <a href="/H">here</a> to turn ON the LED.<br>");
- client.print("Click <a href="/L">here</a> to turn OFF the LED.<br>");
-
- // The HTTP response ends with another blank line:
- client.println();
- // break out of the while loop:
- break;
- } else { // if you got a newline, then clear currentLine:
- currentLine = "";
- }
- } else if (c != '\r') { // if you got anything else but a carriage return character,
- currentLine += c; // add it to the end of the currentLine
- }
-
- // Check to see if the client request was "GET /H" or "GET /L":
- if (currentLine.endsWith("GET /H")) {
- digitalWrite(LED_BUILTIN, HIGH); // GET /H turns the LED on
- delay(1000);
- digitalWrite(LED_BUILTIN, LOW);
- }
- //if (currentLine.endsWith("GET /L")) {
- // digitalWrite(LED_BUILTIN, LOW); // GET /L turns the LED off
- //}
- }
- }
- // close the connection:
- client.stop();
- Serial.println("Client Disconnected.");
- }
- }
程序根据例程改写,其它无改动,仅修改,当收到“GET/H”,设置引脚2高电平,等待一秒后,设置引脚2低电平。使得“电弧发生器”放电一秒。("GET/L"注释掉) - // Check to see if the client request was "GET /H" or "GET /L":
- if (currentLine.endsWith("GET /H")) {
- digitalWrite(LED_BUILTIN, HIGH); // GET /H turns the LED on
- delay(1000);
- digitalWrite(LED_BUILTIN, LOW);
- }
- //if (currentLine.endsWith("GET /L")) {
- // digitalWrite(LED_BUILTIN, LOW); // GET /L turns the LED off
- //}
【APP Inventor2程序】
逻辑设计
使用到WIFI扩展,用于自动连接FireBeetle Board ESP32-E热点AP。使用HTTP客户端,发送指令。
 app_invertor.zip app_invertor.zip
智能点火器.zip
【演示视频】
操作有危险性,小朋友不要模仿!因家中好多年不燃放烟花爆竹了,所以用酒精测试一下效果。
| 


 沪公网安备31011502402448
 置顶卡
置顶卡 变色卡
变色卡 千斤顶
千斤顶


 活跃会员
活跃会员
 宣传大使
宣传大使
 牛X认证
牛X认证
 创客造
创客造
 编辑选择奖
编辑选择奖
 志“童”道合
 编辑选择奖
编辑选择奖
 编辑选择奖
编辑选择奖
 编辑选择奖
编辑选择奖
 编辑选择奖
编辑选择奖


