本帖最后由 无垠的广袤 于 2025-4-14 14:43 编辑
ESP8266 采集 DHT11 和 DS18B20 温湿度数据 MQTT 上传至 Home Assistant
本文介绍了 ESP8266 开发板实现 DHT11 温湿度传感器和 DS18B20 温度传感器实现远程温度监测,通过 MQTT 协议上传至 EMQX 平台,发送 JSON 代码实现 HomeAssistant 智能家居平台数据收集和历史数据查看等功能。
硬件平台
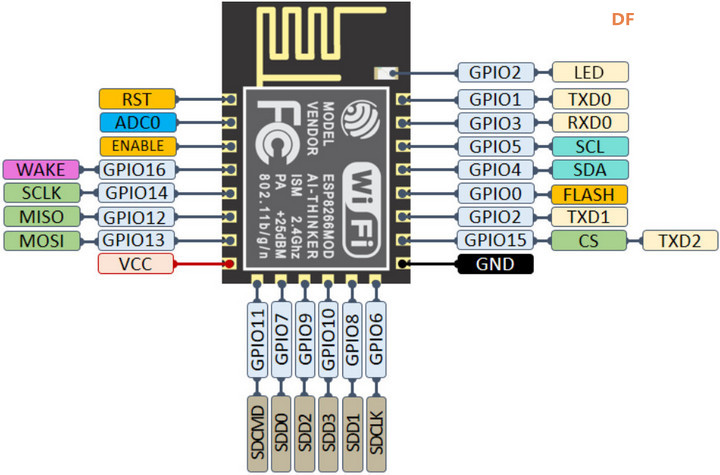
开发板基于 ESP-12E/12F 设计,管脚功能示意图如下
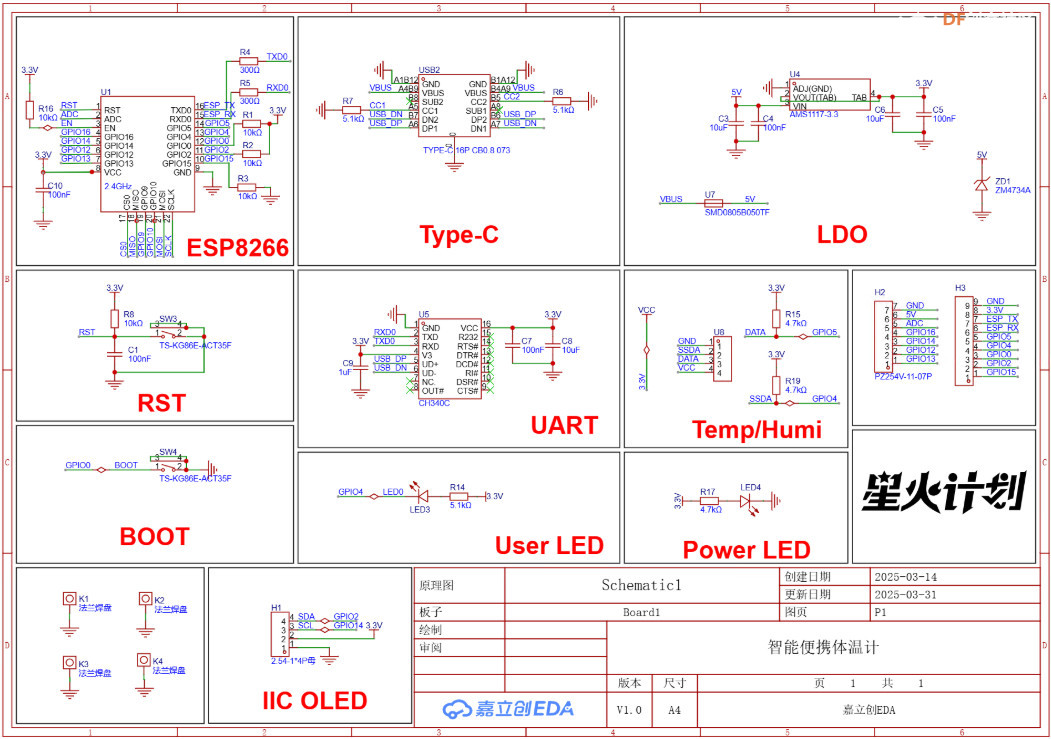
实物图原理图
MQTT
消息队列遥测传输协议(Message Queuing Telemetry Transport,MQTT)是一种基于发布/订阅(publish/subscribe)模式的轻量级通讯协议。
DockerDocker 是一个开源的应用容器引擎,它允许开发者将应用及其依赖打包到一个轻量级、可移植的容器中,可以在任何流行操作系统中发布和运行。
安装 Docker Desktop
EMQXEMQX 是一款完全开源,高度可伸缩,高可用的分布式MQTT 消息服务器。
部署流程点击 EMQX 容器后的端口链接,登录 EMQX 后台,初始账号和密码分别为 admin 和 public
回到平台主界面,可观察节点和连接数目等信息
Home AssistantHome Assistant ,简称 HA,是一款基于 Python 的智能家居开源系统,支持众多品牌的智能家居设备,可以轻松实现硬件物联网、自动化等。
Docker 部署 Home Assistant 的主要流程
部署流程硬盘根目录新建文件夹 homeassistant ,解压 HA 镜像文件,得到 docker-compose.yml ; 当前目录下打开命令行终端,执行安装指令 - cd C:\homeassistant
- docker-compose.yml
- docker-compose up
添加 MQTT 集成
依次点击 设置 - 设备与服务 - 添加集成 - 搜索 MQTT - 填写代理信息;
创建成功后,可在 设备与服务 选项下看到 MQTT 应用图标;
根据开发板蓝牙发送的信息格式,配置 YAML 参数
打开 Home Assistant 安装根目录下的 configuration.yaml 文件,并添加如下代码
- mqtt:
- sensor:
- - name: "Temperature"
- state_topic: "home/sensor/"
- suggested_display_precision: 2
- unit_of_measurement: "C"
- value_template: "{{ value_json.temperature }}"
- - name: "Humidity"
- state_topic: "home/sensor/"
- suggested_display_precision: 2
- unit_of_measurement: "%"
- value_template: "{{ value_json.humidity }}"
需要注意主题 state_topic 和 value_template 的定义。
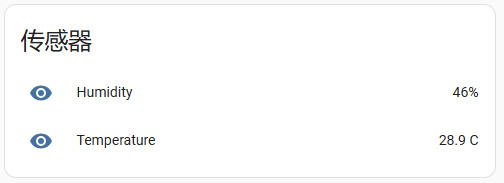
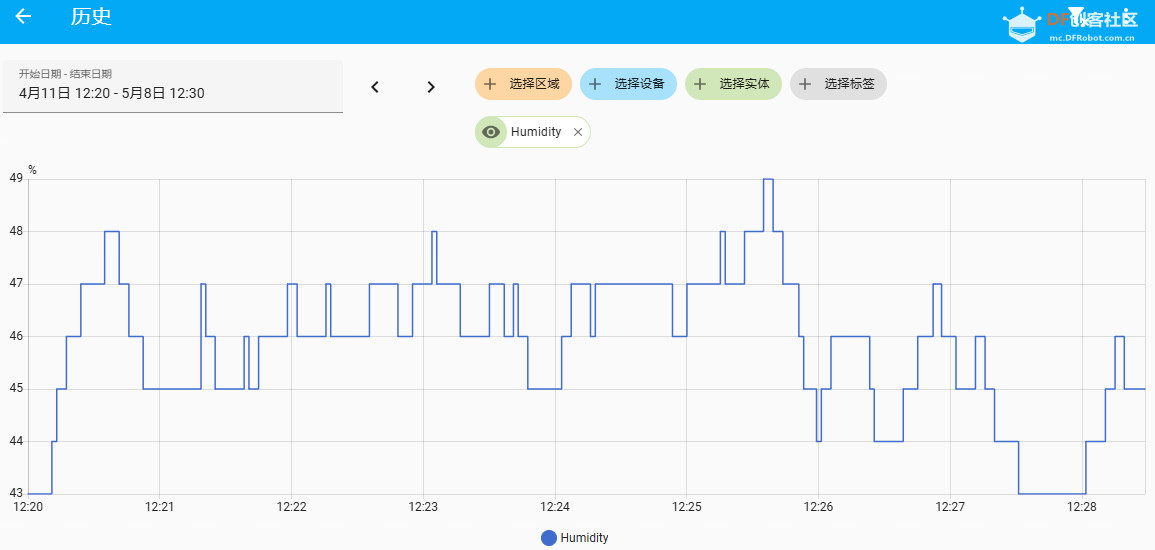
在 开发者工具 界面 重新加载 YAML 所有配置 并刷新浏览器界面,即可看到传感器选项。
DHT11
采集 DHT11 温湿度数据并通过 MQTT 联网上传至 Home Assistant 智能家居平台;
Arduino Code- #include <ESP8266WiFi.h>
- #include <PubSubClient.h>
- #include <ArduinoJson.h>
- #include <DHT.h>
-
- // WiFi Configuration
- const char* ssid = "xxx";
- const char* password = "xxx";
-
- // MQTT Configuration
- const char* mqtt_server = "192.168.1.121";
- const int mqtt_port = 1883;
- const char* mqtt_user = "admin";
- const char* mqtt_password = "admin";
-
- // Device Configuration
- const char* device_name = "esp8266_dht11";
- const char* device_id = "livingroom_sensor";
-
- // Topics
- const char* state_topic = "home/sensor/";
- const char* temp_config_topic = "home/sensor/";
- const char* hum_config_topic = "home/sensor/";
-
- // DHT Sensor
- #define DHTPIN 5
- #define DHTTYPE DHT11
- DHT dht(DHTPIN, DHTTYPE);
-
- WiFiClient espClient;
- PubSubClient client(espClient);
-
- void setup_wifi() {
- delay(10);
- Serial.println();
- Serial.print("Connecting to ");
- Serial.println(ssid);
-
- WiFi.begin(ssid, password);
-
- while (WiFi.status() != WL_CONNECTED) {
- delay(500);
- Serial.print(".");
- }
-
- Serial.println("");
- Serial.println("WiFi connected");
- Serial.println("IP address: ");
- Serial.println(WiFi.localIP());
- }
-
- void reconnect() {
- while (!client.connected()) {
- Serial.print("Attempting MQTT connection...");
- if (client.connect(device_name, mqtt_user, mqtt_password)) {
- Serial.println("connected");
- // Send Home Assistant auto-discovery config
- sendAutoDiscoveryConfig();
- } else {
- Serial.print("failed, rc=");
- Serial.print(client.state());
- Serial.println(" try again in 5 seconds");
- delay(5000);
- }
- }
- }
-
- void sendAutoDiscoveryConfig() {
- // Configuration for temperature sensor
- DynamicJsonDocument temp_config(512);
- temp_config["name"] = "Living Room Temperature";
- temp_config["device_class"] = "temperature";
- temp_config["state_topic"] = state_topic;
- temp_config["unit_of_measurement"] = "°C";
- temp_config["value_template"] = "{{ value_json.temperature }}";
- temp_config["unique_id"] = String(device_id) + "_temperature";
- temp_config["device"]["identifiers"] = device_id;
- temp_config["device"]["name"] = "Living Room Sensor";
- temp_config["device"]["manufacturer"] = "DIY";
- temp_config["device"]["model"] = "ESP8266+DHT11";
-
- char temp_config_message[512];
- serializeJson(temp_config, temp_config_message);
- client.publish(temp_config_topic, temp_config_message, true);
-
- // Configuration for humidity sensor
- DynamicJsonDocument hum_config(512);
- hum_config["name"] = "Living Room Humidity";
- hum_config["device_class"] = "humidity";
- hum_config["state_topic"] = state_topic;
- hum_config["unit_of_measurement"] = "%";
- hum_config["value_template"] = "{{ value_json.humidity }}";
- hum_config["unique_id"] = String(device_id) + "_humidity";
- hum_config["device"] = temp_config["device"]; // Same device info
-
- char hum_config_message[512];
- serializeJson(hum_config, hum_config_message);
- client.publish(hum_config_topic, hum_config_message, true);
- }
-
- void setup() {
- Serial.begin(115200);
- dht.begin();
- setup_wifi();
- client.setServer(mqtt_server, mqtt_port);
- }
-
- void loop() {
- if (!client.connected()) {
- reconnect();
- }
- client.loop();
-
- delay(2000); // Wait between measurements
-
- float h = dht.readHumidity();
- float t = dht.readTemperature();
-
- if (isnan(h) || isnan(t)) {
- Serial.println("Failed to read from DHT sensor!");
- return;
- }
-
- // Create JSON payload
- DynamicJsonDocument doc(256);
- doc["temperature"] = t;
- doc["humidity"] = h;
-
- char json_string[256];
- serializeJson(doc, json_string);
-
- Serial.print("Publishing: ");
- Serial.println(json_string);
-
- client.publish(state_topic, json_string, true);
- }
效果DS18B20
采集 DS18B20 温度数据并通过 MQTT 联网上传至 Home Assistant 智能家居平台;
Arduino Code- #include <ESP8266WiFi.h>
- #include <PubSubClient.h>
- #include <ArduinoJson.h>
- #include <OneWire.h>
- #include <DallasTemperature.h>
-
- // WiFi Configuration
- const char* ssid = "B228-230";
- const char* password = "LPSerB228";
-
- // MQTT Configuration
- const char* mqtt_server = "192.168.1.121";
- const int mqtt_port = 1883;
- const char* mqtt_user = "LJL";
- const char* mqtt_password = "4421989g";
-
- // Device Configuration
- const char* device_name = "esp8266_ds18b20";
- const char* device_id = "water_tank_sensor";
-
- // Topics
- const char* state_topic = "home/sensor/";
- const char* temp_config_topic = "home/sensor/";
-
- // DS18B20 Setup
- #define ONE_WIRE_BUS 5
- OneWire oneWire(ONE_WIRE_BUS);
- DallasTemperature sensors(&oneWire);
-
- WiFiClient espClient;
- PubSubClient client(espClient);
-
- void setup_wifi() {
- delay(10);
- Serial.println();
- Serial.print("Connecting to ");
- Serial.println(ssid);
-
- WiFi.begin(ssid, password);
-
- while (WiFi.status() != WL_CONNECTED) {
- delay(500);
- Serial.print(".");
- }
-
- Serial.println("");
- Serial.println("WiFi connected");
- Serial.println("IP address: ");
- Serial.println(WiFi.localIP());
- }
-
- void reconnect() {
- while (!client.connected()) {
- Serial.print("Attempting MQTT connection...");
- if (client.connect(device_name, mqtt_user, mqtt_password)) {
- Serial.println("connected");
- // Send Home Assistant auto-discovery config
- sendAutoDiscoveryConfig();
- } else {
- Serial.print("failed, rc=");
- Serial.print(client.state());
- Serial.println(" try again in 5 seconds");
- delay(5000);
- }
- }
- }
-
- void sendAutoDiscoveryConfig() {
- // Configuration for temperature sensor
- DynamicJsonDocument temp_config(512);
- temp_config["name"] = "Water Tank Temperature";
- temp_config["device_class"] = "temperature";
- temp_config["state_topic"] = state_topic;
- temp_config["unit_of_measurement"] = "°C";
- temp_config["value_template"] = "{{ value_json.temperature }}";
- temp_config["unique_id"] = String(device_id) + "_temperature";
- temp_config["device"]["identifiers"] = device_id;
- temp_config["device"]["name"] = "Water Tank Sensor";
- temp_config["device"]["manufacturer"] = "DIY";
- temp_config["device"]["model"] = "ESP8266+DS18B20";
-
- char temp_config_message[512];
- serializeJson(temp_config, temp_config_message);
- client.publish(temp_config_topic, temp_config_message, true);
- }
-
- void setup() {
- Serial.begin(115200);
- sensors.begin();
- setup_wifi();
- client.setServer(mqtt_server, mqtt_port);
- }
-
- void loop() {
- if (!client.connected()) {
- reconnect();
- }
- client.loop();
-
- delay(2000); // Wait between measurements
-
- sensors.requestTemperatures();
- float t = sensors.getTempCByIndex(0);
-
- // Check if reading is valid
- if(t == DEVICE_DISCONNECTED_C) {
- Serial.println("Error: Could not read temperature data");
- return;
- }
-
- // Create JSON payload
- DynamicJsonDocument doc(128);
- doc["temperature"] = t;
-
- char json_string[128];
- serializeJson(doc, json_string);
-
- Serial.print("Temperature: ");
- Serial.print(t);
- Serial.println(" °C");
- Serial.print("Publishing: ");
- Serial.println(json_string);
-
- client.publish(state_topic, json_string, true);
- }
OLED显示- #include <ESP8266WiFi.h>
- #include <PubSubClient.h>
- #include <ArduinoJson.h>
- #include <OneWire.h>
- #include <DallasTemperature.h>
- // OLED
- #include <Wire.h>
- #include <Adafruit_GFX.h>
- #include <Adafruit_SSD1306.h>
- #include <Adafruit_Sensor.h>
-
- #define SCREEN_WIDTH 128 // OLED display width, in pixels
- #define SCREEN_HEIGHT 64 // OLED display height, in pixels
- #define OLED_SDA 02 // SDA引脚,gpio2(D4)
- #define OLED_SCL 14 // SCL引脚,gpio14(D5)
-
- // Declaration for an SSD1306 display connected to I2C (SDA, SCL pins)
- Adafruit_SSD1306 display(SCREEN_WIDTH, SCREEN_HEIGHT, &Wire, -1);
-
- // WiFi Configuration
- const char* ssid = "B228-230";
- const char* password = "LPSerB228";
-
- // MQTT Configuration
- const char* mqtt_server = "192.168.1.121";
- const int mqtt_port = 1883;
- const char* mqtt_user = "LJL";
- const char* mqtt_password = "4421989g";
-
- // Device Configuration
- const char* device_name = "esp8266_ds18b20";
- const char* device_id = "water_tank_sensor";
-
- // Topics
- const char* state_topic = "home/sensor/";
- const char* temp_config_topic = "home/sensor/";
-
- // DS18B20 Setup
- #define ONE_WIRE_BUS 5
- OneWire oneWire(ONE_WIRE_BUS);
- DallasTemperature sensors(&oneWire);
-
- WiFiClient espClient;
- PubSubClient client(espClient);
-
- void setup_wifi() {
- delay(10);
- Serial.println();
- Serial.print("Connecting to ");
- Serial.println(ssid);
-
- WiFi.begin(ssid, password);
-
- while (WiFi.status() != WL_CONNECTED) {
- delay(500);
- Serial.print(".");
- }
-
- Serial.println("");
- Serial.println("WiFi connected");
- Serial.println("IP address: ");
- Serial.println(WiFi.localIP());
- }
-
- void reconnect() {
- while (!client.connected()) {
- Serial.print("Attempting MQTT connection...");
- if (client.connect(device_name, mqtt_user, mqtt_password)) {
- Serial.println("connected");
- // Send Home Assistant auto-discovery config
- sendAutoDiscoveryConfig();
- } else {
- Serial.print("failed, rc=");
- Serial.print(client.state());
- Serial.println(" try again in 5 seconds");
- delay(5000);
- }
- }
- }
-
- void sendAutoDiscoveryConfig() {
- // Configuration for temperature sensor
- DynamicJsonDocument temp_config(512);
- temp_config["name"] = "Water Tank Temperature";
- temp_config["device_class"] = "temperature";
- temp_config["state_topic"] = state_topic;
- temp_config["unit_of_measurement"] = "°C";
- temp_config["value_template"] = "{{ value_json.temperature }}";
- temp_config["unique_id"] = String(device_id) + "_temperature";
- temp_config["device"]["identifiers"] = device_id;
- temp_config["device"]["name"] = "Water Tank Sensor";
- temp_config["device"]["manufacturer"] = "DIY";
- temp_config["device"]["model"] = "ESP8266+DS18B20";
-
- char temp_config_message[512];
- serializeJson(temp_config, temp_config_message);
- client.publish(temp_config_topic, temp_config_message, true);
- }
-
- void setup() {
- Wire.begin(OLED_SDA, OLED_SCL);
- Serial.begin(115200);
-
- sensors.begin();
-
- if(!display.begin(SSD1306_SWITCHCAPVCC, 0x3C)) {
- Serial.println(F("SSD1306 allocation failed"));
- for(;;);
- }
- delay(2000);
- display.clearDisplay();
- display.setTextColor(WHITE);
-
- setup_wifi();
- client.setServer(mqtt_server, mqtt_port);
- }
-
- void loop() {
- //read temperature
- Serial.print("Requesting temperatures...");
- sensors.requestTemperatures(); // Send the command to get temperatures
- Serial.println("DONE");
-
- if (!client.connected()) {
- reconnect();
- }
- client.loop();
-
- delay(2000); // Wait between measurements
-
- //sensors.requestTemperatures();
- float tempC = sensors.getTempCByIndex(0);
-
- // Check if reading is valid
- if (tempC != DEVICE_DISCONNECTED_C)
- {
- Serial.print("Temperature for the device 1 (index 0) is: ");
- Serial.println(tempC);
- }
- else
- {
- Serial.println("Error: Could not read temperature data");
- return;
- }
- /*
- if(tempC == DEVICE_DISCONNECTED_C) {
- Serial.println("Error: Could not read temperature data");
- return;
- }
- */
- // clear display
- display.clearDisplay();
- // display temperature
- display.setTextSize(1);
- display.setCursor(0,0);
- display.print("Temperature: ");
- display.setTextSize(2);
- display.setCursor(0,17);
- display.print(tempC);
- display.print(" ");
- display.setTextSize(1);
- display.cp437(true);
- display.write(167);
- display.setTextSize(2);
- display.print("C");
-
- display.display();
-
- // Create JSON payload
- DynamicJsonDocument doc(128);
- doc["temperature"] = tempC;
-
- char json_string[128];
- serializeJson(doc, json_string);
-
- Serial.print("Temperature: ");
- Serial.print(tempC);
- Serial.println(" °C");
- Serial.print("Publishing: ");
- Serial.println(json_string);
-
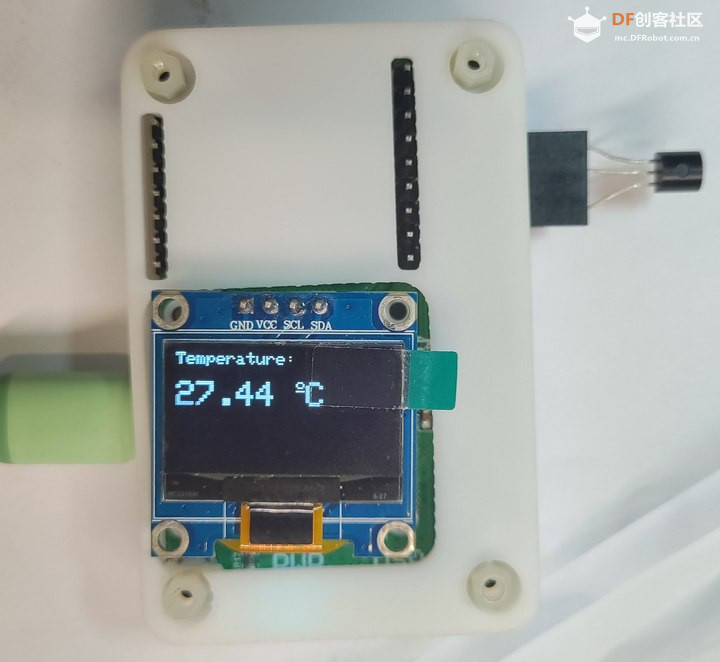
- client.publish(state_topic, json_string, true);
- }
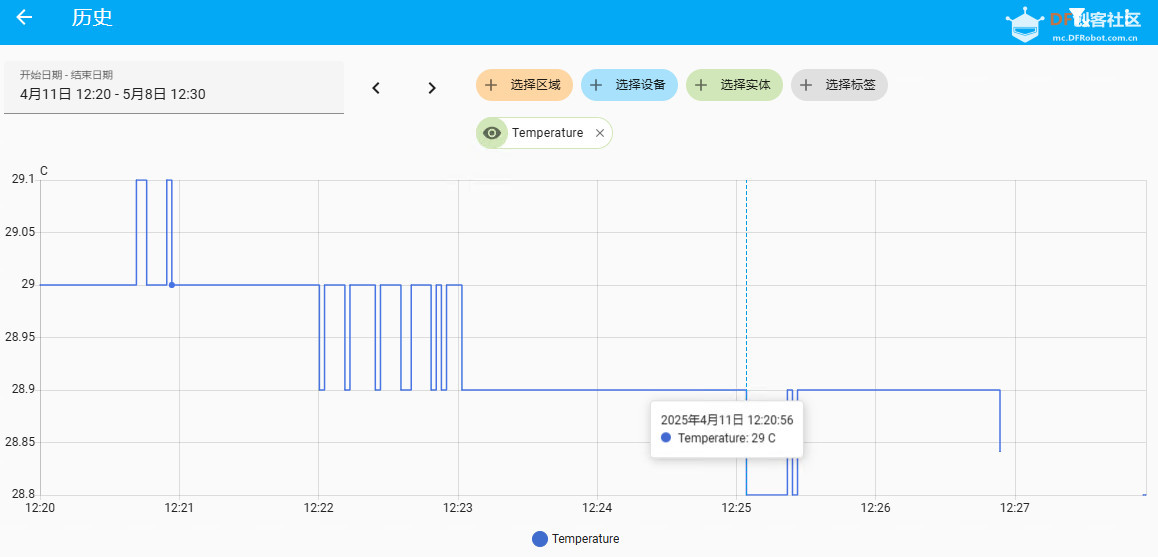
效果
总结
本文介绍了 ESP8266 开发板实现 DHT11 温湿度传感器和 DS18B20 温度传感器实现远程温度监测,通过 MQTT 协议上传至 EMQX 平台,发送 JSON 代码实现 HomeAssistant 智能家居平台数据收集和历史数据查看等功能,为物联网相关硬件部署和智能家居的开发和拓展提供了参考。
| 


 沪公网安备31011502402448

 置顶卡
置顶卡 变色卡
变色卡 千斤顶
千斤顶


