更新:
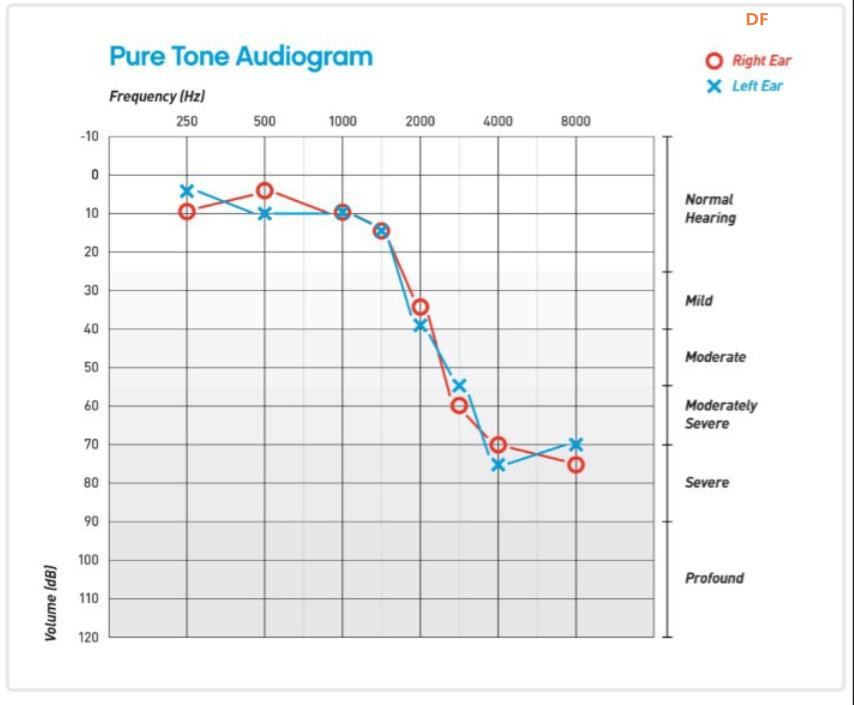
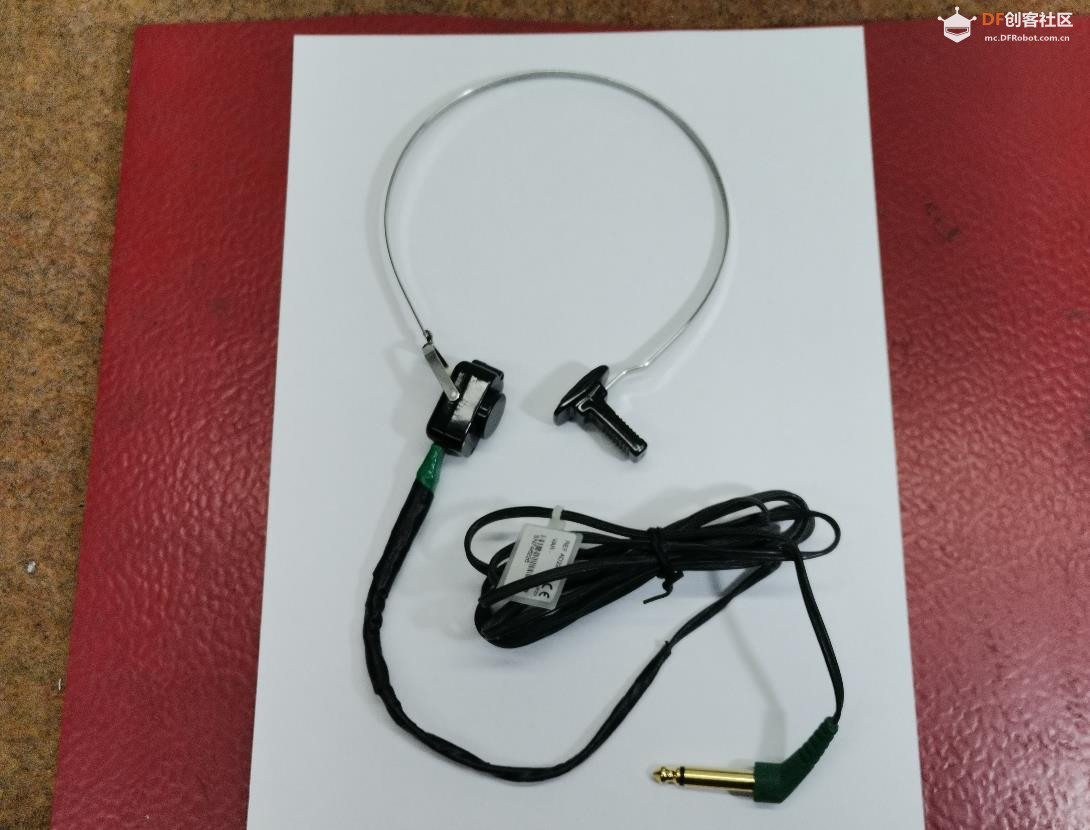
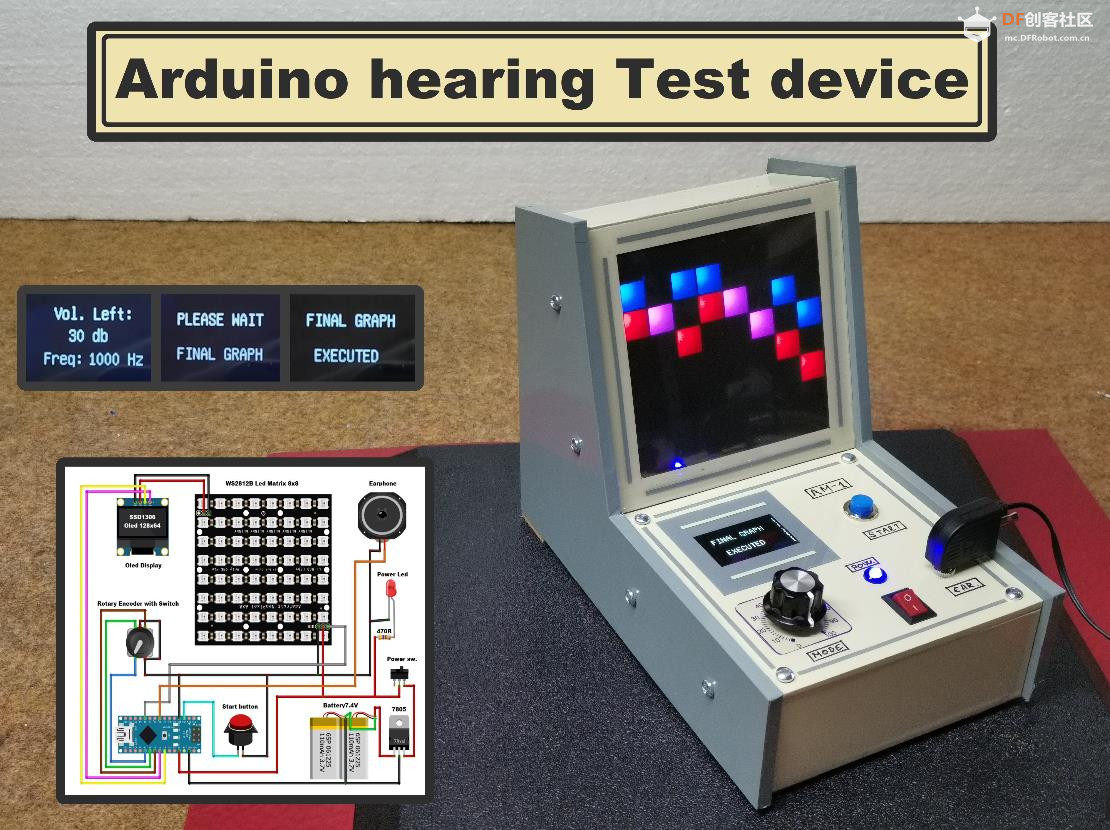
项目完成几天后,我拿到了用于骨传导测试的骨传导耳机。这是另一种纯音测试,用于测量内耳对声音的响应。测试人员会将一个导体放置在耳后,它会将微小的振动通过骨骼直接传递到内耳。这与传统的利用空气传递可听声音的测试方法不同。如果骨传导测试的结果与纯音听力测试结果不同,您的听力学家可以使用这些信息来确定您的听力损失类型。确定阈值的方法与获取气导阈值的方法相同。骨传导测量通常限制在 250 至 4000 Hz 的频率范围内。我对之前描述的设备进行了小幅修改,扩展了它的功能,之后也可以用它来进行骨传导测试。
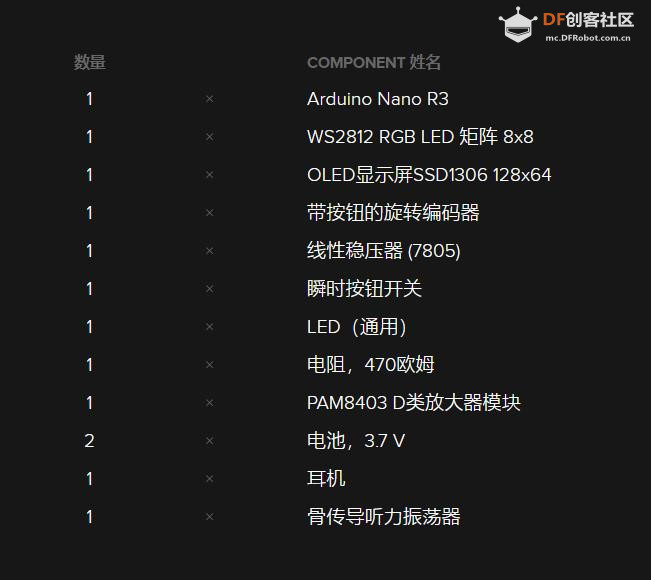
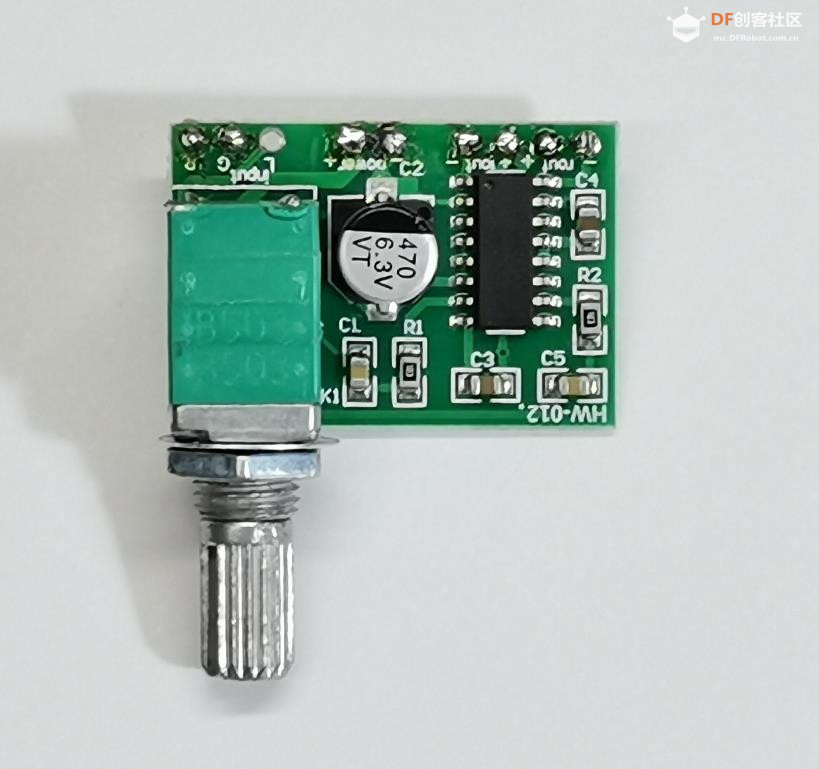
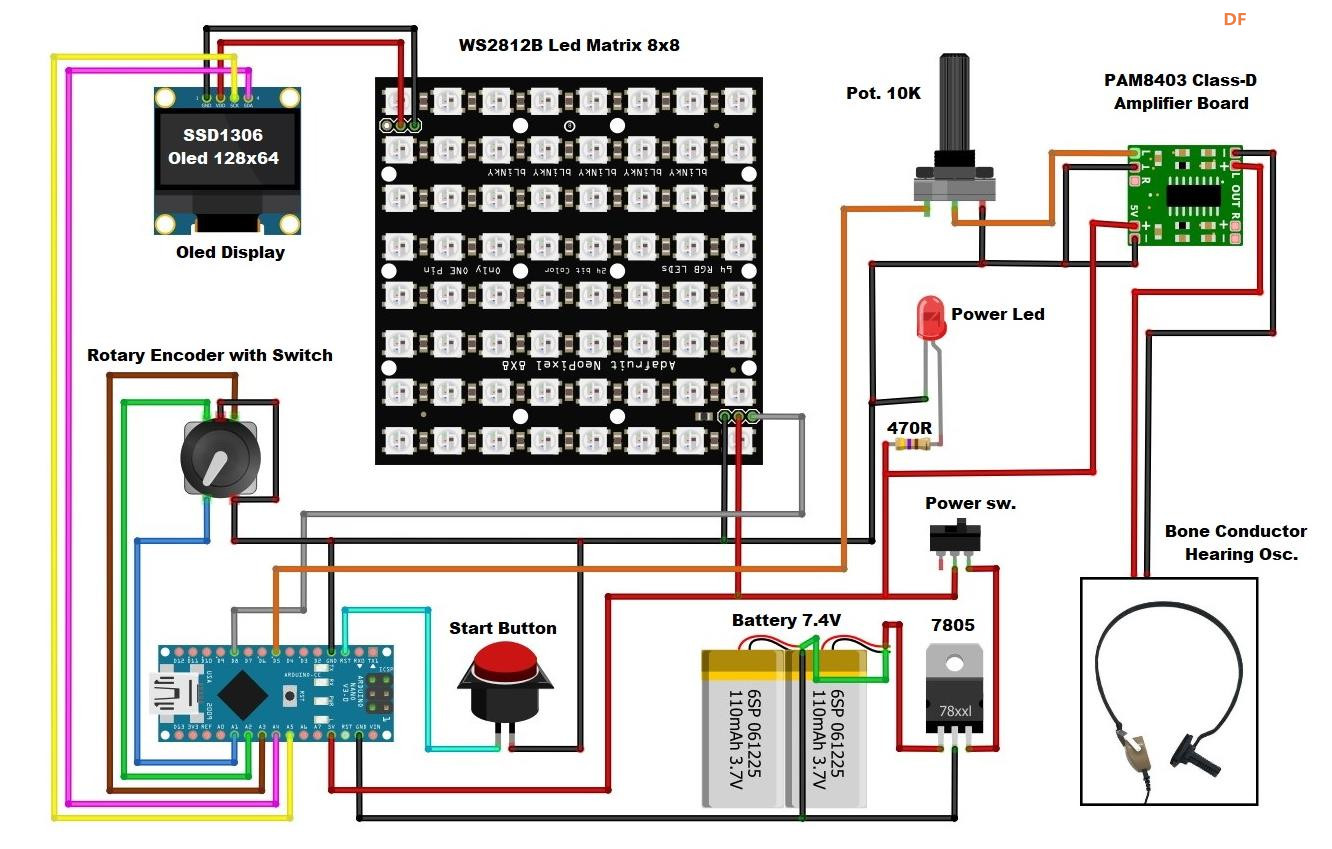
由于测试耳机振动器的欧姆电阻只有 4 欧姆,因此只需添加一个小型音频放大器即可。我使用了一个小型廉价的 D 类放大器,带有一个电位器,非常适合此目的。
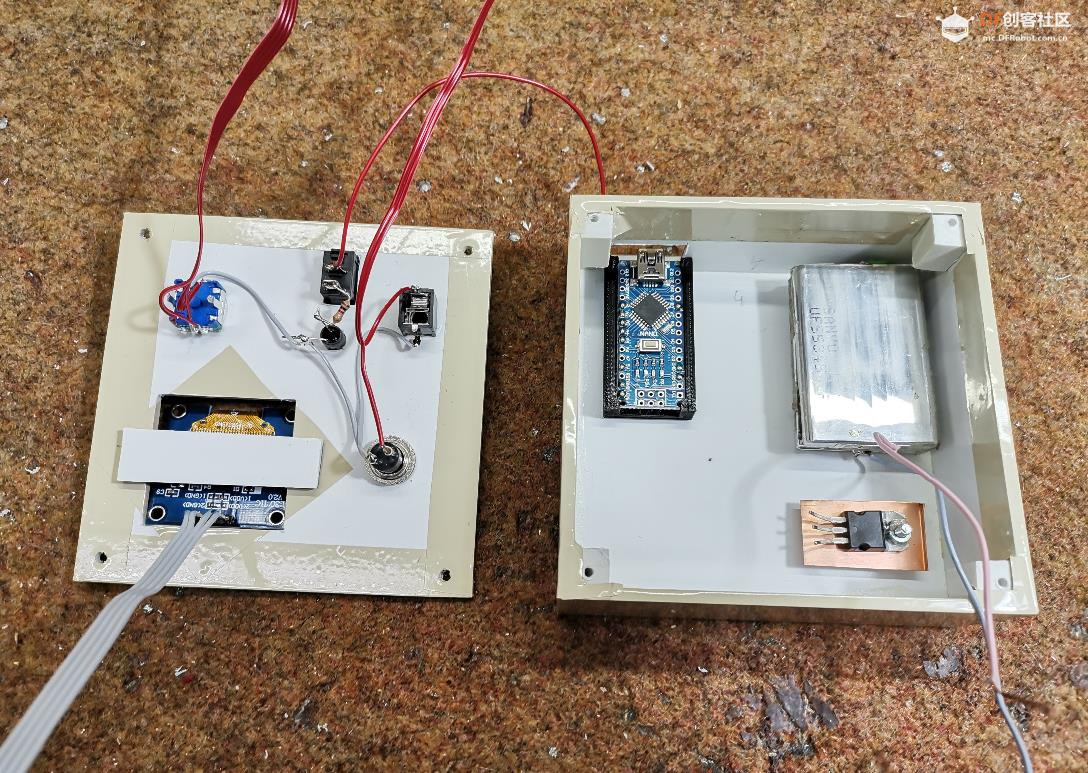
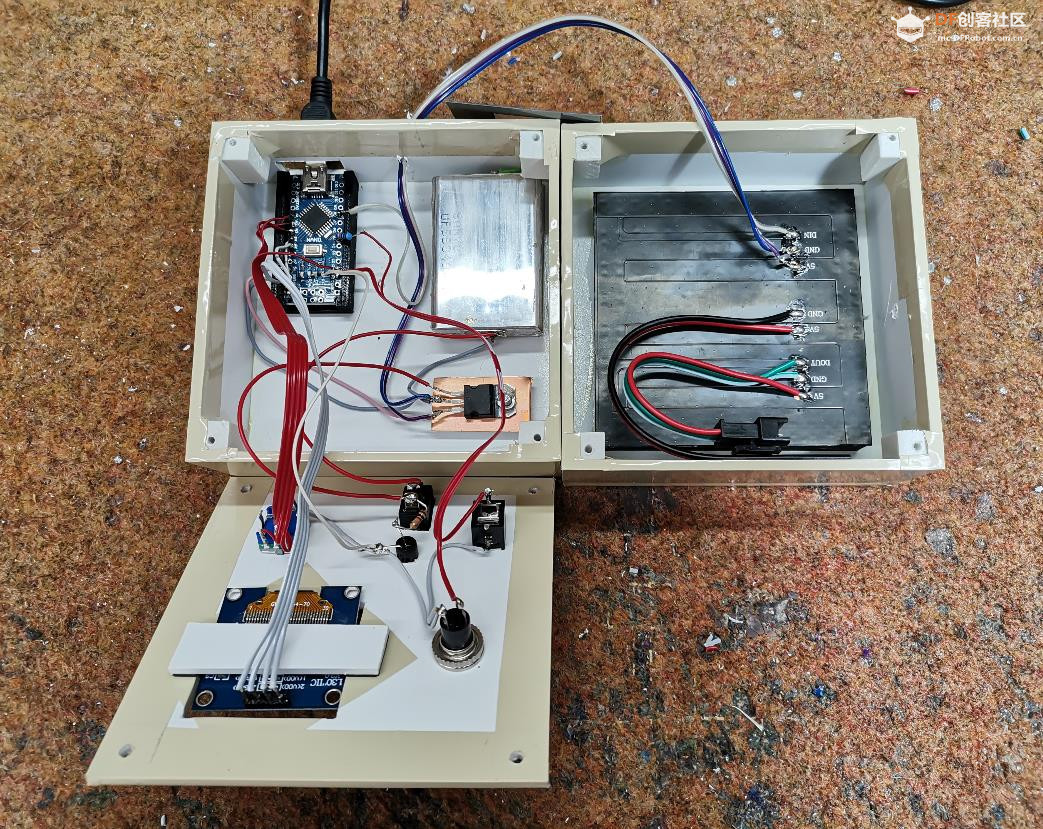
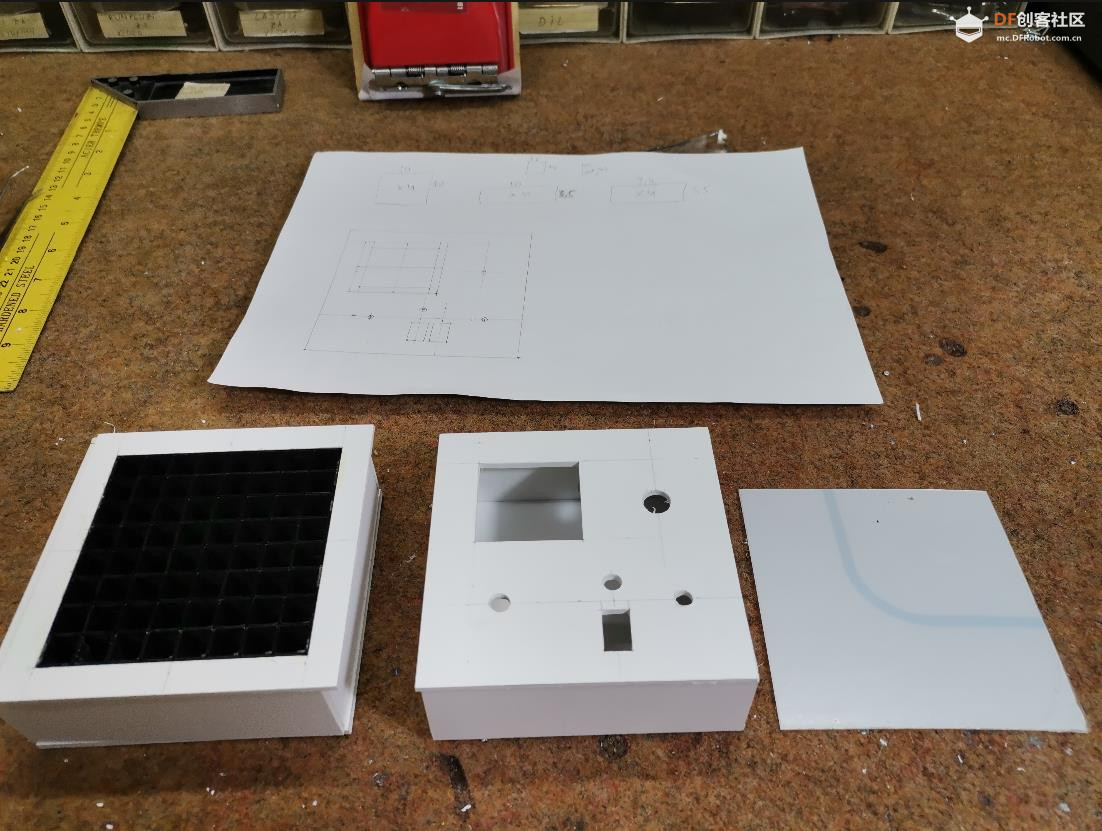
只需将耳机信号连接到放大器的输入端即可。骨传导耳机通过合适的连接器连接到放大器的输出端。借助电位器,我们可以使用类似的商用设备进行精确校准。正如我之前提到的,测试方法与上一个案例完全相同,只是将骨传导振荡器放置在耳后骨头上,而不是耳机上。最后,将设备安装在一个合适的PVC板盒子中,并用彩色壁纸覆盖。
- #include <Volume.h>
- #include <RotaryEncoder.h>
- #include <Adafruit_NeoPixel.h>
- #include <OneButton.h>
- #include <U8glib.h>
-
- #define PIN 8
- Adafruit_NeoPixel strip = Adafruit_NeoPixel(64, PIN, NEO_GRB + NEO_KHZ800);
- U8GLIB_SSD1306_128X64 u8g(U8G_I2C_OPT_NONE); // I2C / TWI
-
- Volume vol;
- // Change these two numbers to the pins connected to your encoder.
- // Best Performance: both pins have interrupt capability
- // Good Performance: only the first pin has interrupt capability
- // Low Performance: neither pin has interrupt capability
-
- // ----- Rotary settings here ----
- #define ROTARYSTEPS 1
- #define ROTARYMIN 1
- #define ROTARYMAX 8
- int lastPos = 0;
- int exitFlag = 0;
- // Setup a RoraryEncoder for pins A2 and A3:
- RotaryEncoder encoder(A2, A3);
-
- // Last known rotary position.
- // Setup a new OneButton on pin A1.
- OneButton button(A1, true);
-
- int risultati[3][8];
- int j=0;
- int x=0;
- int y=0;
- int orecchio=1;
- int pos = 1;
- char db[9][10]=
- { "0 db",
- "10 db",
- "20 db",
- "30 db",
- "40 db",
- "50 db",
- "60 db",
- "70 db",
- "80 db"
- };
- char freq[8][10]
- { "125 Hz",
- "250 Hz",
- "500 Hz",
- "1000 Hz",
- "2000 Hz",
- "3000 Hz",
- "4000 Hz",
- "8000 Hz"
- };
-
- int freqn[8][2]
- {
- 125, 250, 500, 1000, 2000, 3000, 4000, 8000
- };
-
- char ear[3][11]
- { "Volume:",
- "Vol. Left:",
- "Vol. Righ:"
- };
-
-
-
-
- void setup() {
- strip.begin();
- strip.show(); // Initialize all pixels to 'off'
-
- encoder.setPosition(0 / ROTARYSTEPS); // start with the value of 0.
-
- u8g.setColorIndex(1); // pixel on for Display
-
- button.attachLongPressStop(longPressStop);
-
-
- vol.begin(); // After calling this, delay() and delayMicroseconds will no longer work
- // correctly! Instead, use vol.delay() and vol.delayMicroseconds() for
- // the correct timing
-
- vol.setMasterVolume(3.00); // Self-explanatory enough, right? Try lowering this value if the speaker is too loud! (0.00 - 1.00)
- vol.delay(500);
-
- Serial.begin(115200);
- Serial.println("Volume test with Encoder:");
-
- }
-
-
- void loop() {
-
- button.tick();
-
- encoder.tick();
-
- int newPos = encoder.getPosition();
- if (pos != newPos) {
-
- if (newPos < ROTARYMIN) {
- encoder.setPosition(ROTARYMIN / ROTARYSTEPS);
- newPos = ROTARYMIN;
- } else if (newPos > ROTARYMAX) {
- encoder.setPosition(ROTARYMAX / ROTARYSTEPS);
- newPos = ROTARYMAX;
- }
-
- Serial.print(newPos);
- Serial.print(", ");
- Serial.print(x);
- Serial.println();
-
- if (orecchio < 3){
- u8g.firstPage();
- do {
- draw(ear[orecchio], 25, 16);
- draw("Freq:", 15, 55);
- draw(db[newPos], 40, 35);
- draw(freq[x], 60, 55);
- } while( u8g.nextPage() );
- } else {
- u8g.firstPage();
- do {
- draw(" FINAL GRAPH ", 0, 20);
- draw(" EXECUTED ", 0, 50);
- } while( u8g.nextPage() );
- }
-
- pos = newPos;
- vol.tone (freqn[x],pos);
-
- if (orecchio < 3)
- for (j=(x*8); j<64;j++)
- strip.setPixelColor(j, 0, 0, 0);
- strip.show();
-
- if ((x==0 or x==2 or x==4 or x==6) and orecchio==1)
- strip.setPixelColor((pos-1)+(x*8), 10, 0, 0);
- if ((x==1 or x==3 or x==5 or x==7) and orecchio==1)
- strip.setPixelColor(((x+1)*8)-(pos), 10, 0, 0);
- if ((x==0 or x==2 or x==4 or x==6) and orecchio==2)
- strip.setPixelColor((pos-1)+(x*8), 0, 0, 10);
- if ((x==1 or x==3 or x==5 or x==7) and orecchio==2)
- strip.setPixelColor(((x+1)*8)-(pos), 0, 0, 10);
- strip.show();
- }
-
- // vol.delay(10); // solo per test
-
- }
-
-
-
- // This function will be called once, when the button1 is released after beeing pressed for a long time.
- void longPressStop() {
- Serial.print("Button 1 longPress stop, x=");
- // scanf("%d", &risultati[orecchio][pos]);
- risultati[orecchio][x]=pos;
- x=x+1;
- pos=0;
- encoder.setPosition(1);
- if (x>7 and orecchio == 1) {
- x=0;
- orecchio =2;
- }
- if (x>7 and orecchio == 2) {
- u8g.firstPage();
- do {
- draw(" PLEASE WAIT ", 0, 20);
- draw(" FINAL GRAPH ", 0, 50);
- } while( u8g.nextPage() );
- strip.clear();
- for (j=1; j<3;j++) {
- Serial.println();
- for (x=0; x<8;x++) {
- if ((x==0 or x==2 or x==4 or x==6) and j==1)
- strip.setPixelColor((risultati[j][x]-1)+(x*8), 10, 0, 0);
- if ((x==1 or x==3 or x==5 or x==7) and j==1)
- strip.setPixelColor(((x+1)*8)-(risultati[j][x]), 10, 0, 0);
- if ((x==0 or x==2 or x==4 or x==6) and j==2)
- if (strip.getPixelColor((risultati[j][x]-1)+(x*8)) == 0)
- strip.setPixelColor((risultati[j][x]-1)+(x*8), 0, 0, 10);
- else
- strip.setPixelColor((risultati[j][x]-1)+(x*8), 10, 0, 10);
- if ((x==1 or x==3 or x==5 or x==7) and j==2)
- if (strip.getPixelColor(((x+1)*8)-(risultati[j][x])) == 0)
- strip.setPixelColor(((x+1)*8)-(risultati[j][x]), 0, 0, 10);
- else
- strip.setPixelColor(((x+1)*8)-(risultati[j][x]), 10, 0, 10);
- strip.show();
- Serial.print(risultati[j][x]);
- Serial.print(", ");
- vol.delay(1000);
- }
-
- }
- x=0;
- orecchio = 3;
- }
-
- Serial.println(x);
- Serial.print("Ear = ");
- Serial.println(orecchio);
-
- } // longPressStop1
-
- void draw(char* parola, int posx, int posy) {
- // graphic commands to redraw the complete screen should be placed here
- u8g.setFont(u8g_font_unifont);
- //u8g.setFont(u8g_font_osb21);
- u8g.drawStr( posx, posy, parola);
- }
|


 沪公网安备31011502402448
 置顶卡
置顶卡 变色卡
变色卡 千斤顶
千斤顶

 萌萌哒新人
萌萌哒新人
 活跃会员
活跃会员
 宣传大使
宣传大使
 牛X认证
牛X认证
 创作达人
创作达人
 ARD DAY
 摸鱼团员
摸鱼团员
 志“童”道合
 编辑选择奖
编辑选择奖


