项目代码
- /*
- Rui Santos & Sara Santos - Random Nerd Tutorials
- Complete project details at https://RandomNerdTutorials.com/esp-now-two-way-communication-esp32/
- Permission is hereby granted, free of charge, to any person obtaining a copy of this software and associated documentation files.
- The above copyright notice and this permission notice shall be included in all copies or substantial portions of the Software.
- */
- #include <esp_now.h>
- #include <WiFi.h>
-
- #include <Wire.h>
- #include <Adafruit_Sensor.h>
- #include <Adafruit_BME280.h>
-
- #include <Adafruit_GFX.h>
- #include <Adafruit_SSD1306.h>
-
- #define SCREEN_WIDTH 128 // OLED display width, in pixels
- #define SCREEN_HEIGHT 64 // OLED display height, in pixels
-
- // Declaration for an SSD1306 display connected to I2C (SDA, SCL pins)
- Adafruit_SSD1306 display(SCREEN_WIDTH, SCREEN_HEIGHT, &Wire, -1);
-
- Adafruit_BME280 bme;
-
- // REPLACE WITH THE MAC Address of your receiver
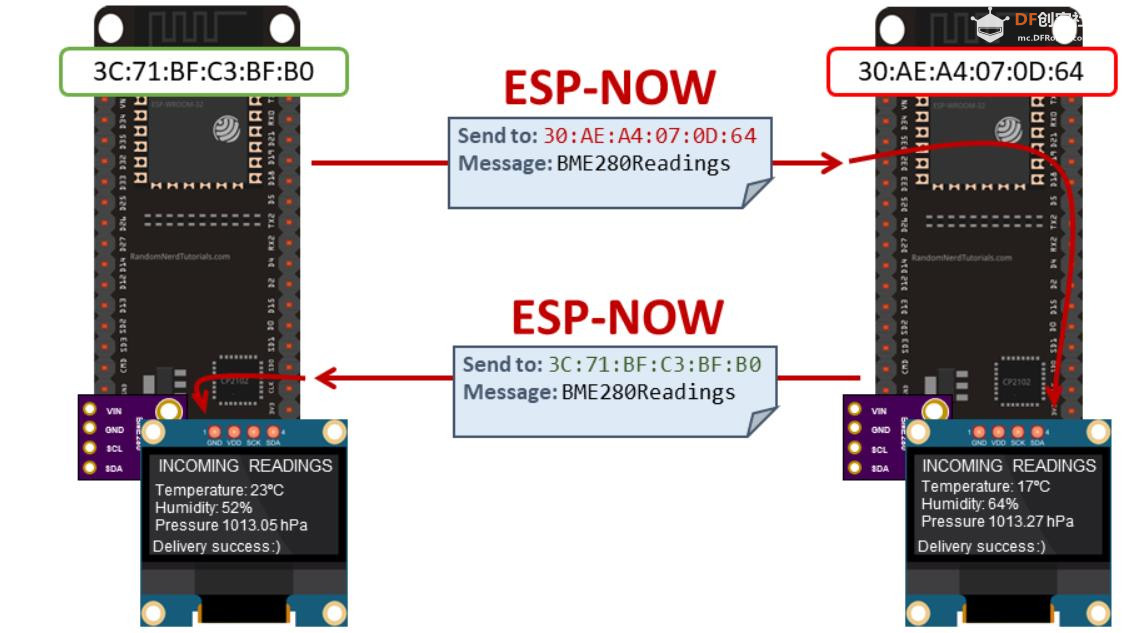
- uint8_t broadcastAddress[] = {0xFF, 0xFF, 0xFF, 0xFF, 0xFF, 0xFF};
-
- // Define variables to store BME280 readings to be sent
- float temperature;
- float humidity;
- float pressure;
-
- // Define variables to store incoming readings
- float incomingTemp;
- float incomingHum;
- float incomingPres;
-
- // Variable to store if sending data was successful
- String success;
-
- //Structure example to send data
- //Must match the receiver structure
- typedef struct struct_message {
- float temp;
- float hum;
- float pres;
- } struct_message;
-
- // Create a struct_message called BME280Readings to hold sensor readings
- struct_message BME280Readings;
-
- // Create a struct_message to hold incoming sensor readings
- struct_message incomingReadings;
-
- esp_now_peer_info_t peerInfo;
-
- // Callback when data is sent
- void OnDataSent(const uint8_t *mac_addr, esp_now_send_status_t status) {
- Serial.print("\r\nLast Packet Send Status:\t");
- Serial.println(status == ESP_NOW_SEND_SUCCESS ? "Delivery Success" : "Delivery Fail");
- if (status ==0){
- success = "Delivery Success :)";
- }
- else{
- success = "Delivery Fail :(";
- }
- }
-
- // Callback when data is received
- void OnDataRecv(const uint8_t * mac, const uint8_t *incomingData, int len) {
- memcpy(&incomingReadings, incomingData, sizeof(incomingReadings));
- Serial.print("Bytes received: ");
- Serial.println(len);
- incomingTemp = incomingReadings.temp;
- incomingHum = incomingReadings.hum;
- incomingPres = incomingReadings.pres;
- }
-
- void setup() {
- // Init Serial Monitor
- Serial.begin(115200);
-
- // Init BME280 sensor
- bool status = bme.begin(0x76);
- if (!status) {
- Serial.println("Could not find a valid BME280 sensor, check wiring!");
- while (1);
- }
-
- // Init OLED display
- if(!display.begin(SSD1306_SWITCHCAPVCC, 0x3C)) {
- Serial.println(F("SSD1306 allocation failed"));
- for(;;);
- }
-
- // Set device as a Wi-Fi Station
- WiFi.mode(WIFI_STA);
-
- // Init ESP-NOW
- if (esp_now_init() != ESP_OK) {
- Serial.println("Error initializing ESP-NOW");
- return;
- }
-
- // Once ESPNow is successfully Init, we will register for Send CB to
- // get the status of Trasnmitted packet
- esp_now_register_send_cb(OnDataSent);
-
- // Register peer
- memcpy(peerInfo.peer_addr, broadcastAddress, 6);
- peerInfo.channel = 0;
- peerInfo.encrypt = false;
-
- // Add peer
- if (esp_now_add_peer(&peerInfo) != ESP_OK){
- Serial.println("Failed to add peer");
- return;
- }
- // Register for a callback function that will be called when data is received
- esp_now_register_recv_cb(esp_now_recv_cb_t(OnDataRecv));
- }
-
- void loop() {
- getReadings();
-
- // Set values to send
- BME280Readings.temp = temperature;
- BME280Readings.hum = humidity;
- BME280Readings.pres = pressure;
-
- // Send message via ESP-NOW
- esp_err_t result = esp_now_send(broadcastAddress, (uint8_t *) &BME280Readings, sizeof(BME280Readings));
-
- if (result == ESP_OK) {
- Serial.println("Sent with success");
- }
- else {
- Serial.println("Error sending the data");
- }
- updateDisplay();
- delay(10000);
- }
- void getReadings(){
- temperature = bme.readTemperature();
- humidity = bme.readHumidity();
- pressure = (bme.readPressure() / 100.0F);
- }
-
- void updateDisplay(){
- // Display Readings on OLED Display
- display.clearDisplay();
- display.setTextSize(1);
- display.setTextColor(WHITE);
- display.setCursor(0, 0);
- display.println("INCOMING READINGS");
- display.setCursor(0, 15);
- display.print("Temperature: ");
- display.print(incomingTemp);
- display.cp437(true);
- display.write(248);
- display.print("C");
- display.setCursor(0, 25);
- display.print("Humidity: ");
- display.print(incomingHum);
- display.print("%");
- display.setCursor(0, 35);
- display.print("Pressure: ");
- display.print(incomingPres);
- display.print("hPa");
- display.setCursor(0, 56);
- display.print(success);
- display.display();
-
- // Display Readings in Serial Monitor
- Serial.println("INCOMING READINGS");
- Serial.print("Temperature: ");
- Serial.print(incomingReadings.temp);
- Serial.println(" ºC");
- Serial.print("Humidity: ");
- Serial.print(incomingReadings.hum);
- Serial.println(" %");
- Serial.print("Pressure: ");
- Serial.print(incomingReadings.pres);
- Serial.println(" hPa");
- Serial.println();
- }
| 


 沪公网安备31011502402448
 置顶卡
置顶卡 变色卡
变色卡 千斤顶
千斤顶
 萌萌哒新人
萌萌哒新人
 活跃会员
活跃会员
 宣传大使
宣传大使
 牛X认证
牛X认证
 创作达人
创作达人
 ARD DAY
 摸鱼团员
摸鱼团员
 志“童”道合
 编辑选择奖
编辑选择奖


