本帖最后由 PY学习笔记 于 2025-8-26 12:07 编辑
近期,DFRobot 推出了全新开发板 FireBeetle 2 ESP32-C5。这块开发板搭载了 ESP32-C5 主控,集成 支持5GHz的Wi-Fi6(意思为可以连接5G网络),凭借强劲性能,令人眼前一亮。很荣幸能抢先体验这块开发板! 1.开发板介绍FireBeetle 2 ESP32-C5有很多外设: 2.micropython编译由于 MicroPython 官方尚未支持 ESP32-C5,支持尚需时日,我直接采用 GitHub PR 中某位大佬的半成品,稍作修改后,再集成到lvgl_micropython项目中,所以过程复杂,而且很多人并不想自行编译,所以这里,只放固件了(固件后期DF工作人员也会会放在文档中)。 3.烧录建议使用esptool进行烧录,官方的工具现在无法擦除,所以用一下代码进行烧录(最后的固件名字自行修改):
- esptool --chip esp32c5 -p COM15 -b 460800 --before default_reset --after hard_reset write_flash --flash_mode dio --flash_size 4MB --flash_freq 80m --erase-all 0x2000 firmware_eco1.bin
4.正式体验注意:因为扩展板有问题,在测试之前请把扩展板拔下来。 1.普通MicroPython部分LED测试: - from machine import Pin
- import time
-
- led=Pin(15,Pin.OUT)
-
- while True:
- led.on()
- time.sleep(0.5)
- led.off()
- time.sleep(0.5)
联网测试: - import network,time
- SSID = 'SSID'
- PWD = 'PWD'
- def connect():
- wlan = network.WLAN(network.STA_IF)
- wlan.active(True)
- if not wlan.isconnected():
- print('esp32c5正在联网',end="")
- wlan.connect(SSID, PWD)
- while not wlan.isconnected():
- print(".",end="")
- time.sleep(1)
- print('\n网络信息为: ', wlan.ifconfig())
-
- connect()
联网扩展测试(串口与AI对话): - import network
- import time
- import urequests
- import ujson,micropython,select,sys
- from machine import reset
-
- # ====== 配置部分 ======
- SSID = 'SSID'
- PASSWORD = 'PWD'
- API_KEY = "API-KEY"
- API_URL = "https://api.siliconflow.cn/v1/chat/completions"
-
- def connect_wifi():
- wlan = network.WLAN(network.STA_IF)
- wlan.active(True)
- if not wlan.isconnected():
- print('esp32c5正在联网',end="")
- wlan.connect(SSID, PASSWORD)
- while not wlan.isconnected():
- print(".",end="")
- time.sleep(1)
- print('网络信息为: ', wlan.ifconfig())
- print("连接成功!")
- return wlan
-
- def api_request():
- headers = {
- "Authorization": "Bearer sk-fzvjpoldzvziuvdrvrjiadercddliahbfyohdrnfnnaedjmt",
- "Content-Type": "application/json"
- }
-
- micropython.kbd_intr(-1)
- print("您:",end="")
- while True:
-
- while sys.stdin in select.select([sys.stdin],[],[],0)[0]:
- #print("您:",end="")
- sp= sys.stdin.readline().replace("\n", "").replace(" ", "")
- if sp != "":
- #sp = str(input("您:"))
- #print("您:"+sp)
- payload = {
- "model": "Qwen/Qwen3-8B",
- "messages": [ # 必须包含消息内容
- {"role": "system", "content": "你是我的AI助手qwen,你必须用中文回答且字数不超过85个,思考时间不超过1秒"},
- {"role": "user", "content": sp}
- ],
- "enable_thinking":False,
-
- }
- print("AI正在思考中...")
- #print("Payload:", payload)
- start_time = time.time()
- response = urequests.post(
- API_URL,
- headers=headers,
- data=ujson.dumps(payload).encode('utf-8'),
- #timeout=20
- )
- response_time = time.time() - start_time
- print(f"AI思考了{response_time:.1f}s")
- #print(f"\n[Response] Status: {response.status_code}")
- if response.status_code == 200:
- json_resp = response.json()
- print("AI回复:", json_resp['choices'][0]['message']['content'].replace("\n", ""))
- else:
- print("Error Response:", response.text)
-
- response.close()
- print("您:",end="")
-
-
-
-
- print("=== 启动系统 ===")
- connect_wifi()
- api_request()
2.LVGL+MicroPython部分先把屏幕的驱动下载进板子里(命名为screen.py),这里以ILI9488+GT911为主,其它的屏幕DF工作人员正在撰写对应文档,如果更新了即可下载: - import lcd_bus
- from micropython import const
- import machine
- import lcd_utils
-
- # 创建SPI总线对象
- spi_bus = machine.SPI.Bus(
- host=1,
- mosi=24,
- miso=25,
- sck=23,
- )
-
- # 创建显示屏的SPI通信对象
- display_bus = lcd_bus.SPIBus(
- spi_bus=spi_bus,
- freq=40000000,
- dc=8,
- cs=27,
- )
-
- import ili9488
- import lvgl as lv
- import task_handler
-
- # 创建显示屏对象
- display = ili9488.ILI9488(
- data_bus=display_bus,
- display_width=320,
- display_height=480,
- backlight_pin=15,
- reset_pin=26,
- reset_state=ili9488.STATE_LOW,
- color_space=lv.COLOR_FORMAT.RGB888,
- color_byte_order=ili9488.BYTE_ORDER_RGB,
- rgb565_byte_swap=True,
- )
-
- import i2c
- import task_handler
- import gt911
-
- # 初始化显示屏
- display.init()
-
- # 定义触摸屏的I2C通信参数
- i2c_bus = i2c.I2C.Bus(host=0, scl=10, sda=9, freq=400000, use_locks=False)
- print(i2c_bus.scan())
- touch_dev = i2c.I2C.Device(bus=i2c_bus, dev_id=0x5D, reg_bits=gt911.BITS)
-
- # 创建触摸屏设备对象
- indev = gt911.GT911(touch_dev)
-
- # 启用输入优先级
- indev.enable_input_priority()
-
- # 旋转显示
- display.set_rotation(lv.DISPLAY_ROTATION._270)
- # 打开屏幕背光
- display.set_backlight(1)
- th = task_handler.TaskHandler()
滑块测试: - import screen
- import lvgl as lv
-
-
- scrn = lv.screen_active()# 获取当前激活的屏幕对象
- scrn.set_style_bg_color(lv.color_hex(0x000000), 0)# 设置屏幕的背景颜色为黑色
-
- slider = lv.slider(scrn)# 创建一个滑块
- slider.set_size(200, 50)# 设置滑块的大小为宽度300,高50
- slider.center()# 将滑块居中显示
-
- label = lv.label(scrn)# 创建一个标签
- label.set_text('HELLO LVGL_MICROPYTHON!')# 标签内容
- label.align(lv.ALIGN.CENTER, 0, -50)# 将标签对齐到屏幕中心,并向上偏移50
打砖块测试: - import screen
- import lvgl as lv
-
-
- scrn = lv.screen_active()# 获取当前激活的屏幕对象
- scrn.set_style_bg_color(lv.color_hex(0x000000), 0)# 设置屏幕的背景颜色为黑色
-
- slider = lv.slider(scrn)# 创建一个滑块
- slider.set_size(200, 50)# 设置滑块的大小为宽度300,高50
- slider.center()# 将滑块居中显示
-
- label = lv.label(scrn)# 创建一个标签
- label.set_text('HELLO LVGL_MICROPYTHON!')# 标签内容
- label.align(lv.ALIGN.CENTER, 0, -50)# 将标签对齐到屏幕中心,并向上偏移50import screen, math, gc
- import lvgl as lv
- SCREEN_W = 480
- SCREEN_H = 320
- on_pad = True # 球是否还在板上
- # ---------------- 物理参数 ----------------
- BALL_R = 8 # 小球半径
- MAT_W = 80
- MAT_H = 15 # 薄板
- VEL_Y0 = -6 # 初始向上速度
- # ---------------- 全局对象 ----------------
- scrn = lv.screen_active()
- scrn.set_style_bg_color(lv.color_hex(0x000000), 0)
-
- # 容器(避免坐标系混乱)
- root = lv.obj(scrn)
- root.remove_style_all()
- root.set_size(SCREEN_W, SCREEN_H)
- root.center()
-
- # 弹力板
- mat = lv.obj(root)
- mat.set_size(MAT_W, MAT_H)
- mat.set_style_bg_color(lv.palette_main(lv.PALETTE.GREEN), 0)
- mat.set_y(SCREEN_H - MAT_H - 5) # 固定高度
-
- # 小球
- ball = lv.obj(root) # 用 obj 比 led 更易控制
- ball.set_size(BALL_R*2, BALL_R*2)
- ball.set_style_radius(BALL_R, 0)
- ball.set_style_bg_color(lv.palette_main(lv.PALETTE.ORANGE), 0)
-
- # 砖块
- BRICK_W = 31
- BRICK_H = 15
- BRICK_GAP = 2
- BRICK_COLS = SCREEN_W // (BRICK_W + BRICK_GAP)
- BRICK_ROWS = 5
- bricks = []
-
- for r in range(BRICK_ROWS):
- for c in range(BRICK_COLS):
- b = lv.obj(root)
- b.set_size(BRICK_W, BRICK_H)
- b.set_style_bg_color(
- lv.palette_main(lv.PALETTE.BLUE if r % 2 else lv.PALETTE.RED), 0)
- b.set_pos(c*(BRICK_W+BRICK_GAP),
- 5 + r*(BRICK_H+BRICK_GAP))
- bricks.append(b)
-
- # ---------------- 物理量 ----------------
- ball_x = SCREEN_W // 2
- ball_y = SCREEN_H - 50
- vx = 0
- vy = VEL_Y0
- game_over = False
-
- def reset_ball():
- global ball_x, ball_y, vx, vy, game_over, on_pad
- ball_x = mat.get_x() + MAT_W // 2 # 直接按板子位置算
- ball_y = mat.get_y() - BALL_R
- vx = 0
- vy = VEL_Y0
- game_over = False
- on_pad = True # 复位后球在板上
- ball.set_pos(int(ball_x - BALL_R), int(ball_y - BALL_R))
-
- # ---------------- 定时器 ----------------
- def update_timer(t):
- global ball_x, ball_y, vx, vy, game_over, on_pad
-
- if game_over:
- return
-
- # 如果球还在板上,先让球水平跟着板子
- if on_pad:
- ball_x = mat.get_x() + MAT_W // 2
- ball_y = mat.get_y() - BALL_R
- ball.set_pos(int(ball_x - BALL_R), int(ball_y - BALL_R))
- return
- else:
- # 原来的物理运动
- ball_x += vx
- ball_y += vy
-
- # 边界反弹
- if ball_x - BALL_R < 0 or ball_x + BALL_R > SCREEN_W:
- vx = -vx
- ball_x = max(BALL_R, min(SCREEN_W - BALL_R, ball_x))
-
- if ball_y - BALL_R < 0:
- vy = -vy
- ball_y = BALL_R
-
- # 掉出底部
- if ball_y + BALL_R > SCREEN_H:
- reset_ball()
- return
-
- # 与板碰撞
- mat_left = mat.get_x()
- mat_right = mat_left + MAT_W
- if (ball_y + BALL_R >= mat.get_y() and
- ball_y - BALL_R <= mat.get_y() + MAT_H and
- ball_x + BALL_R >= mat_left and
- ball_x - BALL_R <= mat_right and
- vy > 0): # 必须正在下落才反弹
- hit_pos = (ball_x - mat_left) / MAT_W
- vx = (hit_pos - 0.5) * 10
- vy = -abs(vy)
- ball_y = mat.get_y() - BALL_R
-
- # ---------------- 碰撞检测 ----------------
- to_delete = [] # 1. 先收集要删的砖块
-
- for brick in bricks:
- bx, by = brick.get_x(), brick.get_y()
- bw, bh = BRICK_W, BRICK_H
- if (ball_x + BALL_R > bx and
- ball_x - BALL_R < bx + bw and
- ball_y + BALL_R > by and
- ball_y - BALL_R < by + bh):
-
- # 计算最小重叠方向
- overlap_l = (ball_x + BALL_R) - bx
- overlap_r = (bx + bw) - (ball_x - BALL_R)
- overlap_t = (ball_y + BALL_R) - by
- overlap_b = (by + bh) - (ball_y - BALL_R)
- min_overlap = min(overlap_l, overlap_r, overlap_t, overlap_b)
-
- if min_overlap == overlap_t or min_overlap == overlap_b:
- vy = -vy
- else:
- vx = -vx
-
- to_delete.append(brick) # 2. 只记录,不立即删
-
- # 3. 统一删除并回收
- for brick in to_delete:
- brick.delete()
- bricks.remove(brick)
- gc.collect() # 立即释放已删对象
-
- # 4. 统一刷新显示
- ball.set_pos(int(ball_x - BALL_R), int(ball_y - BALL_R))
-
-
- # ---------------- 触摸回调 ----------------
- def touch_cb(e):
- global on_pad, vx, vy, ball_x, ball_y
-
- code = e.get_code()
- point = lv.point_t()
- screen.indev.get_point(point)
-
- # 板子移动逻辑(所有触摸状态都处理)
- new_x = point.x - MAT_W // 2
- new_x = max(0, min(SCREEN_W - MAT_W, new_x))
- mat.set_x(new_x)
-
- # 球在板上时的同步处理
- if code == lv.EVENT.PRESSING:
- if on_pad == 1:
- ball_x = new_x + MAT_W // 2
- ball_y = mat.get_y() - BALL_R
- else:
- ball_x += vx
- ball_y += vy
- # 边界反弹
- if ball_x - BALL_R < 0 or ball_x + BALL_R > SCREEN_W:
- vx = -vx
- ball_x = max(BALL_R, min(SCREEN_W - BALL_R, ball_x))
-
- if ball_y - BALL_R < 0:
- vy = -vy
- ball_y = BALL_R
-
- # 掉出底部
- if ball_y + BALL_R > SCREEN_H:
- reset_ball()
- return
-
- # 与板碰撞
- mat_left = mat.get_x()
- mat_right = mat_left + MAT_W
- if (ball_y + BALL_R >= mat.get_y() and
- ball_y - BALL_R <= mat.get_y() + MAT_H and
- ball_x + BALL_R >= mat_left and
- ball_x - BALL_R <= mat_right and
- vy > 0): # 必须正在下落才反弹
- hit_pos = (ball_x - mat_left) / MAT_W
- vx = (hit_pos - 0.5) * 10
- vy = -abs(vy)
- ball_y = mat.get_y() - BALL_R
- # ---------------- 碰撞检测 ----------------
- to_delete = [] # 1. 先收集要删的砖块
-
- for brick in bricks:
- bx, by = brick.get_x(), brick.get_y()
- bw, bh = BRICK_W, BRICK_H
- if (ball_x + BALL_R > bx and
- ball_x - BALL_R < bx + bw and
- ball_y + BALL_R > by and
- ball_y - BALL_R < by + bh):
-
- # 计算最小重叠方向
- overlap_l = (ball_x + BALL_R) - bx
- overlap_r = (bx + bw) - (ball_x - BALL_R)
- overlap_t = (ball_y + BALL_R) - by
- overlap_b = (by + bh) - (ball_y - BALL_R)
- min_overlap = min(overlap_l, overlap_r, overlap_t, overlap_b)
-
- if min_overlap == overlap_t or min_overlap == overlap_b:
- vy = -vy
- else:
- vx = -vx
-
- to_delete.append(brick) # 2. 只记录,不立即删
-
- # 3. 统一删除并回收
- for brick in to_delete:
- brick.delete()
- bricks.remove(brick)
- gc.collect() # 立即释放已删对象
-
- ball.set_pos(int(ball_x - BALL_R), int(ball_y - BALL_R))
-
- # 仅PRESSED事件触发发射
- elif code == lv.EVENT.PRESSED and on_pad == 1:
- hit_pos = (ball_x - mat.get_x()) / MAT_W
- vx = (hit_pos - 0.5) * 10
- vy = VEL_Y0
- on_pad = False
- # 发射后立即更新一次位置
- ball.set_pos(int(ball_x - BALL_R), int(ball_y - BALL_R))
-
-
-
- # 启动定时器
- lv.timer_create(update_timer, 50, None)
-
- root.add_event_cb(touch_cb, lv.EVENT.PRESSED, None)
- root.add_event_cb(touch_cb, lv.EVENT.PRESSING, None)
-
- reset_ball()
时间表盘测试: - import screen
- import time,gc
- import lvgl as lv
- from machine import Pin, Timer
- import math
-
- scrn = lv.screen_active()
- scrn.set_style_bg_color(lv.color_hex(0x000000), 0)
-
- class AnalogClock:
- def __init__(self, parent):
- self.scale = None
- self.second_hand = None
- self.minute_hand = None
- self.hour_hand = None
- # 获取当前时间
- now = time.localtime()
- self.hour = now[3] % 12 # 转换为12小时制
- self.minute = now[4]
- self.second = now[5]
- self.create_clock(parent)
- self.start_timer()
-
- def create_clock(self, parent):
- """创建模拟时钟组件"""
- # 创建表盘主体(保持120x120大小)
- self.scale = lv.scale(parent)
- self.scale.set_size(200, 200)
- self.scale.set_mode(lv.scale.MODE.ROUND_INNER)
-
- # 设置表盘样式(保持不变)
- self.scale.set_style_bg_opa(lv.OPA._60, 0)
- self.scale.set_style_bg_color(lv.color_hex(0x222222), 0)
- self.scale.set_style_radius(lv.RADIUS_CIRCLE, 0)
- self.scale.set_style_clip_corner(True, 0)
- self.scale.center()
-
- # 配置刻度系统(保持不变)
- self.scale.set_label_show(True)
- hour_labels = ["12", "1", "2", "3", "4", "5", "6", "7", "8", "9", "10", "11", None]
- self.scale.set_text_src(hour_labels)
- self.scale.set_style_text_font(lv.font_montserrat_12, 0)
- self.scale.set_total_tick_count(61)
- self.scale.set_major_tick_every(5)
-
- # 主刻度样式(保持不变)
- style_indicator = lv.style_t()
- style_indicator.init()
- style_indicator.set_text_color(lv.color_hex(0xFFFFFF))
- style_indicator.set_line_color(lv.color_hex(0xFFFFFF))
- style_indicator.set_length(5)
- style_indicator.set_line_width(2)
- self.scale.add_style(style_indicator, lv.PART.INDICATOR)
-
- # 次刻度样式(保持不变)
- style_minor = lv.style_t()
- style_minor.init()
- style_minor.set_line_color(lv.color_hex(0xAAAAAA))
- style_minor.set_length(3)
- style_minor.set_line_width(1)
- self.scale.add_style(style_minor, lv.PART.ITEMS)
-
- # 表盘边框样式(保持不变)
- style_main = lv.style_t()
- style_main.init()
- style_main.set_arc_color(lv.color_hex(0x222222))
- style_main.set_arc_width(3)
- self.scale.add_style(style_main, lv.PART.MAIN)
-
- # 设置量程和角度(保持不变)
- self.scale.set_range(0, 60)
- self.scale.set_angle_range(360)
- self.scale.set_rotation(270)
-
- # 创建秒针(红色,长度90px,细线)
- self.second_hand = lv.line(self.scale)
- self.second_hand.set_style_line_width(1, 0) # 更细的线宽
- self.second_hand.set_style_line_rounded(True, 0)
- self.second_hand.set_style_line_color(lv.color_hex(0xFFFFFF), 0)
-
- # 创建分钟指针(蓝色,长度75px)
- self.minute_hand = lv.line(self.scale)
- self.minute_hand.set_style_line_width(3, 0)
- self.minute_hand.set_style_line_rounded(True, 0)
- self.minute_hand.set_style_line_color(lv.color_hex(0x00BFFF), 0)
-
- # 创建小时指针(橙色,长度60px)
- self.hour_hand = lv.line(self.scale)
- self.hour_hand.set_style_line_width(5, 0)
- self.hour_hand.set_style_line_rounded(True, 0)
- self.hour_hand.set_style_line_color(lv.color_hex(0xFFA500), 0)
-
- # 添加中心点(保持不变)
- center = lv.obj(self.scale)
- center.set_size(8, 8) # 稍微减小中心点大小
- center.center()
- center.set_style_radius(lv.RADIUS_CIRCLE, 0)
- center.set_style_bg_color(lv.color_hex(0xFFD700), 0)
- center.set_style_bg_opa(lv.OPA.COVER, 0)
-
- self.update_hands()
-
- def update_hands(self):
- """更新所有指针位置"""
- # 秒针(90px长度)
- lv.scale.set_line_needle_value(self.scale, self.second_hand, 90, self.second)
-
- # 分钟指针(75px长度)
- lv.scale.set_line_needle_value(self.scale, self.minute_hand, 75, self.minute)
-
- # 小时指针(60px长度),考虑分钟偏移
- hour_value = self.hour * 5 + (self.minute // 12)
- lv.scale.set_line_needle_value(self.scale, self.hour_hand, 60, hour_value)
-
- def timer_callback(self, timer):
- """定时器回调(每秒更新)"""
- # 获取当前时间
- now = time.localtime()
- self.hour = now[3] % 12
- self.minute = now[4]
- self.second = now[5]
-
- self.update_hands()
- gc.collect()
-
- def start_timer(self):
- """启动硬件定时器(每秒触发)"""
- self.timer = Timer(1)
- self.timer.init(period=1000, mode=Timer.PERIODIC, callback=self.timer_callback)
-
- # 创建时钟实例
- clock = AnalogClock(scrn)
5.效果
6.问题解答
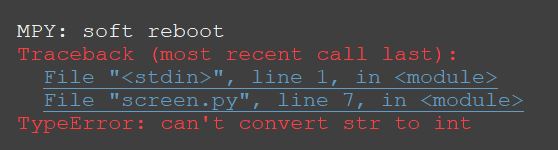
以上的问题是由于设备已经初始化一次了,不能重复初始化,将板子重启再次运行即可
|


 沪公网安备31011502402448

 置顶卡
置顶卡 变色卡
变色卡 千斤顶
千斤顶


