|
21500| 39
|
[MP动手做] MicroPython动手做(13)——掌控板之RGB三色灯 |
|
11、24位弹跳RGB彩虹灯环程序之二 [mw_shl_code=applescript,false]#MicroPython动手做(13)——掌控板之RGB三色灯 #24位弹跳RGB彩虹灯环程序之二 from mpython import * import neopixel np = neopixel.NeoPixel(Pin(Pin.P8), n=24,bpp=3,timing=1) def wheel(pos): # 通过改变在0和255之间的每个颜色参数产生彩虹色光谱 # Input a value 0 to 255 to get a color value. # The colours are a transition r - g - b - back to r. if pos < 0 or pos > 255: r = g = b = 0 elif pos < 85: r = int(pos * 3) g = int(255 - pos*3) b = 0 elif pos < 170: pos -= 85 r = int(255 - pos*3) g = 0 b = int(pos*3) else: pos -= 170 r = 0 g = int(pos*3) b = int(255 - pos*3) return (r, g, b) def cycle(np,r,g,b,wait=20): # 循环效果,有一个像素在所有灯带位置上运行,而其他像素关闭。 for i in range(4 * np.n): for j in range(np.n): np[j] = (0, 0, 0) np[i % np.n] = (r, g, b) np.write() sleep_ms(wait) def bounce(np,r,g,b,wait=20): # 弹跳效果,等待时间决定了弹跳效果的速度 n=np.n for i in range(4 * n): for j in range(n): np[j] = (r, g, b) if (i // n) % 2 == 0: np[i % n] = (0, 0, 0) else: np[n - 1 - (i % n)] = (0, 0, 0) np.write() sleep_ms(wait) def rainbow_cycle(np,wait_us): # 彩虹效果 n=np.n for j in range(255): for i in range(n): pixel_index = (i * 256 // n) + j np = wheel(pixel_index & 255) np.write() sleep_us(wait_us) while True: cycle(np,50,50,50,wait=20) bounce(np,50,0,0,wait=20) rainbow_cycle(np,20)[/mw_shl_code] |
|
6、RGB蓝色呼吸灯 [mw_shl_code=applescript,false]i = None from mpython import * import time while True: for i in range(256): rgb.fill( (int(0), int(0), int(i)) ) rgb.write() time.sleep_ms(1) time.sleep_ms(20) for i in range(255, -1, -1): rgb.fill( (int(0), int(0), int(i)) ) rgb.write() time.sleep_ms(1) time.sleep_ms(20)[/mw_shl_code] 注解: for…in…循环语句(简称为for循环) for语句是microPython中的一个循环控制语句,任何有序的序列对象内的元素都可以遍历,比如字符串、列表list、元组等等。 简单的for循环代码格式: for i in [1,2,3,4,5]: print(i*5) # 遍历列表[1,2,3,4,5],满足就循环执行i*5; # 不要忘记for语句后面的英文冒号; # 不要忘记print()函数前面的缩进。 12345 上述代码可这样理解: ¹. 一群人在排队办理业务,也就是列表[1,2,3,4,5]; ². 它们中的每一个被叫到号的时候(for i in),就轮流进去一个空房间 i 办业务; ³. 每一个数字进去房间之后,都对计算机说:“我要办这个业务”,也就是print(i),然后计算机为每一个数字提供了打印服务,将1,2,3,4,5都打印在了屏幕上。 for循环的3个要点即是:1.空房间;2.一群等着办业务的人;3.业务流程 for循环:空房间 上面代码中的i就是空房间,学名叫元素(item),你可以把它当成是一个变量。给房间取一个名字,也就是“变量名”。 for循环:一群排队办业务的人 列表、字典和字符串这类数据类型往往可理解为“一群排队办业务的人”,而整数、浮点数不行。这个过程,在Python中的学名就叫做遍历。 |
|
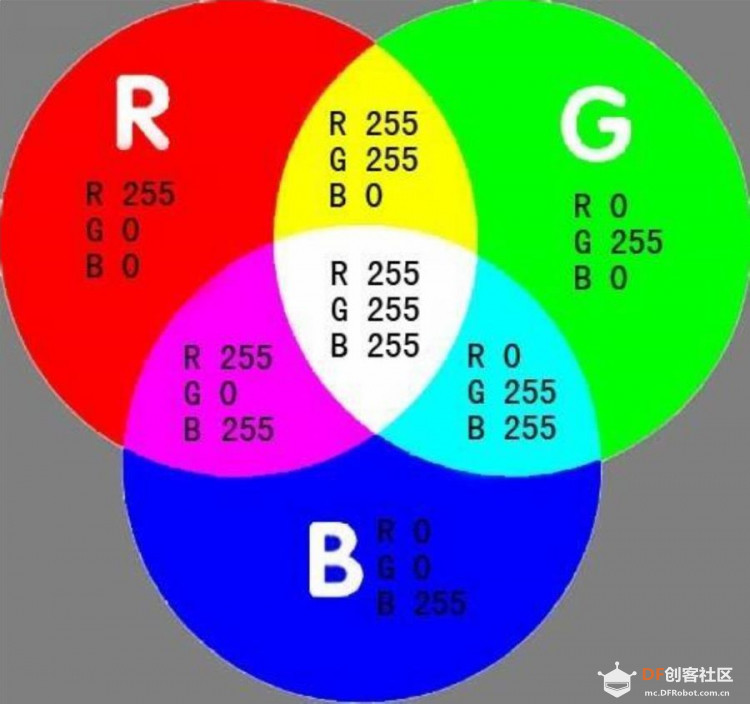
3、RGB色彩模式 是工业界的一种颜色标准,是通过对红(R)、绿(G)、蓝(B)三个颜色通道的变化以及它们相互之间的叠加来得到各式各样的颜色的,RGB即是代表红、绿、蓝三个通道的颜色,这个标准几乎包括了人类视力所能感知的所有颜色,是运用最广的颜色系统之一。 RGB原理 RGB是从颜色发光的原理来设计定的,通俗点说它的颜色混合方式就好像有红、绿、蓝三盏灯,当它们的光相互叠合的时候,色彩相混,而亮度却等于三者亮度之总和,越混合亮度越高,即加法混合。红、绿、蓝三盏灯的叠加情况,中心三色最亮的叠加区为白色,加法混合的特点:越叠加越明亮。红、绿、蓝三个颜色通道每种色各分为256阶亮度,在0时“灯”最弱——是关掉的,而在255时“灯”最亮。当三色灰度数值相同时,产生不同灰度值的灰色调,即三色灰度都为0时,是最暗的黑色调;三色灰度都为255时,是最亮的白色调。RGB 颜色称为加成色,因为您通过将 R、G 和 B 添加在一起(即所有光线反射回眼睛)可产生白色。加成色用于照明光、电视和计算机显示器。例如,显示器通过红色、绿色和蓝色荧光粉发射光线产生颜色。绝大多数可视光谱都可表示为红、绿、蓝 (RGB) 三色光在不同比例和强度上的混合。这些颜色若发生重叠,则产生黄、青和紫。 RGB格式 对一种颜色进行编码的方法统称为“颜色空间”或“色域”。用最简单的话说,世界上任何一种颜色的“颜色空间”都可定义成一个固定的数字或变量。RGB(红、绿、蓝)只是众多颜色空间的一种。采用这种编码方法,每种颜色都可用三个变量来表示-红色绿色以及蓝色的强度。记录及显示彩色图像时,RGB是最常见的一种方案。但是,它缺乏与早期黑白显示系统的良好兼容性。因此,许多电子电器厂商普遍采用的做法是,将RGB转换成YUV颜色空间,以维持兼容,再根据需要换回RGB格式,以便在电脑显示器上显示彩色图形。  |
|
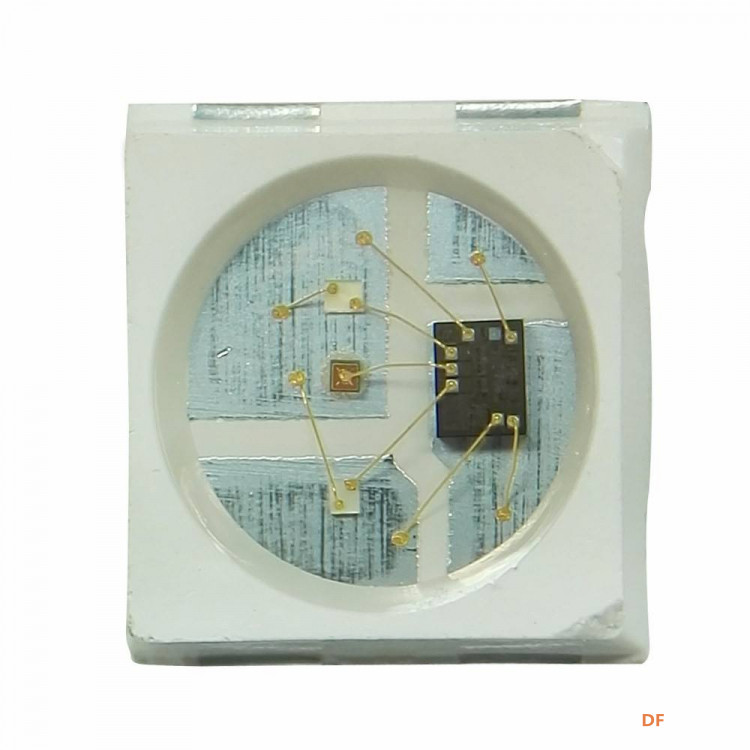
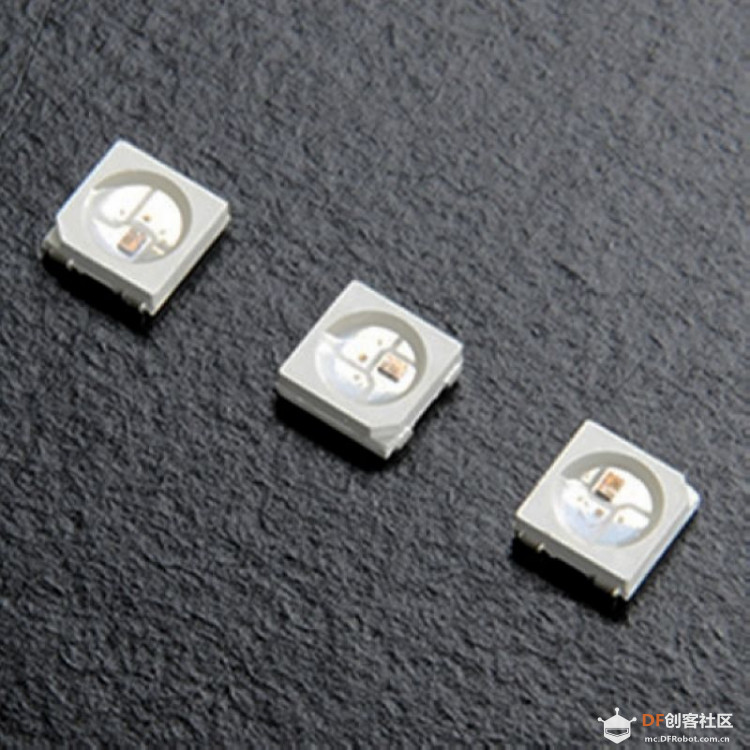
2、WS2812 是一个集控制电路与发光电路于一体的智能外控LED光源。其外型与一个5050LED灯珠相同,每个元件即为一个像素点。像素点内部包含了智能数字接口数据锁存信号整形放大驱动电路,还包含有高精度的内部振荡器和12V高压可编程定电流控制部分,有效保证了像素点光的颜色高度一致。数据协议采用单线归零码的通讯方式,像素点在上电复位以后,DIN端接受从控制器传输过来的数据,首先送过来的24bit数据被第一个像素点提取后,送到像素点内部的数据锁存器,剩余的数据经过内部整形处理电路整形放大后通过DO端口开始转发输出给下一个级联的像素点,每经过一个像素点的传输,信号减少24bit。像素点采用自动整形转发技术,使得该像素点的级联个数不受信号传送的限制,仅仅受限信号传输速度要求。 应用领域 具有低电压驱动,环保节能,亮度高,散射角度大,一致性好,超低功率,超长寿命等优点。将控制电路集成于LED上面,电路变得更加简单,体积小,安装更加简便。主要应用领域,LED全彩发光字灯串,LED全彩模组, LED全彩软灯条硬灯条,LED护栏管。LED点光源,LED像素屏,LED异形屏,各种电子产品,电器设备跑马灯等。  |
 WS2812主要特点 ● 智能反接保护,电源反接不会损坏IC。 ● IC控制电路与LED点光源公用一个电源。 ● 控制电路与RGB芯片集成在一个5050封装的元器件中,构成一个完整的外控像素点。 ● 内置信号整形电路,任何一个像素点收到信号后经过波形整形再输出,保证线路波形畸变不会累加。 ● 内置上电复位和掉电复位电路。 ● 每个像素点的三基色颜色可实现256级亮度显示,完成16777216种颜色的全真色彩显示,扫描频率不低于400Hz/s。 ● 串行级联接口,能通过一根信号线完成数据的接收与解码。 ● 任意两点传传输距离在不超过5米时无需增加任何电路。 ● 当刷新速率30帧/秒时,级联数不小于1024点。 ● 数据发送速度可达800Kbps。 ● 光的颜色高度一致,性价比高。 |
|
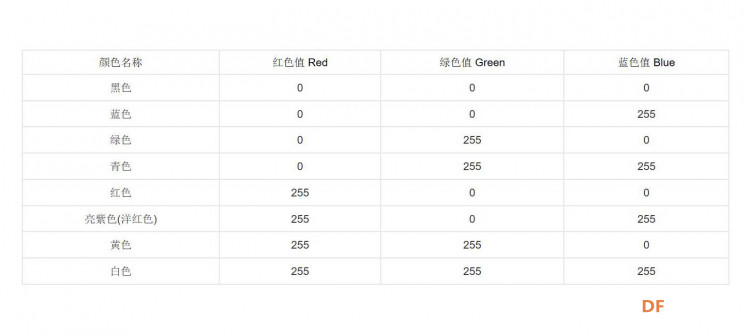
RGB色彩空间 RGB色彩空间根据实际使用设备系统能力的不同,有各种不同的实现方法。截至2006年,最常用的是24-位实现方法,也就是红绿蓝每个通道有8位或者256色级。基于这样的24-位RGB 模型的色彩空间可以表现 256×256×256 ≈ 1670万色。一些实现方法采用每原色16位,能在相同范围内实现更高更精确的色彩密度。这在宽域色彩空间中尤其重要,因为大部分通常使用的颜色排列的相对更紧密。印刷技术的当中的RGB色彩空间主要是指加色法当中的三度色彩空间,通过使用不同强度的三原色,红、绿、蓝色的光线来组合成不同的色彩,就好像说,如果平时我们利用扫描仪从印刷品上扫描图像,原理就是扫描仪阅读了图像上面的红、绿、蓝三色的光亮度,然后把这些量度转换成数据,当显示器收到这些数据的时候就可以按照程序设定转换成制定的红、绿、蓝三原色,其实他们当中是有很多不同颜色的小色块的,由于这些色块的像素非常非常的小而且密密麻麻的,所以我们眼睛没法分辨出来。 常见颜色及色值  |
|
4、点亮RGB三色灯 [mw_shl_code=applescript,false]from mpython import * rgb[0] = (100, 0, 0) # 设置为红色,半亮度 rgb[1] = (0, 100, 0) # 设定为绿色,半亮度 rgb[2] = (0, 0, 255) # 设置为蓝色,全亮度 rgb.write()[/mw_shl_code] 注解: 首先导入mpython模块: from mpython import * 导入mpython模块后,会为掌控创建一个NeoPixel对象rgb,控制板载的RGB只需对rgb对象操作。 设置颜色: rgb[0] = (100, 0, 0) # 设置为红色,半亮度 rgb[1] = (0, 100, 0) # 设定为绿色,半亮度 rgb[2] = (0, 0, 255) # 设置为蓝色,全亮度 rgb[n] = (r, g, b) 可以设置每个像素点颜色,n 为板载RGB灯的个数,第一个灯为0。 r、g、b 为颜色亮度值,范围值为0~255。 rgb.fill(rgb_buf) 可以填充所有像素点的颜色,如:rgb.fill((255,0,0)),所有RGB灯设置为红色,全亮度。 将颜色输出到RGB灯: rgb.write() |
|
5、RGB彩虹流水灯 通过延时模块来控制RGB灯亮的时间,再通过改变RGB灯的RGB值改变灯颜色,从而达到彩虹流水灯效果。 [mw_shl_code=applescript,false]from mpython import * import time rgb[0] = (100, 0, 0) sleep(0.05) rgb[1] = (0, 100, 0) sleep(0.05) rgb[2] = (0, 0, 255) sleep(0.5) rgb.fill( (0, 0, 0) ) rgb.write() rgb[0] = (0, 100, 0) sleep(0.05) rgb[1] = (0, 0, 255) sleep(0.05) rgb[2] = (100, 0, 0) sleep(0.5) rgb.fill( (0, 0, 0) ) rgb.write() rgb[0] = (0, 0, 255) sleep(0.05) rgb[1] = (100, 0, 0) sleep(0.05) rgb[2] = (0, 100, 0) sleep(0.5) rgb.fill( (0, 0, 0) ) rgb.write()[/mw_shl_code] |
|
7、板载三位变幻RGB彩虹灯 [mw_shl_code=applescript,false]#MicroPython动手做(13)——掌控板之RGB三色灯 #板载三位变幻RGB彩虹灯 from mpython import * import neopixel import time my_rgb = neopixel.NeoPixel(Pin(Pin.P7), n=3, bpp=3, timing=1) def make_rainbow(_neopixel, _num, _bright, _offset): _rgb = ((255,0,0), (255,127,0), (255,255,0), (0,255,0), (0,255,255), (0,0,255), (136,0,255), (255,0,0)) for i in range(_num): t = 7 * i / _num t0 = int(t) r = round((_rgb[t0][0] + (t-t0)*(_rgb[t0+1][0]-_rgb[t0][0]))*_bright)>>8 g = round((_rgb[t0][1] + (t-t0)*(_rgb[t0+1][1]-_rgb[t0][1]))*_bright)>>8 b = round((_rgb[t0][2] + (t-t0)*(_rgb[t0+1][2]-_rgb[t0][2]))*_bright)>>8 _neopixel[(i + _offset) % _num] = (r, g, b) offset = 0 while True: make_rainbow(my_rgb, 3, 10, offset) offset = offset + 1 my_rgb.write() time.sleep_ms(100)[/mw_shl_code] |
|
8、外接八位RGB彩虹灯环 [mw_shl_code=applescript,false]#MicroPython动手做(13)——掌控板之RGB三色灯 #外接八位RGB彩虹灯环 from mpython import * import neopixel import time my_rgb = neopixel.NeoPixel(Pin(Pin.P8), n=8, bpp=3, timing=1) def make_rainbow(_neopixel, _num, _bright, _offset): _rgb = ((255,0,0), (255,127,0), (255,255,0), (0,255,0), (0,255,255), (0,0,255), (136,0,255), (255,0,0)) for i in range(_num): t = 7 * i / _num t0 = int(t) r = round((_rgb[t0][0] + (t-t0)*(_rgb[t0+1][0]-_rgb[t0][0]))*_bright)>>8 g = round((_rgb[t0][1] + (t-t0)*(_rgb[t0+1][1]-_rgb[t0][1]))*_bright)>>8 b = round((_rgb[t0][2] + (t-t0)*(_rgb[t0+1][2]-_rgb[t0][2]))*_bright)>>8 _neopixel[(i + _offset) % _num] = (r, g, b) offset = 0 while True: make_rainbow(my_rgb, 8, 6, offset) offset = offset + 1 my_rgb.write() time.sleep_ms(100) [/mw_shl_code] |
 沪公网安备31011502402448
© 2013-2026 Comsenz Inc. Powered by Discuz! X3.4 Licensed