【Arduino】168种传感器模块系列实验(资料代码+仿真编程+图形编程)
实验一百六十五:2.4寸TFT液晶触摸屏 彩屏模块 TFT-LCD 高清真彩显示屏
项目十四:绘制位图8张
bitmap_RGB.h 之二
-
- 0xEDD5, 0xE512, 0xE4B0, 0xE42E, 0xDB49, 0xCA25, 0xD3AC, 0xC533, 0x9268, 0x6922, 0xB34B, 0xC574, 0xE75D, 0xD659, 0x8C30, 0xFFFF, // 0x02E0 (736)
- 0xFFFF, 0xFFFF, 0xFFFF, 0xFFFF, 0xFFFF, 0xFFFF, 0xFFFF, 0xFFFF, 0xFFFF, 0xFFFF, 0xFFFF, 0xFFFF, 0xFFFF, 0xFFFF, 0xFFFF, 0xFFFF, // 0x02F0 (752)
- 0xFFFF, 0xFFFF, 0xFFFF, 0xFFFF, 0xFFFF, 0xFFFF, 0xFFFF, 0xFFFF, 0xFFFF, 0xFFFF, 0xFFFF, 0xFFFF, 0xFFFF, 0xFFFF, 0xFFFF, 0xFFFF, // 0x0300 (768)
- 0xFFFF, 0xFFFF, 0xFFFF, 0xFFFF, 0xFFFF, 0xFFFF, 0xFFFF, 0xFFFF, 0xFFFF, 0xFFFF, 0xFFFF, 0xFFFF, 0xFFFF, 0xFFFF, 0xFFFF, 0xFFFF, // 0x0310 (784)
- 0xFFFF, 0xFFFF, 0xFFFF, 0xFFFF, 0xFFFF, 0xFFFF, 0xFFFF, 0xFFFF, 0xFFFF, 0xFFFF, 0xFFFF, 0xFFFF, 0xFFFF, 0xFFFF, 0xF7DE, 0xFFFF, // 0x0320 (800)
- 0xFFFF, 0xFFFF, 0xFFFF, 0xF7DF, 0xF75D, 0xF6FB, 0xEE38, 0xE553, 0xE4B0, 0xE44E, 0xCA25, 0xB921, 0xD265, 0xDA23, 0xD1E2, 0xD1A1, // 0x0330 (816)
- 0xD160, 0xD920, 0xD920, 0xD920, 0xE180, 0xE180, 0xE1A0, 0xC161, 0x9901, 0xC982, 0xD940, 0xC900, 0xB2E9, 0xB574, 0x8451, 0xFFFF, // 0x0340 (832)
- 0xFFFF, 0xFF9E, 0xFF5D, 0xFF5C, 0xFFBE, 0xFFFF, 0xFFFF, 0xFFFF, 0xFFFF, 0xFFFF, 0xFFFF, 0xFFFF, 0xFFFF, 0xFFFF, 0xFFFF, 0xFFFF, // 0x0350 (848)
- 0xFFFF, 0xFFFF, 0xFFFF, 0xFFFF, 0xFFFF, 0xFFFF, 0xFFFF, 0xFFFF, 0xFFFF, 0xFFFF, 0xFFFF, 0xFFFF, 0xFFFF, 0xFFFF, 0xFFFF, 0xFFFF, // 0x0360 (864)
- 0xFFFF, 0xFFFF, 0xFFFF, 0xFFFF, 0xFFFF, 0xFFFF, 0xFFFF, 0xFFFF, 0xFFFF, 0xFFFF, 0xFFFF, 0xFFFF, 0xFFFF, 0xFFFF, 0xFFFF, 0xFFFF, // 0x0370 (880)
- 0xFFFF, 0xFFDF, 0xFFFF, 0xFFFF, 0xFFFF, 0xFFFF, 0xFFFF, 0xFFFF, 0xFFFF, 0xFFFF, 0xF7DF, 0xF77D, 0xF71B, 0xF699, 0xEDF6, 0xE532, // 0x0380 (896)
- 0xE48F, 0xE3ED, 0xE329, 0xDA85, 0xD9E3, 0xD9C2, 0xD980, 0xD920, 0xD920, 0xD920, 0xE160, 0xE180, 0xE160, 0xE180, 0xE9A0, 0xF1C1, // 0x0390 (912)
- 0xF243, 0xF264, 0xEA44, 0xF2A6, 0xEA86, 0xD204, 0xCA45, 0xAA04, 0x7142, 0x7963, 0x9163, 0xA961, 0xB141, 0x81E5, 0x9C30, 0xED93, // 0x03A0 (928)
- 0xE40D, 0xD286, 0xD1E3, 0xD9E3, 0xD245, 0xCBAC, 0xEEBA, 0xFFFF, 0xFFDF, 0xFFFF, 0xFFFF, 0xFFFF, 0xFFFF, 0xFF9D, 0xFF7D, 0xFFFF, // 0x03B0 (944)
- 0xFFFF, 0xFFFF, 0xFFFF, 0xFFFF, 0xFFFF, 0xFFFF, 0xFFFF, 0xFFFF, 0xFFFF, 0xFFFF, 0xFFFF, 0xFFFF, 0xFFFF, 0xFFFF, 0xFFFF, 0xFFFF, // 0x03C0 (960)
- 0xFFFF, 0xFFFF, 0xFFFF, 0xFFFF, 0xFFFF, 0xFFFF, 0xFFFF, 0xFFFF, 0xFFFF, 0xFFFF, 0xFFFF, 0xFFFF, 0xFFFF, 0xFFFF, 0xFFFF, 0xFFFF, // 0x03D0 (976)
- 0xFFFF, 0xFFFF, 0xFFFF, 0xF77C, 0xF71B, 0xEE78, 0xEDD5, 0xECF1, 0xE44F, 0xE3AB, 0xDAE7, 0xDA44, 0xE204, 0xE1C2, 0xE160, 0xE120, // 0x03E0 (992)
- 0xE140, 0xE160, 0xE160, 0xE160, 0xE160, 0xE980, 0xE981, 0xE1A1, 0xE9C2, 0xEA03, 0xEA65, 0xF2A6, 0xEAA5, 0xEAE8, 0xE2C7, 0xD265, // 0x03F0 (1008)
- 0xCA86, 0xBA45, 0xA1C3, 0x91A4, 0x8983, 0x6922, 0x6902, 0x7122, 0x7942, 0x7963, 0x7164, 0x5944, 0x5943, 0x8122, 0xD1A1, 0xE1A1, // 0x0400 (1024)
- 0xE9E2, 0xE1A1, 0xD980, 0xE1A0, 0xD161, 0x80C0, 0xAA06, 0xFF9D, 0xFFFF, 0xFFFF, 0xF73C, 0xBCF3, 0x8ACA, 0x69C5, 0x69A4, 0x7A68, // 0x0410 (1040)
- 0xA44F, 0xEF5D, 0xFFFF, 0xFFFF, 0xFFFF, 0xFFFF, 0xFFFF, 0xFFFF, 0xFFFF, 0xFFFF, 0xFFFF, 0xFFFF, 0xFFFF, 0xFFFF, 0xFFFF, 0xFFFF, // 0x0420 (1056)
- 0xFFFF, 0xFFFF, 0xFFFF, 0xFFFF, 0xFFFF, 0xFFFF, 0xFFFF, 0xFFFF, 0xFFFF, 0xFFFF, 0xFFFF, 0xFFFF, 0xFFFF, 0xFFFF, 0xFFFF, 0xFFFF, // 0x0430 (1072)
- 0xFED9, 0xD40E, 0xCAE8, 0xD224, 0xD9E2, 0xD9A1, 0xD960, 0xD940, 0xD940, 0xE140, 0xE180, 0xE180, 0xE181, 0xE980, 0xE980, 0xE9A0, // 0x0440 (1088)
- 0xE9A1, 0xE9C2, 0xE9E2, 0xF264, 0xEAC6, 0xF2C6, 0xF307, 0xF38A, 0xEB08, 0xD2C7, 0xCAE8, 0xC287, 0x99C4, 0x9183, 0x9182, 0x6901, // 0x0450 (1104)
- 0x6101, 0x68E1, 0x6102, 0x60E1, 0x7122, 0x8142, 0x8942, 0x9142, 0x9942, 0xB982, 0xB9A2, 0xA962, 0xD1A1, 0xE9C1, 0xE1A2, 0xD9A1, // 0x0460 (1120)
- 0xE1A1, 0xD162, 0xD182, 0xD182, 0xB982, 0x8100, 0xBB29, 0xFFFF, 0xFFDE, 0xAC70, 0x5944, 0x4080, 0x68C1, 0x8901, 0x9941, 0x9920, // 0x0470 (1136)
- 0x98E0, 0x8A27, 0xDEDB, 0xFFFF, 0xFFFF, 0xFFFF, 0xFFFF, 0xFFFF, 0xFFFF, 0xFFFF, 0xFFFF, 0xFFFF, 0xFFFF, 0xFFFF, 0xFFFF, 0xFFFF, // 0x0480 (1152)
- 0xFFFF, 0xFFFF, 0xFFFF, 0xFFFF, 0xFFFF, 0xFFFF, 0xFFFF, 0xFFFF, 0xFFFF, 0xFFFF, 0xFFFF, 0xFFFF, 0xFFFF, 0xFFFF, 0xFFFF, 0xE6DA, // 0x0490 (1168)
- 0xB182, 0xC900, 0xD981, 0xE180, 0xE181, 0xE981, 0xE9A1, 0xE1C1, 0xE1C1, 0xE9C1, 0xE9C1, 0xE9E2, 0xEA64, 0xF2C7, 0xF2C6, 0xFAE7, // 0x04A0 (1184)
- 0xFB69, 0xF3AB, 0xE2E8, 0xD308, 0xD2C8, 0xBA45, 0x99A4, 0x8983, 0x9142, 0x7102, 0x58E1, 0x68E1, 0x68E2, 0x48E2, 0x60E1, 0x8942, // 0x04B0 (1200)
- 0x8162, 0x8962, 0xA162, 0xB182, 0xB982, 0xC9C2, 0xD1C2, 0xD9A1, 0xC9C2, 0xB181, 0xC981, 0xE1C1, 0xD9A0, 0xD9A1, 0xD1A1, 0xD1A1, // 0x04C0 (1216)
- 0xD1A1, 0xC981, 0xC981, 0xB181, 0x9121, 0x91A5, 0xFF9E, 0xEEDB, 0x7227, 0x4840, 0x8901, 0xC182, 0xD9C2, 0xD1C2, 0xE9A1, 0xE981, // 0x04D0 (1232)
- 0xE181, 0xC0E0, 0xA267, 0xFFFF, 0xFFFF, 0xFFFF, 0xFFFF, 0xFFFF, 0xFFFF, 0xFFFF, 0xFFFF, 0xFFFF, 0xFFFF, 0xFFFF, 0xFFFF, 0xFFFF, // 0x04E0 (1248)
- 0xFFFF, 0xFFFF, 0xFFFF, 0xFFFF, 0xFFFF, 0xFFFF, 0xFFFF, 0xFFFF, 0xFFFF, 0xFFFF, 0xFFFF, 0xFFFF, 0xFFFF, 0xFFFF, 0xFFFF, 0xD38C, // 0x04F0 (1264)
- 0x98E0, 0xE1C1, 0xE1A1, 0xE9C1, 0xF1C1, 0xE9E2, 0xEA02, 0xE9C1, 0xE9A1, 0xF1E2, 0xF3AA, 0xEBAA, 0xF34A, 0xEB4A, 0xCAC7, 0xCA44, // 0x0500 (1280)
- 0xB1C4, 0xA183, 0x8121, 0x70E1, 0xB121, 0x70E1, 0x7902, 0x70E2, 0x6902, 0x6901, 0x7922, 0x7901, 0x9AC9, 0xA4F2, 0x49C6, 0x99C3, // 0x0510 (1296)
- 0xD1A2, 0xD1A2, 0xD9C2, 0xD9C2, 0xD9C1, 0xD9A2, 0xD9C2, 0xE1A1, 0xC9A1, 0xA981, 0xB981, 0xD1A1, 0xE1C1, 0xE9C2, 0xE9C1, 0xE1A2, // 0x0520 (1312)
- 0xE9A1, 0xE9A1, 0xD182, 0xA141, 0x6102, 0xD617, 0xE6DA, 0x8184, 0x80C0, 0xC982, 0xD982, 0xD9A1, 0xD160, 0xE181, 0xD9C2, 0xA286, // 0x0530 (1328)
- 0xA225, 0x89C4, 0x6922, 0xA4B1, 0xF79E, 0xFFFF, 0xFFFF, 0xFFFF, 0xFFFF, 0xFFFF, 0xFFFF, 0xFFFF, 0xFFFF, 0xFFFF, 0xFFFF, 0xFFFF, // 0x0540 (1344)
- 0xFFFF, 0xFFFF, 0xFFFF, 0xFFFF, 0xFFFF, 0xFFFF, 0xFFFF, 0xFFFF, 0xFFFF, 0xFFFF, 0xFFFF, 0xFFFF, 0xFFFF, 0xFFFF, 0xF7FF, 0xDBED, // 0x0550 (1360)
- 0xB920, 0xE9E1, 0xE9C1, 0xE9C1, 0xE9A1, 0xEAC7, 0xEBAA, 0xE9C1, 0xE9E2, 0xE9E2, 0xEA03, 0xE9C2, 0xE1A0, 0xD981, 0x88E1, 0x8922, // 0x0560 (1376)
- 0x6902, 0x7102, 0x7122, 0x7122, 0x8902, 0x58C1, 0x48E1, 0x58E1, 0x58A1, 0x48A1, 0x8122, 0x9900, 0xB44E, 0xE6FA, 0x52CB, 0x48E1, // 0x0570 (1392)
- 0xD9A2, 0xD9A1, 0xE1C2, 0xD9A2, 0xD9A1, 0xD9C2, 0xD1C3, 0xD1E3, 0xB981, 0xB981, 0x7122, 0x7142, 0x7941, 0x9941, 0xB961, 0xB981, // 0x0580 (1408)
- 0xB982, 0xA142, 0x6921, 0x40E2, 0x6142, 0xBBAD, 0x81E5, 0xB100, 0xE1A2, 0xD9A1, 0xD981, 0xC182, 0xBAA8, 0xA941, 0x59E5, 0x52AA, // 0x0590 (1424)
- 0x52AA, 0x4248, 0x52EB, 0x41E7, 0x5269, 0xAD33, 0xF79D, 0xFFFF, 0xFFFF, 0xFFFF, 0xFFFF, 0xFFFF, 0xFFFF, 0xFFFF, 0xFFFF, 0xFFFF, // 0x05A0 (1440)
- 0xFFFF, 0xFFFF, 0xFFFF, 0xFFFF, 0xFFFF, 0xFFFF, 0xFFFF, 0xFFFF, 0xFFFF, 0xFFFF, 0xFFFF, 0xFFFF, 0xFFFF, 0xFFFF, 0xFFDF, 0xC36B, // 0x05B0 (1456)
- 0xB120, 0xE1C1, 0xE1C1, 0xD9A1, 0xE9C1, 0xF1C1, 0xE9C2, 0xD9C1, 0xC1A2, 0xC9A2, 0xD182, 0xD1A1, 0xD9A1, 0xC9A2, 0x8922, 0x7102, // 0x05C0 (1472)
- 0x58E1, 0x50C1, 0x48C2, 0x3082, 0x2061, 0x1861, 0x2041, 0xA9A4, 0xE284, 0xB962, 0x8921, 0xA921, 0x9BAC, 0xF75C, 0x52CB, 0x60E1, // 0x05D0 (1488)
- 0xEA22, 0xCA24, 0xC9E3, 0xD203, 0xCA03, 0xC9C3, 0xC1E2, 0xC9E2, 0xC182, 0xB961, 0x38E2, 0x5902, 0x6102, 0x40E2, 0x7102, 0x7143, // 0x05E0 (1504)
- 0x38C2, 0x40A1, 0x6922, 0x8122, 0xC181, 0x88C0, 0xC141, 0xD9A1, 0xD181, 0xE181, 0xE981, 0xA143, 0x6B2C, 0x6289, 0x4A89, 0x5269, // 0x05F0 (1520)
- 0x5248, 0x5289, 0x5269, 0x3185, 0x3185, 0x4227, 0x41E7, 0xAD55, 0xFFFF, 0xFFFF, 0xFFFF, 0xFFFF, 0xFFFF, 0xFFFF, 0xFFFF, 0xFFFF, // 0x0600 (1536)
- 0xFFFF, 0xFFFF, 0xFFFF, 0xFFFF, 0xFFFF, 0xFFFF, 0xFFFF, 0xFFFF, 0xFFFF, 0xFFFF, 0xFFFF, 0xFFFF, 0xFFFF, 0xFFFF, 0xFFDF, 0x9A88, // 0x0610 (1552)
- 0x90E0, 0xC981, 0xC182, 0xC182, 0xC182, 0xD245, 0xD265, 0xC182, 0xB161, 0xA962, 0xA982, 0xB162, 0xC982, 0x8921, 0x2861, 0x2061, // 0x0620 (1568)
- 0x1861, 0x1881, 0x1061, 0x3061, 0x6102, 0x48A1, 0x3860, 0x6102, 0x8984, 0x5922, 0x7122, 0xE9A1, 0xB1C3, 0x7B8D, 0x3985, 0x40E2, // 0x0630 (1584)
- 0x91A3, 0xD203, 0xD1C2, 0xD9C2, 0xD9A2, 0xE1A1, 0xE9C1, 0x9141, 0x9141, 0xD182, 0x40C2, 0x38A2, 0x5902, 0x7923, 0x6921, 0xA942, // 0x0640 (1600)
- 0xA1C3, 0xA309, 0x9182, 0xD1A1, 0xA942, 0xB982, 0xE9A1, 0xD9A1, 0xCA03, 0x71C5, 0x91C4, 0x832A, 0x4A89, 0x5269, 0x5268, 0x5269, // 0x0650 (1616)
- 0x5249, 0x4208, 0x5269, 0x3165, 0x20E4, 0x4207, 0x2103, 0x2924, 0xB595, 0xFFFF, 0xFFFF, 0xFFFF, 0xFFFF, 0xFFFF, 0xFFFF, 0xFFFF, // 0x0660 (1632)
- 0xFFFF, 0xFFFF, 0xFFFF, 0xFFFF, 0xFFFF, 0xFFFF, 0xFFFF, 0xFFFF, 0xFFFF, 0xFFFF, 0xFFFF, 0xFFFF, 0xFFFF, 0xFFFF, 0xFFFF, 0xAB4B, // 0x0670 (1648)
- 0x8102, 0x5902, 0x40A1, 0x48C1, 0x48A1, 0x5903, 0x5103, 0x50A1, 0xA962, 0xC1A2, 0xC9A2, 0xC9A2, 0xE1C2, 0x9941, 0x1841, 0x3881, // 0x0680 (1664)
- 0x7122, 0x9122, 0x8942, 0x8941, 0xB9C3, 0xDCF2, 0x9BAD, 0x48E2, 0xA143, 0x6122, 0xA962, 0xE1C2, 0xC9A2, 0x48C1, 0x38C3, 0x30C2, // 0x0690 (1680)
- 0x9162, 0xE1C1, 0xE1A1, 0xE1C1, 0xE1A1, 0xE9C1, 0xC9A2, 0x40C2, 0x8141, 0xD9C2, 0x9162, 0x38E2, 0x6102, 0x7922, 0x6902, 0x7902, // 0x06A0 (1696)
- 0xE182, 0x9AC8, 0xA9A4, 0xC181, 0x8942, 0xC962, 0xD981, 0xE160, 0xD2A7, 0x7BCF, 0x2986, 0x4A48, 0x5228, 0x734C, 0x8C0F, 0x5248, // 0x06B0 (1712)
- 0x20E3, 0x2924, 0x2924, 0x2924, 0x2103, 0x2124, 0x2104, 0x2904, 0x39A6, 0xEF5D, 0xFFFF, 0xFFFF, 0xFFFF, 0xFFFF, 0xFFFF, 0xFFFF, // 0x06C0 (1728)
- 0xFFFF, 0xFFFF, 0xFFFF, 0xFFFF, 0xFFFF, 0xFFFF, 0xFFFF, 0xFFFF, 0xFFFF, 0xFFFF, 0xFFFF, 0xFFFF, 0xFFFF, 0xFFFF, 0xFFFF, 0xB3EE, // 0x06D0 (1744)
- 0x8122, 0x5903, 0x2840, 0x3881, 0x4081, 0x40E2, 0x38C2, 0x4081, 0xB162, 0xC982, 0xC9A2, 0xD1A2, 0xE1C1, 0x9941, 0x2060, 0xA9A2, // 0x06E0 (1760)
- 0xD204, 0xB162, 0xB182, 0xA142, 0xA941, 0xCC90, 0xDE9A, 0x7207, 0xB1A2, 0xA142, 0xD1A2, 0xD1A2, 0xE9C2, 0xA962, 0x3902, 0x7142, // 0x06F0 (1776)
- 0xD981, 0xE1C2, 0xD9E2, 0xDA43, 0xD204, 0xD9A1, 0x9962, 0x38E2, 0x7122, 0xC9A1, 0xC161, 0x8142, 0x9982, 0xC161, 0x6122, 0x38E2, // 0x0700 (1792)
- 0xA141, 0xB982, 0x8142, 0xA941, 0x6122, 0xA161, 0xF1A1, 0xF181, 0xA1C4, 0x83EE, 0x39A6, 0x5AA9, 0x8C0F, 0xAD13, 0x9C91, 0x5AA9, // 0x0710 (1808)
- 0x3185, 0x20E3, 0x2104, 0x2104, 0x18E3, 0x18E3, 0x18C3, 0x2924, 0x18A2, 0x9491, 0xFFFF, 0xFFFF, 0xFFFF, 0xFFFF, 0xFFFF, 0xFFFF, // 0x0720 (1824)
- 0xFFFF, 0xFFFF, 0xFFFF, 0xFFFF, 0xFFFF, 0xFFFF, 0xFFFF, 0xFFFF, 0xFFFF, 0xFFFF, 0xFFFF, 0xFFFF, 0xFFFF, 0xFFFF, 0xFFFF, 0xB470, // 0x0730 (1840)
- 0x7902, 0x6923, 0x3881, 0x4881, 0x48A0, 0x50E2, 0x48C2, 0x60C1, 0xC982, 0xC9A2, 0xD1A2, 0xD1A2, 0xE1C1, 0xA161, 0x30A1, 0xB983, // 0x0740 (1856)
- 0x9942, 0x8942, 0x8121, 0xB182, 0xC981, 0xA962, 0xCD34, 0x9C70, 0xBA04, 0xA121, 0xD1A2, 0xD1C2, 0xE1C2, 0xE1C2, 0xC9A3, 0xCA04, // 0x0750 (1872)
- 0xD203, 0xD244, 0xD204, 0xD204, 0xE1E2, 0xA142, 0x4102, 0x40E3, 0x5922, 0xB9C2, 0xB9A2, 0xA162, 0x9162, 0xB162, 0x5922, 0x38C2, // 0x0760 (1888)
- 0x5901, 0xC9A2, 0xA962, 0x8941, 0x38E3, 0x7102, 0x9942, 0x8162, 0x4164, 0x62EB, 0x736C, 0x6B2C, 0x7BAD, 0x5A69, 0x39A6, 0x2944, // 0x0770 (1904)
- 0x2104, 0x20E3, 0x20C3, 0x20C3, 0x18E3, 0x18C3, 0x18A2, 0x20E3, 0x18A2, 0x2945, 0xD6BA, 0xFFFF, 0xFFFF, 0xFFFF, 0xFFFF, 0xFFFF, // 0x0780 (1920)
- 0xFFFF, 0xFFFF, 0xFFFF, 0xFFFF, 0xFFFF, 0xFFFF, 0xFFFF, 0xFFFF, 0xFFFF, 0xFFFF, 0xFFFF, 0xFFFF, 0xFFFF, 0xFFFF, 0xFFFF, 0xC4F3, // 0x0790 (1936)
- 0x70E1, 0x6123, 0x4061, 0x48A1, 0x48A1, 0x48E2, 0x48C2, 0x68C1, 0xC9C1, 0xD1C2, 0xD1C1, 0xD9C2, 0xE1C1, 0xA922, 0x48E2, 0x4144, // 0x07A0 (1952)
- 0x28C2, 0x8942, 0xA182, 0x8121, 0x8963, 0x7901, 0x6A07, 0xC618, 0xA2C9, 0xB961, 0xC9C2, 0xD9E2, 0xDA85, 0xC9C3, 0xD9E2, 0xD9E2, // 0x07B0 (1968)
- 0xD9C2, 0xD9A1, 0xE1C2, 0xE9A1, 0xD182, 0x4902, 0x38E3, 0x38E3, 0x6123, 0xB9C3, 0xB9A2, 0x9942, 0x6143, 0x5122, 0x8922, 0x5902, // 0x07C0 (1984)
- 0x5902, 0x9983, 0x8942, 0x6921, 0x40C2, 0x5164, 0x4A68, 0x4248, 0x83AF, 0x5A69, 0x62EA, 0x6B0B, 0x5269, 0x3165, 0x2924, 0x20E3, // 0x07D0 (2000)
- 0x18C3, 0x18C2, 0x31A5, 0x4A28, 0x41E7, 0x20E3, 0x18A2, 0x20C3, 0x20C3, 0x18C2, 0x736D, 0xFFFF, 0xFFFF, 0xFFFF, 0xFFFF, 0xFFFF, // 0x07E0 (2016)
- 0xFFFF, 0xFFFF, 0xFFFF, 0xFFFF, 0xFFFF, 0xFFFF, 0xFFFF, 0xFFFF, 0xFFFF, 0xFFFF, 0xFFFF, 0xFFFF, 0xFFFF, 0xFFFF, 0xFFFF, 0xD595, // 0x07F0 (2032)
- 0x8101, 0x7164, 0x4881, 0x50A1, 0x4080, 0x40C2, 0x40A2, 0x70E2, 0xD1A2, 0xD9C2, 0xD9C2, 0xE1C2, 0xE9E2, 0xB161, 0x3922, 0x2965, // 0x0800 (2048)
- 0x2104, 0x2103, 0x30A2, 0x3081, 0xBA05, 0x68C1, 0x80E0, 0xDD53, 0xA4D2, 0xA1A2, 0x9942, 0xE1C2, 0xE1E2, 0xE9A1, 0xE9C1, 0xE9C1, // 0x0810 (2064)
- 0xE9C1, 0xE9E1, 0xE9C2, 0xE1C2, 0x7142, 0x30E3, 0x6143, 0x5922, 0x9962, 0xD9C3, 0xC9A2, 0xA182, 0x9162, 0x8122, 0x9142, 0x9162, // 0x0820 (2080)
- 0x9143, 0x4902, 0x6122, 0x7922, 0x48E2, 0x5185, 0x734C, 0x3986, 0x41E7, 0x6B0C, 0xBDB5, 0xD678, 0x8C30, 0x39A6, 0x2924, 0x18C3, // 0x0830 (2096)
- 0x2924, 0x632C, 0x736D, 0x7BAD, 0x83CF, 0x7B8E, 0x39A6, 0x1082, 0x18C3, 0x18A2, 0x9492, 0xFFFF, 0xFFFF, 0xFFFF, 0xFFFF, 0xFFFF, // 0x0840 (2112)
- 0xFFFF, 0xFFFF, 0xFFFF, 0xFFFF, 0xFFFF, 0xFFFF, 0xFFFF, 0xFFFF, 0xFFFF, 0xFFFF, 0xFFFF, 0xFFFF, 0xFFFF, 0xFFFF, 0xFFFF, 0xDE37, // 0x0850 (2128)
- 0x98E1, 0x6122, 0x4081, 0x4861, 0x3860, 0x38C2, 0x30A1, 0x8101, 0xD9A1, 0xD9C2, 0xD9C2, 0xE1C2, 0xF1E1, 0xA982, 0x2165, 0x5248, // 0x0860 (2144)
- 0x4A48, 0x4208, 0x5185, 0xA142, 0xCA44, 0x8102, 0xD960, 0xD265, 0xC5F8, 0x830B, 0x78E1, 0xE1A1, 0xF1C1, 0xE9C1, 0xE1C2, 0xD1A2, // 0x0870 (2160)
- 0xC162, 0x9943, 0x8142, 0x6122, 0x30E3, 0x5903, 0xB1A3, 0xB182, 0xB9A2, 0xB1A3, 0xA182, 0x9963, 0x9183, 0xB9A3, 0xA982, 0x9942, // 0x0880 (2176)
- 0x8942, 0x9962, 0xA982, 0xC1C3, 0x6902, 0x38C2, 0x838D, 0x4A48, 0x5AAA, 0x9C90, 0xBD94, 0x9470, 0x4A08, 0x20E3, 0x18A2, 0x2904, // 0x0890 (2192)
- 0xB5F7, 0xB470, 0x80C0, 0x7207, 0x630B, 0x7B8D, 0x83CE, 0x2924, 0x18C3, 0x1081, 0x630B, 0xFFFF, 0xFFFF, 0xFFFF, 0xFFFF, 0xFFFF, // 0x08A0 (2208)
- 0xFFFF, 0xFFFF, 0xFFFF, 0xFFFF, 0xFFFF, 0xFFFF, 0xFFFF, 0xFFFF, 0xFFFF, 0xFFFF, 0xFFFF, 0xFFFF, 0xFFFF, 0xFFFF, 0xFFFF, 0xEEFB, // 0x08B0 (2224)
- 0xA163, 0x6922, 0x40A1, 0x3881, 0x3060, 0x30A1, 0x3082, 0x9121, 0xE1C2, 0xE1C1, 0xE1C2, 0xE9E1, 0xF9E2, 0xB182, 0x18C3, 0x18E3, // 0x08C0 (2240)
- 0x18E3, 0x18E3, 0x18C2, 0x6101, 0xD203, 0x9122, 0xD181, 0xD940, 0xCC2D, 0x8C51, 0x5923, 0x9121, 0x8962, 0x7122, 0x50E2, 0x6164, // 0x08D0 (2256)
- 0x7964, 0x40E2, 0x6923, 0x7122, 0x7142, 0x8183, 0xA162, 0xB163, 0x9962, 0xA1C3, 0xD285, 0xDA44, 0xE265, 0xF223, 0xC9A2, 0xB183, // 0x08E0 (2272)
- 0xC9A2, 0xD182, 0xA162, 0xB962, 0x7122, 0x3924, 0x5A89, 0x5A89, 0x83AD, 0xAD13, 0x9450, 0x2945, 0x2104, 0x20E3, 0x18A2, 0xAD75, // 0x08F0 (2288)
- 0xFF5C, 0xD266, 0x8080, 0xC513, 0xB5D7, 0x62EB, 0x9450, 0x6B0B, 0x18A2, 0x18E3, 0x18C3, 0xB5B6, 0xFFFF, 0xFFFF, 0xFFFF, 0xFFFF, // 0x0900 (2304)
- 0xFFFF, 0xFFFF, 0xFFFF, 0xFFFF, 0xFFFF, 0xFFFF, 0xFFFF, 0xFFFF, 0xFFFF, 0xFFFF, 0xFFFF, 0xFFFF, 0xFFFF, 0xFFFF, 0xFFFF, 0xF77E, // 0x0910 (2320)
- 0xA1C5, 0x7922, 0x3881, 0x3081, 0x3081, 0x38C2, 0x3082, 0x9921, 0xE1A1, 0xE1C1, 0xE9C1, 0xE9C1, 0xF9E1, 0xB161, 0x18E3, 0x2924, // 0x0920 (2336)
- 0x2104, 0x2104, 0x28C2, 0x8123, 0xA9E3, 0x8941, 0xB9A2, 0xE9A1, 0xD1A1, 0xC595, 0xA32C, 0x68E0, 0x38E2, 0x58E3, 0x7942, 0x9205, // 0x0930 (2352)
- 0x6943, 0xD1A2, 0xC9C2, 0xC9A1, 0xC9C2, 0x8983, 0x9962, 0xE9C2, 0xC9A1, 0xC182, 0xE9A2, 0xF1C2, 0xE9A1, 0xE1C1, 0xA963, 0x9182, // 0x0940 (2368)
- 0xC9C2, 0xC9A2, 0xA962, 0x9182, 0x41C6, 0x3186, 0x41E7, 0x9450, 0x83CD, 0x5AAA, 0x41C6, 0x3986, 0x2924, 0x1061, 0x7BAE, 0xFFFF, // 0x0950 (2384)
- 0xE3CE, 0xC8C0, 0xA0C0, 0xCCD1, 0xFFFF, 0x8C30, 0x9471, 0x9C71, 0x2945, 0x20E3, 0x0861, 0x8C51, 0xFFFF, 0xFFFF, 0xFFFF, 0xFFFF, // 0x0960 (2400)
- 0xFFFF, 0xFFFF, 0xFFFF, 0xFFFF, 0xFFFF, 0xFFFF, 0xFFFF, 0xFFFF, 0xFFFF, 0xFFFF, 0xFFFF, 0xFFFF, 0xFFFF, 0xFFFF, 0xFFFF, 0xF79E, // 0x0970 (2416)
- 0x91C6, 0x8101, 0x40A1, 0x3060, 0x3861, 0x38C2, 0x38A2, 0xA162, 0xE1C1, 0xE9C1, 0xF1C1, 0xF1C1, 0xF9E1, 0xB161, 0x20A2, 0x40E2, // 0x0980 (2432)
- 0x48E1, 0x48E2, 0x60C1, 0xB1A2, 0xDA03, 0xB1C3, 0xB1C3, 0xC203, 0xF308, 0xC34A, 0xC5B4, 0xB9A3, 0x9100, 0xF1E2, 0xE203, 0x81C5, // 0x0990 (2448)
- 0x9982, 0xE1E2, 0xC161, 0xC9A2, 0xB1A3, 0x9942, 0xB1A2, 0xF1C2, 0xD1A2, 0x9962, 0xB982, 0xC9C2, 0xE9C2, 0xD982, 0xB181, 0xC1A3, // 0x09A0 (2464)
- 0xB9C3, 0xC9A3, 0xD182, 0xB204, 0x4A49, 0x5AAA, 0x8C0E, 0x5AA9, 0x736C, 0xC5D5, 0x83EF, 0x3165, 0x20E3, 0x2945, 0xD699, 0xD69A, // 0x09B0 (2480)
- 0x9183, 0xB1A3, 0xD940, 0xAA47, 0xFFFF, 0xCE38, 0xA4B1, 0xB554, 0x4207, 0x1061, 0x4208, 0xF79D, 0xFFFF, 0xFFFF, 0xFFFF, 0xFFFF, // 0x09C0 (2496)
- 0xFFFF, 0xFFFF, 0xFFFF, 0xFFFF, 0xFFFF, 0xFFFF, 0xFFFF, 0xFFFF, 0xFFFF, 0xFFFF, 0xFFFF, 0xFFFF, 0xFFFF, 0xFFFF, 0xFFFF, 0xFFDF, // 0x09D0 (2512)
- 0x9227, 0x88E1, 0x4081, 0x3861, 0x3881, 0x38E2, 0x38A2, 0xA941, 0xE1C1, 0xE9C1, 0xF1E1, 0xF1C1, 0xF9E1, 0xA161, 0x3081, 0xC9A2, // 0x09E0 (2528)
- 0xD9C1, 0xE1C2, 0xE1C2, 0xC204, 0xAA05, 0x6142, 0x60E1, 0xB2C8, 0xDC0D, 0x98E0, 0xB4D2, 0xCDB4, 0x9A46, 0xE160, 0xB1E4, 0x7163, // 0x09F0 (2544)
- 0xD9C3, 0xB1C2, 0xB9C3, 0xB1A3, 0xB9A3, 0xD1E2, 0xD9A2, 0xE9C1, 0xD1A1, 0xA142, 0x5922, 0x9962, 0xF1C1, 0xE9A1, 0xE1A1, 0xEA24, // 0x0A00 (2560)
- 0xE1E3, 0xC9A2, 0xB982, 0x7963, 0x6AEA, 0x41E8, 0x5248, 0x6B2B, 0xC5B5, 0xCE16, 0x62CB, 0x20C3, 0x10C3, 0x6A48, 0xB266, 0x8142, // 0x0A10 (2576)
- 0x9921, 0xD9C3, 0xE9A1, 0xA100, 0xD639, 0xF79D, 0xAD13, 0xCDF6, 0x6B0B, 0x0821, 0x5269, 0xFFFF, 0xFFFF, 0xFFFF, 0xFFFF, 0xFFFF, // 0x0A20 (2592)
- 0xFFFF, 0xFFFF, 0xFFFF, 0xFFFF, 0xFFFF, 0xFFFF, 0xFFFF, 0xFFFF, 0xFFFF, 0xFFFF, 0xFFFF, 0xFFFF, 0xFFFF, 0xFFFF, 0xFFFF, 0xFFFF, // 0x0A30 (2608)
- 0xAAC9, 0x80C1, 0x48A1, 0x2880, 0x3861, 0x40E2, 0x48C2, 0xB961, 0xE9C1, 0xE9C1, 0xF1E1, 0xF1C1, 0xF9E1, 0xB161, 0x7101, 0xE1C2, // 0x0A40 (2624)
- 0xE9E2, 0xE1C1, 0xE1E2, 0xC1A2, 0x8121, 0xA141, 0x8100, 0xCB6B, 0xEC4E, 0x90E0, 0x8142, 0x8B6D, 0xC5F6, 0xD3ED, 0x7122, 0xB960, // 0x0A50 (2640)
- 0xF9E2, 0xB9A2, 0xD1C2, 0xCA03, 0xA982, 0xB9A2, 0xA162, 0xA982, 0xA982, 0xA962, 0x9962, 0xC182, 0xF1C1, 0xD9A2, 0xE1A1, 0xE1E3, // 0x0A60 (2656)
- 0xD1A2, 0xE9A2, 0xA982, 0x38A1, 0x730A, 0x5269, 0x41C7, 0x62CA, 0x83CE, 0x6B0B, 0x3165, 0x20C4, 0x2966, 0xAA46, 0xF140, 0xE160, // 0x0A70 (2672)
- 0xF1A1, 0xC182, 0xC1A2, 0xD0E0, 0xB3EE, 0xF7FF, 0xB574, 0xD678, 0x83CE, 0x1082, 0x18C3, 0xBDF7, 0xFFFF, 0xFFFF, 0xFFFF, 0xFFFF, // 0x0A80 (2688)
- 0xFFFF, 0xFFFF, 0xFFFF, 0xFFFF, 0xFFFF, 0xFFFF, 0xFFFF, 0xFFFF, 0xFFFF, 0xFFFF, 0xFFFF, 0xFFFF, 0xFFFF, 0xFFFF, 0xFFFF, 0xFFFF, // 0x0A90 (2704)
- 0xBBAD, 0x88C1, 0x48C2, 0x2861, 0x3840, 0x40C2, 0x48E2, 0xC182, 0xE1E2, 0xE9C1, 0xF1C1, 0xF1C1, 0xF9C1, 0xC1C3, 0xAA66, 0xA942, // 0x0AA0 (2720)
- 0xF1C1, 0xC1C3, 0xA162, 0xF1C2, 0xF1C2, 0xF9E1, 0xC141, 0xB2A7, 0xAB4A, 0x78E1, 0xA961, 0x9900, 0x7A06, 0xAD74, 0xBCB1, 0xE224, // 0x0AB0 (2736)
- 0xC961, 0x9101, 0xB962, 0xC9E2, 0x8121, 0x50A2, 0x7142, 0x8142, 0xA982, 0xA183, 0xC982, 0x8941, 0xB162, 0xD9E2, 0xC981, 0xC182, // 0x0AC0 (2752)
- 0xA962, 0xE1C1, 0x9162, 0x4123, 0x5228, 0x732C, 0x3985, 0x5269, 0x734C, 0x39A6, 0x2924, 0x20C4, 0x31A6, 0x9983, 0xE9A1, 0xE9A1, // 0x0AD0 (2768)
- 0xE9A1, 0xD161, 0xC182, 0xB921, 0x9205, 0xD638, 0xCDF7, 0xE6D9, 0x8C2F, 0x18C3, 0x1061, 0x840F, 0xFFFF, 0xFFFF, 0xFFFF, 0xFFFF, // 0x0AE0 (2784)
- 0xFFFF, 0xFFFF, 0xFFFF, 0xFFFF, 0xFFFF, 0xFFFF, 0xFFFF, 0xFFFF, 0xFFFF, 0xFFFF, 0xFFFF, 0xFFFF, 0xFFFF, 0xFFFF, 0xFFFF, 0xFFFF, // 0x0AF0 (2800)
- 0xBC51, 0x90C0, 0x50C1, 0x2881, 0x2840, 0x30E2, 0x40E2, 0xC982, 0xD9E2, 0xE9E1, 0xF1C1, 0xF1C1, 0xF1E1, 0xBA24, 0x89E5, 0xA163, // 0x0B00 (2816)
- 0xF9E2, 0xC1E3, 0xC1A2, 0xE9C1, 0xE9C1, 0xE9C1, 0xF1E1, 0xE181, 0xA100, 0xA162, 0xC182, 0xC182, 0xB141, 0x7903, 0x93CE, 0xC574, // 0x0B10 (2832)
- 0x9B0B, 0x92EA, 0xB205, 0xB920, 0x8247, 0x8AEA, 0x90E0, 0x9921, 0xB182, 0xB982, 0xB9A2, 0x7122, 0xA162, 0xC9A1, 0xC181, 0xC9A2, // 0x0B20 (2848)
- 0xB181, 0xC9A2, 0x8962, 0x31C6, 0x31A6, 0x3165, 0x5AAA, 0x6B0B, 0x62CA, 0x4A28, 0x3165, 0x18C3, 0x62A9, 0x6963, 0xB961, 0xE9A1, // 0x0B30 (2864)
- 0xE9A1, 0xE9E3, 0xA162, 0x8122, 0x9101, 0x8121, 0xCD74, 0xF75B, 0x8C0F, 0x18A3, 0x10A2, 0xBDF7, 0xFFFF, 0xFFFF, 0xFFFF, 0xFFFF, // 0x0B40 (2880)
- 0xFFFF, 0xFFFF, 0xFFFF, 0xFFFF, 0xFFFF, 0xFFFF, 0xFFFF, 0xFFFF, 0xFFFF, 0xFFFF, 0xFFFF, 0xFFFF, 0xFFFF, 0xFFFF, 0xFFFF, 0xFFFF, // 0x0B50 (2896)
- 0xBCD2, 0x98A0, 0xB981, 0xA161, 0xA142, 0x99C4, 0xA1A3, 0xD9A2, 0xD9A2, 0xE9C1, 0xF1C1, 0xF1C1, 0xF9E1, 0xA9E3, 0x71C5, 0xA1A2, // 0x0B60 (2912)
- 0xE9C2, 0xE1A1, 0xE9C1, 0xF1E1, 0xF1E1, 0xF1C1, 0xF1C1, 0xD9A1, 0xD1A2, 0xB182, 0xB9A1, 0xA983, 0x9941, 0x6080, 0x938E, 0xBD54, // 0x0B70 (2928)
- 0xB513, 0xE6DB, 0xE658, 0xCC50, 0xF75D, 0xF71B, 0xC533, 0xAC70, 0xB1E4, 0x9920, 0xA183, 0xD1C2, 0xE1A1, 0xE1C1, 0xE1C1, 0xE181, // 0x0B80 (2944)
- 0xD1A2, 0xB142, 0x6963, 0x4207, 0x4A28, 0x5269, 0x5249, 0x5A89, 0xA4D2, 0x5269, 0x2103, 0x18C2, 0xB554, 0x8A48, 0x88E1, 0xE9A1, // 0x0B90 (2960)
- 0xE9A1, 0xDA24, 0xA941, 0xB961, 0xB942, 0x932B, 0xEED9, 0xEF3B, 0x734C, 0x0841, 0x8C51, 0xFFFF, 0xFFFF, 0xFFFF, 0xFFFF, 0xFFFF, // 0x0BA0 (2976)
- 0xFFFF, 0xFFFF, 0xFFFF, 0xFFFF, 0xFFFF, 0xFFFF, 0xFFFF, 0xFFFF, 0xFFFF, 0xFFFF, 0xFFFF, 0xFFFF, 0xFFFF, 0xFFFF, 0xFFFF, 0xFFFF, // 0x0BB0 (2992)
- 0xDD74, 0xA0E0, 0xD1A2, 0xF1C1, 0xF9C1, 0xF9E2, 0xF1E2, 0xD9A1, 0xD9A2, 0xE9C1, 0xF1E2, 0xF1E2, 0xF9E1, 0xA962, 0x8944, 0xA182, // 0x0BC0 (3008)
- 0xD9C2, 0xD9C1, 0xC9A1, 0xD1A2, 0xD9C2, 0xB9A2, 0x9942, 0x7102, 0x5101, 0x5901, 0xA163, 0x58C1, 0x38E3, 0x5164, 0xE6B9, 0xFFFF, // 0x0BD0 (3024)
- 0xCDD7, 0xA491, 0xCDB6, 0xF7BE, 0xFFFF, 0xFFFF, 0xFFFF, 0xFFFF, 0xD40E, 0x90C0, 0x9142, 0x9101, 0x9962, 0xB162, 0x8942, 0x7A26, // 0x0BE0 (3040)
- 0x89C4, 0x7268, 0x49C7, 0x5A48, 0x4A29, 0x5269, 0x39A6, 0x62CB, 0x6B2C, 0x39A6, 0x2924, 0x20E3, 0xBDB6, 0xAA46, 0x9901, 0xD9A1, // 0x0BF0 (3056)
- 0xD181, 0xA920, 0xB141, 0xA982, 0xA122, 0xD4B0, 0xF79C, 0xE6FA, 0x5269, 0x0820, 0x9CB2, 0xFFFF, 0xFFFF, 0xFFFF, 0xFFFF, 0xFFFF, // 0x0C00 (3072)
- 0xFFFF, 0xFFFF, 0xFFFF, 0xFFFF, 0xFFFF, 0xFFFF, 0xFFFF, 0xFFFF, 0xFFFF, 0xFFFF, 0xFFFF, 0xFFFF, 0xFFFF, 0xFFFF, 0xFFFF, 0xFFFF, // 0x0C10 (3088)
- 0xEE37, 0xB941, 0xC982, 0xE1C1, 0xE9C1, 0xE9C1, 0xE9C1, 0xD9A1, 0xD1A1, 0xE9C1, 0xF1C1, 0xF1E1, 0xD9A2, 0xB961, 0xB1A2, 0xA9A3, // 0x0C20 (3104)
- 0xB182, 0xD9E3, 0xB982, 0x7942, 0x5122, 0x4103, 0x40A1, 0x38A1, 0x50C1, 0x7942, 0x6123, 0x4902, 0xD679, 0xF79D, 0xFFFF, 0xFFFF, // 0x0C30 (3120)
- 0xFFFF, 0xEF1C, 0xB513, 0xB533, 0xDE78, 0xFFDF, 0xFFFF, 0xFFFF, 0xF7BF, 0xCE17, 0xBC2F, 0xC42F, 0xA450, 0x8A47, 0xB575, 0xD6FB, // 0x0C40 (3136)
- 0xBAE9, 0xB3CD, 0xD679, 0x9CD3, 0x2924, 0x3165, 0x3986, 0x41C7, 0x41C7, 0x41E7, 0x2924, 0x2145, 0xB34B, 0xE181, 0xC961, 0xB962, // 0x0C50 (3152)
- 0xB181, 0x8901, 0x78E2, 0x78C0, 0x8247, 0xE657, 0xF77C, 0xD678, 0x3986, 0x1061, 0x4A28, 0xFFDE, 0xFFFF, 0xFFFF, 0xFFFF, 0xFFFF, // 0x0C60 (3168)
- 0xFFFF, 0xFFFF, 0xFFFF, 0xFFFF, 0xFFFF, 0xFFFF, 0xFFFF, 0xFFFF, 0xFFFF, 0xFFFF, 0xFFFF, 0xFFFF, 0xFFFF, 0xFFFF, 0xE73C, 0xA4D3, // 0x0C70 (3184)
- 0x7ACA, 0xC9A2, 0xC981, 0xE1C2, 0xE9E1, 0xE9C1, 0xE9C1, 0xD1A1, 0xD1C1, 0xE9C1, 0xF1C1, 0xF1C1, 0xB982, 0xCA03, 0xC1E2, 0x8961, // 0x0C80 (3200)
- 0x6903, 0x8142, 0x7121, 0x48C2, 0x60A1, 0xA100, 0xCB4A, 0xD5D5, 0xA1A3, 0x8921, 0x6060, 0x8B6D, 0xFFFF, 0xFFFF, 0xFFFF, 0xFFDF, // 0x0C90 (3216)
- 0xFFFF, 0xFFFF, 0xFFFF, 0xD659, 0xB4F3, 0xCD96, 0xEEFB, 0xEF3C, 0xDE79, 0xC595, 0xACD2, 0xB5B6, 0xD554, 0xC32A, 0xC5F7, 0xA4D1, // 0x0CA0 (3232)
- 0x91A3, 0xA309, 0xCE18, 0x5AEB, 0x39A6, 0x2924, 0x3144, 0x41E7, 0x41E7, 0x2104, 0x20E3, 0x2186, 0xA9A3, 0xC9A2, 0xE1A2, 0xD961, // 0x0CB0 (3248)
- 0xD181, 0xB161, 0x70A0, 0x81C6, 0xEF5C, 0xF75C, 0xF77B, 0xB553, 0x2924, 0x1082, 0x630C, 0xFFDF, 0xFFFF, 0xFFFF, 0xFFFF, 0xFFFF, // 0x0CC0 (3264)
- 0xFFFF, 0xFFFF, 0xFFFF, 0xFFFF, 0xFFFF, 0xFFFF, 0xFFFF, 0xFFFF, 0xFFFF, 0xFFFF, 0xFFFF, 0xFFFF, 0xFFFF, 0xBDD6, 0x6B4C, 0x71E6, // 0x0CD0 (3280)
- 0x7183, 0xB9C2, 0xD1C2, 0xE9E1, 0xF1C1, 0xF223, 0xEA03, 0xD9C1, 0xD9C1, 0xF1C1, 0xE9E2, 0xC9A2, 0xD1A1, 0xDA03, 0xB1A2, 0x8123, // 0x0CE0 (3296)
- 0x8963, 0xB1E3, 0x7983, 0x79E4, 0xC287, 0xB2C8, 0xC533, 0xDD54, 0xA962, 0xA100, 0xA205, 0xE69A, 0xFFFF, 0xFFFF, 0xFFFF, 0xFFFF, // 0x0CF0 (3312)
- 0xFFFF, 0xFFFF, 0xFFFF, 0xFFFF, 0xEF3C, 0xB554, 0x9C71, 0xACF3, 0xC596, 0xCDF7, 0xAC91, 0xB4D2, 0x8AA9, 0x9A26, 0xB40F, 0xC450, // 0x0D00 (3328)
- 0xD574, 0xFF1C, 0xB535, 0x18C3, 0x3165, 0x2924, 0x3986, 0x4A08, 0x3986, 0x2945, 0x2924, 0x2966, 0x89C4, 0xD980, 0xE140, 0xD181, // 0x0D10 (3344)
- 0xB161, 0xB161, 0xA121, 0xDE17, 0xF7BD, 0xEF1A, 0xEF5A, 0x738C, 0x1081, 0x8410, 0xFFFF, 0xFFFF, 0xFFFF, 0xFFFF, 0xFFFF, 0xFFFF, // 0x0D20 (3360)
- 0xFFFF, 0xFFFF, 0xFFFF, 0xFFFF, 0xFFFF, 0xFFFF, 0xFFFF, 0xFFFF, 0xFFFF, 0xFFFF, 0xFFFF, 0xFFFF, 0xAD34, 0x5A89, 0x41E7, 0x69E6, // 0x0D30 (3376)
- 0x9162, 0x8942, 0x9962, 0xC1A2, 0xB961, 0xC285, 0xC224, 0xB961, 0xB982, 0xB182, 0x8142, 0x9962, 0xD9C2, 0x8942, 0x3060, 0x78C1, // 0x0D40 (3392)
- 0x79E4, 0x930A, 0x8A68, 0x8ACA, 0x93CD, 0x93CF, 0xABEE, 0xD4B0, 0xCD74, 0x91E5, 0xBC2F, 0xFFFF, 0xFFDF, 0xFFFF, 0xFFFF, 0xFFFF, // 0x0D50 (3408)
- 0xFFFF, 0xFFFF, 0xFFFF, 0xFFFF, 0xFFFF, 0xFFFF, 0xE73C, 0xEF5C, 0xFFDF, 0xFFFF, 0xFF9D, 0xDDD6, 0xDDB6, 0xF6FA, 0xFFBE, 0xFFFF, // 0x0D60 (3424)
- 0xFFFF, 0xFFFF, 0xD6DB, 0x39C7, 0x2924, 0x3165, 0x39A6, 0x2945, 0x41C7, 0x3165, 0x2945, 0x2165, 0x71A4, 0xB901, 0xBA87, 0x91A4, // 0x0D70 (3440)
- 0x9141, 0xC900, 0xC3AC, 0xF7DF, 0xE6D9, 0xEF3B, 0xCE17, 0x39A6, 0x18C2, 0xD69A, 0xFFFF, 0xFFFF, 0xFFFF, 0xFFFF, 0xFFFF, 0xFFFF, // 0x0D80 (3456)
- 0xFFFF, 0xFFFF, 0xFFFF, 0xFFFF, 0xFFFF, 0xFFFF, 0xFFFF, 0xFFFF, 0xFFFF, 0xFFFF, 0xFFFF, 0xAD54, 0x4A48, 0x4A07, 0x5269, 0x2965, // 0x0D90 (3472)
- 0x3904, 0x7A06, 0x7983, 0xA162, 0x9942, 0x91C4, 0x9183, 0x9142, 0x8141, 0x8142, 0x8162, 0xA9A2, 0x8942, 0x6184, 0x9BAE, 0x92C8, // 0x0DA0 (3488)
- 0x99C4, 0xC4F2, 0xE6FA, 0xFFBE, 0xFFDF, 0xFFFF, 0xFFFF, 0xFFFF, 0xDD75, 0xC3CC, 0xF6FC, 0xFFFF, 0xFFFF, 0xFFFF, 0xFFFF, 0xFFFF, // 0x0DB0 (3504)
- 0xFFFF, 0xFFFF, 0xFFFF, 0xFFFF, 0xFFFF, 0xFFFF, 0xFFFF, 0xFFFF, 0xFFFF, 0xFFFF, 0xFFFF, 0xFFFF, 0xFFFF, 0xFFFF, 0xFFFF, 0xFFFF, // 0x0DC0 (3520)
- 0xFFFF, 0xFFFF, 0xFFFF, 0x7BAE, 0x3165, 0x2945, 0x2104, 0x3165, 0x39A6, 0x4208, 0x3986, 0x20E4, 0x6ACA, 0xE6BA, 0xF7FF, 0xB4D2, // 0x0DD0 (3536)
- 0x98E0, 0xA182, 0xD638, 0xEF3B, 0xE6D9, 0xEF1A, 0x83CF, 0x2904, 0x0840, 0xAD55, 0xFFFF, 0xFFFF, 0xFFFF, 0xFFFF, 0xFFFF, 0xFFFF, // 0x0DE0 (3552)
- 0xFFFF, 0xFFFF, 0xFFFF, 0xFFFF, 0xFFFF, 0xFFFF, 0xFFFF, 0xFFFF, 0xFFFF, 0xFFFF, 0xDEDA, 0x5248, 0x3986, 0x5289, 0x39A6, 0x3A08, // 0x0DF0 (3568)
- 0x934C, 0x9B4B, 0x9A47, 0x8921, 0xA961, 0x9962, 0xB181, 0xD9C2, 0xB981, 0xA162, 0xB181, 0xC182, 0x99C3, 0xE6BA, 0xFFFF, 0xFFFF, // 0x0E00 (3584)
- 0xE5F6, 0xC3ED, 0xCC0E, 0xE658, 0xFFFF, 0xFFFF, 0xEF5C, 0xB3CD, 0xB36B, 0xF77D, 0xFFFF, 0xFFFF, 0xFFFF, 0xFFFF, 0xFFFF, 0xFFFF, // 0x0E10 (3600)
- 0xFFFF, 0xFFFF, 0xFFFF, 0xFFFF, 0xFFFF, 0xFFFF, 0xFFFF, 0xFFFF, 0xFFFF, 0xFFFF, 0xFFFF, 0xFFFF, 0xFFFF, 0xFFFF, 0xFFFF, 0xFFFF, // 0x0E20 (3616)
- 0xFFFF, 0xFFFF, 0xFFFF, 0xA514, 0x2124, 0x2103, 0x2924, 0x2924, 0x39A6, 0x41C7, 0x2924, 0x2924, 0x5ACA, 0xFFDF, 0xFFFF, 0xF7BE, // 0x0E30 (3632)
- 0xB1E5, 0x8901, 0xC554, 0xE6FA, 0xE6FA, 0xB574, 0x41E7, 0x20C3, 0x18C2, 0xAD55, 0xFFFF, 0xFFFF, 0xFFFF, 0xFFFF, 0xFFFF, 0xFFFF, // 0x0E40 (3648)
- 0xFFFF, 0xFFFF, 0xFFFF, 0xFFFF, 0xFFFF, 0xFFFF, 0xFFFF, 0xFFFF, 0xFFFF, 0xFFFF, 0x8C30, 0x3985, 0x41E7, 0x41E7, 0x39E8, 0xAC2F, // 0x0E50 (3664)
- 0xDA03, 0xB141, 0xA961, 0xAA46, 0xB3AD, 0xC981, 0x9121, 0x8121, 0x7142, 0x60C0, 0xA100, 0xD9A1, 0xD1E1, 0xEB69, 0xEDD5, 0xFFFF, // 0x0E60 (3680)
- 0xFFFF, 0xFFFF, 0xDE58, 0x9A27, 0xA30A, 0xCCF2, 0xA246, 0x99C4, 0xF7BE, 0xFFFF, 0xFFFF, 0xFFFF, 0xFFFF, 0xFFFF, 0xFFFF, 0xFFFF, // 0x0E70 (3696)
- 0xFFFF, 0xFFFF, 0xFFFF, 0xFFFF, 0xFFFF, 0xFFFF, 0xFFFF, 0xFFFF, 0xFFFF, 0xFFFF, 0xFFFF, 0xFFFF, 0xFFFF, 0xFFFF, 0xFFFF, 0xFFFF, // 0x0E80 (3712)
- 0xFFFF, 0xFFFF, 0xFFFF, 0x9CB2, 0x18C3, 0x3186, 0x2924, 0x2924, 0x3186, 0x2104, 0x2904, 0x3165, 0x39C6, 0x9CB2, 0xE71C, 0xDEFB, // 0x0E90 (3728)
- 0xBD13, 0xA36B, 0xD616, 0xE6FA, 0xC5D6, 0x5ACA, 0x20E3, 0x5269, 0xDEDA, 0xFFFF, 0xFFFF, 0xFFFF, 0xFFFF, 0xFFFF, 0xFFFF, 0xFFFF, // 0x0EA0 (3744)
- 0xFFFF, 0xFFFF, 0xFFFF, 0xFFFF, 0xFFFF, 0xFFFF, 0xFFFF, 0xFFFF, 0xFFFF, 0xE73C, 0x4A49, 0x3165, 0x39A6, 0x2924, 0x8C0F, 0xE265, // 0x0EB0 (3760)
- 0xE1A1, 0x9162, 0xC181, 0x9942, 0x8C30, 0xC1E3, 0x81A4, 0x4944, 0x50C1, 0xA3AC, 0xCBED, 0xB161, 0xD140, 0xE980, 0xEA65, 0xE349, // 0x0EC0 (3776)
- 0xD46F, 0xF79C, 0xEF7C, 0xC267, 0x7880, 0x8983, 0x81A3, 0x8944, 0xEF3C, 0xFFFF, 0xFFFF, 0xFFFF, 0xFFFF, 0xFFFF, 0xFFFF, 0xFFFF, // 0x0ED0 (3792)
- 0xFFFF, 0xFFFF, 0xFFFF, 0xFFFF, 0xFFFF, 0xFFFF, 0xFFFF, 0xFFFF, 0xFFFF, 0xFFFF, 0xFFFF, 0xFFFF, 0xFFFF, 0xFFFF, 0xFFFF, 0xFFFF, // 0x0EE0 (3808)
- 0xFFFF, 0xFFFF, 0xFFFF, 0xE73C, 0x3186, 0x2103, 0x3145, 0x3165, 0x2945, 0x2904, 0x2904, 0x3145, 0x39C6, 0x5A8A, 0xB554, 0xCE17, // 0x0EF0 (3824)
- 0xCE57, 0xD658, 0xDE79, 0xBD75, 0x734C, 0x3986, 0x20C3, 0xD699, 0xFFFF, 0xFFFF, 0xFFFF, 0xFFFF, 0xFFFF, 0xFFFF, 0xFFFF, 0xFFFF, // 0x0F00 (3840)
- 0xFFFF, 0xFFFF, 0xFFFF, 0xFFFF, 0xFFFF, 0xFFFF, 0xFFFF, 0xFFFF, 0xFFFF, 0xAD75, 0x2904, 0x2944, 0x20E3, 0x4A28, 0xB40F, 0xB941, // 0x0F10 (3856)
- 0xB981, 0xA9C3, 0xB1A2, 0x80E1, 0x6269, 0xBCF2, 0xC553, 0x4207, 0x0841, 0xB5B6, 0xFFFF, 0xE679, 0xAB4B, 0xA942, 0xD1C3, 0xEB07, // 0x0F20 (3872)
- 0xCA04, 0xBA67, 0xA1C4, 0xB961, 0x9206, 0xDEBA, 0xEF3B, 0xDDB5, 0xF7BE, 0xFFFF, 0xFFFF, 0xFFFF, 0xFFFF, 0xFFFF, 0xFFFF, 0xFFFF, // 0x0F30 (3888)
- 0xFFFF, 0xFFFF, 0xFFFF, 0xFFFF, 0xFFFF, 0xFFFF, 0xFFFF, 0xFFFF, 0xFFFF, 0xFFFF, 0xFFFF, 0xFFFF, 0xFFFF, 0xFFFF, 0xFFFF, 0xFFFF, // 0x0F40 (3904)
- 0xFFFF, 0xFFFF, 0xFFFF, 0xFFFF, 0xA514, 0x1882, 0x3165, 0x2924, 0x20E3, 0x2924, 0x3186, 0x2924, 0x3165, 0x4A28, 0x6B2B, 0xA4F2, // 0x0F50 (3920)
- 0xBDB5, 0xB553, 0x9471, 0x732C, 0x41C7, 0x18A2, 0x1082, 0xD69A, 0xFFFF, 0xFFFF, 0xFFFF, 0xFFFF, 0xFFFF, 0xFFFF, 0xFFFF, 0xFFFF, // 0x0F60 (3936)
- 0xFFFF, 0xFFFF, 0xFFFF, 0xFFFF, 0xFFFF, 0xFFFF, 0xFFFF, 0xFFFF, 0xFFFF, 0x7BCE, 0x1062, 0x20C3, 0x1081, 0x738E, 0xD329, 0xB940, // 0x0F70 (3952)
- 0xA982, 0xB9C2, 0xB9A3, 0x70E1, 0x6227, 0xE6FA, 0xE6F9, 0x41A6, 0x1061, 0xB5B6, 0xFFFF, 0xFFFF, 0xFFFF, 0xDE78, 0xAB6A, 0xB141, // 0x0F80 (3968)
- 0x9982, 0xA9E4, 0xB224, 0xC9A1, 0xB30A, 0xFFFF, 0xFFFF, 0xFFFF, 0xFFFF, 0xFFFF, 0xFFFF, 0xFFFF, 0xFFFF, 0xFFFF, 0xFFFF, 0xFFFF, // 0x0F90 (3984)
- 0xFFFF, 0xFFFF, 0xFFFF, 0xFFFF, 0xFFFF, 0xFFFF, 0xFFFF, 0xFFFF, 0xFFFF, 0xFFFF, 0xFFFF, 0xFFFF, 0xFFFF, 0xFFFF, 0xFFFF, 0xFFFF, // 0x0FA0 (4000)
- 0xFFFF, 0xFFFF, 0xFFFF, 0xFFFF, 0xFFFF, 0x62EB, 0x18A2, 0x20E3, 0x20E3, 0x3165, 0x3186, 0x20E3, 0x2924, 0x39A6, 0x5269, 0x6B2B, // 0x0FB0 (4016)
- 0x7BAD, 0x736C, 0x62CA, 0x39A6, 0x1882, 0x5269, 0x8430, 0xDEFB, 0xFFFF, 0xFFFF, 0xFFFF, 0xFFFF, 0xFFFF, 0xFFFF, 0xFFFF, 0xFFFF, // 0x0FC0 (4032)
- 0xFFFF, 0xFFFF, 0xFFFF, 0xFFFF, 0xFFFF, 0xFFFF, 0xFFFF, 0xFFFF, 0xFFFF, 0x738E, 0x0821, 0x18A2, 0x1082, 0x8430, 0xDB49, 0xD960, // 0x0FD0 (4048)
- 0x9962, 0x8142, 0xC182, 0x68E1, 0x7902, 0xEDF5, 0xD678, 0x3144, 0x20E3, 0xD699, 0xFFFF, 0xFFFF, 0xFFFF, 0xFFFF, 0xFFFF, 0xE679, // 0x0FE0 (4064)
- 0xA288, 0x8901, 0xBA04, 0xCAA6, 0x8AA8, 0xA4B1, 0x8C10, 0x9451, 0xAD34, 0xEF3C, 0xFFFF, 0xFFFF, 0xFFFF, 0xFFFF, 0xFFFF, 0xFFFF, // 0x0FF0 (4080)
- 0xFFFF, 0xFFFF, 0xFFFF, 0xFFFF, 0xFFFF, 0xFFFF, 0xFFFF, 0xFFFF, 0xFFFF, 0xFFFF, 0xFFFF, 0xFFFF, 0xFFFF, 0xFFFF, 0xFFFF, 0xFFFF, // 0x1000 (4096)
- 0xFFFF, 0xFFFF, 0xFFFF, 0xFFFF, 0xFFFF, 0xD69A, 0x20C3, 0x20C3, 0x2904, 0x2924, 0x20E3, 0x20E3, 0x2945, 0x2924, 0x3145, 0x41E7, // 0x1010 (4112)
- 0x4A28, 0x41A6, 0x2924, 0x18A2, 0x41C7, 0xEF7D, 0xFFFF, 0xFFFF, 0xFFFF, 0xFFFF, 0xFFFF, 0xFFFF, 0xFFFF, 0xFFFF, 0xFFFF, 0xFFFF, // 0x1020 (4128)
- 0xFFFF, 0xFFFF, 0xFFFF, 0xFFFF, 0xFFFF, 0xFFFF, 0xFFFF, 0xFFFF, 0xFFFF, 0x83EF, 0x0820, 0x18C3, 0x1082, 0x7C0F, 0xDB8B, 0xB100, // 0x1030 (4144)
- 0x9983, 0x8942, 0x80A0, 0x71C5, 0xC574, 0xF73A, 0xACF2, 0x18A2, 0x41C7, 0xFFDF, 0xFFFF, 0xFFFF, 0xFFFF, 0xFFFF, 0xFFFF, 0xFFFF, // 0x1040 (4160)
- 0xED94, 0x9942, 0x8AC9, 0x9C2F, 0x8BEF, 0x62A9, 0x41C6, 0x41C6, 0x3145, 0x4A07, 0xA4F3, 0xFFFF, 0xFFFF, 0xFFFF, 0xFFFF, 0xFFFF, // 0x1050 (4176)
- 0xFFFF, 0xFFFF, 0xFFFF, 0xFFFF, 0xFFFF, 0xFFFF, 0xFFFF, 0xFFFF, 0xFFFF, 0xFFFF, 0xFFFF, 0xFFFF, 0xFFFF, 0xFFFF, 0xFFFF, 0xFFFF, // 0x1060 (4192)
- 0xFFFF, 0xFFFF, 0xFFFF, 0xFFFF, 0xFFFF, 0xFFFF, 0x9CB3, 0x1882, 0x20E3, 0x28E3, 0x20C3, 0x2924, 0x3165, 0x20E3, 0x2924, 0x2944, // 0x1070 (4208)
- 0x2904, 0x20E3, 0x1882, 0x18A2, 0x5249, 0xFFFF, 0xFFFF, 0xFFFF, 0xFFFF, 0xFFFF, 0xFFFF, 0xFFFF, 0xFFFF, 0xFFFF, 0xFFFF, 0xFFFF, // 0x1080 (4224)
- 0xFFFF, 0xFFFF, 0xFFFF, 0xFFFF, 0xFFFF, 0xFFFF, 0xFFFF, 0xFFFF, 0xFFFF, 0xB575, 0x1021, 0x18C3, 0x1081, 0x4A28, 0x9A88, 0x8183, // 0x1090 (4240)
- 0xA941, 0xC1C3, 0xB32A, 0xD5D6, 0xE75B, 0xE6FA, 0x5AAA, 0x0820, 0x8C30, 0xFFFF, 0xFFFF, 0xFFFF, 0xFFFF, 0xFFFF, 0xFFFF, 0xFFFF, // 0x10A0 (4256)
- 0xC5F7, 0x93CD, 0x9C90, 0x7BAE, 0x39E6, 0x3164, 0x3145, 0x2924, 0x2924, 0x2104, 0x18A2, 0x7BCF, 0xFFFF, 0xFFFF, 0xFFFF, 0xFFFF, // 0x10B0 (4272)
- 0xFFFF, 0xFFFF, 0xFFFF, 0xFFFF, 0xFFFF, 0xFFFF, 0xFFFF, 0xFFFF, 0xFFFF, 0xFFFF, 0xFFFF, 0xFFFF, 0xFFFF, 0xFFFF, 0xFFFF, 0xFFFF, // 0x10C0 (4288)
- 0xFFFF, 0xFFFF, 0xFFFF, 0xFFFF, 0xFFFF, 0xFFFF, 0xFFFF, 0xBDB6, 0x3145, 0x1041, 0x18A2, 0x2924, 0x2104, 0x18C3, 0x3165, 0x18C3, // 0x10D0 (4304)
- 0x1882, 0x18C2, 0x8C71, 0xCE58, 0xBDB6, 0xFFFF, 0xFFFF, 0xFFFF, 0xFFFF, 0xFFFF, 0xFFFF, 0xFFFF, 0xFFFF, 0xFFFF, 0xFFFF, 0xFFFF, // 0x10E0 (4320)
- 0xFFFF, 0xFFFF, 0xFFFF, 0xFFFF, 0xFFFF, 0xFFFF, 0xFFFF, 0xFFFF, 0xFFFF, 0xEF5D, 0x2924, 0x1082, 0x18C3, 0x2904, 0x736D, 0xC5B6, // 0x10F0 (4336)
- 0xD594, 0xD658, 0xE73C, 0xE73B, 0xEEFA, 0x8C2F, 0x2104, 0x2945, 0xEF5D, 0xFFFF, 0xFFFF, 0xFFFF, 0xFFFF, 0xFFFF, 0xFFFF, 0xC5F7, // 0x1100 (4352)
- 0x7BAD, 0x83CE, 0x630B, 0x3986, 0x2924, 0x2124, 0x18A3, 0x18C2, 0x18A2, 0x18C3, 0x2924, 0x1882, 0xA514, 0xFFFF, 0xFFFF, 0xFFFF, // 0x1110 (4368)
- 0xFFFF, 0xFFFF, 0xFFFF, 0xFFFF, 0xFFFF, 0xFFFF, 0xFFFF, 0xFFFF, 0xFFFF, 0xFFFF, 0xFFFF, 0xFFFF, 0xFFFF, 0xFFFF, 0xFFFF, 0xFFFF, // 0x1120 (4384)
- 0xFFFF, 0xFFFF, 0xFFFF, 0xFFFF, 0xFFFF, 0xFFFF, 0xFFFF, 0xFFFF, 0xE73C, 0x7BCF, 0x3165, 0x18A2, 0x20E3, 0x2904, 0x1061, 0x6B2C, // 0x1130 (4400)
- 0x94B2, 0x39E7, 0xDEFB, 0xFFFF, 0xFFFF, 0xFFFF, 0xFFFF, 0xFFFF, 0xFFFF, 0xFFFF, 0xFFFF, 0xFFFF, 0xFFFF, 0xFFFF, 0xFFFF, 0xFFFF, // 0x1140 (4416)
- 0xFFFF, 0xFFFF, 0xFFFF, 0xFFFF, 0xFFFF, 0xFFFF, 0xFFFF, 0xFFFF, 0xFFFF, 0xFFFF, 0x8C30, 0x0000, 0x18C3, 0x18C3, 0x39C6, 0x9491, // 0x1150 (4432)
- 0xCE78, 0xD678, 0xD657, 0xCE16, 0x8C0F, 0x39A6, 0x1061, 0xB596, 0xFFFF, 0xFFFF, 0xFFFF, 0xFFFF, 0xFFFF, 0xFFFF, 0xD6BA, 0x62CA, // 0x1160 (4448)
- 0x6B0B, 0x5A89, 0x3185, 0x2944, 0x20E3, 0x39A6, 0x736D, 0x8C2F, 0x83CE, 0x39A7, 0x18C3, 0x20E3, 0x39C7, 0xEF7D, 0xFFFF, 0xFFFF, // 0x1170 (4464)
- 0xFFFF, 0xFFFF, 0xFFFF, 0xFFFF, 0xFFFF, 0xFFFF, 0xFFFF, 0xFFFF, 0xFFFF, 0xFFFF, 0xFFFF, 0xFFFF, 0xFFFF, 0xFFFF, 0xFFFF, 0xFFFF, // 0x1180 (4480)
- 0xFFFF, 0xFFFF, 0xFFFF, 0xFFFF, 0xFFFF, 0xFFFF, 0xFFFF, 0xFFFF, 0xFFFF, 0xFFFF, 0xE71C, 0xB575, 0xB596, 0xB596, 0x630C, 0xE75D, // 0x1190 (4496)
- 0xFFFF, 0xEF7D, 0xFFFF, 0xFFFF, 0xFFFF, 0xFFFF, 0xFFFF, 0xFFFF, 0xFFFF, 0xFFFF, 0xFFFF, 0xFFFF, 0xFFFF, 0xFFFF, 0xFFFF, 0xFFFF, // 0x11A0 (4512)
- 0xFFFF, 0xFFFF, 0xFFFF, 0xFFFF, 0xFFFF, 0xFFFF, 0xFFFF, 0xFFFF, 0xFFFF, 0xFFFF, 0xF7BE, 0x5249, 0x0000, 0x20C3, 0x2924, 0x4A08, // 0x11B0 (4528)
- 0x736D, 0x8BCE, 0x83AE, 0x5AAA, 0x2924, 0x0861, 0x9CD2, 0xFFFF, 0xFFFF, 0xFFFF, 0xFFFF, 0xFFFF, 0xFFFF, 0xFFDF, 0x738E, 0x41E7, // 0x11C0 (4544)
- 0x4A48, 0x39A6, 0x2945, 0x20E3, 0x6B8D, 0xD6DA, 0xEF9E, 0xEF7D, 0xD658, 0xC5D6, 0x4A28, 0x18A2, 0x18A2, 0xAD75, 0xFFFF, 0xFFFF, // 0x11D0 (4560)
- 0xFFFF, 0xFFFF, 0xFFFF, 0xFFFF, 0xFFFF, 0xFFFF, 0xFFFF, 0xFFFF, 0xFFFF, 0xFFFF, 0xFFFF, 0xFFFF, 0xFFFF, 0xFFFF, 0xFFFF, 0xFFFF, // 0x11E0 (4576)
- 0xFFFF, 0xFFFF, 0xFFFF, 0xFFFF, 0xFFFF, 0xFFFF, 0xFFFF, 0xFFFF, 0xFFFF, 0xFFFF, 0xFFFF, 0xFFFF, 0xFFFF, 0xFFFF, 0xFFFF, 0xFFFF, // 0x11F0 (4592)
- 0xFFFF, 0xFFFF, 0xFFFF, 0xFFFF, 0xFFFF, 0xFFFF, 0xFFFF, 0xFFFF, 0xFFFF, 0xFFFF, 0xFFFF, 0xFFFF, 0xFFFF, 0xFFFF, 0xFFFF, 0xFFFF, // 0x1200 (4608)
- 0xFFFF, 0xFFFF, 0xFFFF, 0xFFFF, 0xFFFF, 0xFFFF, 0xFFFF, 0xFFFF, 0xFFFF, 0xFFFF, 0xFFFF, 0xEF7D, 0x528A, 0x0861, 0x0841, 0x1882, // 0x1210 (4624)
- 0x20E3, 0x2904, 0x18C3, 0x0841, 0x3186, 0xB596, 0xFFFF, 0xFFFF, 0xFFFF, 0xFFFF, 0xFFFF, 0xFFFF, 0xFFFF, 0xBDD7, 0x3185, 0x41E7, // 0x1220 (4640)
- 0x39C7, 0x2924, 0x2904, 0x7C0F, 0xBCB1, 0xE3AA, 0xDAE8, 0xE4F2, 0xD679, 0xDEB9, 0xBD94, 0x2903, 0x18A2, 0x8410, 0xFFFF, 0xFFFF, // 0x1230 (4656)
- 0xFFFF, 0xFFFF, 0xFFFF, 0xFFFF, 0xFFFF, 0xFFFF, 0xFFFF, 0xFFFF, 0xFFFF, 0xFFFF, 0xFFFF, 0xFFFF, 0xFFFF, 0xFFFF, 0xFFFF, 0xFFFF, // 0x1240 (4672)
- 0xFFFF, 0xFFFF, 0xFFFF, 0xFFFF, 0xFFFF, 0xFFFF, 0xFFFF, 0xFFFF, 0xFFFF, 0xFFFF, 0xFFFF, 0xFFFF, 0xFFFF, 0xFFFF, 0xFFFF, 0xFFFF, // 0x1250 (4688)
- 0xFFFF, 0xFFFF, 0xFFFF, 0xFFFF, 0xFFFF, 0xFFFF, 0xFFFF, 0xFFFF, 0xFFFF, 0xFFFF, 0xFFFF, 0xFFFF, 0xFFFF, 0xFFFF, 0xFFFF, 0xFFFF, // 0x1260 (4704)
- 0xFFFF, 0xFFFF, 0xFFFF, 0xFFFF, 0xFFFF, 0xFFFF, 0xFFFF, 0xFFFF, 0xFFFF, 0xFFFF, 0xFFFF, 0xFFFF, 0xFFFF, 0xB5B6, 0x6B4D, 0x4A28, // 0x1270 (4720)
- 0x39C6, 0x4207, 0x5ACA, 0x9CD3, 0xF7BE, 0xFFFF, 0xFFFF, 0xFFFF, 0xFFFF, 0xFFFF, 0xFFFF, 0xFFFF, 0xFFFF, 0x630C, 0x2924, 0x3986, // 0x1280 (4736)
- 0x2945, 0x20C3, 0x630B, 0xB554, 0x936C, 0xD100, 0xF1A1, 0xE120, 0xDBCC, 0xDF3C, 0xE6B9, 0x5AAA, 0x1061, 0x62EC, 0xFFFF, 0xFFFF, // 0x1290 (4752)
- 0xFFFF, 0xFFFF, 0xFFFF, 0xFFFF, 0xFFFF, 0xFFFF, 0xFFFF, 0xFFFF, 0xFFFF, 0xFFFF, 0xFFFF, 0xFFFF, 0xFFFF, 0xFFFF, 0xFFFF, 0xFFFF, // 0x12A0 (4768)
- 0xFFFF, 0xFFFF, 0xFFFF, 0xFFFF, 0xFFFF, 0xFFFF, 0xFFFF, 0xFFFF, 0xFFFF, 0xFFFF, 0xFFFF, 0xFFFF, 0xFFFF, 0xFFFF, 0xFFFF, 0xFFFF, // 0x12B0 (4784)
- 0xFFFF, 0xFFFF, 0xFFFF, 0xFFFF, 0xFFFF, 0xFFFF, 0xFFFF, 0xFFFF, 0xFFFF, 0xFFFF, 0xFFFF, 0xFFFF, 0xFFFF, 0xFFFF, 0xFFFF, 0xFFFF, // 0x12C0 (4800)
- 0xFFFF, 0xFFFF, 0xFFFF, 0xFFFF, 0xFFFF, 0xFFFF, 0xFFFF, 0xFFFF, 0xFFFF, 0xFFFF, 0xFFFF, 0xFFFF, 0xFFFF, 0xF7DE, 0xFFFF, 0xFFFF, // 0x12D0 (4816)
- 0xF7BE, 0xFFDE, 0xFFFF, 0xFFFF, 0xFFFF, 0xFFFF, 0xFFFF, 0xFFFF, 0xFFFF, 0xFFFF, 0xFFFF, 0xFFFF, 0xDEFB, 0x3165, 0x2944, 0x3165, // 0x12E0 (4832)
- 0x20E3, 0x4A8A, 0xD554, 0xC9C4, 0xB203, 0xDA02, 0xE1E1, 0xE9A2, 0xD9E3, 0xCD53, 0xCE58, 0x7BAD, 0x0841, 0x528A, 0xFFFF, 0xFFFF, // 0x12F0 (4848)
- 0xFFFF, 0xFFFF, 0xFFFF, 0xFFFF, 0xFFFF, 0xFFFF, 0xFFFF, 0xFFFF, 0xFFFF, 0xFFFF, 0xFFFF, 0xFFFF, 0xFFFF, 0xFFFF, 0xFFFF, 0xFFFF, // 0x1300 (4864)
- 0xFFFF, 0xFFFF, 0xFFFF, 0xFFFF, 0xFFFF, 0xFFFF, 0xFFFF, 0xFFFF, 0xFFFF, 0xFFFF, 0xFFFF, 0xFFFF, 0xFFFF, 0xFFFF, 0xFFFF, 0xFFFF, // 0x1310 (4880)
- 0xFFFF, 0xFFFF, 0xFFFF, 0xFFFF, 0xFFFF, 0xFFFF, 0xFFFF, 0xFFFF, 0xFFFF, 0xFFFF, 0xFFFF, 0xFFFF, 0xFFFF, 0xFFFF, 0xFFFF, 0xFFFF, // 0x1320 (4896)
- 0xFFFF, 0xFFFF, 0xFFFF, 0xFFFF, 0xFFFF, 0xFFFF, 0xFFFF, 0xFFFF, 0xFFFF, 0xFFFF, 0xFFFF, 0xFFFF, 0xFFFF, 0xF7DE, 0xFFFF, 0xFFFF, // 0x1330 (4912)
- 0xFFFF, 0xFFFF, 0xFFFF, 0xFFFF, 0xFFFF, 0xFFFF, 0xFFFF, 0xFFFF, 0xFFFF, 0xFFFF, 0xFFFF, 0xFFFF, 0x9CD3, 0x18C2, 0x3145, 0x2924, // 0x1340 (4928)
- 0x1882, 0x94D3, 0xFC4D, 0xF140, 0xF2A6, 0xE4CF, 0xCA66, 0xC982, 0xE1E3, 0xA3CD, 0xC637, 0x8C0F, 0x0820, 0x528A, 0xFFFF, 0xFFFF, // 0x1350 (4944)
- 0xFFFF, 0xFFFF, 0xFFFF, 0xFFFF, 0xFFFF, 0xFFFF, 0xFFFF, 0xFFFF, 0xFFFF, 0xFFFF, 0xFFFF, 0xFFFF, 0xFFFF, 0xFFFF, 0xFFFF, 0xFFFF, // 0x1360 (4960)
- 0xFFFF, 0xFFFF, 0xFFFF, 0xFFFF, 0xFFFF, 0xFFFF, 0xFFFF, 0xFFFF, 0xFFFF, 0xFFFF, 0xFFFF, 0xFFFF, 0xFFFF, 0xFFFF, 0xFFFF, 0xFFFF, // 0x1370 (4976)
- 0xFFFF, 0xFFFF, 0xFFFF, 0xFFFF, 0xFFFF, 0xFFFF, 0xFFFF, 0xFFFF, 0xFFFF, 0xFFFF, 0xFFFF, 0xFFFF, 0xFFFF, 0xFFFF, 0xFFFF, 0xFFFF, // 0x1380 (4992)
- 0xFFFF, 0xFFFF, 0xFFFF, 0xFFFF, 0xFFFF, 0xFFFF, 0xFFFF, 0xFFFF, 0xFFFF, 0xFFFF, 0xFFFF, 0xFFFF, 0xFFFF, 0xF7DE, 0xFFFF, 0xFFFF, // 0x1390 (5008)
- 0xFFFF, 0xFFFF, 0xFFFF, 0xFFFF, 0xFFFF, 0xFFFF, 0xFFFF, 0xFFFF, 0xFFFF, 0xFFFF, 0xFFFF, 0xFFFF, 0x6B4C, 0x1082, 0x2924, 0x20E3, // 0x13A0 (5024)
- 0x2945, 0xC5D6, 0xEA44, 0xF1A1, 0xE224, 0xE285, 0xE2C7, 0xB1C3, 0xB163, 0xB4F1, 0xDED9, 0x7B8D, 0x1041, 0x738E, 0xFFFF, 0xFFFF, // 0x13B0 (5040)
- 0xFFFF, 0xFFFF, 0xFFFF, 0xFFFF, 0xFFFF, 0xFFFF, 0xFFFF, 0xFFFF, 0xFFFF, 0xFFFF, 0xFFFF, 0xFFFF, 0xFFFF, 0xFFFF, 0xFFFF, 0xFFFF, // 0x13C0 (5056)
- 0xFFFF, 0xFFFF, 0xFFFF, 0xFFFF, 0xFFFF, 0xFFFF, 0xFFFF, 0xFFFF, 0xFFFF, 0xFFFF, 0xFFFF, 0xFFFF, 0xFFFF, 0xFFFF, 0xFFFF, 0xFFFF, // 0x13D0 (5072)
- 0xFFFF, 0xFFFF, 0xFFFF, 0xFFFF, 0xFFFF, 0xFFFF, 0xFFFF, 0xFFFF, 0xFFFF, 0xFFFF, 0xFFFF, 0xFFFF, 0xFFFF, 0xFFFF, 0xFFFF, 0xFFFF, // 0x13E0 (5088)
- 0xFFFF, 0xFFFF, 0xFFFF, 0xFFFF, 0xFFFF, 0xFFFF, 0xFFFF, 0xFFFF, 0xFFFF, 0xFFFF, 0xFFFF, 0xFFFF, 0xFFFF, 0xF7DE, 0xFFFF, 0xFFFF, // 0x13F0 (5104)
- 0xFFFF, 0xFFFF, 0xFFFF, 0xFFFF, 0xFFFF, 0xFFFF, 0xFFFF, 0xFFFF, 0xFFFF, 0xFFFF, 0xFFFF, 0xFFFF, 0x62EB, 0x1082, 0x2924, 0x20E3, // 0x1400 (5120)
- 0x41E7, 0xDE99, 0xDA24, 0xF1E1, 0xD9A2, 0xB962, 0xDA86, 0xA9C4, 0x99E5, 0xFF9D, 0xF77C, 0x4A48, 0x0841, 0xA514, 0xFFFF, 0xFFFF, // 0x1410 (5136)
- 0xFFFF, 0xFFFF, 0xFFFF, 0xFFFF, 0xFFFF, 0xFFFF, 0xFFFF, 0xFFFF, 0xFFFF, 0xFFFF, 0xFFFF, 0xFFFF, 0xFFFF, 0xFFFF, 0xFFFF, 0xFFFF, // 0x1420 (5152)
- 0xFFFF, 0xFFFF, 0xFFFF, 0xFFFF, 0xFFFF, 0xFFFF, 0xFFFF, 0xFFFF, 0xFFFF, 0xFFFF, 0xFFFF, 0xFFFF, 0xFFFF, 0xFFFF, 0xFFFF, 0xFFFF, // 0x1430 (5168)
- 0xFFFF, 0xFFFF, 0xFFFF, 0xFFFF, 0xFFFF, 0xFFFF, 0xFFFF, 0xFFFF, 0xFFFF, 0xFFFF, 0xFFFF, 0xFFFF, 0xFFFF, 0xFFFF, 0xFFFF, 0xFFFF, // 0x1440 (5184)
- 0xFFFF, 0xFFFF, 0xFFFF, 0xFFFF, 0xFFFF, 0xFFFF, 0xFFFF, 0xFFFF, 0xFFFF, 0xFFFF, 0xFFFF, 0xFFFF, 0xFFFF, 0xF7DE, 0xFFFF, 0xFFFF, // 0x1450 (5200)
- 0xFFFF, 0xFFFF, 0xFFFF, 0xFFFF, 0xFFFF, 0xFFFF, 0xFFFF, 0xFFFF, 0xFFFF, 0xFFFF, 0xFFFF, 0xFFFF, 0x62EB, 0x1082, 0x2124, 0x18C3, // 0x1460 (5216)
- 0x41E8, 0xDE99, 0xD246, 0xF1E2, 0xE9E2, 0xB9A3, 0x9162, 0x88C0, 0xCC90, 0xFFFF, 0xCE17, 0x2944, 0x2103, 0xD69A, 0xFFFF, 0xFFFF, // 0x1470 (5232)
- 0xFFFF, 0xFFFF, 0xFFFF, 0xFFFF, 0xFFFF, 0xFFFF, 0xFFFF, 0xFFFF, 0xFFFF, 0xFFFF, 0xFFFF, 0xFFFF, 0xFFFF, 0xFFFF, 0xFFFF, 0xFFFF, // 0x1480 (5248)
- 0xFFFF, 0xFFFF, 0xFFFF, 0xFFFF, 0xFFFF, 0xFFFF, 0xFFFF, 0xFFFF, 0xFFFF, 0xFFFF, 0xFFFF, 0xFFFF, 0xFFFF, 0xFFFF, 0xFFFF, 0xFFFF, // 0x1490 (5264)
- 0xFFFF, 0xFFFF, 0xFFFF, 0xFFFF, 0xFFFF, 0xFFFF, 0xFFFF, 0xFFFF, 0xFFFF, 0xFFFF, 0xFFFF, 0xFFFF, 0xFFFF, 0xFFFF, 0xFFFF, 0xFFFF, // 0x14A0 (5280)
- 0xFFFF, 0xFFFF, 0xFFFF, 0xFFFF, 0xFFFF, 0xFFFF, 0xFFFF, 0xFFFF, 0xFFFF, 0xFFFF, 0xFFFF, 0xFFFF, 0xFFFF, 0xF7DE, 0xFFFF, 0xFFFF, // 0x14B0 (5296)
- 0xFFFF, 0xFFFF, 0xFFFF, 0xFFFF, 0xFFFF, 0xFFFF, 0xFFFF, 0xFFFF, 0xFFFF, 0xFFFF, 0xFFFF, 0xFFFF, 0x738E, 0x1081, 0x2124, 0x18C2, // 0x14C0 (5312)
- 0x31A6, 0xD69A, 0xD328, 0xF180, 0xF1C1, 0xF202, 0xD141, 0xCB8B, 0xEFBD, 0xFFDD, 0x7BAD, 0x1081, 0x5ACB, 0xFFFF, 0xFFFF, 0xFFFF, // 0x14D0 (5328)
- 0xFFFF, 0xFFFF, 0xFFFF, 0xFFFF, 0xFFFF, 0xFFFF, 0xFFFF, 0xFFFF, 0xFFFF, 0xFFFF, 0xFFFF, 0xFFFF, 0xFFFF, 0xFFFF, 0xFFFF, 0xFFFF, // 0x14E0 (5344)
- 0xFFFF, 0xFFFF, 0xFFFF, 0xFFFF, 0xFFFF, 0xFFFF, 0xFFFF, 0xFFFF, 0xFFFF, 0xFFFF, 0xFFFF, 0xFFFF, 0xFFFF, 0xFFFF, 0xFFFF, 0xFFFF, // 0x14F0 (5360)
- 0xFFFF, 0xFFFF, 0xFFFF, 0xFFFF, 0xFFFF, 0xFFFF, 0xFFFF, 0xFFFF, 0xFFFF, 0xFFFF, 0xFFFF, 0xFFFF, 0xFFFF, 0xFFFF, 0xFFFF, 0xFFFF, // 0x1500 (5376)
- 0xFFFF, 0xFFFF, 0xFFFF, 0xFFFF, 0xFFFF, 0xFFFF, 0xFFFF, 0xFFFF, 0xFFFF, 0xFFFF, 0xFFFF, 0xFFFF, 0xF7DE, 0xFFFF, 0xFFFF, 0xFFFF, // 0x1510 (5392)
- 0xFFFF, 0xFFFF, 0xFFFF, 0xFFFF, 0xFFFF, 0xFFFF, 0xFFFF, 0xFFFF, 0xFFFF, 0xFFFF, 0xFFFF, 0xFFFF, 0x9492, 0x0861, 0x2104, 0x20E3, // 0x1520 (5408)
- 0x2924, 0xBE18, 0xE595, 0xC9E3, 0xCA44, 0xD182, 0xCB6A, 0xE75B, 0xFFFE, 0xBDD5, 0x3165, 0x18A2, 0xC5F7, 0xFFFF, 0xFFFF, 0xFFFF, // 0x1530 (5424)
- 0xFFFF, 0xFFFF, 0xFFFF, 0xFFFF, 0xFFFF, 0xFFFF, 0xFFFF, 0xFFFF, 0xFFFF, 0xFFFF, 0xFFFF, 0xFFFF, 0xFFFF, 0xFFFF, 0xFFFF, 0xFFFF, // 0x1540 (5440)
- 0xFFFF, 0xFFFF, 0xFFFF, 0xFFFF, 0xFFFF, 0xFFFF, 0xFFFF, 0xFFFF, 0xFFFF, 0xFFFF, 0xFFFF, 0xFFFF, 0xFFFF, 0xFFFF, 0xFFFF, 0xFFFF, // 0x1550 (5456)
- 0xFFFF, 0xFFFF, 0xFFFF, 0xFFFF, 0xFFFF, 0xFFFF, 0xFFFF, 0xFFFF, 0xFFFF, 0xFFFF, 0xFFFF, 0xFFFF, 0xFFFF, 0xFFFF, 0xFFFF, 0xFFFF, // 0x1560 (5472)
- 0xFFFF, 0xFFFF, 0xFFFF, 0xFFFF, 0xFFFF, 0xFFFF, 0xFFFF, 0xFFFF, 0xFFFF, 0xFFFF, 0xFFFF, 0xFFFF, 0xF7DE, 0xFFFF, 0xFFFF, 0xFFFF, // 0x1570 (5488)
- 0xFFFF, 0xFFFF, 0xFFFF, 0xFFFF, 0xFFFF, 0xFFFF, 0xFFFF, 0xFFFF, 0xFFFF, 0xFFFF, 0xFFFF, 0xFFFF, 0xCE79, 0x10A2, 0x20E3, 0x2104, // 0x1580 (5504)
- 0x20E3, 0x7BCE, 0xDE58, 0xB40E, 0x83EF, 0xB513, 0xDF1A, 0xFFBD, 0xCE57, 0x4A48, 0x1061, 0x630C, 0xFFFF, 0xFFFF, 0xFFFF, 0xFFFF, // 0x1590 (5520)
- 0xFFFF, 0xFFFF, 0xFFFF, 0xFFFF, 0xFFFF, 0xFFFF, 0xFFFF, 0xFFFF, 0xFFFF, 0xFFFF, 0xFFFF, 0xFFFF, 0xFFFF, 0xFFFF, 0xFFFF, 0xFFFF, // 0x15A0 (5536)
- 0xFFFF, 0xFFFF, 0xFFFF, 0xFFFF, 0xFFFF, 0xFFFF, 0xFFFF, 0xFFFF, 0xFFFF, 0xFFFF, 0xFFFF, 0xFFFF, 0xFFFF, 0xFFFF, 0xFFFF, 0xFFFF, // 0x15B0 (5552)
- 0xFFFF, 0xFFFF, 0xFFFF, 0xFFFF, 0xFFFF, 0xFFFF, 0xFFFF, 0xFFFF, 0xFFFF, 0xFFFF, 0xFFFF, 0xFFFF, 0xFFFF, 0xFFFF, 0xFFFF, 0xFFFF, // 0x15C0 (5568)
- 0xFFFF, 0xFFFF, 0xFFFF, 0xFFFF, 0xFFFF, 0xFFFF, 0xFFFF, 0xFFFF, 0xFFFF, 0xFFFF, 0xFFFF, 0xF7DE, 0xFFFF, 0xFFFF, 0xFFFF, 0xFFFF, // 0x15D0 (5584)
- 0xFFFF, 0xFFFF, 0xFFFF, 0xFFFF, 0xFFFF, 0xFFFF, 0xFFFF, 0xFFFF, 0xFFFF, 0xFFFF, 0xFFFF, 0xFFFF, 0xFFFF, 0x4A49, 0x1081, 0x2103, // 0x15E0 (5600)
- 0x20E3, 0x3165, 0x9CB1, 0xBDB5, 0xAD14, 0xE71B, 0xE6FA, 0xB553, 0x5A89, 0x18A2, 0x39A6, 0xEF3C, 0xFFFF, 0xFFFF, 0xFFFF, 0xFFFF, // 0x15F0 (5616)
- 0xFFFF, 0xFFFF, 0xFFFF, 0xFFFF, 0xFFFF, 0xFFFF, 0xFFFF, 0xFFFF, 0xFFFF, 0xFFFF, 0xFFFF, 0xFFFF, 0xFFFF, 0xFFFF, 0xFFFF, 0xFFFF, // 0x1600 (5632)
- 0xFFFF, 0xFFFF, 0xFFFF, 0xFFFF, 0xFFFF, 0xFFFF, 0xFFFF, 0xFFFF, 0xFFFF, 0xFFFF, 0xFFFF, 0xFFFF, 0xFFFF, 0xFFFF, 0xFFFF, 0xFFFF, // 0x1610 (5648)
- 0xFFFF, 0xFFFF, 0xFFFF, 0xFFFF, 0xFFFF, 0xFFFF, 0xFFFF, 0xFFFF, 0xFFFF, 0xFFFF, 0xFFFF, 0xFFFF, 0xFFFF, 0xFFFF, 0xFFFF, 0xFFFF, // 0x1620 (5664)
- 0xFFFF, 0xFFFF, 0xFFFF, 0xFFFF, 0xFFFF, 0xFFFF, 0xFFFF, 0xFFFF, 0xFFFF, 0xFFFF, 0xFFFF, 0xF7DE, 0xFFFF, 0xFFFF, 0xFFFF, 0xFFFF, // 0x1630 (5680)
- 0xFFFF, 0xFFFF, 0xFFFF, 0xFFFF, 0xFFFF, 0xFFFF, 0xFFFF, 0xFFFF, 0xFFFF, 0xFFFF, 0xFFFF, 0xFFFF, 0xFFFF, 0xCE38, 0x1082, 0x18A2, // 0x1640 (5696)
- 0x20E3, 0x2124, 0x39A6, 0x7B6D, 0x9450, 0x9450, 0x7B8E, 0x4207, 0x20C3, 0x2104, 0xD679, 0xFFFF, 0xFFFF, 0xFFFF, 0xFFFF, 0xFFFF, // 0x1650 (5712)
- 0xFFFF, 0xFFFF, 0xFFFF, 0xFFFF, 0xFFFF, 0xFFFF, 0xFFFF, 0xFFFF, 0xFFFF, 0xFFFF, 0xFFFF, 0xFFFF, 0xFFFF, 0xFFFF, 0xFFFF, 0xFFFF, // 0x1660 (5728)
- 0xFFFF, 0xFFFF, 0xFFFF, 0xFFFF, 0xFFFF, 0xFFFF, 0xFFFF, 0xFFFF, 0xFFFF, 0xFFFF, 0xFFFF, 0xFFFF, 0xFFFF, 0xFFFF, 0xFFFF, 0xFFFF, // 0x1670 (5744)
- 0xFFFF, 0xFFFF, 0xFFFF, 0xFFFF, 0xFFFF, 0xFFFF, 0xFFFF, 0xFFFF, 0xFFFF, 0xFFFF, 0xFFFF, 0xFFFF, 0xFFFF, 0xFFFF, 0xFFFF, 0xFFFF, // 0x1680 (5760)
- 0xFFFF, 0xFFFF, 0xFFFF, 0xFFFF, 0xFFFF, 0xFFFF, 0xFFFF, 0xFFFF, 0xFFFF, 0xFFFF, 0xF7DE, 0xFFFF, 0xFFFF, 0xFFFF, 0xFFFF, 0xFFFF, // 0x1690 (5776)
- 0xFFFF, 0xFFFF, 0xFFFF, 0xFFFF, 0xFFFF, 0xFFFF, 0xFFFF, 0xFFFF, 0xFFFF, 0xFFFF, 0xFFFF, 0xFFFF, 0xFFFF, 0xFFFF, 0xA534, 0x18C3, // 0x16A0 (5792)
- 0x1082, 0x18C2, 0x2104, 0x3165, 0x39A6, 0x39A6, 0x2944, 0x1061, 0x3165, 0xC638, 0xFFFF, 0xFFFF, 0xFFFF, 0xFFFF, 0xFFFF, 0xFFFF, // 0x16B0 (5808)
- 0xFFFF, 0xFFFF, 0xFFFF, 0xFFFF, 0xFFFF, 0xFFFF, 0xFFFF, 0xFFFF, 0xFFFF, 0xFFFF, 0xFFFF, 0xFFFF, 0xFFFF, 0xFFFF, 0xFFFF, 0xFFFF, // 0x16C0 (5824)
- 0xFFFF, 0xFFFF, 0xFFFF, 0xFFFF, 0xFFFF, 0xFFFF, 0xFFFF, 0xFFFF, 0xFFFF, 0xFFFF, 0xFFFF, 0xFFFF, 0xFFFF, 0xFFFF, 0xFFFF, 0xFFFF, // 0x16D0 (5840)
- 0xFFFF, 0xFFFF, 0xFFFF, 0xFFFF, 0xFFFF, 0xFFFF, 0xFFFF, 0xFFFF, 0xFFFF, 0xFFFF, 0xFFFF, 0xFFFF, 0xFFFF, 0xFFFF, 0xFFFF, 0xFFFF, // 0x16E0 (5856)
- 0xFFFF, 0xFFFF, 0xFFFF, 0xFFFF, 0xFFFF, 0xFFFF, 0xFFFF, 0xFFFF, 0xFFFF, 0xF7DE, 0xFFFF, 0xFFFF, 0xFFFF, 0xFFFF, 0xFFFF, 0xFFFF, // 0x16F0 (5872)
- 0xFFFF, 0xFFFF, 0xFFFF, 0xFFFF, 0xFFFF, 0xFFFF, 0xFFFF, 0xFFFF, 0xFFFF, 0xFFFF, 0xFFFF, 0xFFFF, 0xFFDF, 0xFFFF, 0xFFFF, 0xB5B6, // 0x1700 (5888)
- 0x4A28, 0x2104, 0x1061, 0x0820, 0x0820, 0x1061, 0x2944, 0x7BAE, 0xEF5C, 0xFFFF, 0xFFFF, 0xFFFF, 0xFFFF, 0xFFFF, 0xFFFF, 0xFFFF, // 0x1710 (5904)
- 0xFFFF, 0xFFFF, 0xFFFF, 0xFFFF, 0xFFFF, 0xFFFF, 0xFFFF, 0xFFFF, 0xFFFF, 0xFFFF, 0xFFFF, 0xFFFF, 0xFFFF, 0xFFFF, 0xFFFF, 0xFFFF, // 0x1720 (5920)
- 0xFFFF, 0xFFFF, 0xFFFF, 0xFFFF, 0xFFFF, 0xFFFF, 0xFFFF, 0xFFFF, 0xFFFF, 0xFFFF, 0xFFFF, 0xFFFF, 0xFFFF, 0xFFFF, 0xFFFF, 0xFFFF, // 0x1730 (5936)
- 0xFFFF, 0xFFFF, 0xFFFF, 0xFFFF, 0xFFFF, 0xFFFF, 0xFFFF, 0xFFFF, 0xFFFF, 0xFFFF, 0xFFFF, 0xFFFF, 0xFFFF, 0xFFFF, 0xFFFF, 0xFFFF, // 0x1740 (5952)
- 0xFFFF, 0xFFFF, 0xFFFF, 0xFFFF, 0xFFFF, 0xFFFF, 0xFFFF, 0xFFFF, 0xF7DE, 0xFFFF, 0xFFFF, 0xFFFF, 0xFFFF, 0xFFFF, 0xFFFF, 0xFFFF, // 0x1750 (5968)
- 0xFFFF, 0xFFFF, 0xFFFF, 0xFFFF, 0xFFFF, 0xFFFF, 0xFFFF, 0xFFFF, 0xFFFF, 0xFFFF, 0xFFFF, 0xFFFF, 0xFFFF, 0xFFFF, 0xFFFF, 0xFFFF, // 0x1760 (5984)
- 0xFFDF, 0xD6BA, 0xB596, 0x9CD3, 0x9CD3, 0xB596, 0xEF3C, 0xFFFF, 0xFFFF, 0xFFFF, 0xFFFF, 0xFFFF, 0xFFFF, 0xFFFF, 0xFFFF, 0xFFFF, // 0x1770 (6000)
- 0xFFFF, 0xFFFF, 0xFFFF, 0xFFFF, 0xFFFF, 0xFFFF, 0xFFFF, 0xFFFF, 0xFFFF, 0xFFFF, 0xFFFF, 0xFFFF, 0xFFFF, 0xFFFF, 0xFFFF, 0xFFFF, // 0x1780 (6016)
- 0xFFFF, 0xFFFF, 0xFFFF, 0xFFFF, 0xFFFF, 0xFFFF, 0xFFFF, 0xFFFF, 0xFFFF, 0xFFFF, 0xFFFF, 0xFFFF, 0xFFFF, 0xFFFF, 0xFFFF, 0xFFFF, // 0x1790 (6032)
- 0xFFFF, 0xFFFF, 0xFFFF, 0xFFFF, 0xFFFF, 0xFFFF, 0xFFFF, 0xFFFF, 0xFFFF, 0xFFFF, 0xFFFF, 0xFFFF, 0xFFFF, 0xFFFF, 0xFFFF, 0xFFFF, // 0x17A0 (6048)
- 0xFFFF, 0xFFFF, 0xFFFF, 0xFFFF, 0xFFFF, 0xFFFF, 0xF7DE, 0xFFFF, 0xFFFF, 0xFFFF, 0xFFFF, 0xFFFF, 0xFFFF, 0xFFFF, 0xFFFF, 0xFFFF, // 0x17B0 (6064)
- 0xFFFF, 0xFFFF, 0xFFFF, 0xFFFF, 0xFFFF, 0xFFFF, 0xFFFF, 0xFFFF, 0xFFFF, 0xFFFF, 0xFFFF, 0xFFFF, 0xFFFF, 0xFFFF, 0xFFFF, 0xFFFF, // 0x17C0 (6080)
- 0xFFFF, 0xFFFF, 0xFFFF, 0xFFFF, 0xFFFF, 0xFFFF, 0xFFFF, 0xFFFF, 0xFFFF, 0xFFFF, 0xFFFF, 0xFFFF, 0xFFFF, 0xFFFF, 0xFFFF, 0xFFFF, // 0x17D0 (6096)
- 0xFFFF, 0xFFFF, 0xFFFF, 0xFFFF, 0xFFFF, 0xFFFF, 0xFFFF, 0xFFFF, 0xFFFF, 0xFFFF, 0xFFFF, 0xFFFF, 0xFFFF, 0xFFFF, 0xFFFF, 0xFFFF, // 0x17E0 (6112)
- 0xFFFF, 0xFFFF, 0xFFFF, 0xFFFF, 0xFFFF, 0xFFFF, 0xF7DE, 0xFFFF, 0xFFFF, 0xFFFF, 0xFFFF, 0xFFFF, 0xFFFF, 0xFFFF, 0xFFFF, 0xFFFF, // 0x17F0 (6128)
- 0xFFFF, 0xFFFF, 0xFFFF, 0xFFFF, 0xFFFF, 0xFFFF, 0xFFFF, 0xFFFF, 0xFFFF, 0xFFFF, 0xFFFF, 0xFFFF, 0xFFFF, 0xFFFF, 0xFFFF, 0xFFFF, // 0x1800 (6144)
- };
|

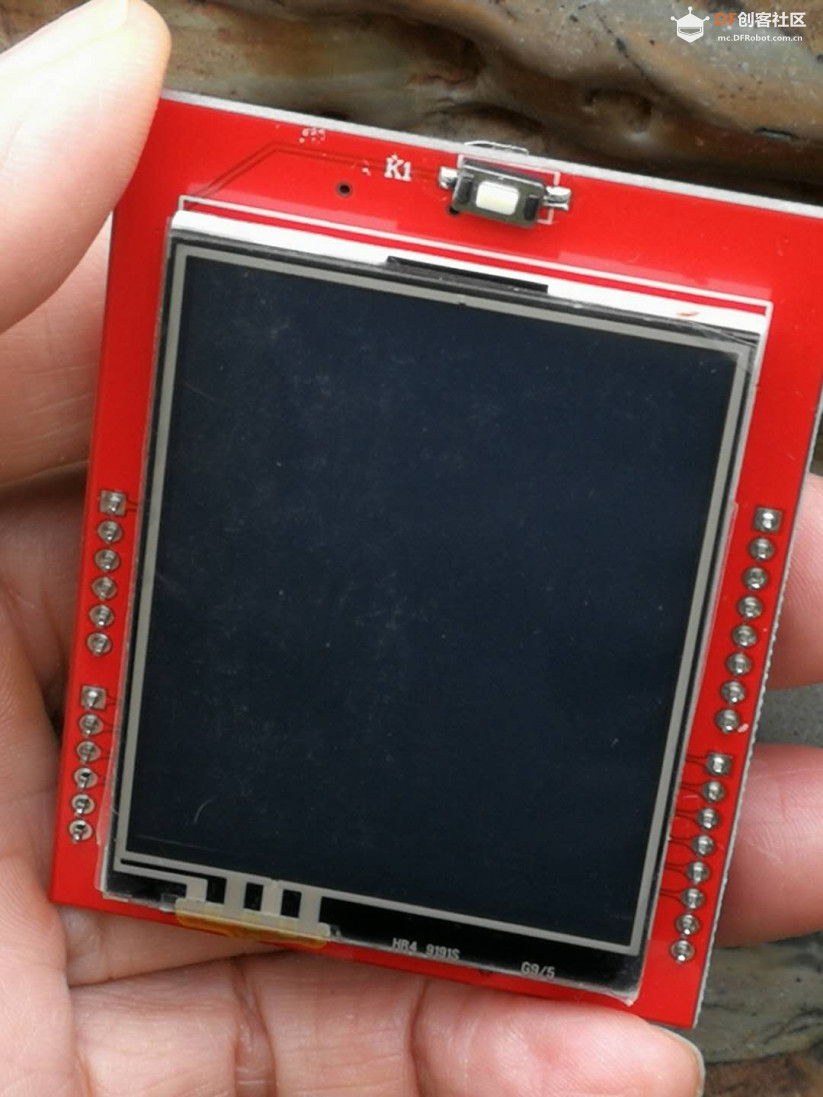
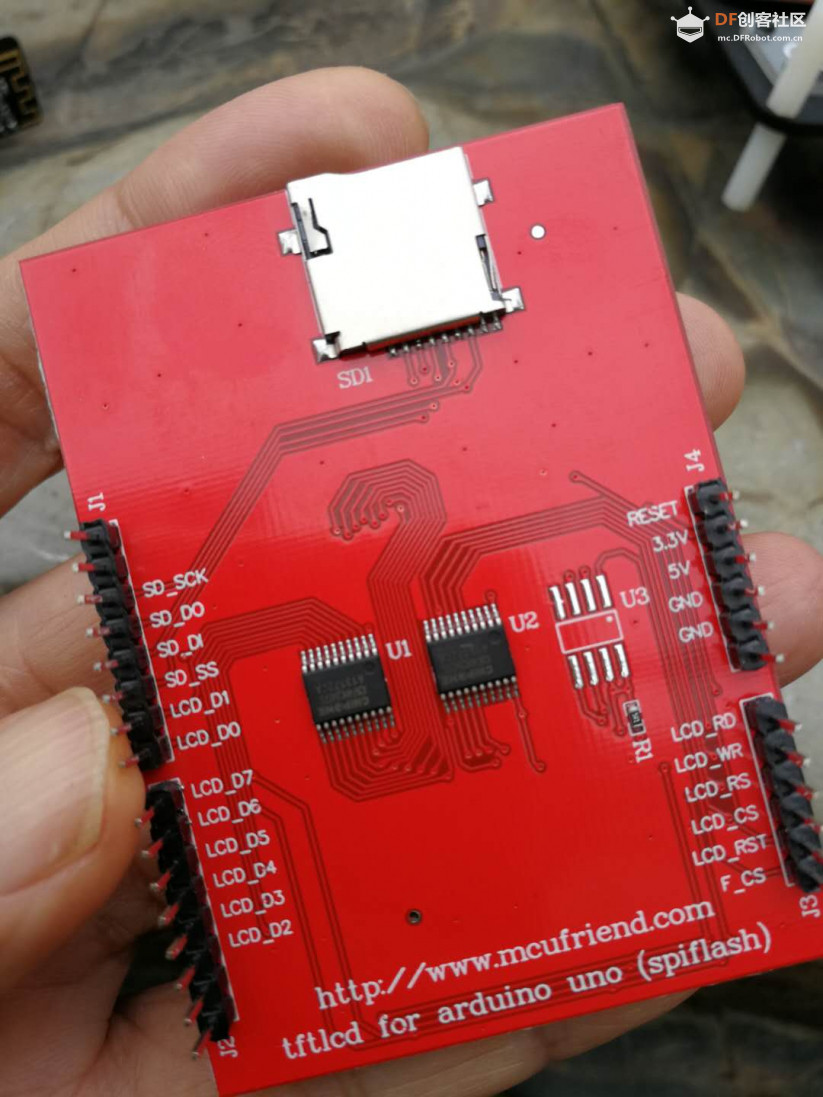
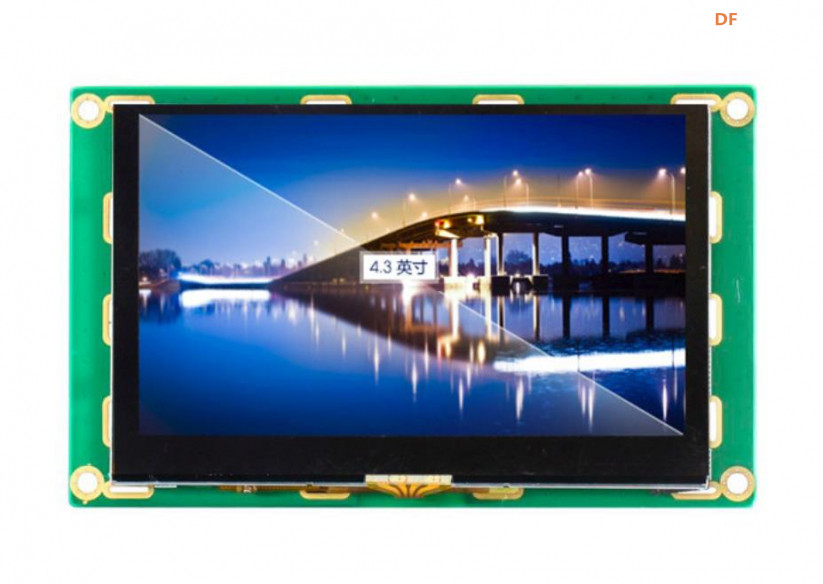
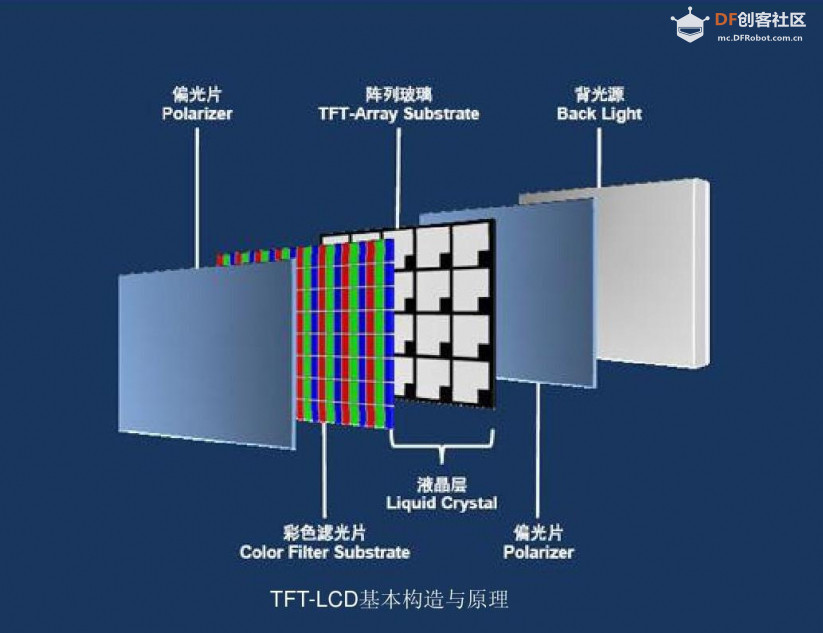


 、特征:
、特征: 沪公网安备31011502402448