FireBeetle 2 ESP32-S3 Micropython webserver
2023-09-075793

AI 快速预览详细
本文介绍了如何使用FireBeetle-ESP32-S3开发板和MicroPython搭建Web服务器。首先,通过`network`库连接到Wi-Fi网络,并将Wi-Fi的SSID和密码存储在JSON配置文件中以提高安全性。然后,创建Web服务器并处理HTTP请求,根据请求路径返回相应的HTML内容或JSON数据。最后,构建适当的HTTP响应并发送回客户端。整个过程提供了详细的代码示例,适合新手学习。
|
FireBeetle-ESP32-S3是一款基于ESP32-S3的开发板,支持MicroPython编程。要实现FireBeetle-ESP32-S3上的Web服务器功能,可以遵循以下步骤: 1. 连接到Wi-Fi网络:在FireBeetle-ESP32-S3上使用`network`库连接到您的Wi-Fi网络。您需要提供Wi-Fi的SSID和密码。 import network # 连接到Wi-Fi网络 def connect_to_wifi(ssid, password): wlan = network.WLAN(network.STA_IF) wlan.active(True) if not wlan.isconnected(): print("Connecting to WiFi...") wlan.connect(ssid, password) while not wlan.isconnected(): pass print("Connected to WiFi") print("IP address:", wlan.ifconfig()[0]) # WiFi配置 wifi_ssid = "Your_WiFi_SSID" wifi_password = "Your_WiFi_Password" # 连接到Wi-Fi网络 connect_to_wifi(wifi_ssid, wifi_password) 当然这个wifi用户名密码使用明文不是很好,我们把他们放在配置文件config.json里 import network import ujson as json # 从JSON配置文件中读取WiFi的SSID和密码 def read_wifi_config(file_path): with open(file_path, "r") as f: config = json.load(f) ssid = config["wifi_ssid"] password = config["wifi_password"] return ssid, password # 连接到WLAN def connect_to_wifi(ssid, password): wlan = network.WLAN(network.STA_IF) wlan.active(True) if not wlan.isconnected(): print("Connecting to WiFi...") wlan.connect(ssid, password) while not wlan.isconnected(): pass print("Connected to WiFi") print("IP address:", wlan.ifconfig()[0]) # JSON配置文件路径 config_file = "config.json" # 读取WiFi配置 wifi_ssid, wifi_password = read_wifi_config(config_file) # 连接到WLAN并获取IP地址 connect_to_wifi(wifi_ssid, wifi_password) config.json 样例 { "wifi_ssid": "MiffyDad", "wifi_password": "xxxxxxx" } 2. 创建Web服务器: 这里我们的web基于此工程 https://github.com/lemariva/uPyCam/blob/master/webserver.py 3. 处理HTTP请求:在处理HTTP请求时,您可以根据请求的URL路径和方法执行相应的操作。例如,如果请求的路径是`/`,您可以返回主页的HTML内容;如果请求的路径是`/api/data`,您可以返回一些JSON数据。 self.routeHandlers = [ ("/", "GET", self._httpHello), ("/index", "GET", self._httpHandlerIndex), ("/logo.svg", "GET", self._httpLogo), ...其他可按需书写 ] 4. 发送HTTP响应:根据请求处理的结果,您可以构建适当的HTTP响应并发送回客户端。响应可以包括状态码、响应头和响应正文。 下面是几个简单的示例代码: 文字响应 def _httpHello(self, httpClient, httpResponse): response = "HTTP/1.0 200 OK\r\n" httpResponse.WriteResponseOk(headers=None, contentType="text/html", contentCharset="UTF-8", content=response) 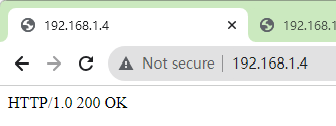 html 页面相应 def _httpHandlerIndex(self, httpClient, httpResponse): f = open("www/index.html", "r") content = f.read() f.close() headers = { 'Last-Modified' : 'Thu, 7 Sep 2023 10:00:00 GMT', \ 'Cache-Control' : 'no-cache, no-store, must-revalidate' } httpResponse.WriteResponseOk(headers=None, contentType="text/html", contentCharset="UTF-8", content=content)  SVG文件相应(也可以是其他文件响应) def _httpLogo(self, httpClient, httpResponse): f = open("www/Logo.svg", "r") content = f.read() f.close() httpResponse.WriteResponseOk(headers=None, contentType="image/svg+xml", contentCharset="UTF-8", content=content)  启动webserver server = webcam() server.run() 因为是后台线程启动,所以这里是有提示符显示的,但是后台程序依然在运行。这一点新手要注意  在下面的文章中我将继续探索FireBeetle 2 ESP32-S3摄像头在Micropython中的使用。关于这个在网上的资料极少,所以我只能缓步前行。 谢谢大家 |
相关帖子
- . StyleTransferCam - 基于 FireBeetle 2 ESP32-S3 的风格迁移相机
- . FireBeetle 2 ESP32-S3初体验之教师投影辅助神器
- . FireBeetle 2 ESP32-S3助力校园隐蔽空间可视化预警系统
- . 基于FireBeetle 2 ESP32-S3和行空板的无线图传相机
- . 在CircuitPython中使用FireBeetle 2 ESP32-S3上的摄像头
- . 基于CircuitPython实现的FireBeetle 2 ESP32-S3延时相机
- . 用树莓派PICO制作一个FPV小车
- . "ESP32-S3 AI摄像头"+DeepSeek—皮肤分析系统—灵犀镜
- . “ESP32-S3 AI摄像头”边缘轮廓检测—AI数万物
- . 开源esp32s3多功能智能手表使用立创实战派