本帖最后由 _深蓝_ 于 2023-9-6 16:47 编辑
FireBeetle 2 ESP32-S3助力校园隐蔽空间可视化预警系统
一、项目背景 相比非寄宿制学校,初中寄宿制学校的学生管理让人头疼,学生的管理不单单是白天的课堂上和下课后,晚上的管理会出更多的问题。以及初中的青少年都处于青春的萌芽状态,早恋现象也时而发生。更有甚者,在校园的印记处经常会出现校园欺凌,霸凌事件。由于欺凌霸凌事件的隐蔽性,突然性,常常使得值周老师无可奈何。 为了有效的防止青少年早恋以及欺凌霸凌的行为,专门设计了校园隐蔽空间可视化预警系统。 二、方案设计 1、使用mind+1.8制作校园监控及预警大屏。 2、使用行空板自带的SIOT2.0物联网平台,存储和物联通信。 3、项目共设计了大屏数据监测和视频监控系统。使用行空板自带的光照传感器和声强传感器采集数据,并上传到物联网平台,连接可视化大屏,可以看到当前光照情况和声音强度。便于值周老师对于环境的直观认识。 4、由于青少年早恋以及欺凌霸凌的行为都发生在空间隐蔽,或者光照昏暗的场所,使用行空板的光照传感器检测光照的强度。另外发生青少年早恋以及欺凌霸凌的行为时伴随着声音强度的变化,使用行空板自带的声强传感器可以检测户外声强的变化。
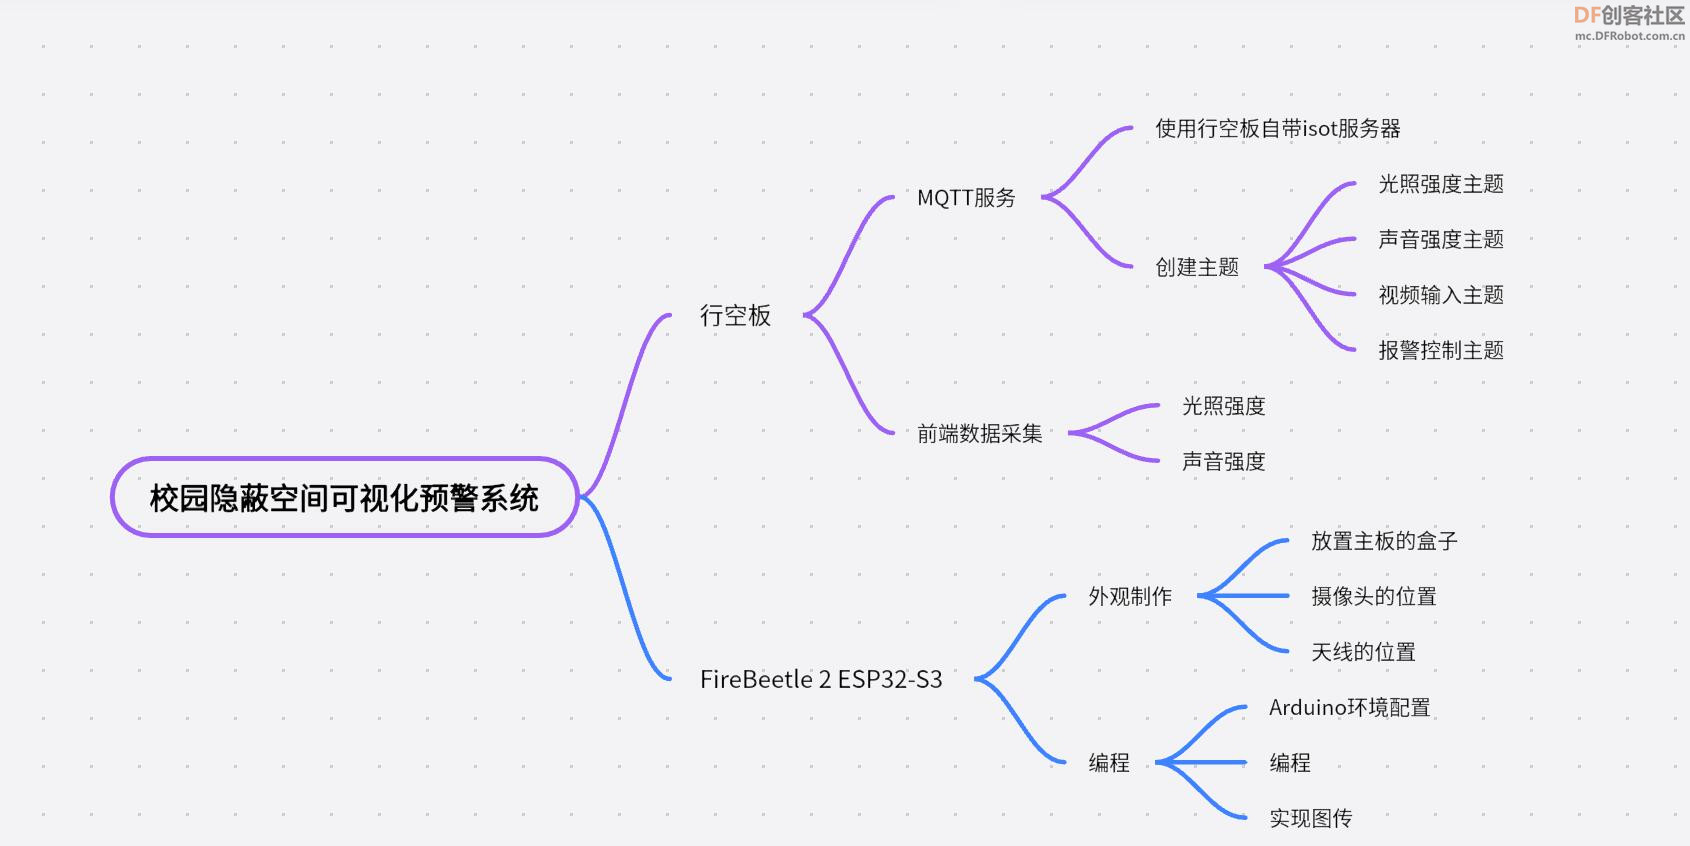
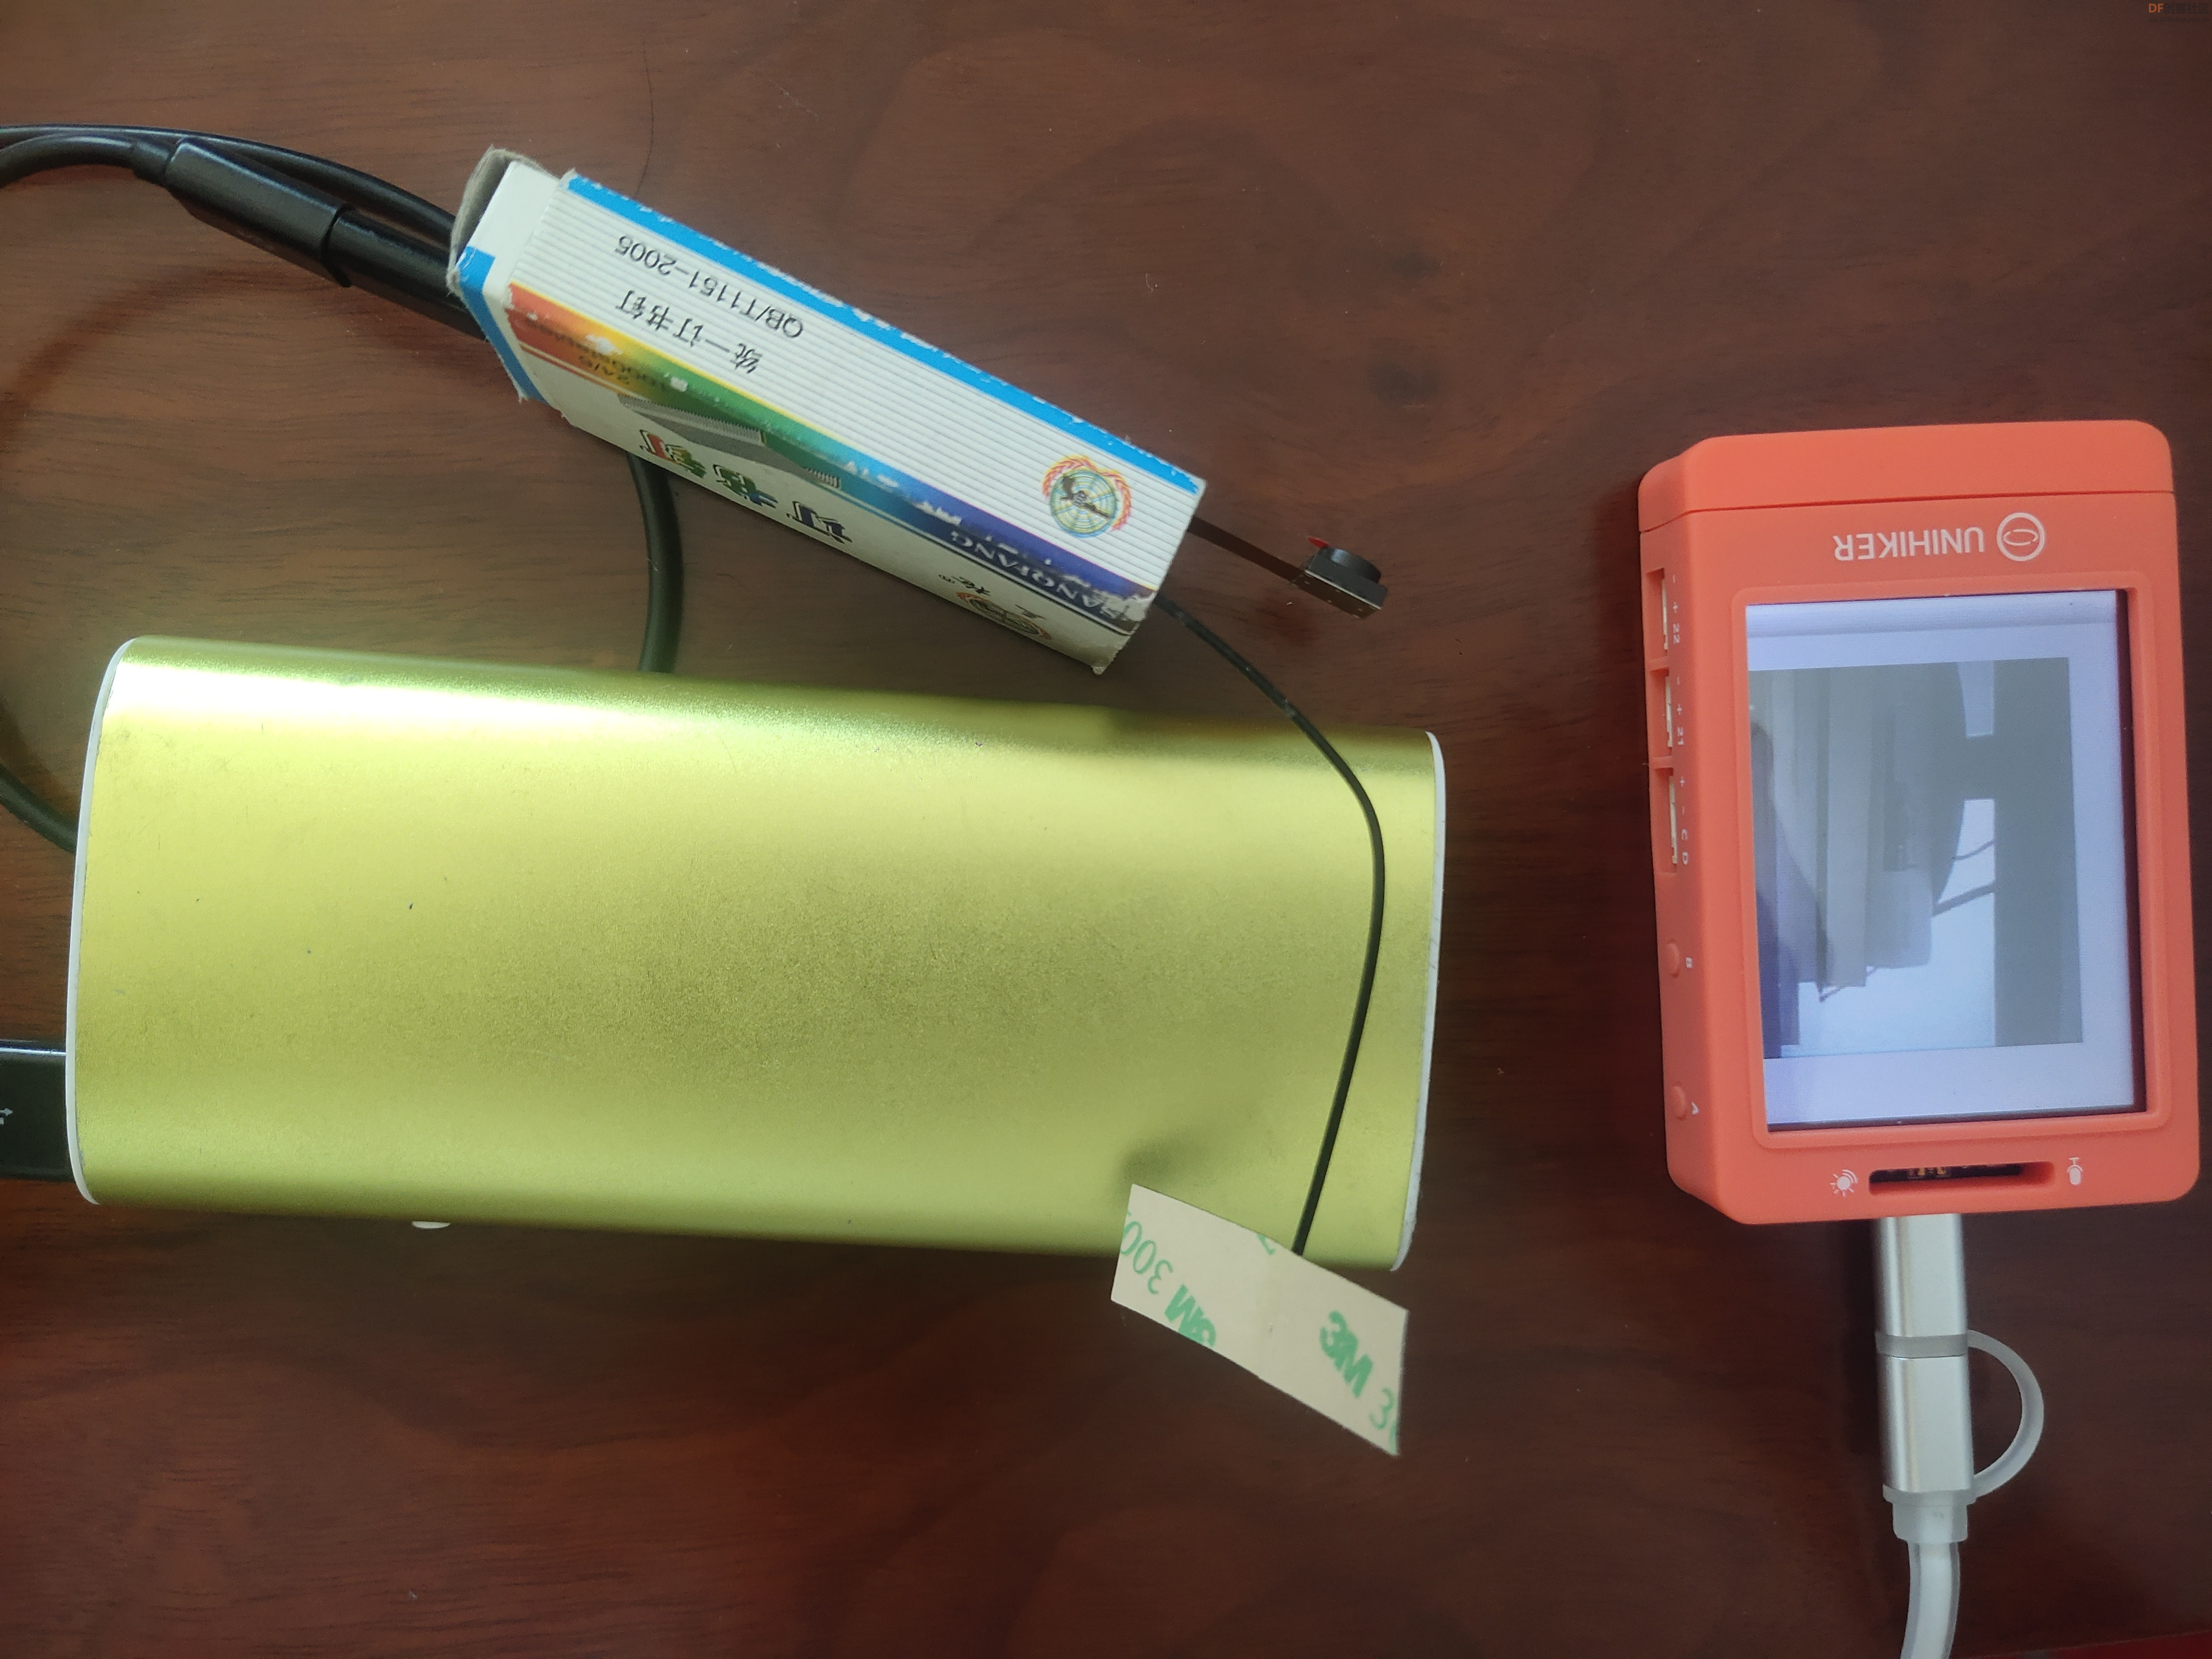
本项目设计思维导图如下所示 5、使用行空板和FireBeetle 2 ESP32-S3主控板完成本次项目 行空板 FireBeetle 2 ESP32-S3(已安装摄像头和天线)
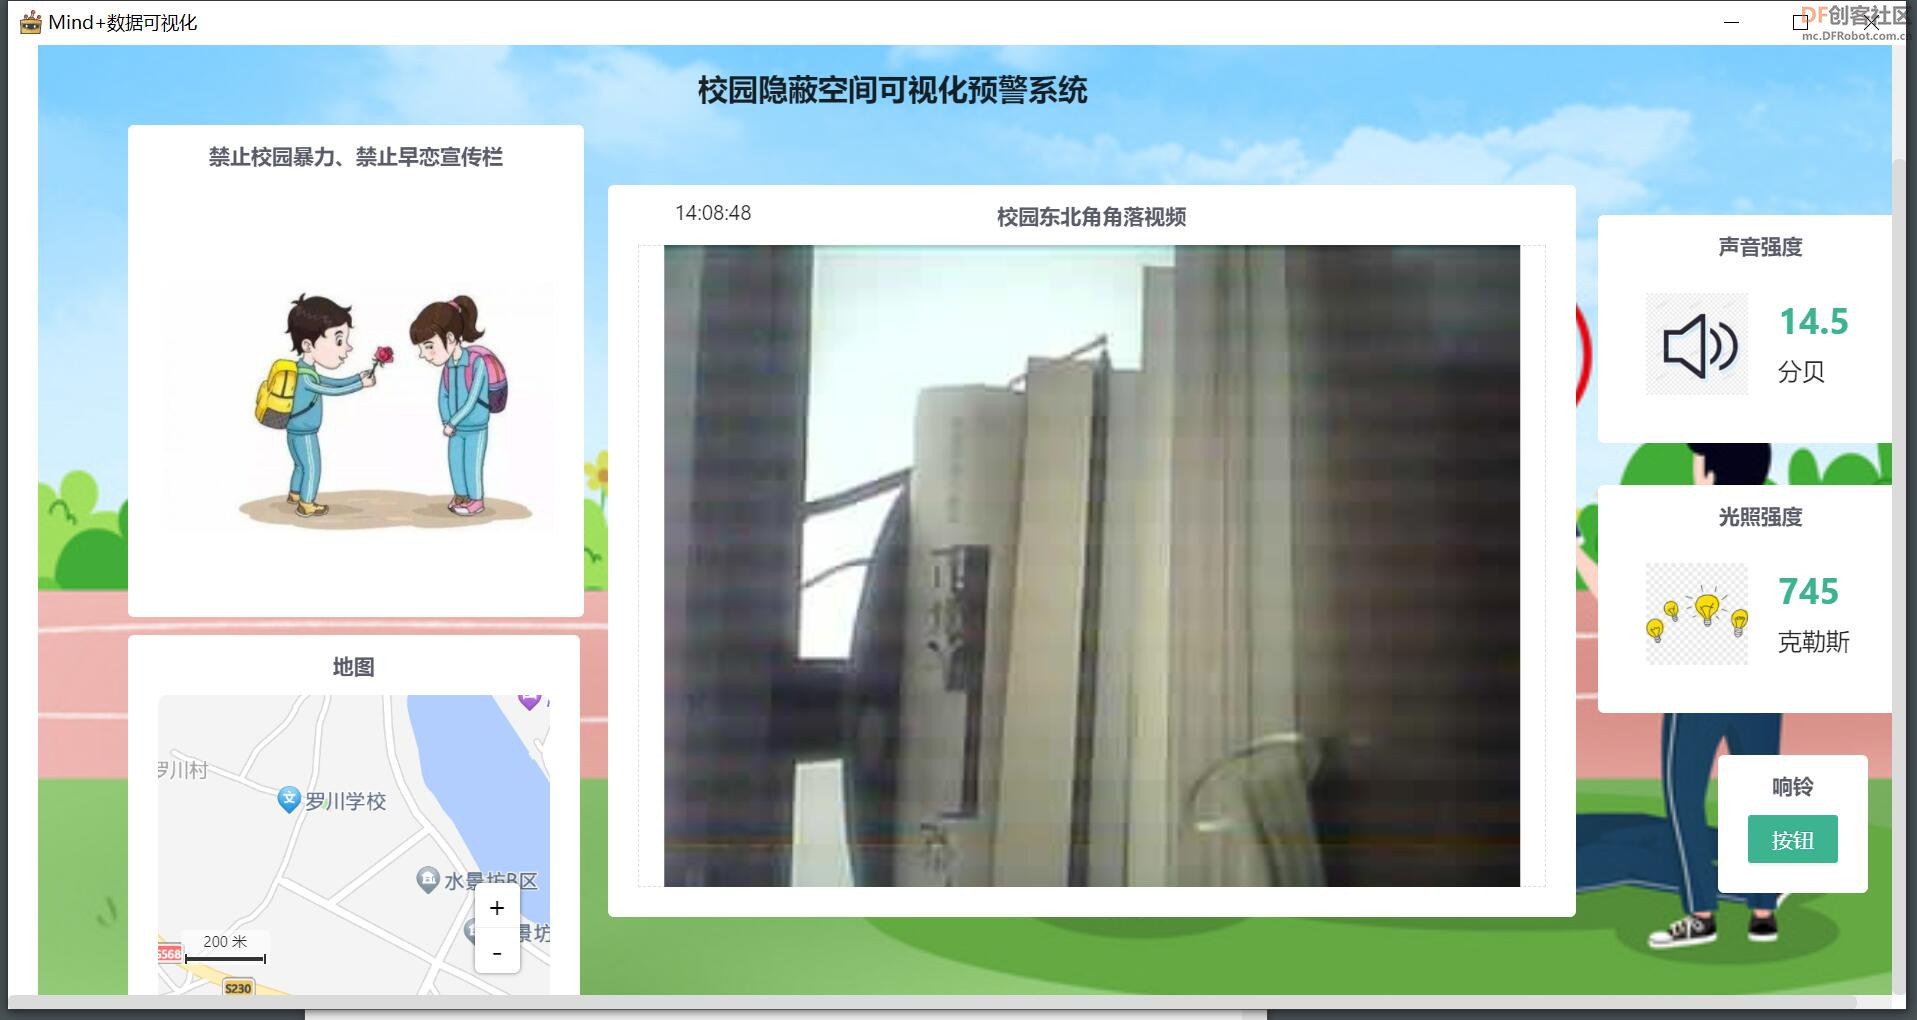
三、制作过程 (一)数据版面大屏设计 利用Mind+的可视化面板,设计“校园隐蔽空间可视化预警系统”大屏。大屏内容包括:当前时间、户外光照、户外声强、摄像头视频、报警按钮。
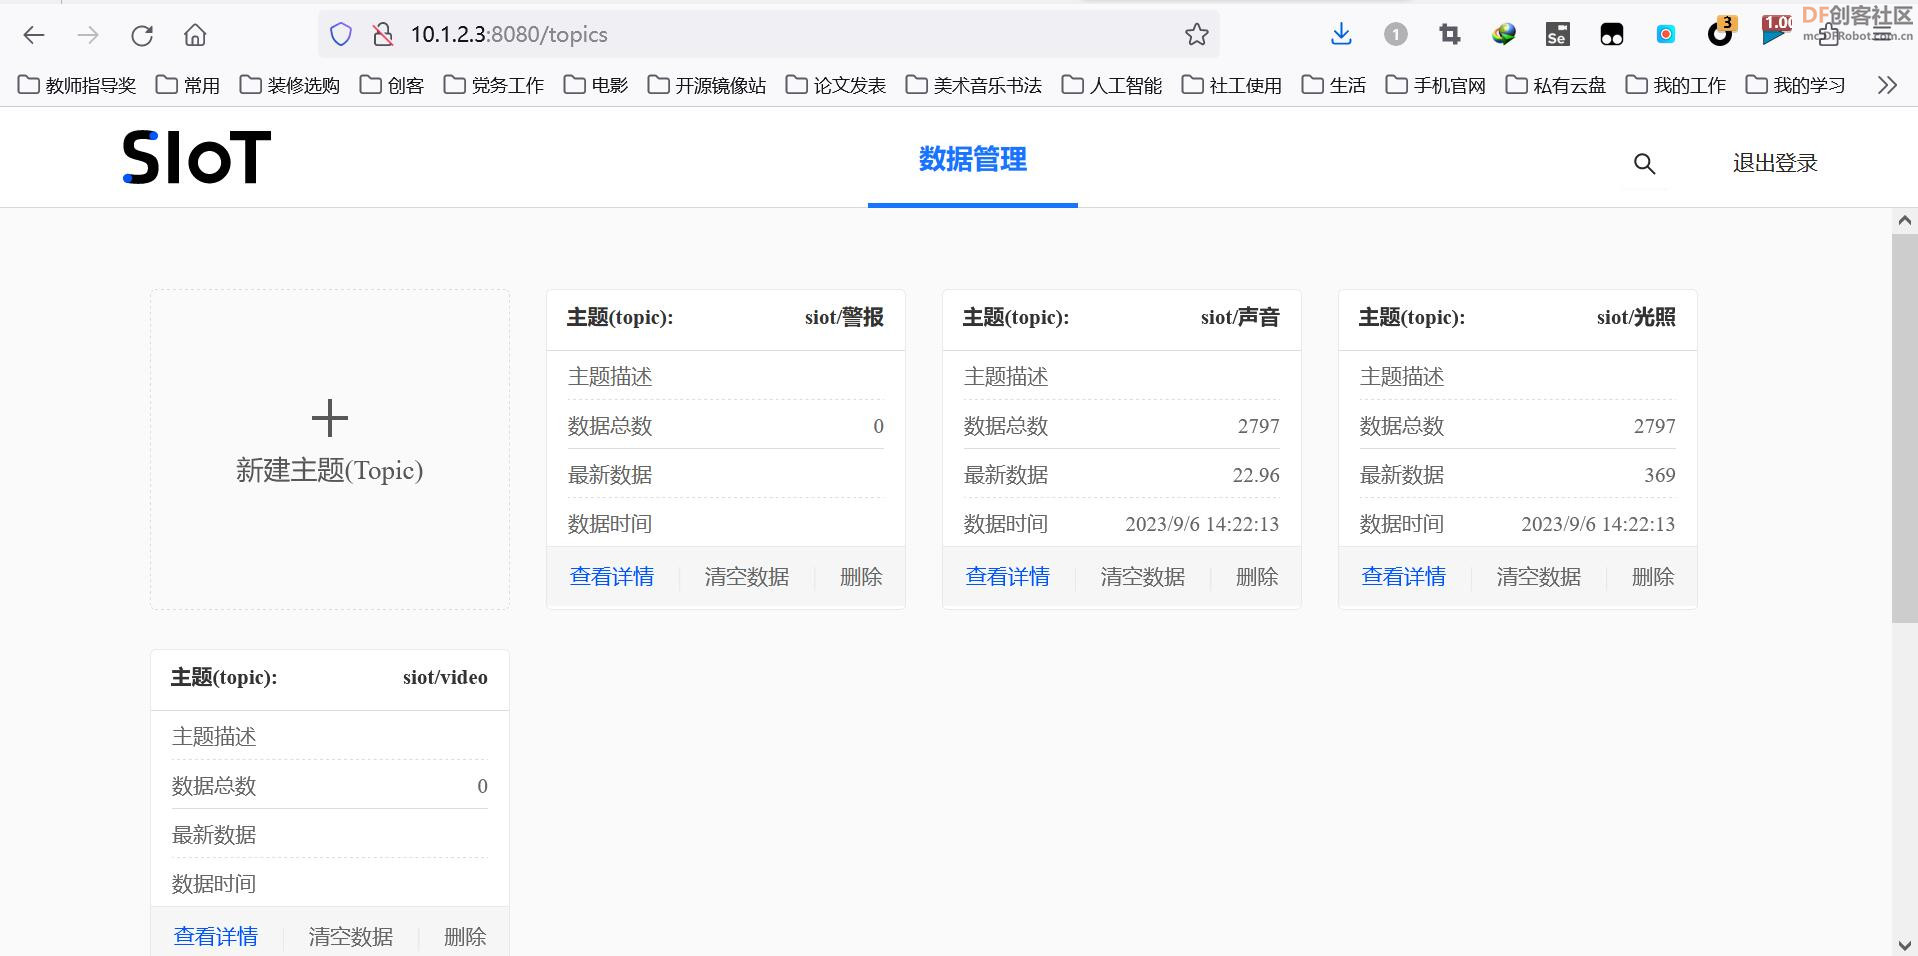
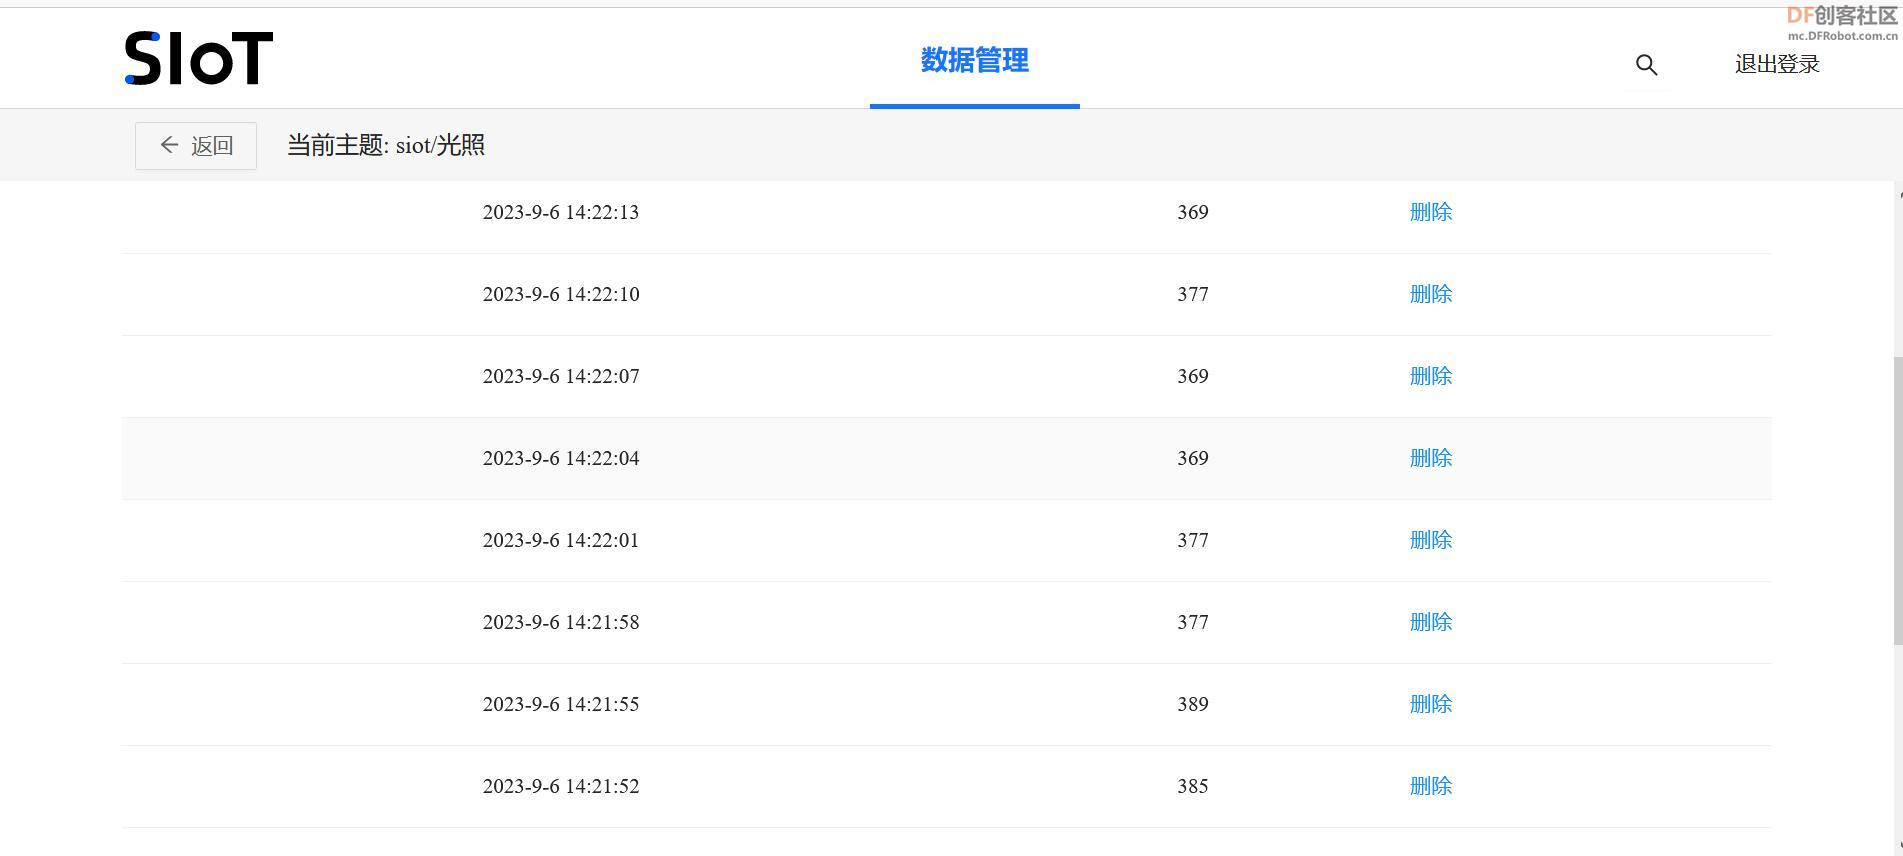
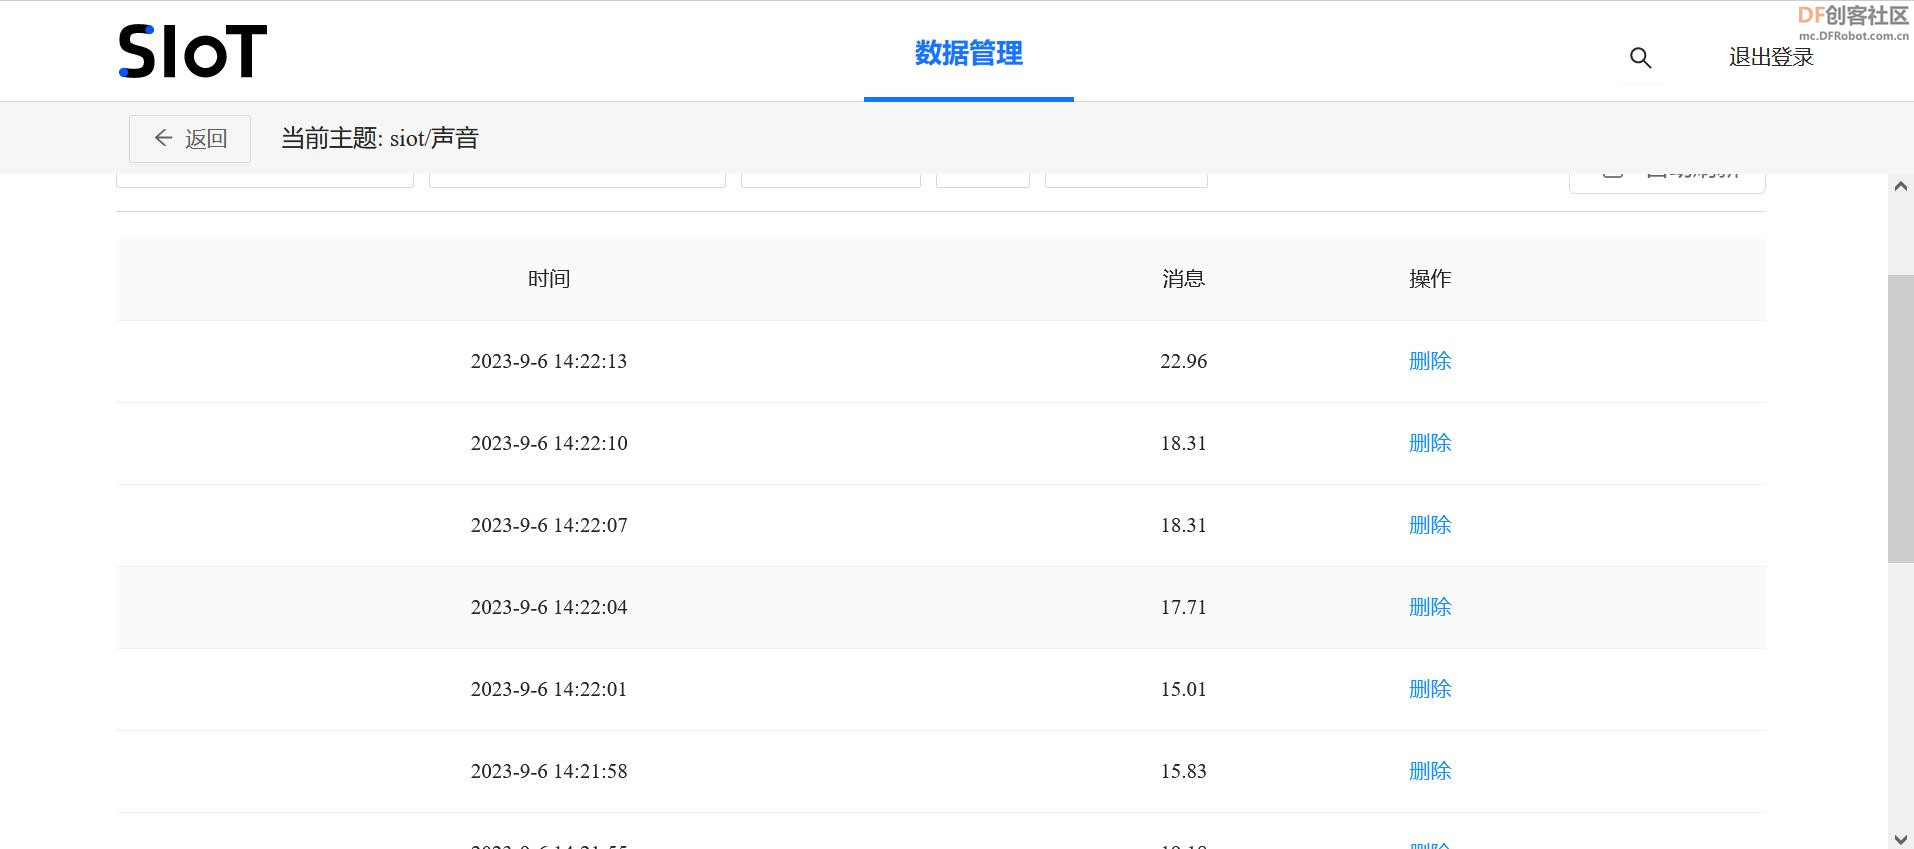
(二)SIOT设计 利用行空板自带的SIot,设计了以下的数据管理:
(三)行空板程序 积木程序如下:
代码如下:(可复制)
- # -*- coding: UTF-8 -*-
-
- # MindPlus
- # Python
- import base64
- from io import BytesIO
- from PIL import Image
- from pinpong.extension.unihiker import *
- from pinpong.board import Board,Pin
- from unihiker import Audio
- from unihiker import GUI
- import time
- import siot
- import cv2
-
- # 自定义函数
- def LaXiangJingBao():
- for my_variable in range(200, 801):
- buzzer.pitch(my_variable)
- time.sleep(0.005)
- time.sleep(3)
- for my_variable in range(800, 199, -1):
- buzzer.pitch(my_variable)
- time.sleep(0.005)
-
- # 事件回调函数
- def on_message_callback(client, userdata, msg):
- if (msg.payload.decode() == "on"):
- LaXiangJingBao()
- def u_thread1_function():
- vd = cv2.VideoCapture()
- vd.open("http://192.168.97.90:81/stream")
- if vd.isOpened():
- while not (False):
- if vd.grab():
- ret, grab = vd.read()
- cv2.imshow("Mind+.png", grab)
- siot.publish(topic="siot/video", data=base642base64(grab))
- if cv2.waitKey(20) & 0xff== 65:
- break
-
-
- siot.init(client_id="45850317527391704",server="192.168.97.139",port=1883,user="siot",password="dfrobot")
- u_gui=GUI()
- u_audio = Audio()
- Board().begin()
- siot.connect()
- siot.loop()
- siot.set_callback(on_message_callback)
-
- def frame2base64(frame):
- frame = cv2.cvtColor(frame, cv2.COLOR_BGR2RGB)
- img = Image.fromarray(frame) #将每一帧转为Image
- output_buffer = BytesIO() #创建一个BytesIO
- img.save(output_buffer, format='JPEG') #写入output_buffer
- byte_data = output_buffer.getvalue() #在内存中读取
- base64_data = base64.b64encode(byte_data) #转为BASE64
- return base64_data #转码成功 返回base64编码
-
- def base642base64(frame):
- data=str('data:image/png;base64,')
- base64data = str(frame2base64(frame))
- framedata = base64data[2:(len(base64data)-1)]
- base642base64_data = data + str(framedata)
- return base642base64_data
- siot.getsubscribe(topic="siot/警报")
- thread1=u_gui.start_thread(u_thread1_function)
-
- while True:
- siot.publish_save(topic="siot/声音", data=u_audio.sound_level())
- siot.publish_save(topic="siot/光照", data=light.read())
- time.sleep(3)
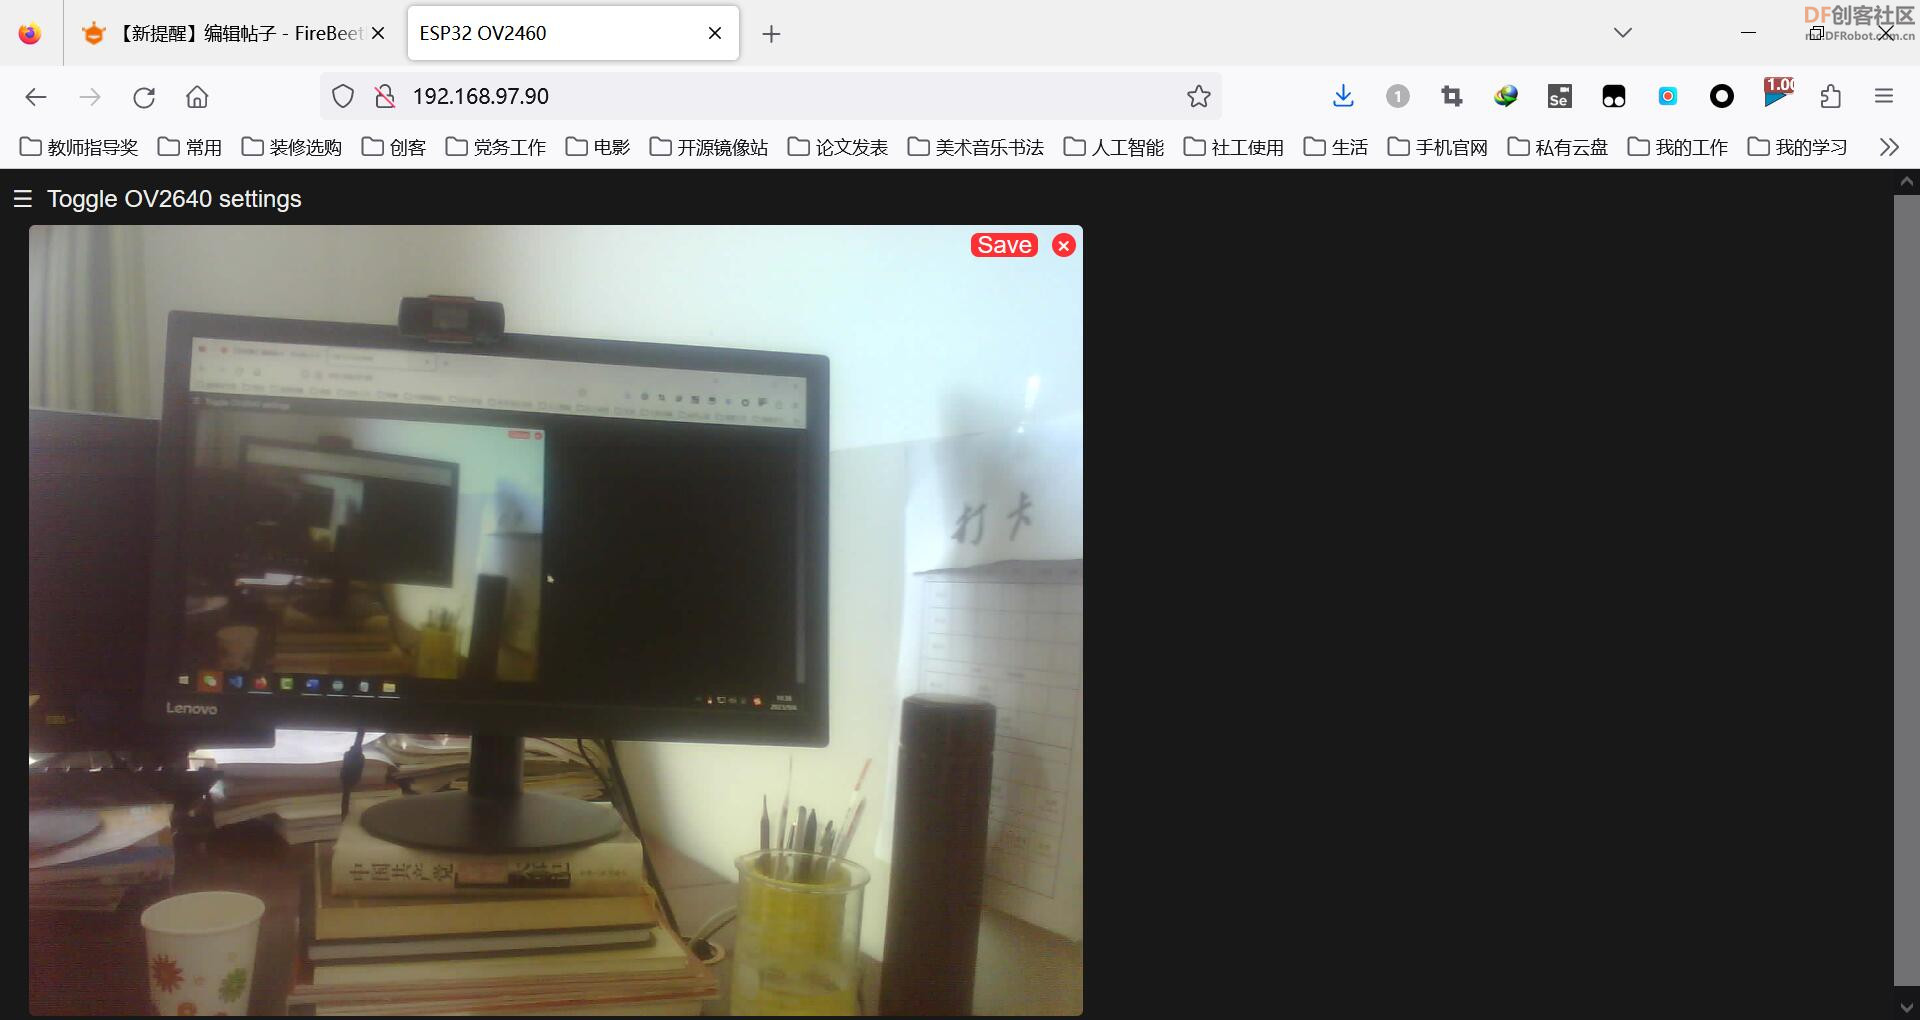
(四)使用FireBeetle 2 ESP32-S3驱动摄像头实现web图传 1、环境配置 环境配置可以查看以下网址: 2、编写代码
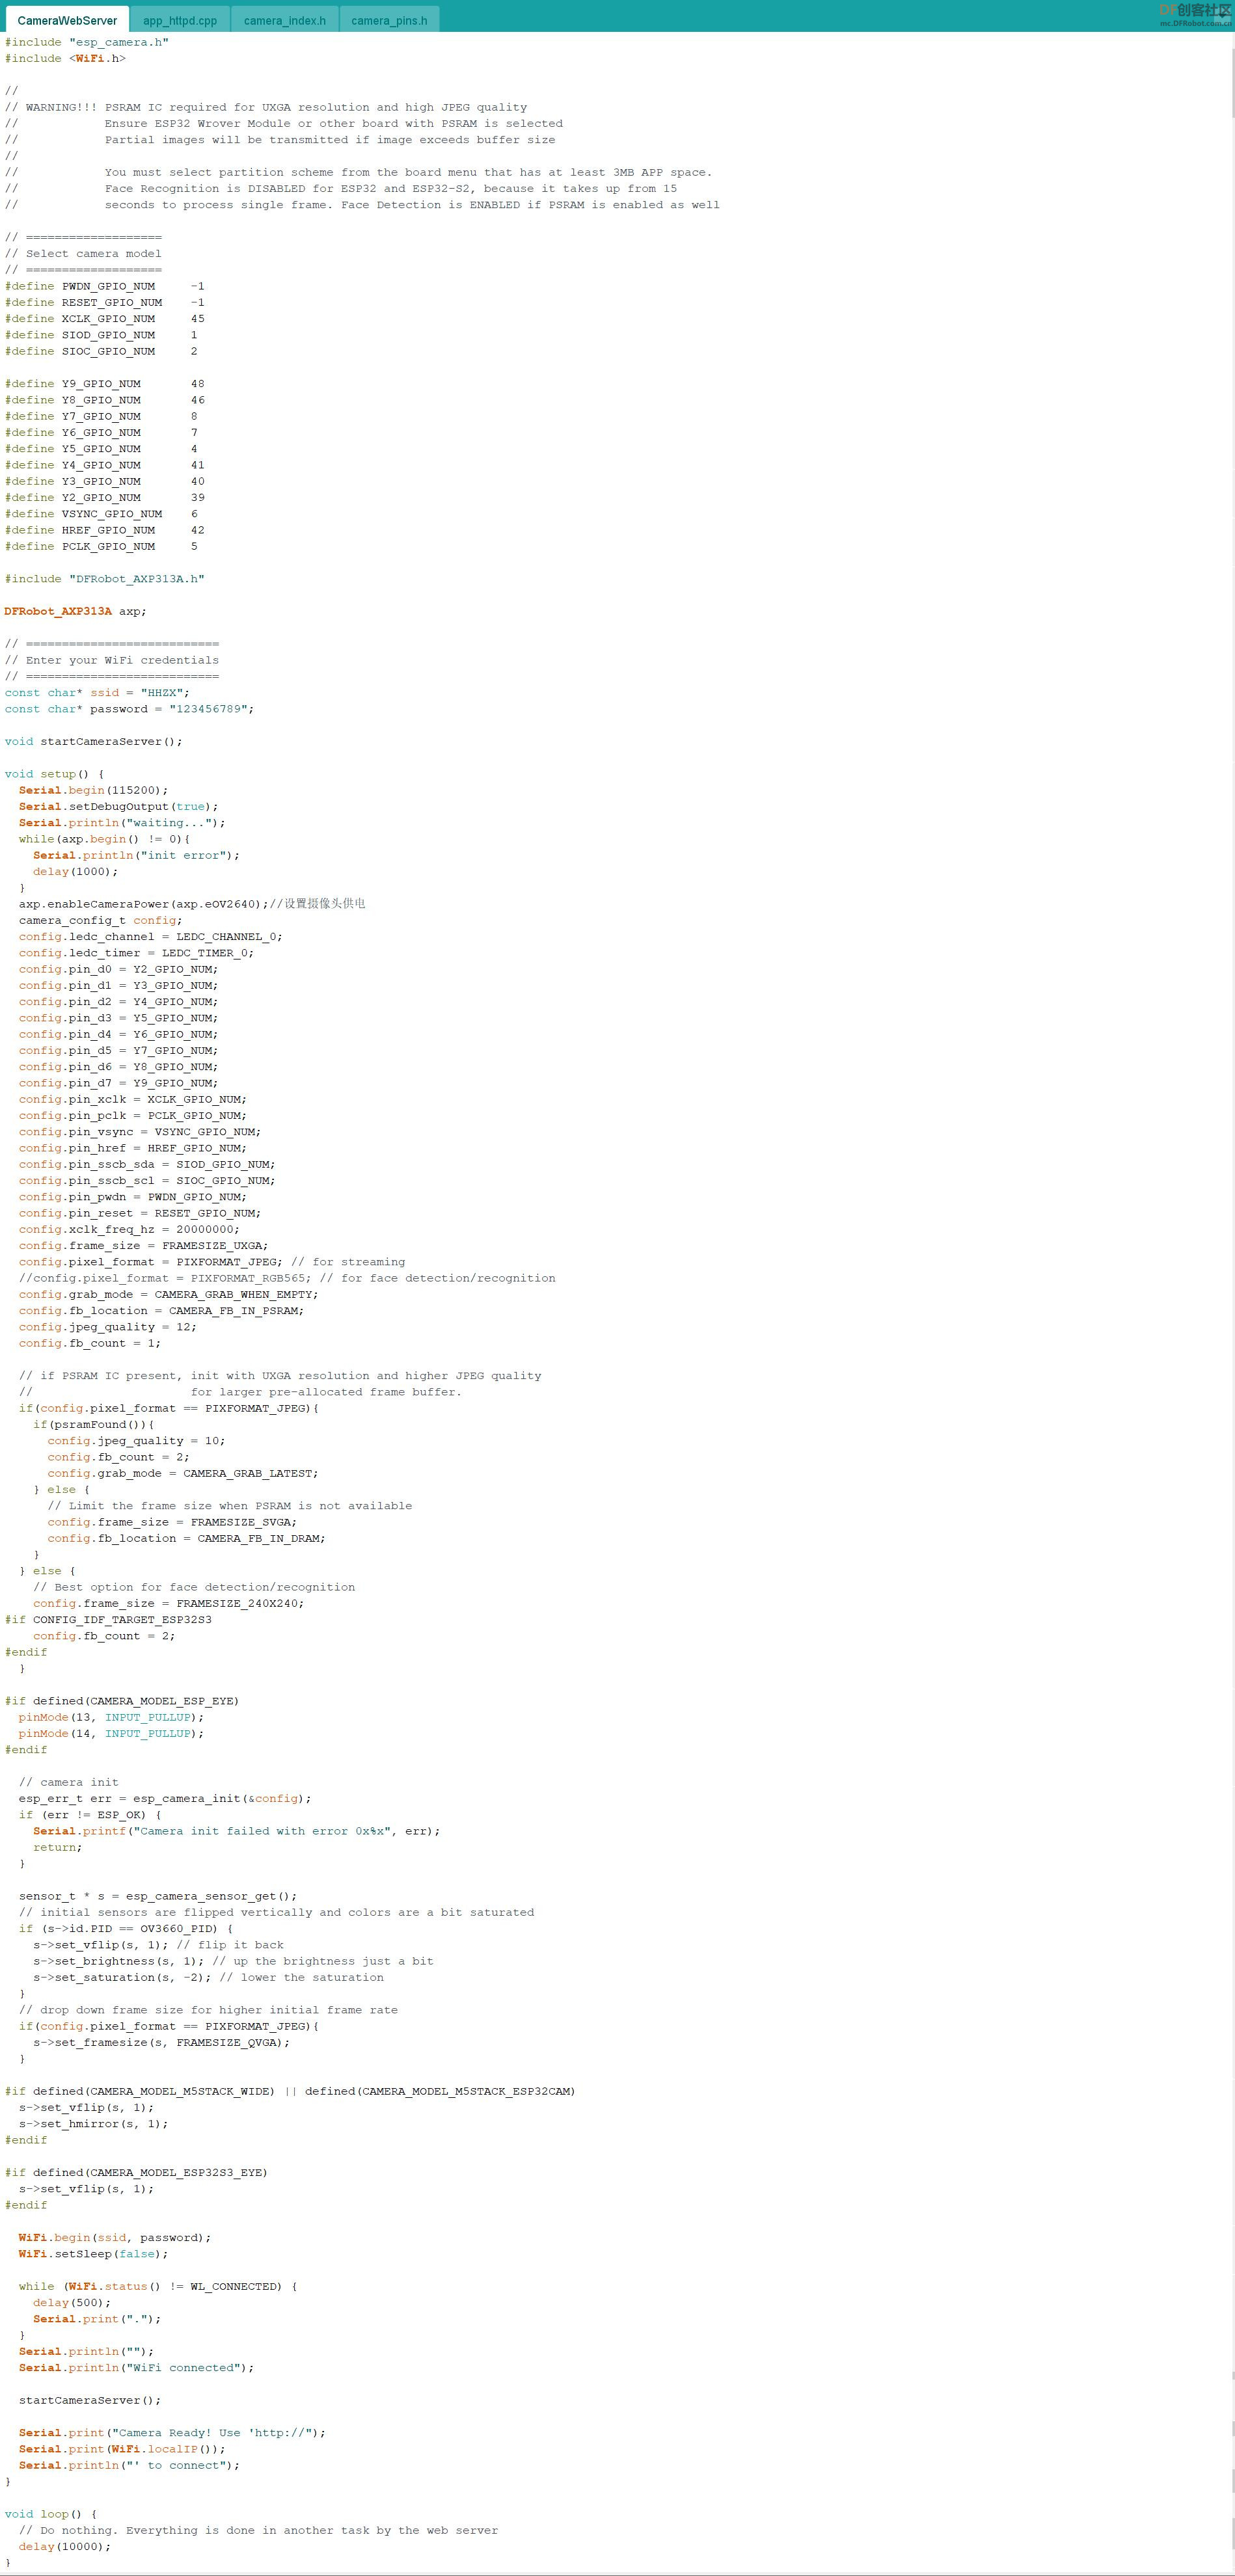
代码如下:(可复制)
- #include "esp_camera.h"
- #include <WiFi.h>
-
-
- // ===================
- // Select camera model
- // ===================
- #define PWDN_GPIO_NUM -1
- #define RESET_GPIO_NUM -1
- #define XCLK_GPIO_NUM 45
- #define SIOD_GPIO_NUM 1
- #define SIOC_GPIO_NUM 2
-
- #define Y9_GPIO_NUM 48
- #define Y8_GPIO_NUM 46
- #define Y7_GPIO_NUM 8
- #define Y6_GPIO_NUM 7
- #define Y5_GPIO_NUM 4
- #define Y4_GPIO_NUM 41
- #define Y3_GPIO_NUM 40
- #define Y2_GPIO_NUM 39
- #define VSYNC_GPIO_NUM 6
- #define HREF_GPIO_NUM 42
- #define PCLK_GPIO_NUM 5
-
- #include "DFRobot_AXP313A.h"
-
- DFRobot_AXP313A axp;
-
- // ===========================
- // Enter your WiFi credentials
- // ===========================
- const char* ssid = "HHZX";
- const char* password = "123456789";
-
- void startCameraServer();
-
- void setup() {
- Serial.begin(115200);
- Serial.setDebugOutput(true);
- Serial.println("waiting...");
- while(axp.begin() != 0){
- Serial.println("init error");
- delay(1000);
- }
- axp.enableCameraPower(axp.eOV2640);//设置摄像头供电
- camera_config_t config;
- config.ledc_channel = LEDC_CHANNEL_0;
- config.ledc_timer = LEDC_TIMER_0;
- config.pin_d0 = Y2_GPIO_NUM;
- config.pin_d1 = Y3_GPIO_NUM;
- config.pin_d2 = Y4_GPIO_NUM;
- config.pin_d3 = Y5_GPIO_NUM;
- config.pin_d4 = Y6_GPIO_NUM;
- config.pin_d5 = Y7_GPIO_NUM;
- config.pin_d6 = Y8_GPIO_NUM;
- config.pin_d7 = Y9_GPIO_NUM;
- config.pin_xclk = XCLK_GPIO_NUM;
- config.pin_pclk = PCLK_GPIO_NUM;
- config.pin_vsync = VSYNC_GPIO_NUM;
- config.pin_href = HREF_GPIO_NUM;
- config.pin_sscb_sda = SIOD_GPIO_NUM;
- config.pin_sscb_scl = SIOC_GPIO_NUM;
- config.pin_pwdn = PWDN_GPIO_NUM;
- config.pin_reset = RESET_GPIO_NUM;
- config.xclk_freq_hz = 20000000;
- config.frame_size = FRAMESIZE_UXGA;
- config.pixel_format = PIXFORMAT_JPEG; // for streaming
- //config.pixel_format = PIXFORMAT_RGB565; // for face detection/recognition
- config.grab_mode = CAMERA_GRAB_WHEN_EMPTY;
- config.fb_location = CAMERA_FB_IN_PSRAM;
- config.jpeg_quality = 12;
- config.fb_count = 1;
-
- // if PSRAM IC present, init with UXGA resolution and higher JPEG quality
- // for larger pre-allocated frame buffer.
- if(config.pixel_format == PIXFORMAT_JPEG){
- if(psramFound()){
- config.jpeg_quality = 10;
- config.fb_count = 2;
- config.grab_mode = CAMERA_GRAB_LATEST;
- } else {
- // Limit the frame size when PSRAM is not available
- config.frame_size = FRAMESIZE_SVGA;
- config.fb_location = CAMERA_FB_IN_DRAM;
- }
- } else {
- // Best option for face detection/recognition
- config.frame_size = FRAMESIZE_240X240;
- #if CONFIG_IDF_TARGET_ESP32S3
- config.fb_count = 2;
- #endif
- }
-
- #if defined(CAMERA_MODEL_ESP_EYE)
- pinMode(13, INPUT_PULLUP);
- pinMode(14, INPUT_PULLUP);
- #endif
-
- // camera init
- esp_err_t err = esp_camera_init(&config);
- if (err != ESP_OK) {
- Serial.printf("Camera init failed with error 0x%x", err);
- return;
- }
-
- sensor_t * s = esp_camera_sensor_get();
- // initial sensors are flipped vertically and colors are a bit saturated
- if (s->id.PID == OV3660_PID) {
- s->set_vflip(s, 1); // flip it back
- s->set_brightness(s, 1); // up the brightness just a bit
- s->set_saturation(s, -2); // lower the saturation
- }
- // drop down frame size for higher initial frame rate
- if(config.pixel_format == PIXFORMAT_JPEG){
- s->set_framesize(s, FRAMESIZE_QVGA);
- }
-
- #if defined(CAMERA_MODEL_M5STACK_WIDE) || defined(CAMERA_MODEL_M5STACK_ESP32CAM)
- s->set_vflip(s, 1);
- s->set_hmirror(s, 1);
- #endif
-
- #if defined(CAMERA_MODEL_ESP32S3_EYE)
- s->set_vflip(s, 1);
- #endif
-
- WiFi.begin(ssid, password);
- WiFi.setSleep(false);
-
- while (WiFi.status() != WL_CONNECTED) {
- delay(500);
- Serial.print(".");
- }
- Serial.println("");
- Serial.println("WiFi connected");
-
- startCameraServer();
-
- Serial.print("Camera Ready! Use 'http://");
- Serial.print(WiFi.localIP());
- Serial.println("' to connect");
- }
-
- void loop() {
- // Do nothing. Everything is done in another task by the web server
- delay(10000);
- }
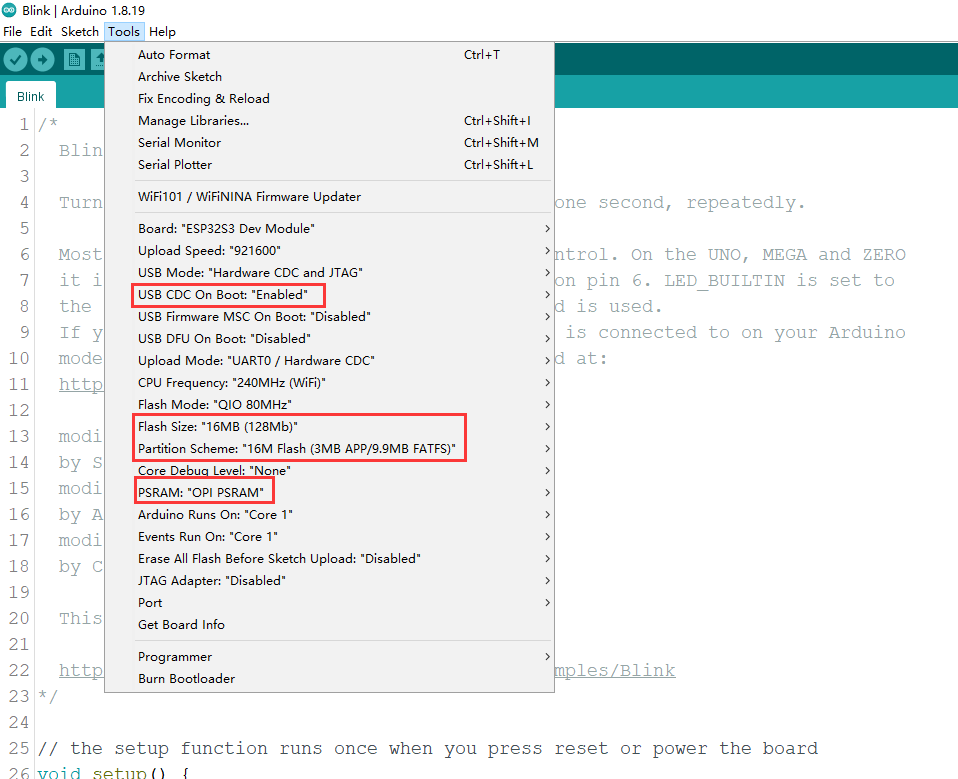
3、程序调试 踩坑ONE.....在上传程序时,打开串口监视器,没有内容。有可能是没有配置如下设置(当您选择 Disabled 时,串口为RX(44)、TX(43),如果您需要通过USB在Arduino监视器上打印,您需要选择Enable)
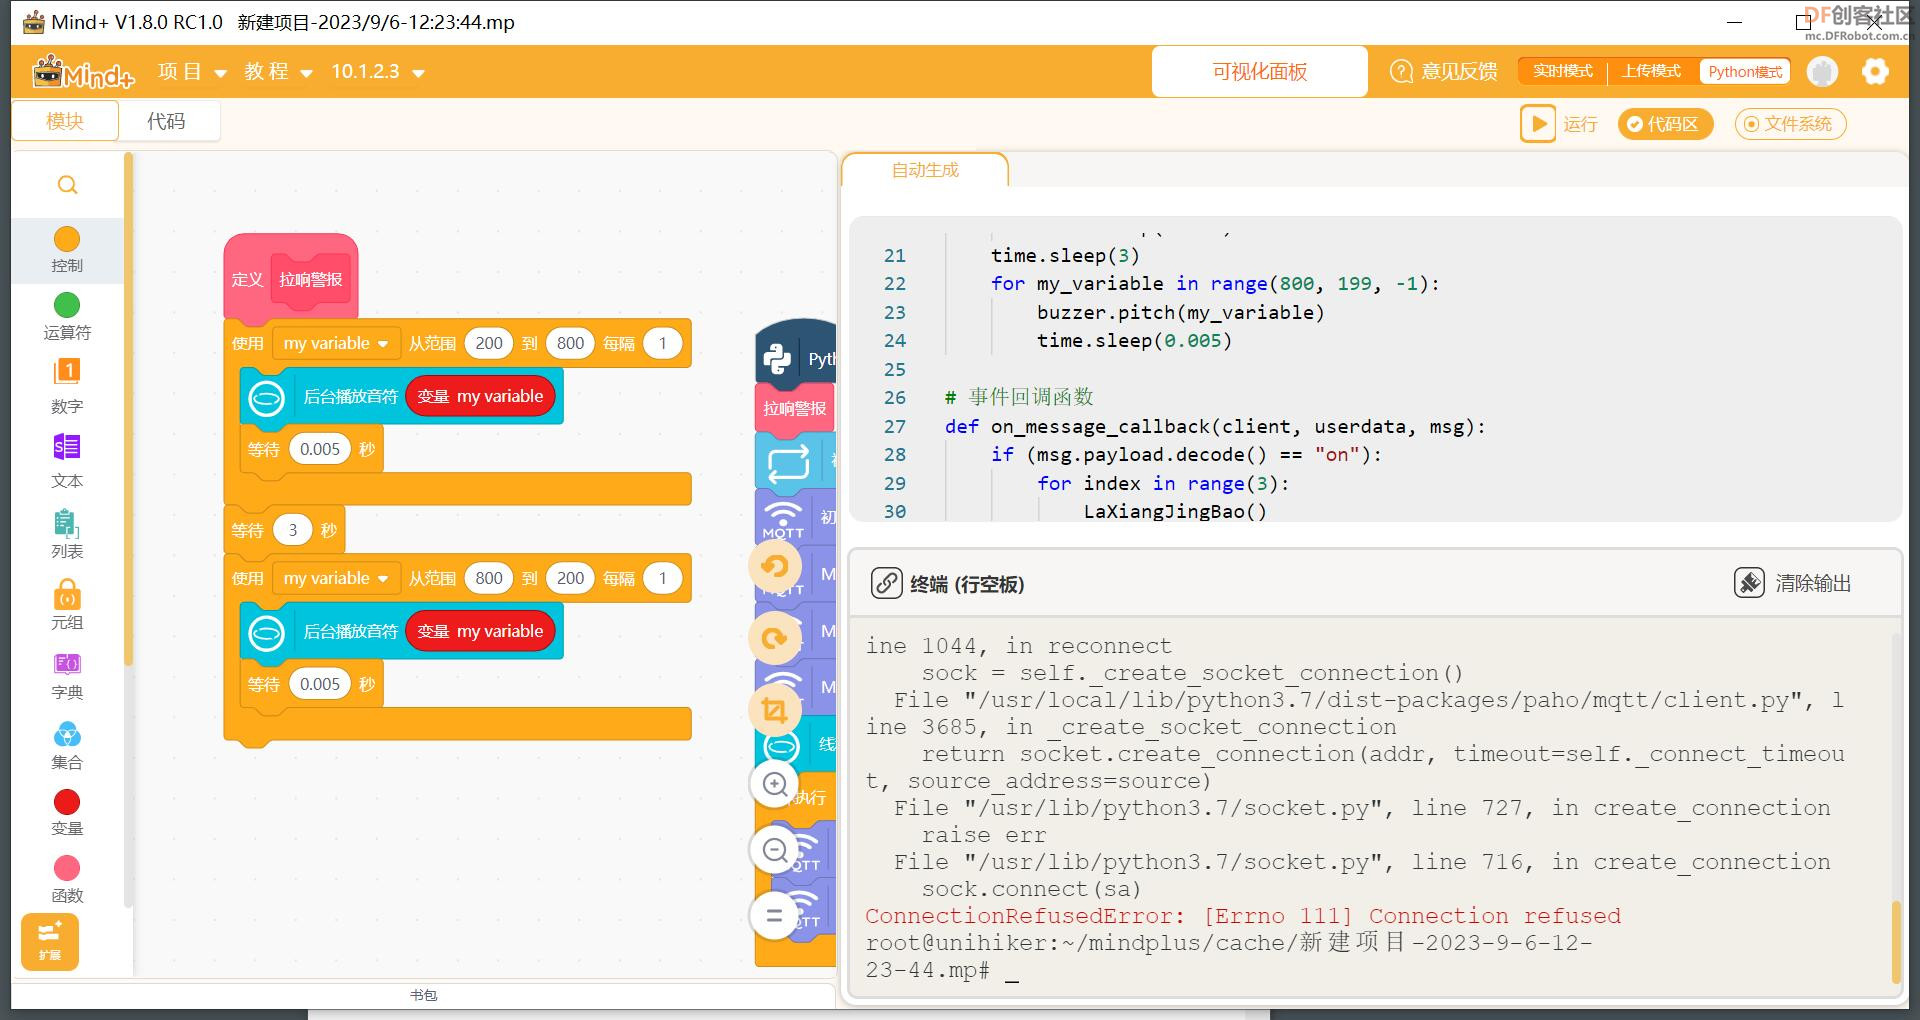
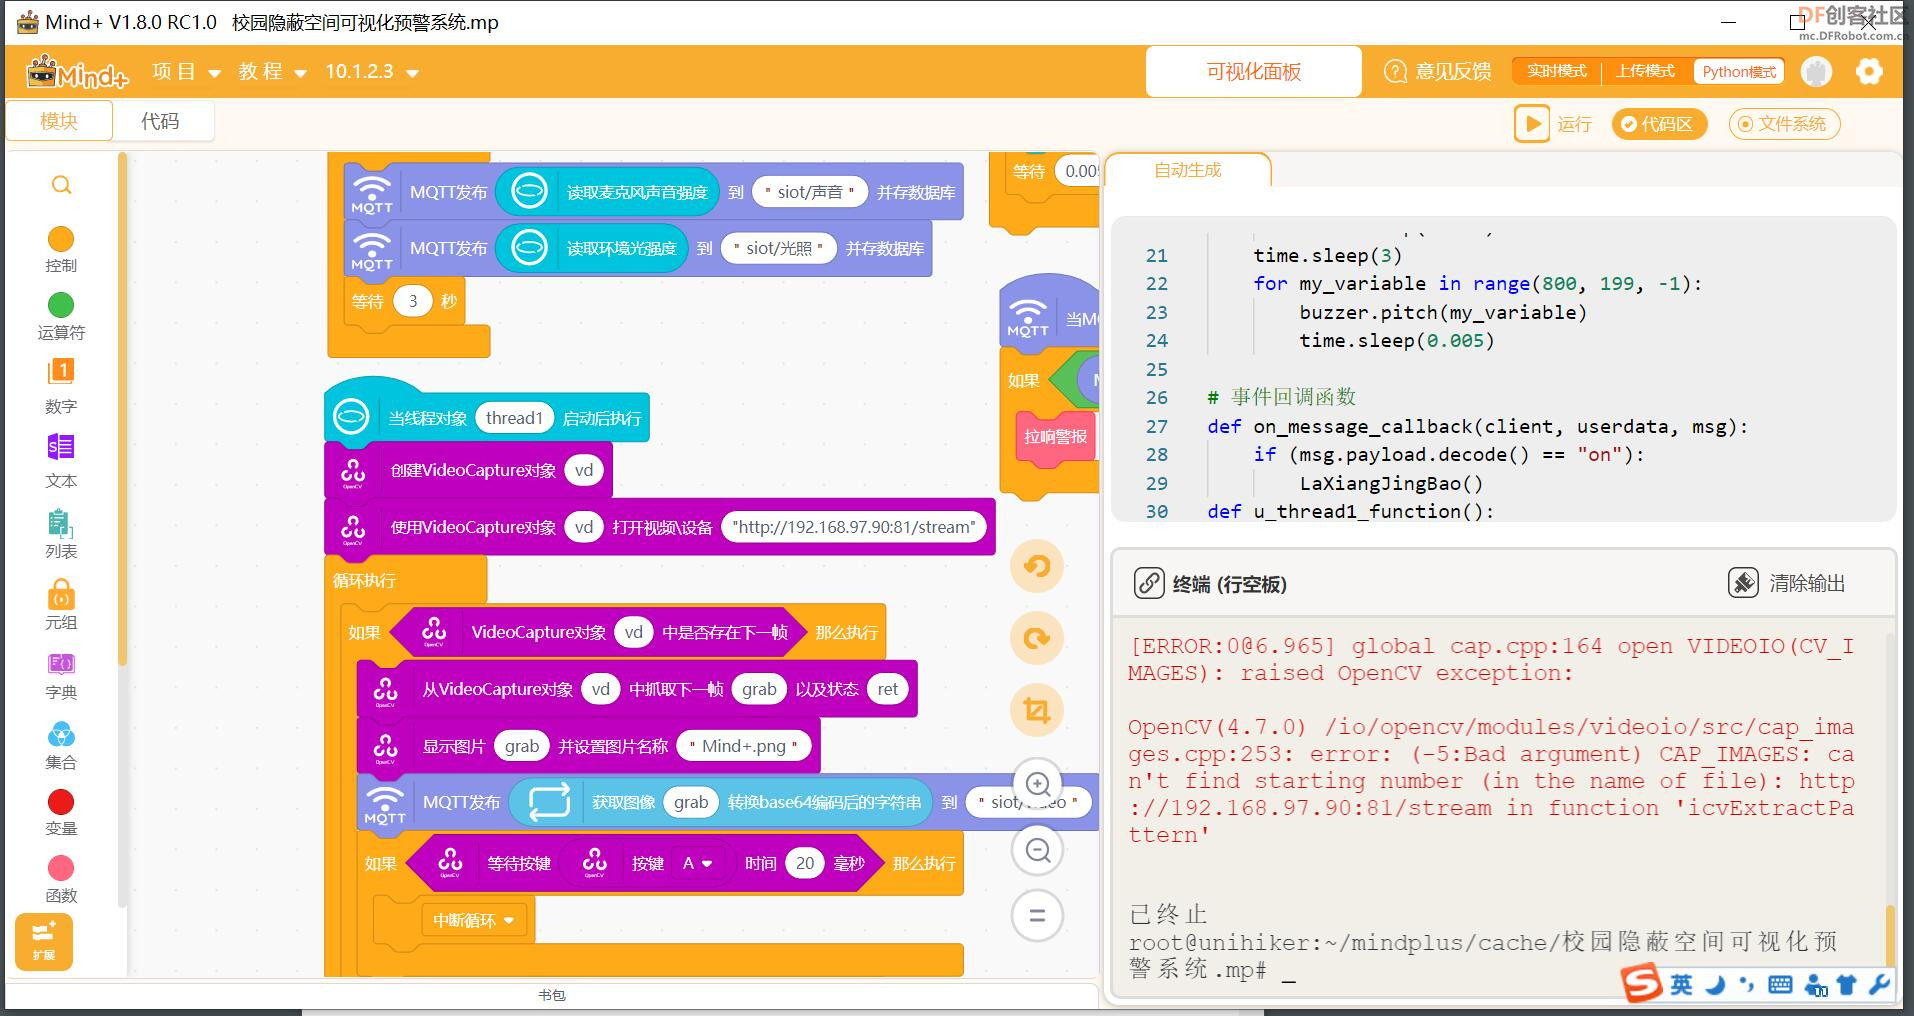
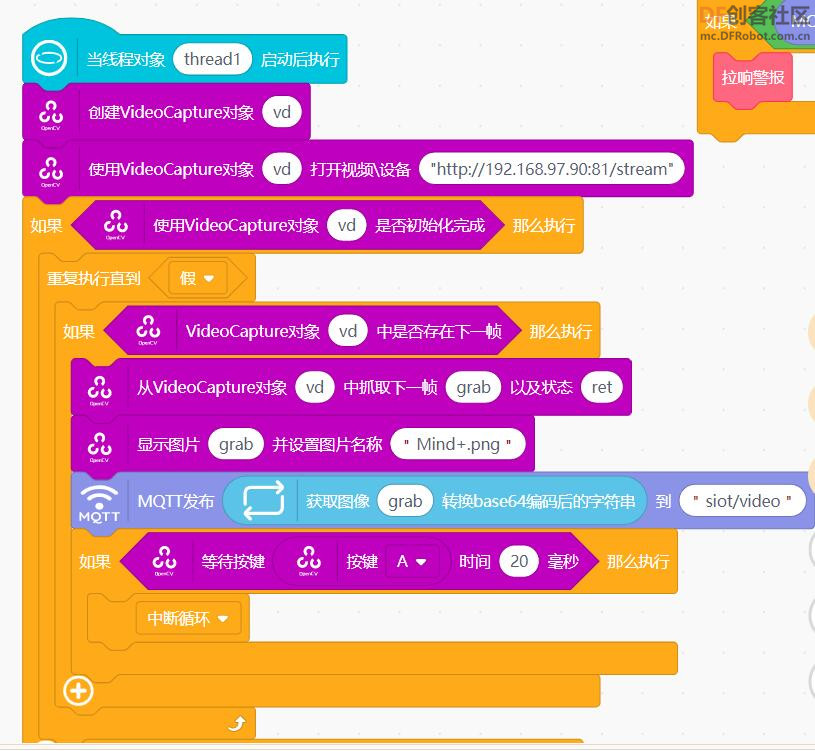
踩坑TWO......将程序上传到行空板出现如下提示: 这种情况都是编写代码不当造成的,将openCV模块的代码改写如下,程序运行正常。 今天你走过了人生所有的弯路,从此人生尽是坦途。
图传完成后调试行空板,一切顺利的话,可以使用了。 4、外观设计 使用订书钉的盒子,将板子粘贴到盒子内部,天线固定盒外,摄像头固定在盒子上,看起来很简单的样子。 四、效果展示 本例是使用行空板连接FireBeetle 2 ESP32-S3图传的视频数据,并显示到行空板和数据大屏上。 下图可以看到行空板上出现摄像头拍摄画面。
siot服务器还采集了光照强度和声音强度的数据,这些数据都会可视化的方式显示在大屏中。 如下所示是可视化大屏拍摄到画面和显示当前声音强度和光照强度的截图。
在教室办公的老师发现大屏中出现异常情况,如有小青年在这里打情骂俏,或者出现打架的行为,可以点击响铃按钮,出现防空警报的铃声,这样可以让学生受到惊吓,而不敢在触犯校园规定。
五、附件
| 




 沪公网安备31011502402448