本项目使用两块micro:bit,一块用USB线与PC机相连(Mind+Python模式下用Pinpong控制),一块安装在小车上,两者通过无线功能通信。
【制作小车】
使用“MiniQ 桌面机器人底盘”,Microbit加扩展板,从小风扇上拆下的3.7V锂电池。制作一个小车。
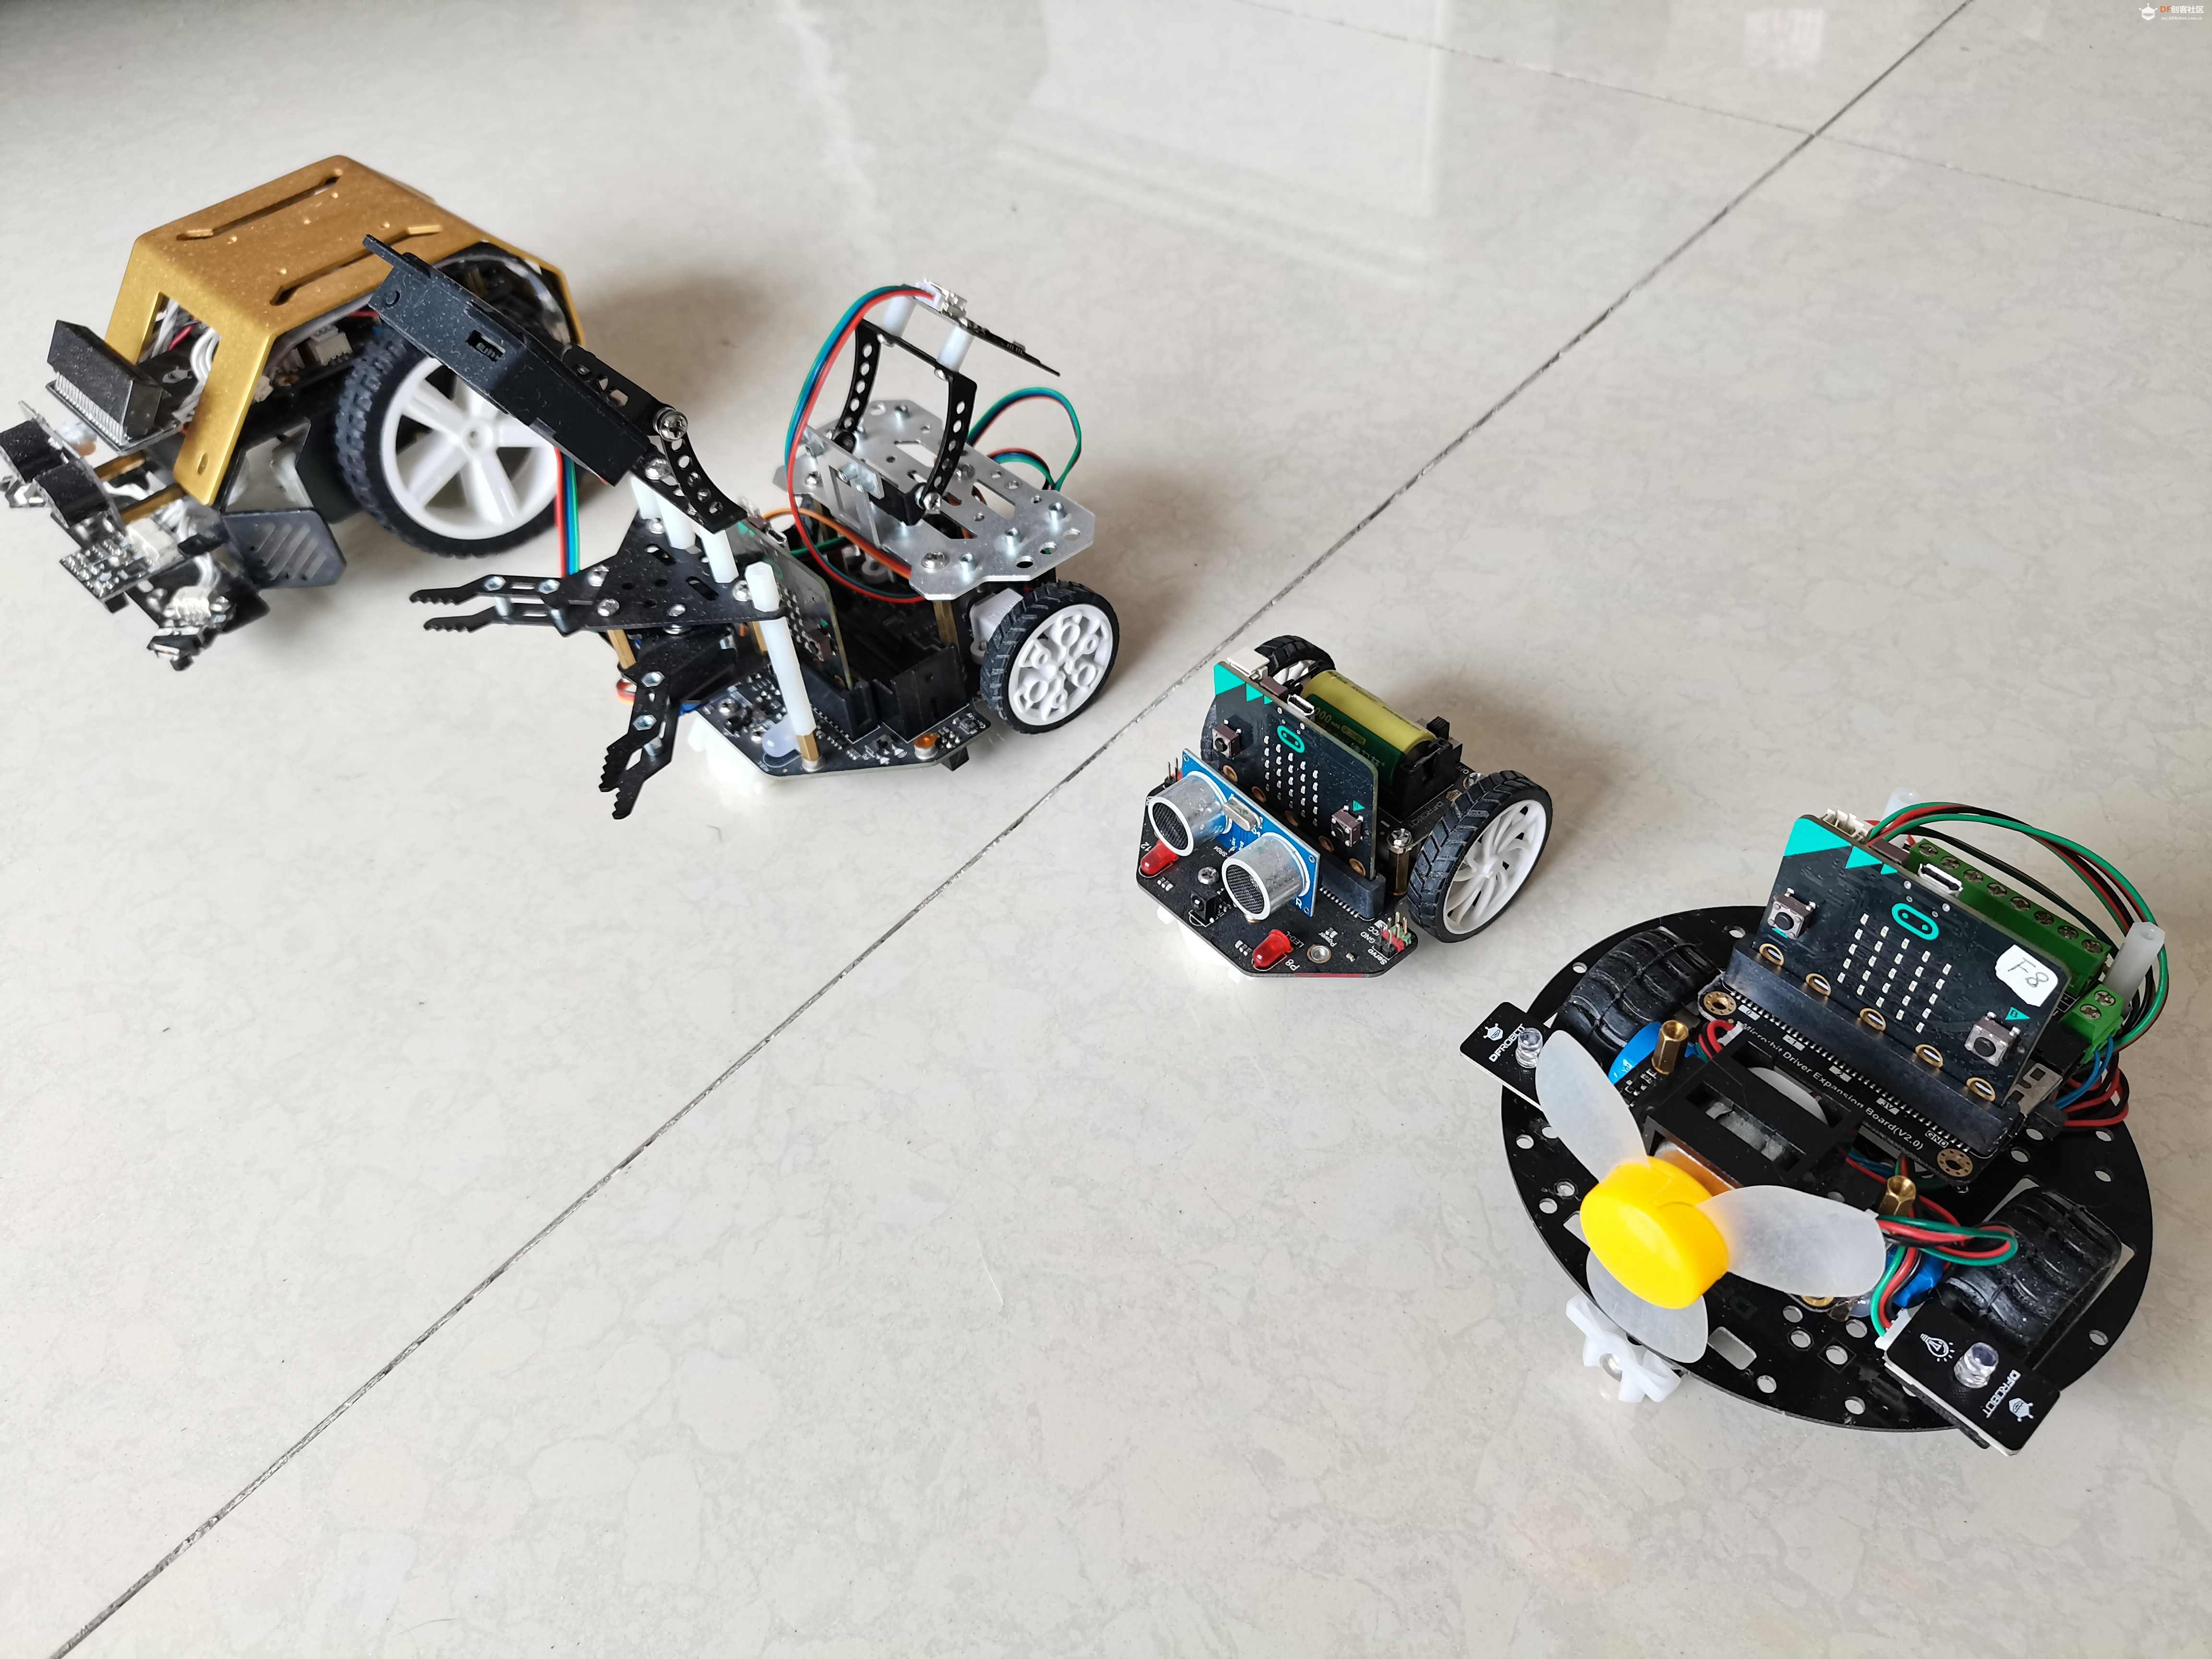
比较图
【特色硬件】
两个车灯,使用了“炫彩LED模块”
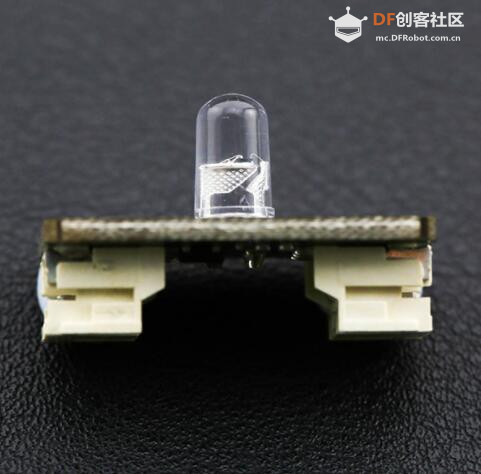
LED拥有七色炫光,无需编程,通电即可点亮。内置控制芯片,七种颜色随机闪烁,时快时慢,绚丽缤纷,五彩斑斓。并且模块支持级联控制,只需一个接口,即可控制所有LED,是打造环境,烘托气氛的理想佳品。简单而不失浪漫,低调而不失奢华。
【小车展示】
【Mind+Python程序】
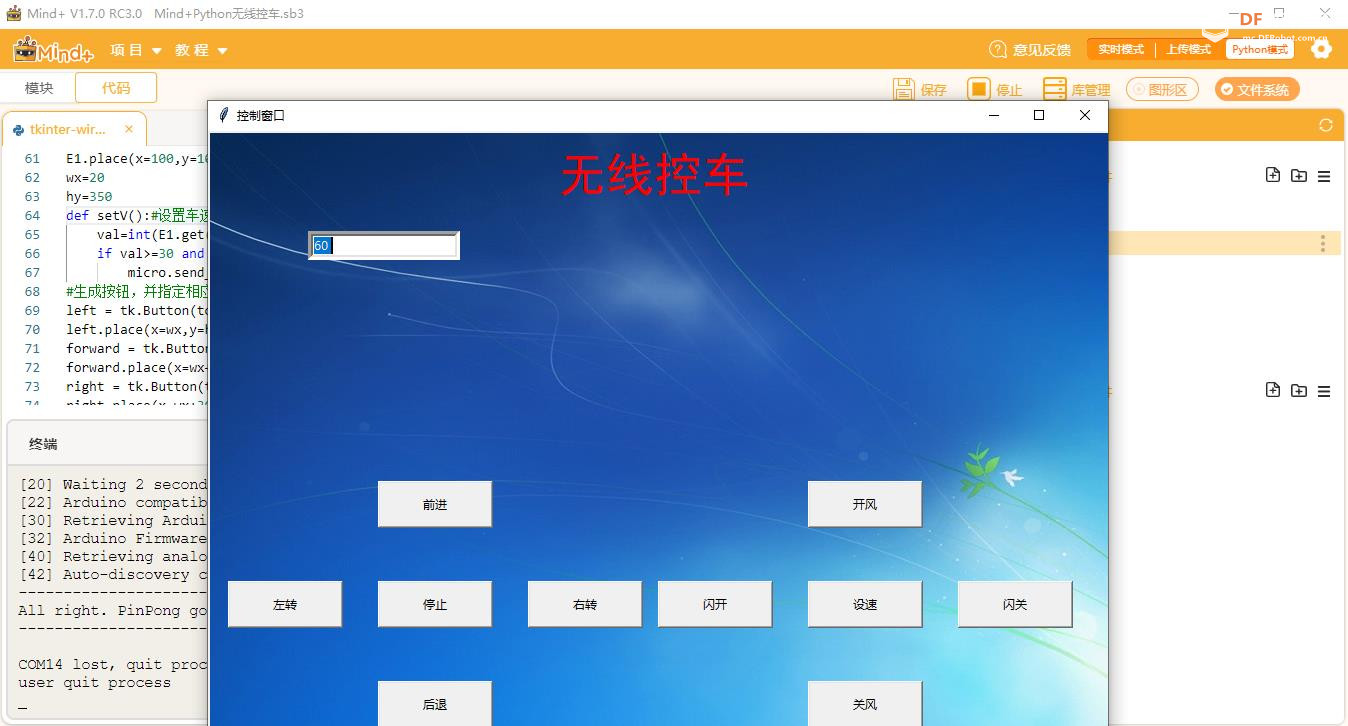
为求稳定,Mind+使用版本1.7.0RC3,Pinpong库使用版本0.3.5
-
-
- # -*- coding: UTF-8 -*-
-
- # MindPlus
- # Python
-
- import tkinter as tk
- from tkinter import *
- from PIL import Image, ImageTk#图像控件
- import time
- from pinpong.board import Board
- from pinpong.extension.microbit import MBWireless
-
- Board("microbit").begin()#初始化,选择板型和端口号,不输入端口号则进行自动识别
- micro = MBWireless()
- micro.set_wireless_channel(7) #设置无线频道为7
- micro.open_wireless() #打开无线通信
- # 事件回调函数
-
- #定义函数,向物联网发送相应控制指令
- def forward():#前进
- micro.send_wireless("A") #通过无线通信发送
- def back():#后退
- micro.send_wireless("B") #通过无线通信发送
- def left():#左转
- micro.send_wireless("C") #通过无线通信发送
- def right():#右转
- micro.send_wireless("D") #通过无线通信发送
- def stop():#停止
- micro.send_wireless("E") #通过无线通信发送
- def open_s():#风扇开
- micro.send_wireless("F") #通过无线通信发送
- def stop_s():#风扇关
- micro.send_wireless("G") #通过无线通信发送
- def light_open():#双闪开
- micro.send_wireless("H") #通过无线通信发送
- def light_close():#双闪关
- micro.send_wireless("I") #通过无线通信发送
-
- #生成窗体,布置相应文本框和按钮
- top = tk.Tk()
- top.title('控制窗口')
- top.geometry('900x600')
- image_width = 900
- image_height = 600
- canvas = Canvas(top,bg = 'white',width = image_width,height = image_height )#绘制画布
- canvas.pack()
-
-
-
- img = Image.open('bg.jpg')
- bg = ImageTk.PhotoImage(img)
- bgid = canvas.create_image(0, 0, image=bg, anchor='nw')
- canvas.place(x = 0,y = 0)
- #产生标签文本背景透明效果
- txtid=canvas.create_text(350,20, fill = 'red',font=("黑体", 35),anchor="nw")
- canvas.insert(txtid,1,"无线控车")
-
- E1 = Entry(top, bd =5)
- E1.pack(side = RIGHT)
- E1.place(x=100,y=100)
- wx=20
- hy=350
- def setV():#设置车速
- val=int(E1.get())
- if val>=30 and val<=200:
- micro.send_wireless(E1.get()) #通过无线通信发送
- #生成按钮,并指定相应功能
- left = tk.Button(top,text='左转',height=2,width=15,command=left)
- left.place(x=wx,y=hy+100)
- forward = tk.Button(top,text='前进',height=2,width=15,command=forward)
- forward.place(x=wx+150,y=hy)
- right = tk.Button(top,text='右转',height=2,width=15,command=right)
- right.place(x=wx+300,y=hy+100)
- back = tk.Button(top,text='后退',height=2,width=15,command=back)
- back.place(x=wx+150,y=hy+200)
- stop = tk.Button(top,text='停止',height=2,width=15,command=stop)
- stop.place(x=wx+150,y=hy+100)
-
- wx=450
- hy=350
- open_s = tk.Button(top,text='开风',height=2,width=15,command=open_s)
- open_s.place(x=wx+150,y=hy)
- stop_s = tk.Button(top,text='关风',height=2,width=15,command=stop_s)
- stop_s.place(x=wx+150,y=hy+200)
- light_open = tk.Button(top,text='闪开',height=2,width=15,command=light_open)
- light_open.place(x=wx,y=hy+100)
- light_close = tk.Button(top,text='闪关',height=2,width=15,command=light_close)
- light_close.place(x=wx+300,y=hy+100)
- setV = tk.Button(top,text='设速',height=2,width=15,command=setV)
- setV.place(x=wx+150,y=hy+100)
-
-
-
-
- while True:
-
- top.update()
- top.after(100)
-
-
- top.mainloop()
-
【小车代码】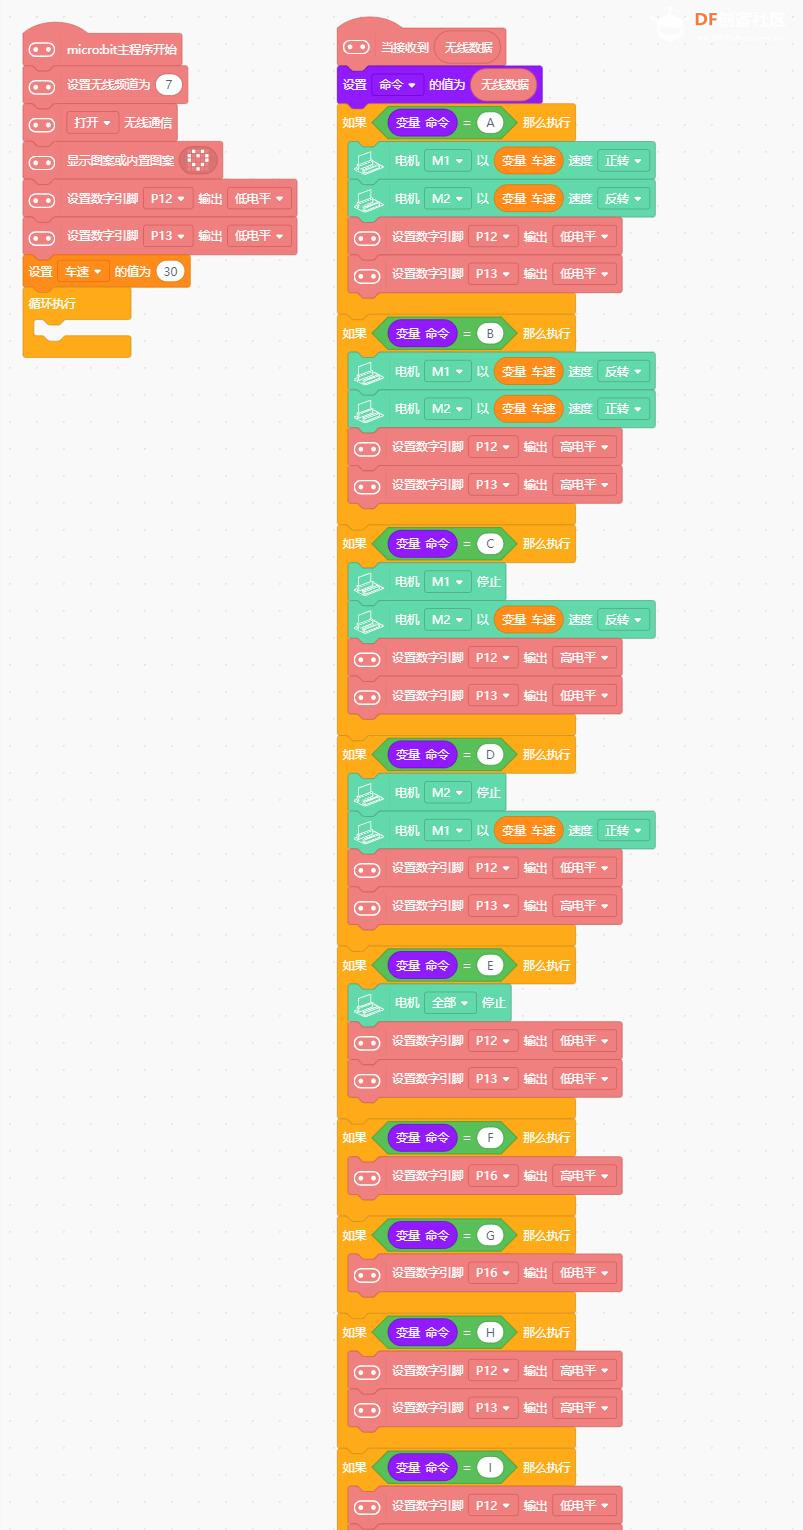
Arduino C代码(同上)
-
- /*!
- * MindPlus
- * microbit
- *
- */
- #include <Microbit_Motor.h>
- #include <Microbit_Matrix.h>
- #include <DFMicrobit_Radio.h>
-
- // 动态变量
- String mind_s_MingLing;
- volatile float mind_n_CheSu;
- // 函数声明
- void onRadioReceive(String radio_message);
- // 静态常量
- const uint8_t bbcBitmap[][5] = {
- {B01010,B10101,B10001,B01010,B00100}
- };
- // 创建对象
- Microbit_Motor motorbit;
-
-
- // 主程序开始
- void setup() {
- Radio.setCallback(onRadioReceive);
- Radio.setGroup(7);
- Radio.turnOn();
- MMatrix.show(bbcBitmap[0]);
- digitalWrite(12, LOW);
- digitalWrite(13, LOW);
- mind_n_CheSu = 30;
- }
- void loop() {
-
- }
-
- // 事件回调函数
- void onRadioReceive(String radio_message) {
- mind_s_MingLing = radio_message;
- if ((mind_s_MingLing==String("A"))) {
- motorbit.motorRun(M1, CW, mind_n_CheSu);
- motorbit.motorRun(M2, CCW, mind_n_CheSu);
- digitalWrite(12, LOW);
- digitalWrite(13, LOW);
- }
- if ((mind_s_MingLing==String("B"))) {
- motorbit.motorRun(M1, CCW, mind_n_CheSu);
- motorbit.motorRun(M2, CW, mind_n_CheSu);
- digitalWrite(12, HIGH);
- digitalWrite(13, HIGH);
- }
- if ((mind_s_MingLing==String("C"))) {
- motorbit.motorStop(M1);
- motorbit.motorRun(M2, CCW, mind_n_CheSu);
- digitalWrite(12, HIGH);
- digitalWrite(13, LOW);
- }
- if ((mind_s_MingLing==String("D"))) {
- motorbit.motorStop(M2);
- motorbit.motorRun(M1, CW, mind_n_CheSu);
- digitalWrite(12, LOW);
- digitalWrite(13, HIGH);
- }
- if ((mind_s_MingLing==String("E"))) {
- motorbit.motorStop(ALL);
- digitalWrite(12, LOW);
- digitalWrite(13, LOW);
- }
- if ((mind_s_MingLing==String("F"))) {
- digitalWrite(16, HIGH);
- }
- if ((mind_s_MingLing==String("G"))) {
- digitalWrite(16, LOW);
- }
- if ((mind_s_MingLing==String("H"))) {
- digitalWrite(12, HIGH);
- digitalWrite(13, HIGH);
- }
- if ((mind_s_MingLing==String("I"))) {
- digitalWrite(12, LOW);
- digitalWrite(13, LOW);
- }
- if (((String(mind_s_MingLing).length())>1)) {
- mind_n_CheSu = (String(mind_s_MingLing).toInt());
- MMatrix.print(mind_s_MingLing);
- }
- }
-
【演示视频】
前进不走直线,问题原因:1、速度快2、两轮驱动
|


 沪公网安备31011502402448
 置顶卡
置顶卡 变色卡
变色卡 千斤顶
千斤顶

 活跃会员
活跃会员
 宣传大使
宣传大使
 牛X认证
牛X认证
 创客造
创客造
 编辑选择奖
编辑选择奖
 志“童”道合
 编辑选择奖
编辑选择奖
 编辑选择奖
编辑选择奖
 编辑选择奖
编辑选择奖
 编辑选择奖
编辑选择奖


