【项目背景】
坐在电脑前,时间长了,眼睛不免有些看不清,就愿意往前凑,越来越近。有网友在电脑前使用超声波检测人与屏幕的距离,这可能会受到肢体的干扰。而电脑一般都配有摄像头,这个设备我们可以利用起来。
【项目设计】
在Mind+Python模式下,通过mediapipe库检测人脸,提取在摄像头的宽度值,以此判断与屏幕的距离。通过Pinpong库控制Arduino,用LED灯提醒。并pynput库,模拟键盘和鼠标操作,“Ctrl+鼠标滚轮”放大和缩小网面上的文字。
【技术亮点】
使用Python中列表的“队列”功能。
队列,其实就是一个先进先出的线性表,只能在队首执行删除操作,在队尾执行插入操作。用列表表示队列,可以用append()方法实现在队尾插入元素,用pop(0)方法实现在队首删除元素。
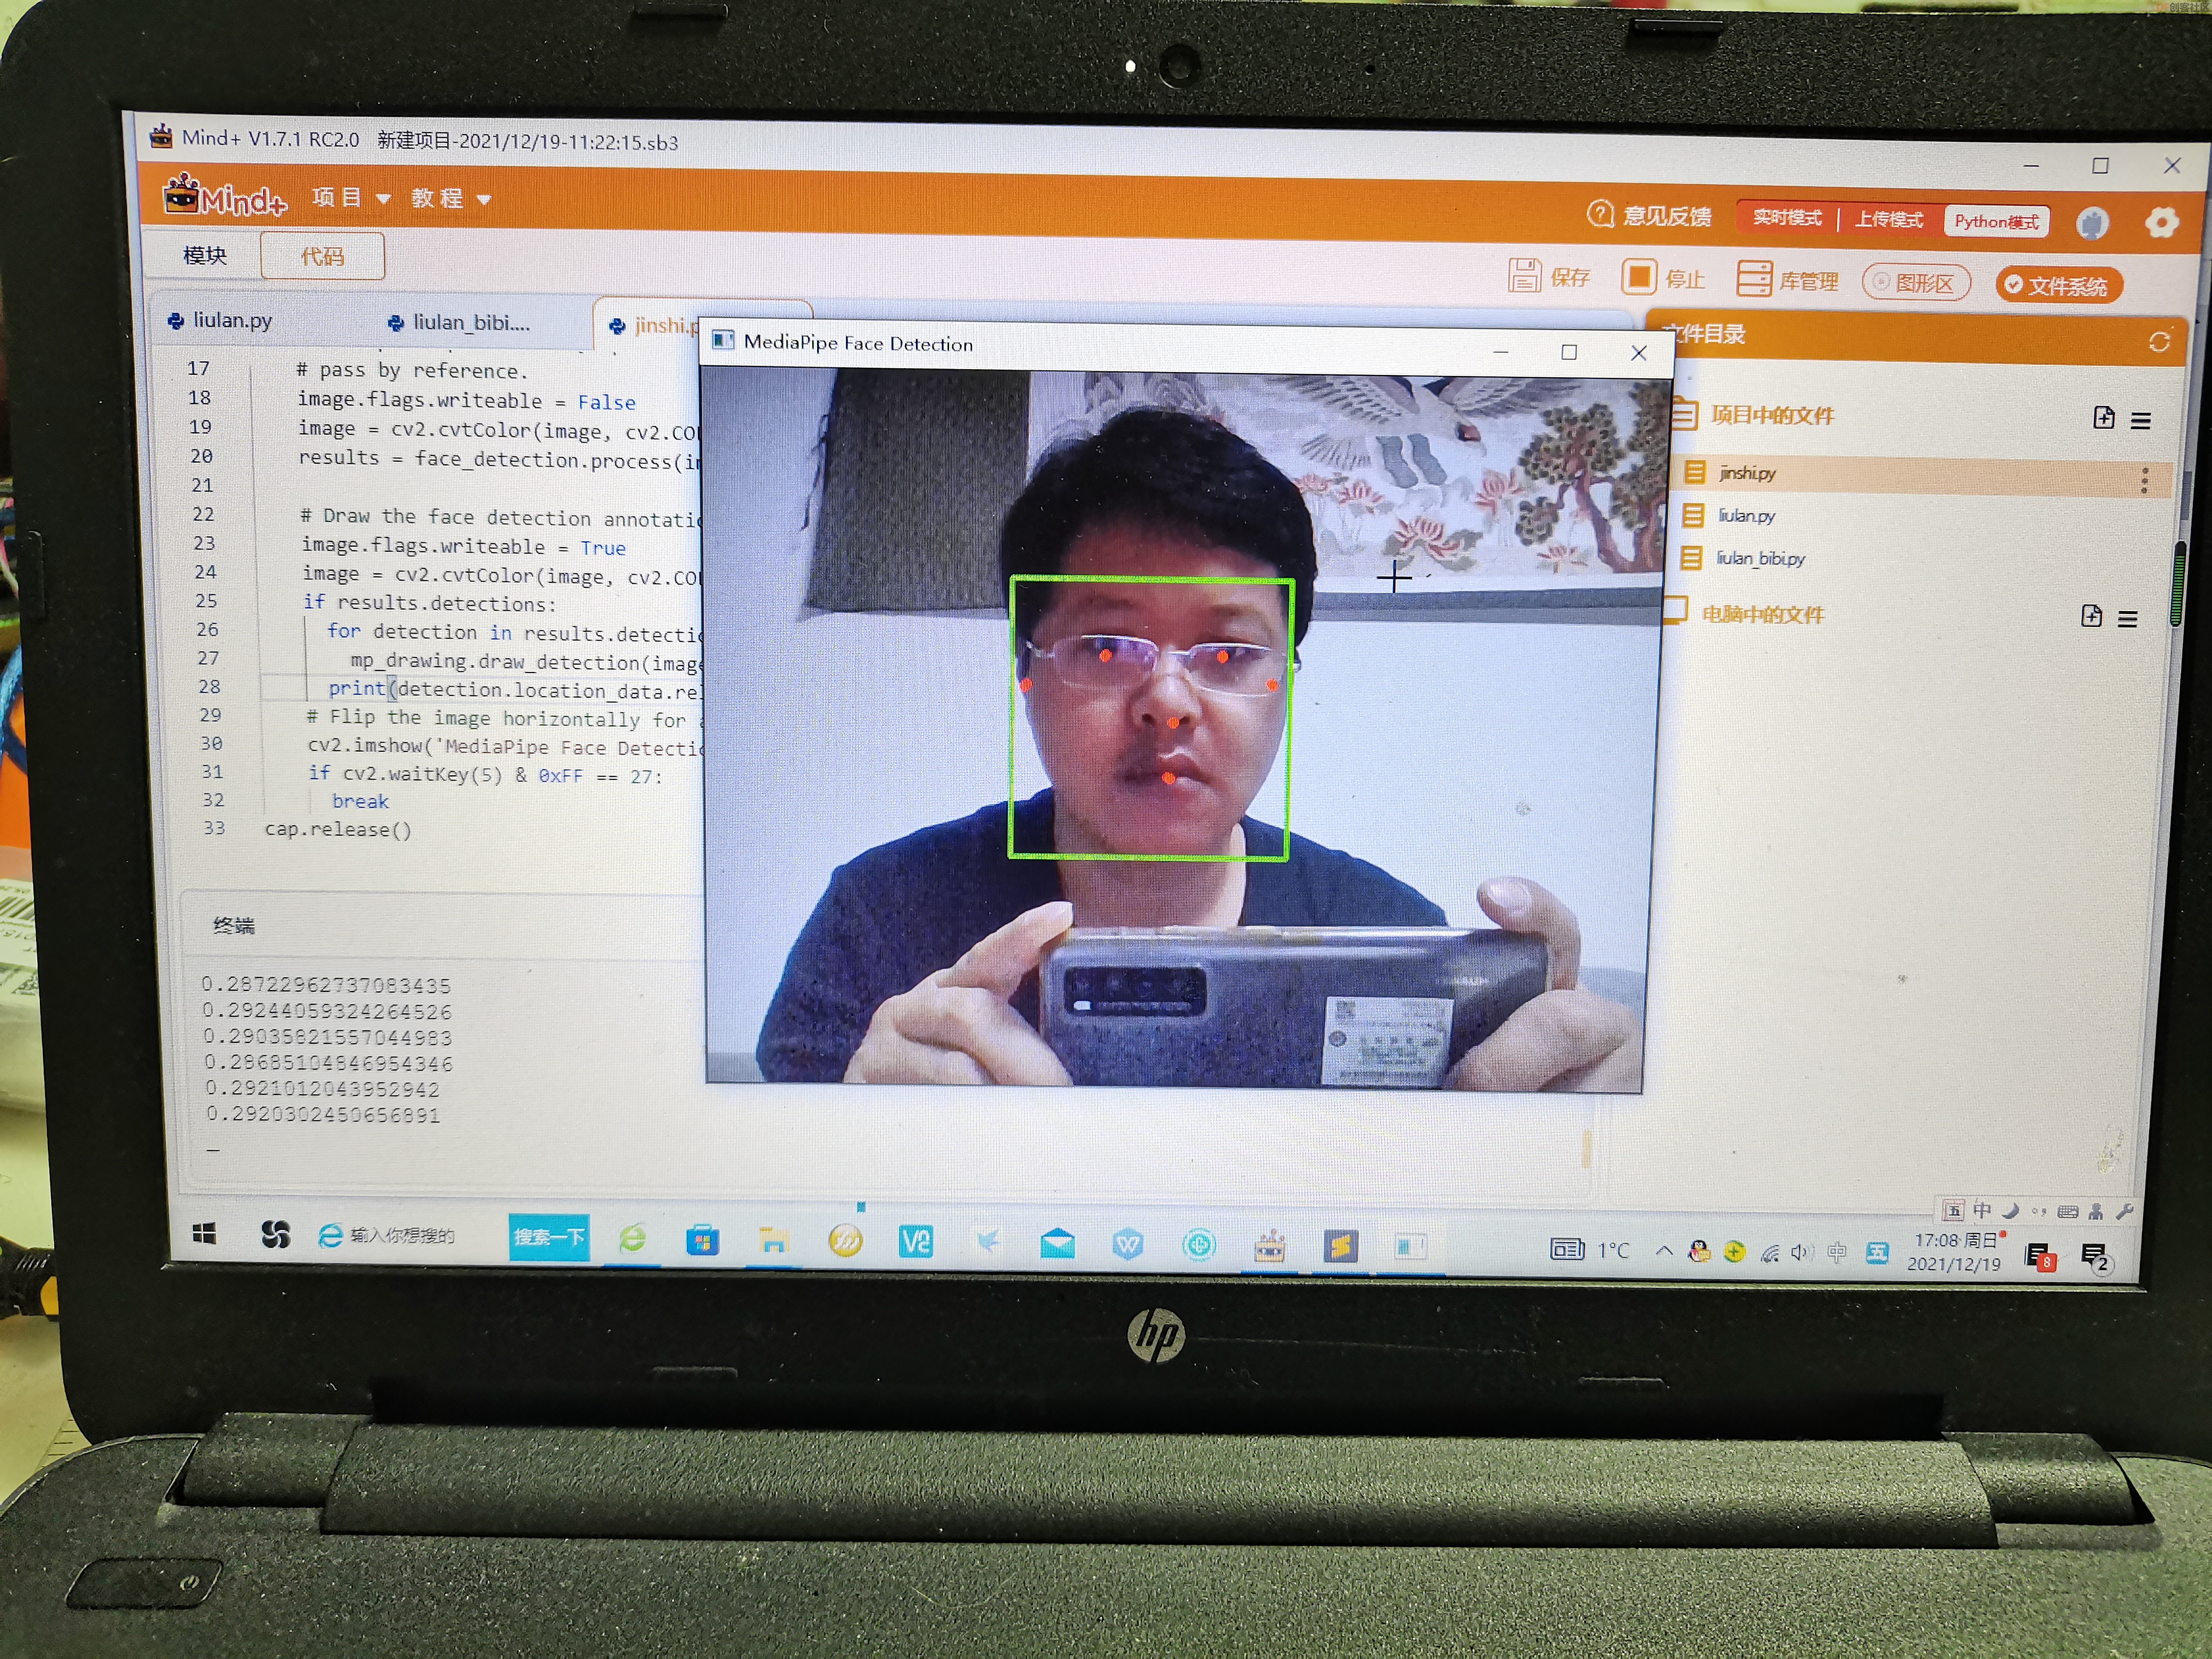
【人脸检测】通过mediapipe库,进行人脸检测,并找到人脸的宽:detection.location_data.relative_bounding_box.width
-
-
- import cv2
- import mediapipe as mp
- mp_face_detection = mp.solutions.face_detection
- mp_drawing = mp.solutions.drawing_utils
-
- # For webcam input:
- cap = cv2.VideoCapture(0)
- with mp_face_detection.FaceDetection(min_detection_confidence=0.5) as face_detection:
- while cap.isOpened():
- success, image = cap.read()
- if not success:
- print("Ignoring empty camera frame.")
- # If loading a video, use 'break' instead of 'continue'.
- continue
-
- # To improve performance, optionally mark the image as not writeable to
- # pass by reference.
- image.flags.writeable = False
- image = cv2.cvtColor(image, cv2.COLOR_BGR2RGB)
- results = face_detection.process(image)
-
- # Draw the face detection annotations on the image.
- image.flags.writeable = True
- image = cv2.cvtColor(image, cv2.COLOR_RGB2BGR)
- if results.detections:
- for detection in results.detections:
- mp_drawing.draw_detection(image, detection)
- print(detection.location_data.relative_bounding_box.width)
- # Flip the image horizontally for a selfie-view display.
- cv2.imshow('MediaPipe Face Detection', cv2.flip(image, 1))
- if cv2.waitKey(5) & 0xFF == 27:
- break
- cap.release()
【亮灯提醒】
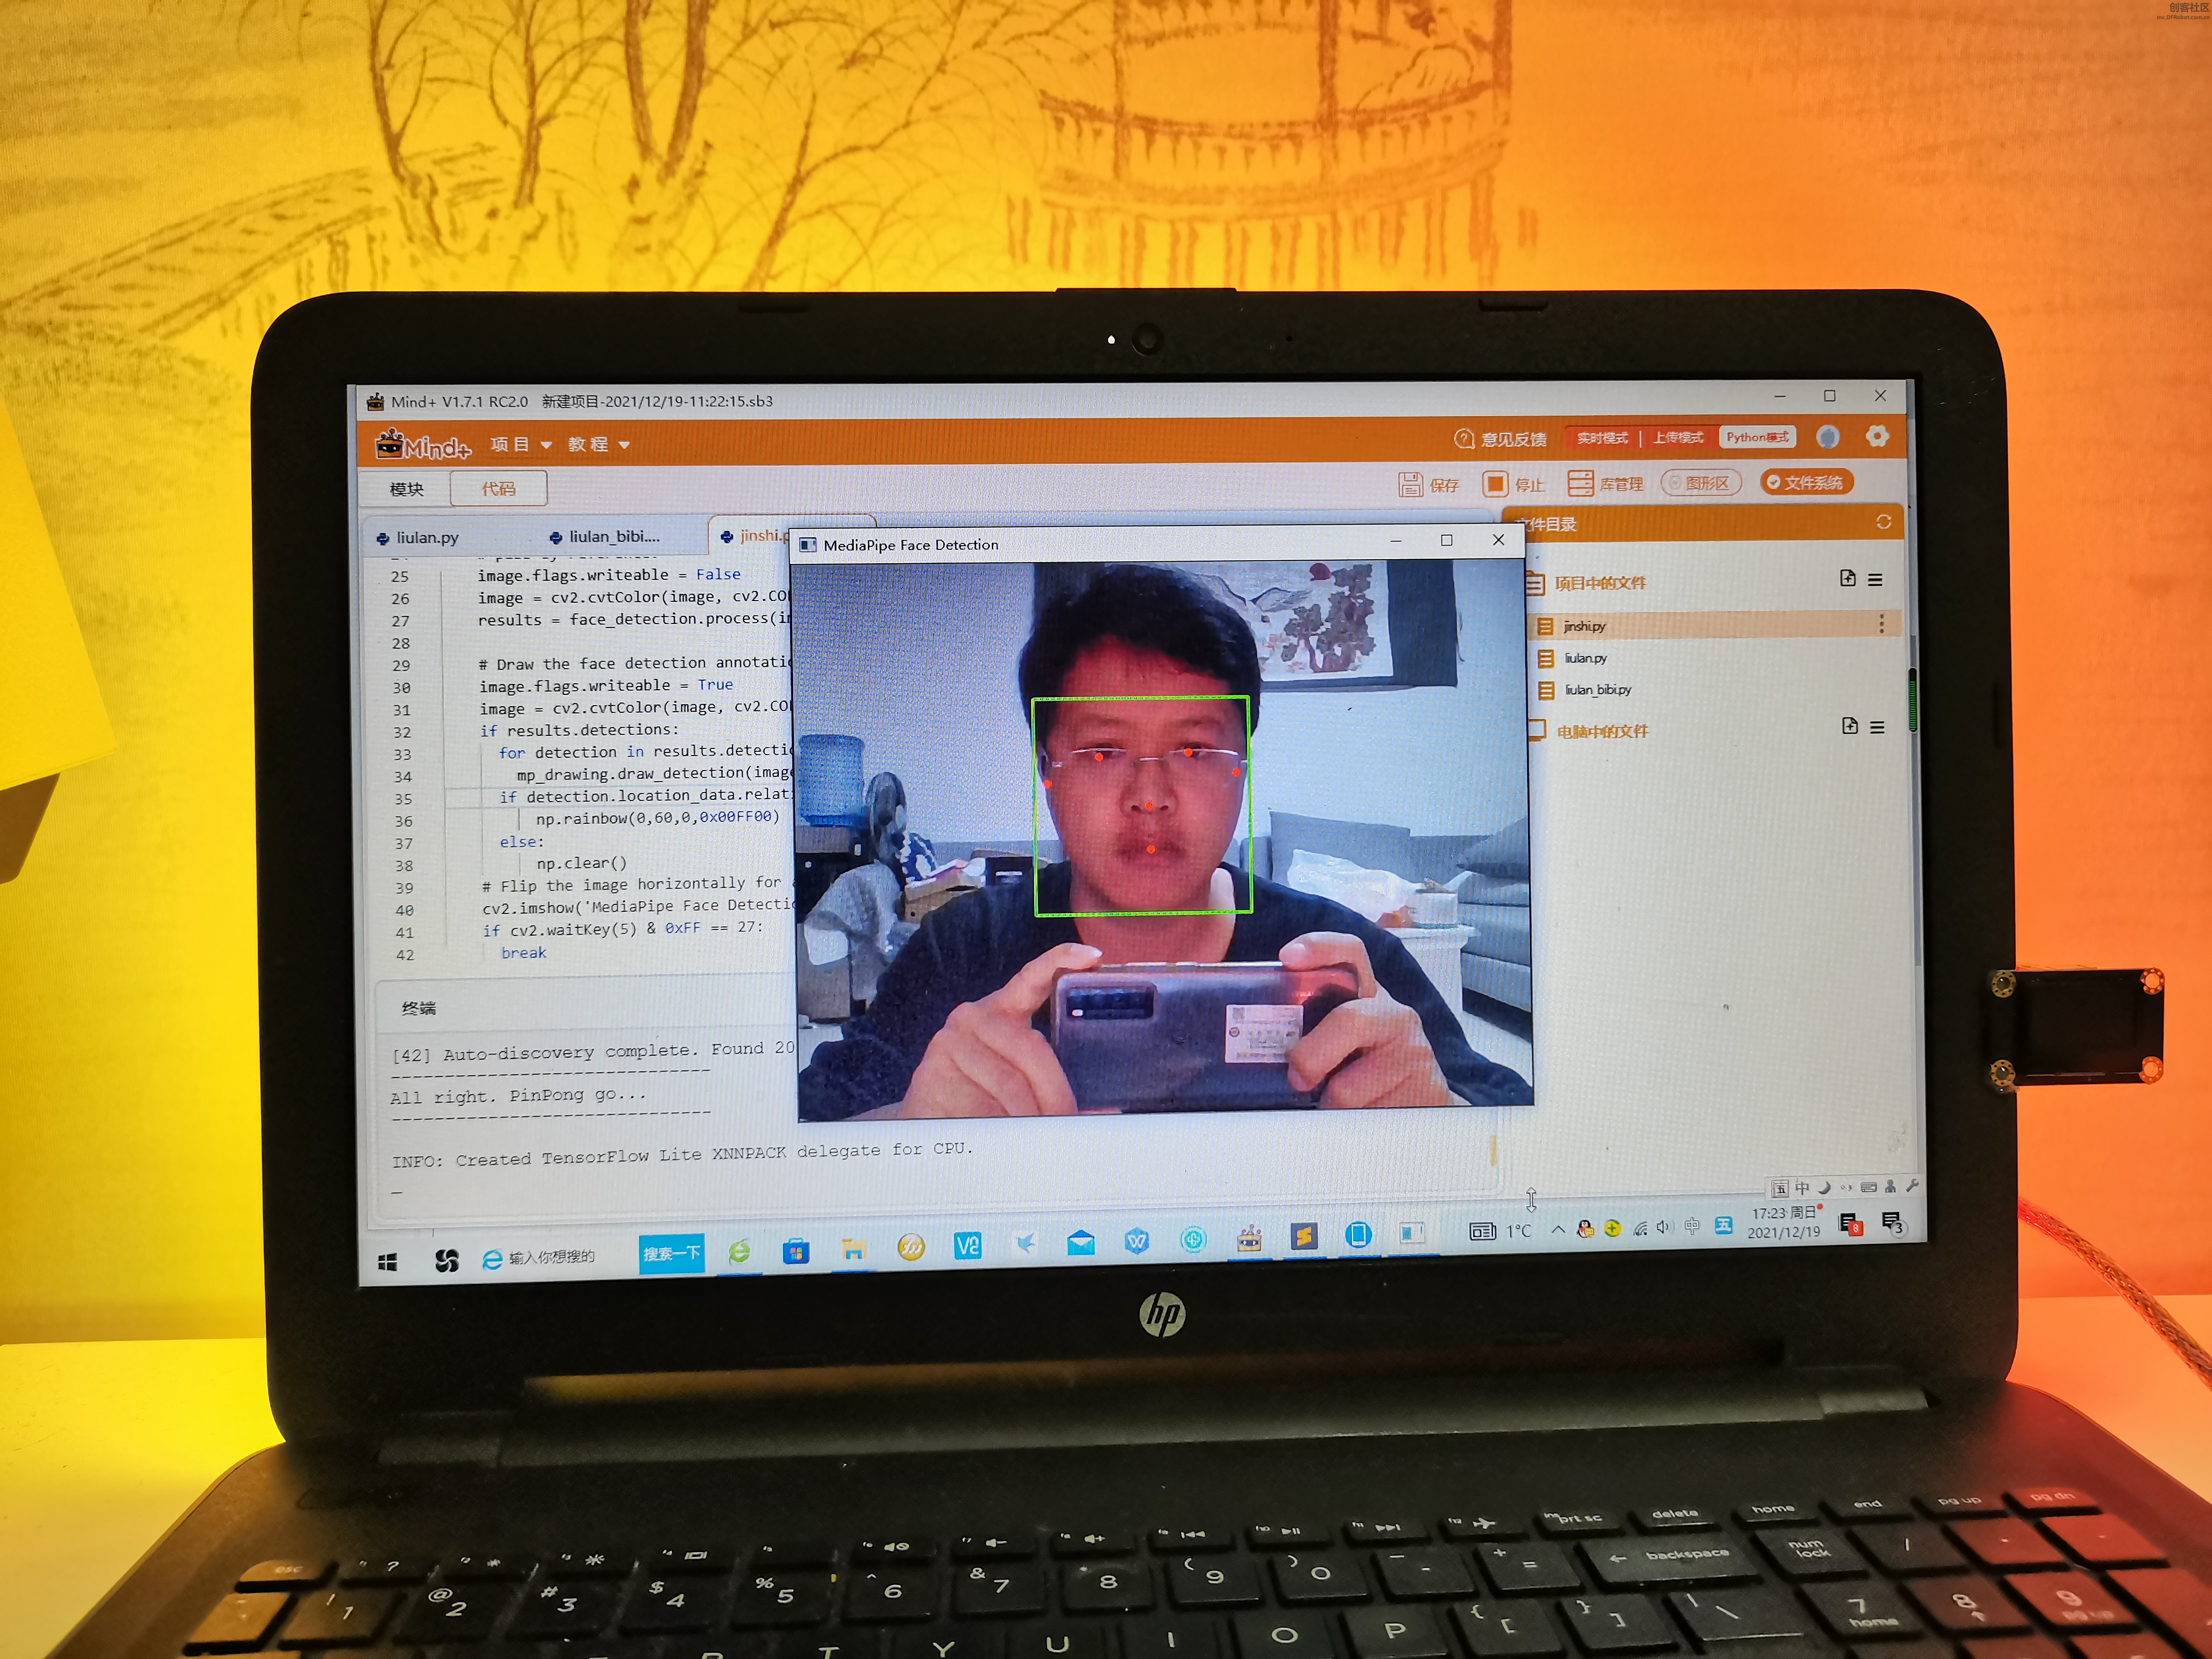
通过mediapipe人脸检测,人脸在摄像头上会出现近大远小的情况,以脸在摄像头中的宽度来判断,人眼是否离屏幕过近。当超过阈值时(过近),LED提醒。
-
-
- import cv2
- import mediapipe as mp
- from pinpong.board import Board,NeoPixel,Pin
-
- Board("uno").begin()
- NEOPIXEL_PIN = Pin(Pin.D2)
- PIXELS_NUM = 60 #灯数
- np = NeoPixel(NEOPIXEL_PIN,PIXELS_NUM)
-
- mp_face_detection = mp.solutions.face_detection
- mp_drawing = mp.solutions.drawing_utils
- np.clear()
- # For webcam input:
- cap = cv2.VideoCapture(0)
- with mp_face_detection.FaceDetection(min_detection_confidence=0.5) as face_detection:
- while cap.isOpened():
- success, image = cap.read()
- if not success:
- print("Ignoring empty camera frame.")
- # If loading a video, use 'break' instead of 'continue'.
- continue
-
- # To improve performance, optionally mark the image as not writeable to
- # pass by reference.
- image.flags.writeable = False
- image = cv2.cvtColor(image, cv2.COLOR_BGR2RGB)
- results = face_detection.process(image)
-
- # Draw the face detection annotations on the image.
- image.flags.writeable = True
- image = cv2.cvtColor(image, cv2.COLOR_RGB2BGR)
- if results.detections:
- for detection in results.detections:
- mp_drawing.draw_detection(image, detection)
- if detection.location_data.relative_bounding_box.width>0.4:
- np.rainbow(0,60,0,0x00FF00)
- else:
- np.clear()
- # Flip the image horizontally for a selfie-view display.
- cv2.imshow('MediaPipe Face Detection', cv2.flip(image, 1))
- if cv2.waitKey(5) & 0xFF == 27:
- break
- cap.release()
【模拟放大操作】
通过pynput库,模拟键盘和鼠标操作,“Ctrl+鼠标滚轮”放大和缩小网面上的文字。
-
- import pynput
- import time
- keyboard =pynput.keyboard.Controller()
- key=pynput.keyboard.Key
- mouse = pynput.mouse.Controller()
- time.sleep(10)
- keyboard.press(key.ctrl)
- mouse.scroll(0, 50)
- keyboard.release(key.ctrl)
【完整代码】
-
- import cv2
- import mediapipe as mp
- from pinpong.board import Board,NeoPixel,Pin
- from pykeyboard import *
- import pynput
- import numpy as npy
- import time
- Board("uno").begin()
- NEOPIXEL_PIN = Pin(Pin.D2)
- PIXELS_NUM = 60 #灯数
- np = NeoPixel(NEOPIXEL_PIN,PIXELS_NUM)
- np.clear()
- mp_face_detection = mp.solutions.face_detection
- mp_drawing = mp.solutions.drawing_utils
- keyboard =pynput.keyboard.Controller()
- key=pynput.keyboard.Key
- mouse = pynput.mouse.Controller()
- scrollnum=25
- bs=0
- # For webcam input:
- cap = cv2.VideoCapture(0)
- scroll=[]
- bs1=0
- with mp_face_detection.FaceDetection(min_detection_confidence=0.5) as face_detection:
- while cap.isOpened():
- success, image = cap.read()
- if not success:
- print("Ignoring empty camera frame.")
- # If loading a video, use 'break' instead of 'continue'.
- continue
-
- # To improve performance, optionally mark the image as not writeable to
- # pass by reference.
- image.flags.writeable = False
- image = cv2.cvtColor(image, cv2.COLOR_BGR2RGB)
- results = face_detection.process(image)
-
- # Draw the face detection annotations on the image.
- image.flags.writeable = True
- image = cv2.cvtColor(image, cv2.COLOR_RGB2BGR)
- if results.detections:
- for detection in results.detections:
- mp_drawing.draw_detection(image, detection)
- width=detection.location_data.relative_bounding_box.width
- if bs1<10:
- bs1=bs1+1
- scroll.append(width)
- else:
- scroll.append(width)
- scroll.pop(0)
- width=npy.mean(scroll)
- if width>0.5:
- np.rainbow(0,60,0,0x00FF00)
- bs=1
- elif bs==1:
- bs=0
- np.clear()
- else:
- width=int(width*100/10)
- if width!=scrollnum:
- temp=-width+scrollnum
- keyboard.press(key.ctrl)
- mouse.scroll(0, temp*10)#向上滚动50单位
- keyboard.release(key.ctrl)
- scrollnum=width
- print(width)
-
- # Flip the image horizontally for a selfie-view display.
- cv2.imshow('MediaPipe Face Detection', cv2.flip(image, 1))
- if cv2.waitKey(5) & 0xFF == 27:
- break
- cap.release()
【演示视频】
| 


 沪公网安备31011502402448
 置顶卡
置顶卡 变色卡
变色卡 千斤顶
千斤顶

 活跃会员
活跃会员
 宣传大使
宣传大使
 牛X认证
牛X认证
 创客造
创客造
 编辑选择奖
编辑选择奖
 志“童”道合
 编辑选择奖
编辑选择奖
 编辑选择奖
编辑选择奖
 编辑选择奖
编辑选择奖
 编辑选择奖
编辑选择奖


