本帖最后由 云天 于 2023-3-13 09:27 编辑
【项目背景】
这是听障人士的日常手语表达之一,意为“最近好吗?”。然而,对于一个从未接受过专业训练的健听人士而言,理解手语几乎是不可能的。 这种不被理解的窘境,正是听障人士的日常。全国7200万听障人士中,有2700万人需要通过手语进行日常沟通。但他们在公共场所与健听人士交流困难重重,怎么办? 【项目设计】 AI手语翻译机,听障人士只要面对摄像头做手语,经过后台计算机高速运算,翻译机屏幕就能快速把手语转换成文字,让健听人士秒懂。 本项目设计使用国产编程软件Mind+,使用开源机器学习TensorFlow框架、Mediapipe框架。 本项目设计的AI手语翻译机: 1.Python程序使用OpenCV库调用摄像头,使用Mediapipe识别手部关键点,提取手部关键点运动轨迹,将手语形成图片,如“你好”、“谢谢”、“晚安”、“我要睡觉”等。 2.将手语图片上传到“英荔AI训练平台”进行模型训练。 3.Python程序利用TensorFlow库加载模型进行推理识别摄像头前的手语动作。 【演示视频】 (可信度显示时,数字忘记乘100了  ) 【Mediapipe】
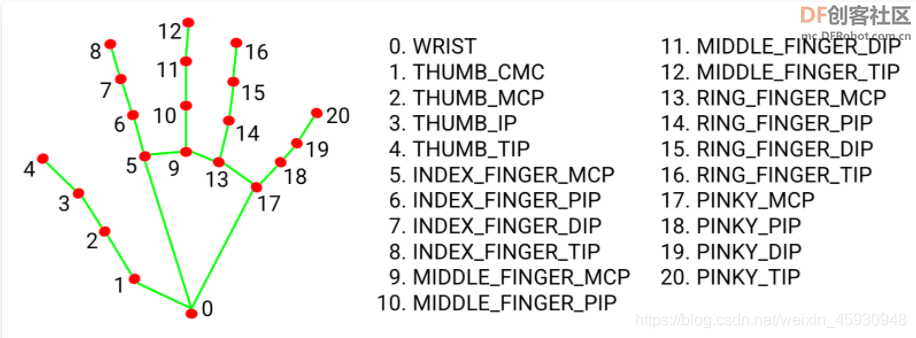
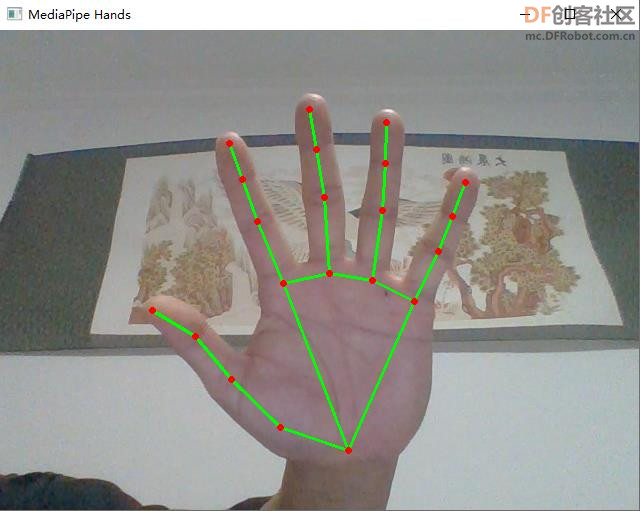
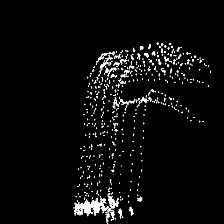
Mediapipe 是google的一个开源项目,可以提供开源的、跨平台的常用机器学习(machine learning)方案。Mediapipe实际上是一个集成的机器学习视觉算法的工具库,包含了人脸检测、人脸关键点、手势识别、头像分割和姿态识别等各种模型。官网地址:https://mediapipe.dev/。 【采集手语图片】 利用手部关键点的Z轴坐标大小调整描绘关键点的圆形大小,表示手部距离摄像头的远近, 将手部关键点运动轨迹形成图片程序。
-
- import cv2
- import mediapipe as mp
- import time
- import numpy as np
- mp_drawing = mp.solutions.drawing_utils
- mp_hands = mp.solutions.hands
- hands = mp_hands.Hands(
- static_image_mode=False,
- max_num_hands=2,
- min_detection_confidence=0.75,
- min_tracking_confidence=0.75)
-
- cap = cv2.VideoCapture(0)
- h, w=480,640
- r=2
- img=np.zeros((480,640,3),np.uint8)
- temptime=time.time()
- i=0
- j=0
- while True:
-
- if time.time()-temptime>3:
- j=0
- img=cv2.resize(img,(224,224))
- cv2.imwrite('three/three'+str(i)+'.jpg', img)
- i=i+1
- time.sleep(3)
- temptime=time.time()
- img=np.zeros((480,640,3),np.uint8)
- ret,frame = cap.read()
- #h, w, c = frame.shape
- #print(h,w)
- frame = cv2.cvtColor(frame, cv2.COLOR_BGR2RGB)
- # 因为摄像头是镜像的,所以将摄像头水平翻转
- # 不是镜像的可以不翻转
- frame= cv2.flip(frame,1)
- results = hands.process(frame)
- frame = cv2.cvtColor(frame, cv2.COLOR_RGB2BGR)
- if results.multi_handedness:
- for hand_label in results.multi_handedness:
- #print(hand_label)
- pass
- if results.multi_hand_landmarks:
- for hand_landmarks in results.multi_hand_landmarks:
-
- for id, lm in enumerate(hand_landmarks.landmark):
-
- px, py, pz = int(lm.x * w), int(lm.y * h), int(lm.z * w)
- #利用Z轴坐标,实现描绘关键点近大远小(离摄像头)
- if pz>100:
- pz=100
- cv2.circle(img, (px, py), r-int(r*pz/101), (255, 255, 255), cv2.FILLED)
-
- # 关键点可视化
- #mp_drawing.draw_landmarks(frame, hand_landmarks, mp_hands.HAND_CONNECTIONS)
- cv2.putText(frame, str(j), (int(w/2), int(h/2)),cv2.FONT_HERSHEY_PLAIN, 2, (0, 0, 255), 2)
- cv2.imshow('MediaPipe Hands', frame)
-
- cv2.imshow('Hands Points', img)
- j=j+1
- if cv2.waitKey(1) & 0xFF == 27:
- break
- cap.release()
-
-
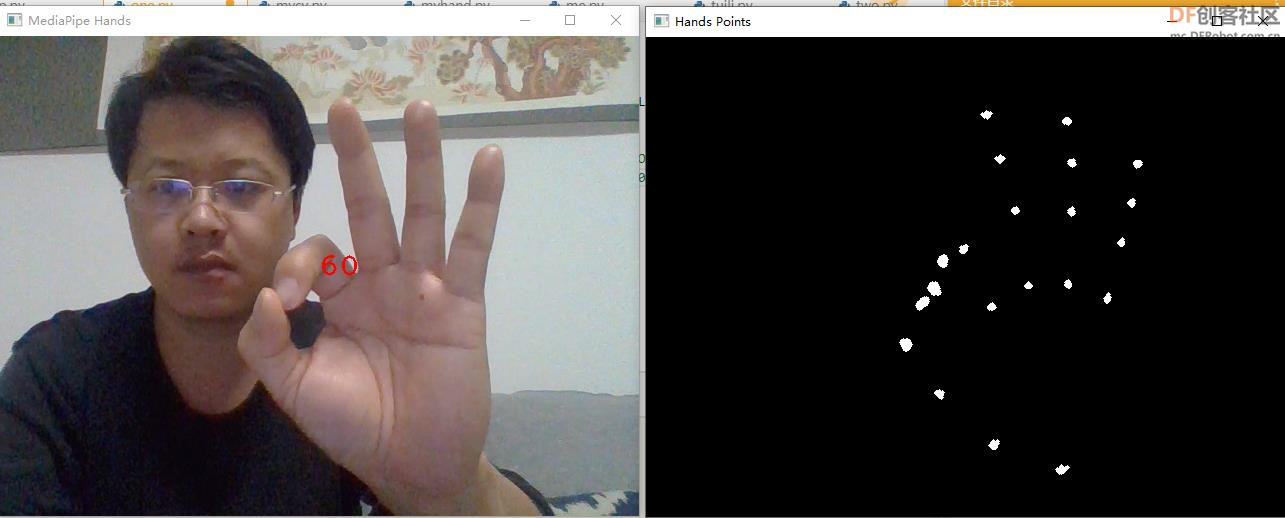
1、静态手语:“3”
2、动态手语:“你好”
3、“晚安”
4、“谢谢”
5、“我要睡觉”
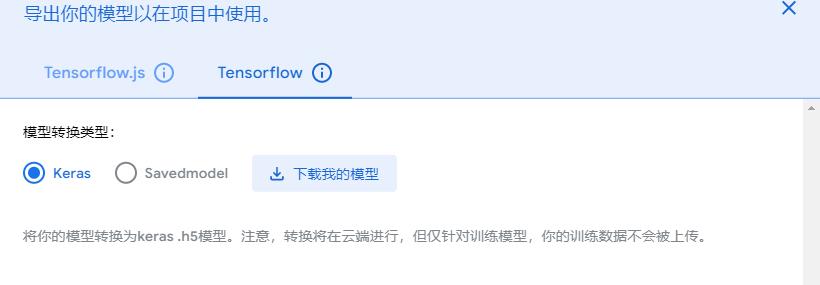
【模型训练】
利用 AI训练平台进行手语模型训练。英荔AI 训练平台 | Teachable Machine,网址:https://train.aimaker.space/train。
模型下载
【手语推理】
Python程序利用TensorFlow库加载模型进行推理识别摄像头前的手语动作。
-
- import cv2
- import mediapipe as mp
- import time
- import numpy as np
- import tensorflow.keras
- mp_drawing = mp.solutions.drawing_utils
- mp_hands = mp.solutions.hands
- hands = mp_hands.Hands(
- static_image_mode=False,
- max_num_hands=2,
- min_detection_confidence=0.75,
- min_tracking_confidence=0.75)
-
- cap = cv2.VideoCapture(0)
- h, w=480,640
- r=2
- img=np.zeros((480,640,3),np.uint8)
- temptime=time.time()
- i=0
-
- model = tensorflow.keras.models.load_model('keras_model.h5')
- labels=['Back','Bye','Good','Morning','One','Two','Three']
- while True:
- if time.time()-temptime>3:
-
- img=cv2.resize(img,(224,224))
- img = np.array(img,dtype=np.float32)
- img = np.expand_dims(img,axis=0)
- img = img/255
- prediction = model.predict(img)
- predicted_class = labels[np.argmax(prediction)]
- print(predicted_class)
- time.sleep(3)
- temptime=time.time()
- img=np.zeros((480,640,3),np.uint8)
- ret,frame = cap.read()
- #h, w, c = frame.shape
- #print(h,w)
- frame = cv2.cvtColor(frame, cv2.COLOR_BGR2RGB)
- # 因为摄像头是镜像的,所以将摄像头水平翻转
- # 不是镜像的可以不翻转
- frame= cv2.flip(frame,1)
- results = hands.process(frame)
- frame = cv2.cvtColor(frame, cv2.COLOR_RGB2BGR)
- if results.multi_handedness:
- for hand_label in results.multi_handedness:
- #print(hand_label)
- pass
- if results.multi_hand_landmarks:
- for hand_landmarks in results.multi_hand_landmarks:
-
- for id, lm in enumerate(hand_landmarks.landmark):
-
- px, py, pz = int(lm.x * w), int(lm.y * h), int(lm.z * w)
- #利用Z轴坐标,实现描绘关键点近大远小(离摄像头)
- if pz>100:
- pz=100
- cv2.circle(img, (px, py), r-int(r*pz/101), (255, 255, 255), cv2.FILLED)
-
- # 关键点可视化
- #mp_drawing.draw_landmarks(frame, hand_landmarks, mp_hands.HAND_CONNECTIONS)
- cv2.imshow('MediaPipe Hands', frame)
- cv2.imshow('Hands Points', img)
- if cv2.waitKey(1) & 0xFF == 27:
- break
- cap.release()
-
-
【行空板】
-
- import cv2
- import mediapipe as mp
- import time
- import numpy as np
- import tensorflow.keras
- from unihiker import GUI
-
-
- u_gui=GUI()
- 图片=u_gui.draw_image(image="img.jpg",x=0,y=0)
- 提示=u_gui.draw_text(text="手语识别",x=100,y=260,font_size=20, color="#0000FF")
-
- mp_drawing = mp.solutions.drawing_utils
- mp_hands = mp.solutions.hands
- hands = mp_hands.Hands(
- static_image_mode=False,
- max_num_hands=2,
- min_detection_confidence=0.75,
- min_tracking_confidence=0.75)
-
- cap = cv2.VideoCapture(0)
- h, w=480,640
- r=2
- img=np.zeros((480,640,3),np.uint8)
- temptime=time.time()
- i=0
-
- model = tensorflow.keras.models.load_model('keras_model.h5')
- labels=['back','Good Moning','You Good']
- while True:
- if time.time()-temptime>3:
-
-
- img = np.array(img,dtype=np.float32)
- img = np.expand_dims(img,axis=0)
- img = img/255
- prediction = model.predict(img)
- predicted_class = labels[np.argmax(prediction)]
- print(predicted_class)
-
- 提示.config(text=predicted_class)
- time.sleep(3)
- temptime=time.time()
- img=np.zeros((480,640,3),np.uint8)
- ret,frame = cap.read()
- #h, w, c = frame.shape
- #print(h,w)
- frame = cv2.cvtColor(frame, cv2.COLOR_BGR2RGB)
- # 因为摄像头是镜像的,所以将摄像头水平翻转
- # 不是镜像的可以不翻转
- frame= cv2.flip(frame,1)
- results = hands.process(frame)
- frame = cv2.cvtColor(frame, cv2.COLOR_RGB2BGR)
- if results.multi_handedness:
- for hand_label in results.multi_handedness:
- #print(hand_label)
- pass
- if results.multi_hand_landmarks:
- for hand_landmarks in results.multi_hand_landmarks:
-
- for id, lm in enumerate(hand_landmarks.landmark):
-
- px, py, pz = int(lm.x * w), int(lm.y * h), int(lm.z * w)
- #利用Z轴坐标,实现描绘关键点近大远小(离摄像头)
- if pz>100:
- pz=100
- cv2.circle(img, (px, py), r-int(r*pz/101), (255, 255, 255), cv2.FILLED)
-
- # 关键点可视化
- #mp_drawing.draw_landmarks(frame, hand_landmarks, mp_hands.HAND_CONNECTIONS)
- #cv2.imshow('MediaPipe Hands', frame)
- #cv2.imshow('Hands Points', img)
- img=cv2.resize(img,(224,224))
- 图片.config(image="img2.png")
- if cv2.waitKey(1) & 0xFF == 27:
- break
- cap.release()
-
-
【LattePanda】
使用 LattePanda(拿铁熊猫)提升识别速度。LattePanda Delta,Delta 系列采用Intel第8代赛扬N4100处理器作为主要的机器人控制器、交互项目核心、物联网边缘设备或人工智能大脑,在功能和价格上都是完美的选择。所以LattePanda Delta仍然是基于x86的SBC设计。把这个计算机缩小了,从笔记本电脑的大小缩小到手机的大小。因OpenCV2.x的putText是无法处理中文,可将cv2图片转为pil,然后再添加汉字后,再转成cv2格式。
-
-
- import cv2
- import mediapipe as mp
- import time
- import numpy as np
- import tensorflow.keras
-
- from PIL import Image,ImageDraw,ImageFont
-
-
-
- mp_drawing = mp.solutions.drawing_utils
- mp_hands = mp.solutions.hands
- hands = mp_hands.Hands(
- static_image_mode=False,
- max_num_hands=2,
- min_detection_confidence=0.75,
- min_tracking_confidence=0.75)
-
- cap = cv2.VideoCapture(0)
- h, w=480,640
- r=2
- img=np.zeros((480,640,3),np.uint8)
- temptime=time.time()
- i=0
-
- model = tensorflow.keras.models.load_model('keras_model.h5')
- labels=['未识别到内容','你好','晚安','我要睡觉','谢谢']
- predicted_class="未识别到内容"
- prediction_max=0
- while True:
- if time.time()-temptime>3:
- h, w, c = img.shape
- temimg=cv2.resize(img,(224,224))
- temimg = np.array(temimg,dtype=np.float32)
- temimg = np.expand_dims(temimg,axis=0)
- temimg = temimg/255
- prediction = model.predict(temimg)
- predicted_class = labels[np.argmax(prediction)]
- prediction_max=np.max(prediction)
-
-
- time.sleep(3)
- temptime=time.time()
- img=np.zeros((480,640,3),np.uint8)
- ret,frame = cap.read()
- #h, w, c = frame.shape
- #print(h,w)
- if ret:
- frame = cv2.cvtColor(frame, cv2.COLOR_BGR2RGB)
- # 因为摄像头是镜像的,所以将摄像头水平翻转
- # 不是镜像的可以不翻转
- frame= cv2.flip(frame,1)
- results = hands.process(frame)
- frame = cv2.cvtColor(frame, cv2.COLOR_RGB2BGR)
- if results.multi_handedness:
- for hand_label in results.multi_handedness:
- #print(hand_label)
- pass
- if results.multi_hand_landmarks:
- for hand_landmarks in results.multi_hand_landmarks:
-
- for id, lm in enumerate(hand_landmarks.landmark):
-
- px, py, pz = int(lm.x * w), int(lm.y * h), int(lm.z * w)
- #利用Z轴坐标,实现描绘关键点近大远小(离摄像头)
- if pz>100:
- pz=100
- cv2.circle(img, (px, py), r-int(r*pz/101), (255, 255, 255), cv2.FILLED)
-
- # 关键点可视化
- #mp_drawing.draw_landmarks(frame, hand_landmarks, mp_hands.HAND_CONNECTIONS)
- #cv2.imshow('MediaPipe Hands', frame)
- cv2.imshow('cap', img)
-
- #显示中文
- pil_img = Image.fromarray(cv2.cvtColor(frame, cv2.COLOR_BGR2RGB))
- draw = ImageDraw.Draw(pil_img)
- # 第一个参数是字体文件的路径,第二个是字体大小
- font = ImageFont.truetype('Alibaba-PuHuiTi-Medium.ttf',30,encoding='utf-8')
- # 第一个参数是文字的起始坐标,第二个需要输出的文字,第三个是字体颜色,第四个是字体类型
- if prediction_max>0.8:
- draw.text((240,420),predicted_class+str(round(prediction_max,2))+"%",(0,255,255),font=font)
- else:
- draw.text((240,420),"未识别到内容",(0,255,255),font=font)
-
- # PIL图片转cv2
- frame = cv2.cvtColor(np.array(pil_img), cv2.COLOR_RGB2BGR)
- cv2.imshow('Hands Points', frame)
- if cv2.waitKey(1) & 0xFF == 27:
- break
- cap.release()
-
-
-
【中文播报识别结果】
pyttsx3是一个文本朗读库,通过调用此库,很容易就可以让程序“开口说话”。
- #导入pyttsx3库
- import pyttsx3
-
- engine = pyttsx3.init() #创建engine并初始化
- engine.say('有志者,事竟成。') #开始朗读
- engine.runAndWait() #等待语音播报完毕
完整程序
-
-
- import cv2
- import mediapipe as mp
- import time
- import numpy as np
- import tensorflow.keras
-
- from PIL import Image,ImageDraw,ImageFont
- import pyttsx3
-
- engine = pyttsx3.init() #创建engine并初始化
- mp_drawing = mp.solutions.drawing_utils
- mp_hands = mp.solutions.hands
- hands = mp_hands.Hands(
- static_image_mode=False,
- max_num_hands=2,
- min_detection_confidence=0.75,
- min_tracking_confidence=0.75)
-
- cap = cv2.VideoCapture(0)
- h, w=480,640
- r=2
- img=np.zeros((480,640,3),np.uint8)
- temptime=time.time()
- i=0
-
- model = tensorflow.keras.models.load_model('keras_model.h5')
- labels=['未识别到内容','你好','晚安','我要睡觉','谢谢']
- predicted_class="未识别到内容"
- prediction_max=0
- while True:
- if time.time()-temptime>3:
- h, w, c = img.shape
- temimg=cv2.resize(img,(224,224))
- temimg = np.array(temimg,dtype=np.float32)
- temimg = np.expand_dims(temimg,axis=0)
- temimg = temimg/255
- prediction = model.predict(temimg)
- predicted_class = labels[np.argmax(prediction)]
- prediction_max=np.max(prediction)
- if prediction_max>0.8:
- engine.say(predicted_class) #开始朗读
- else:
- engine.say('未识别到内容') #开始朗读
- engine.runAndWait() #等待语音播报完毕
-
- time.sleep(3)
- temptime=time.time()
- img=np.zeros((480,640,3),np.uint8)
- ret,frame = cap.read()
- #h, w, c = frame.shape
- #print(h,w)
- if ret:
- frame = cv2.cvtColor(frame, cv2.COLOR_BGR2RGB)
- # 因为摄像头是镜像的,所以将摄像头水平翻转
- # 不是镜像的可以不翻转
- frame= cv2.flip(frame,1)
- results = hands.process(frame)
- frame = cv2.cvtColor(frame, cv2.COLOR_RGB2BGR)
- if results.multi_handedness:
- for hand_label in results.multi_handedness:
- #print(hand_label)
- pass
- if results.multi_hand_landmarks:
- for hand_landmarks in results.multi_hand_landmarks:
-
- for id, lm in enumerate(hand_landmarks.landmark):
-
- px, py, pz = int(lm.x * w), int(lm.y * h), int(lm.z * w)
- #利用Z轴坐标,实现描绘关键点近大远小(离摄像头)
- if pz>100:
- pz=100
- cv2.circle(img, (px, py), r-int(r*pz/101), (255, 255, 255), cv2.FILLED)
-
- # 关键点可视化
- #mp_drawing.draw_landmarks(frame, hand_landmarks, mp_hands.HAND_CONNECTIONS)
- #cv2.imshow('MediaPipe Hands', frame)
- cv2.imshow('cap', img)
-
- #显示中文
- pil_img = Image.fromarray(cv2.cvtColor(frame, cv2.COLOR_BGR2RGB))
- draw = ImageDraw.Draw(pil_img)
- # 第一个参数是字体文件的路径,第二个是字体大小
- font = ImageFont.truetype('Alibaba-PuHuiTi-Medium.ttf',30,encoding='utf-8')
- # 第一个参数是文字的起始坐标,第二个需要输出的文字,第三个是字体颜色,第四个是字体类型
- if prediction_max>0.8:
- draw.text((240,420),predicted_class+str(round(prediction_max,2))+"%",(0,255,255),font=font)
- else:
- draw.text((240,420),"未识别到内容",(0,255,255),font=font)
-
- # PIL图片转cv2
- frame = cv2.cvtColor(np.array(pil_img), cv2.COLOR_RGB2BGR)
- cv2.imshow('Hands Points', frame)
- if cv2.waitKey(1) & 0xFF == 27:
- break
- cap.release()
-
-
-
解决pyttsx3不发声问题: 因为pyttsx3调用的本地语音包实现文本转音频, 首先确认环境中是否有微软语音包。
- import pyttsx3
-
- tts = pyttsx3.init()
- voices = tts.getProperty('voices')
- for voice in voices:
- print('id = {} \n name = {} \n'.format(voice.id, voice.name))
如果结果有输出, 说明存在语音包. 如果结果没有任何输出, 则需要下载Microsoft Speech Platform - Runtime Languages中的MSSpeech_TTS_zh-CN_HuiHui.msi 并安装。
|


 沪公网安备31011502402448
 置顶卡
置顶卡 变色卡
变色卡 千斤顶
千斤顶


 活跃会员
活跃会员
 宣传大使
宣传大使
 牛X认证
牛X认证
 创客造
创客造
 编辑选择奖
编辑选择奖
 志“童”道合
 编辑选择奖
编辑选择奖
 编辑选择奖
编辑选择奖
 编辑选择奖
编辑选择奖
 编辑选择奖
编辑选择奖


