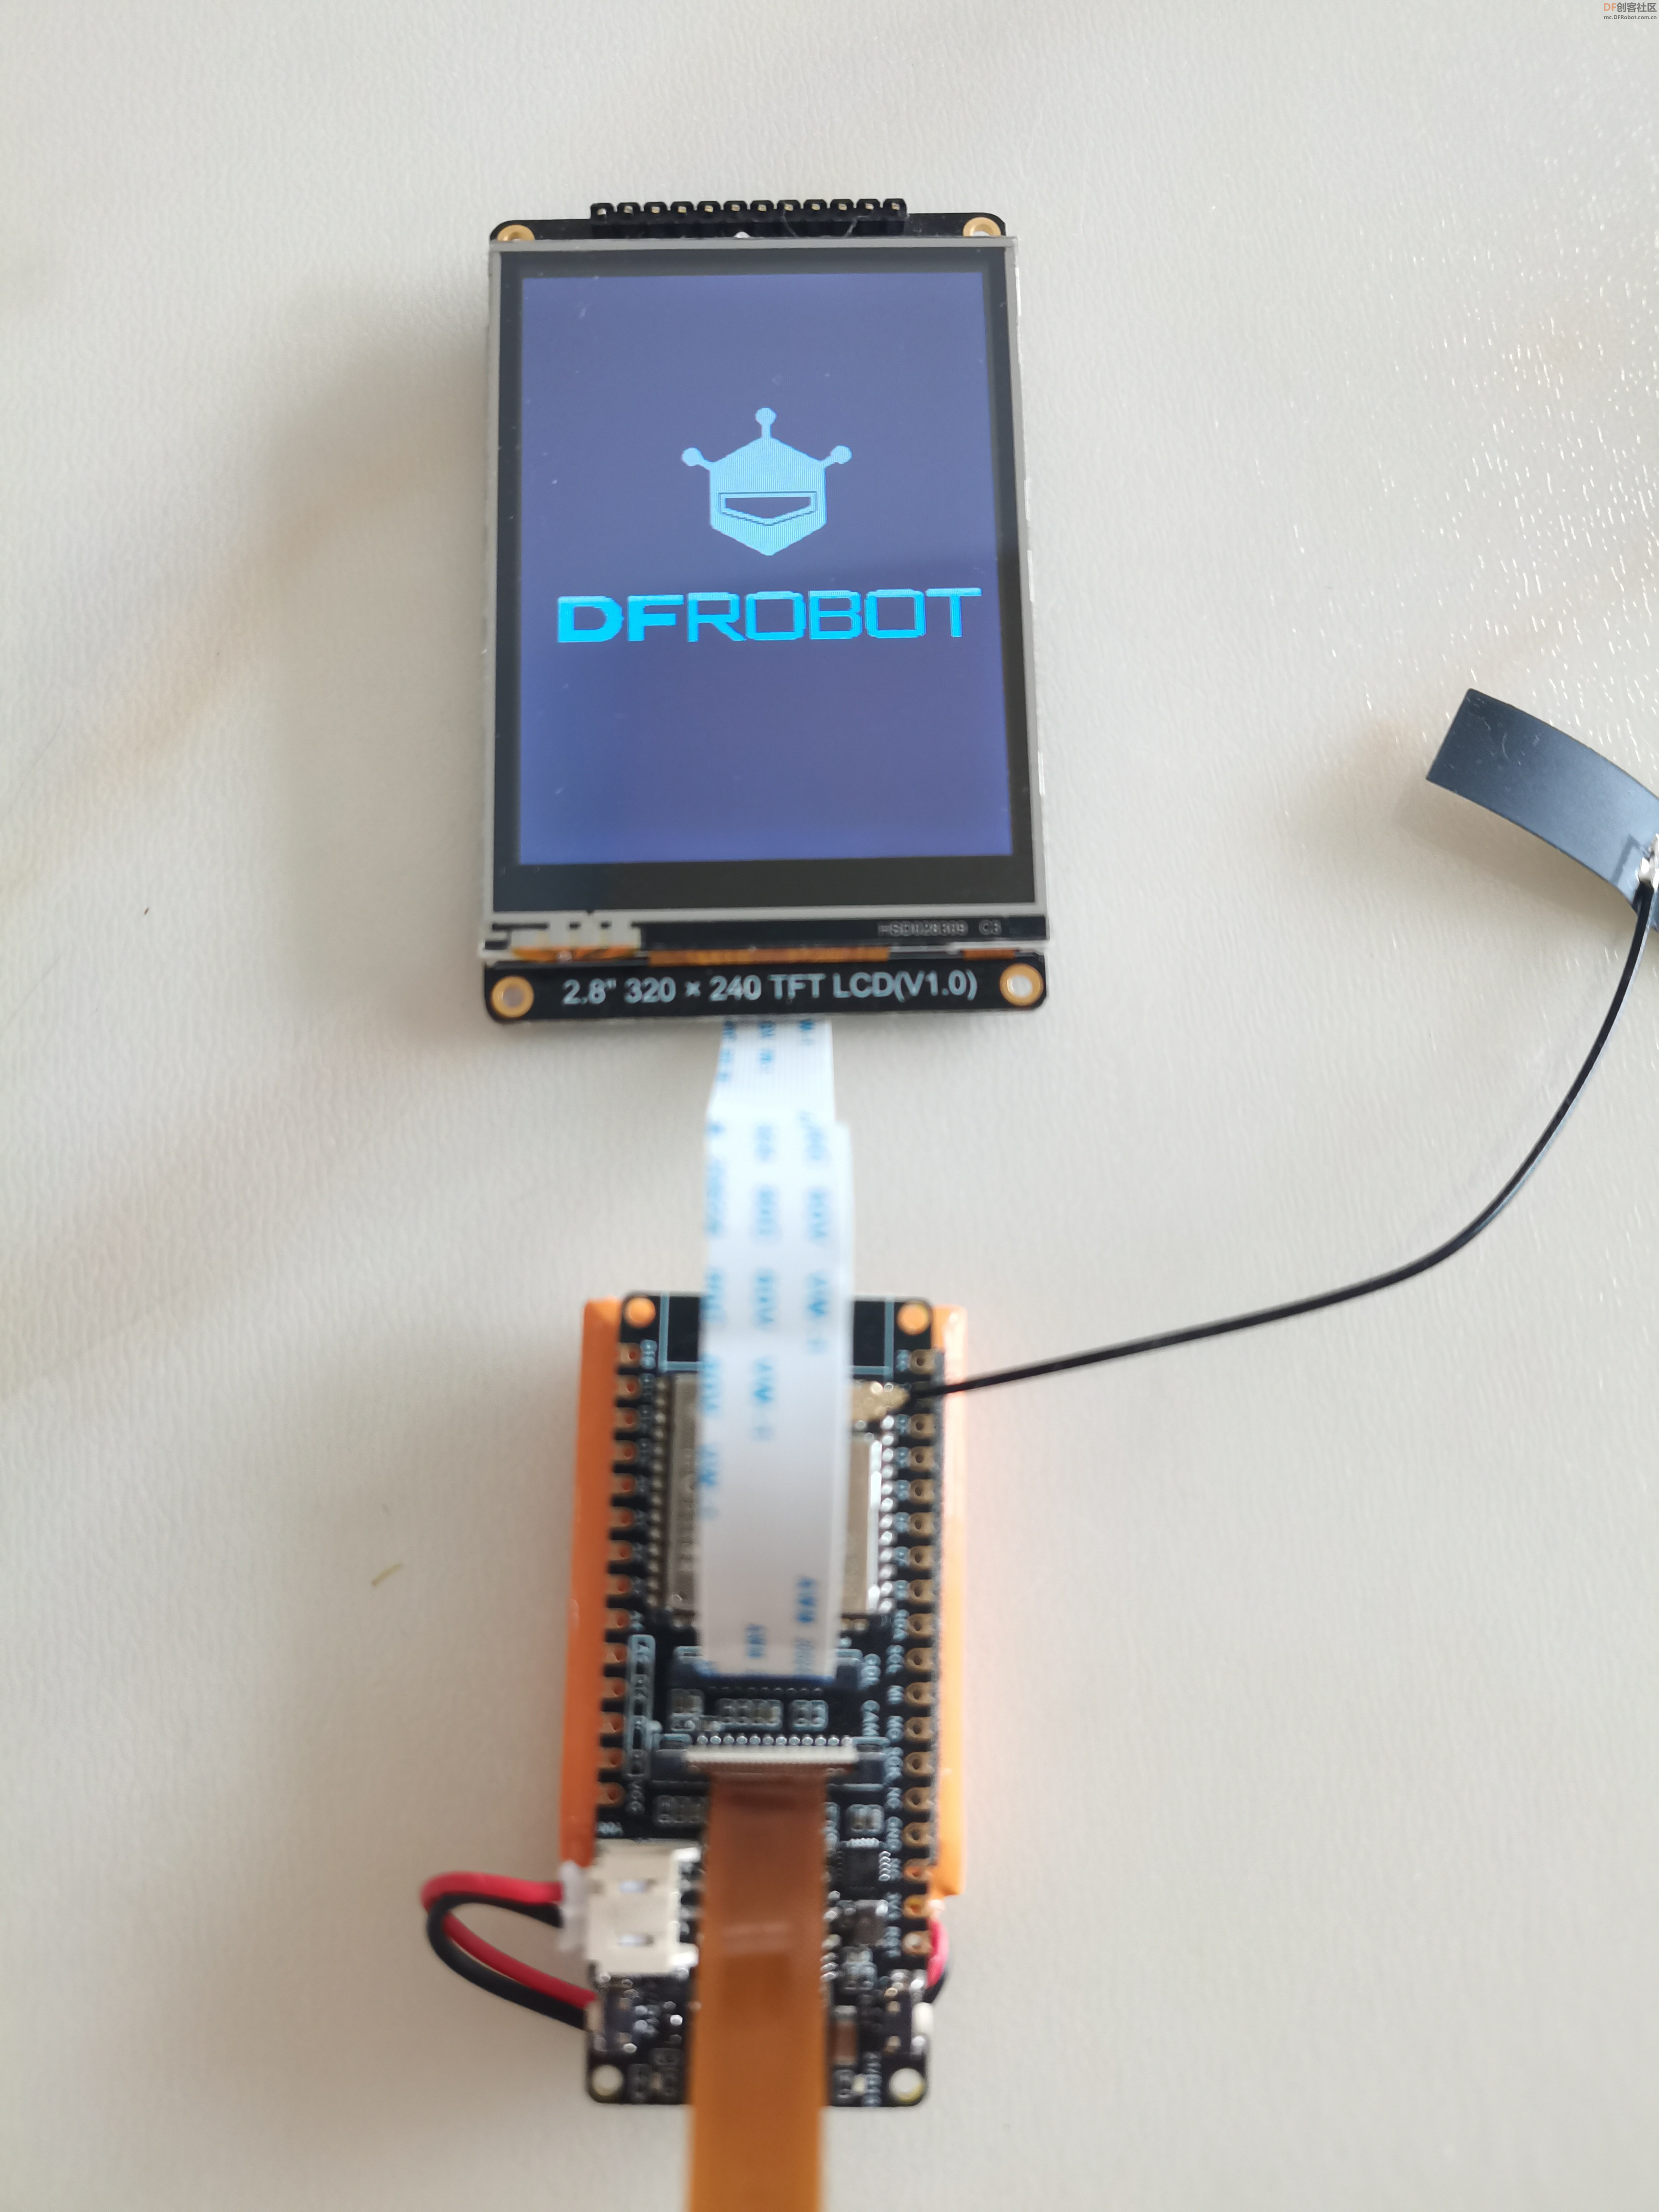
本帖最后由 云天 于 2023-8-27 10:19 编辑 一、测试屏幕显示
/*!
* @file bitmap.ino
* @brief Draw monochrome, colorful, and grayscale images based on the image array generated by the bitmap software.
* [url=home.php?mod=space&uid=821650]@N[/url] The demo requires to be run on a main-controller with 40000 bytes of dynamic memory, like FireBeetle-ESP8266 and FireBeetle-ESP32 since there are 380,000 bytes in this project.
* [url=home.php?mod=space&uid=843077]@n[/url] This demo supports mainboard FireBeetle-ESP32, FireBeetle-ESP8266, and FireBeetle-M0.
* @copyright Copyright (c) 2010 DFRobot Co. Ltd (http://www.dfrobot.com)
* @license The MIT License (MIT)
* @author [YeHangYu] (hangyu.ye@dfrobot.com)
* @version V0.1
* @date 2020-01-07
* @url https://github.com/DFRobot/DFRobot_GDL
*/
#include "DFRobot_GDL.h"
#include "Bitmap.h"
#include "XBitmap.h"
#include "GrayscaleBitmap.h"
#include "mask.h"
#include "RGBBitmap.h"
//Custom communication pins
/*M0*/
#if defined Arduino _SAM_ZERO
#define TFT_DC 7
#define TFT_CS 5
#define TFT_RST 6
#define TFT_BL 9
/*ESP32 and ESP8266*/
#elif defined(ESP32) || defined(ESP8266)
#define TFT_DC 3
#define TFT_CS 18
#define TFT_RST 38
#define TFT_BL 47
/* AVR series mainboard */
#else
#define TFT_DC 2
#define TFT_CS 3
#define TFT_RST 4
#define TFT_BL 5
#endif
/**
* @brief Constructor Constructor of hardware SPI communication
* @param dc Command/data line pin for SPI communication
* @param cs Chip select pin for SPI communication
* @param rst reset pin of the screen
*/
//DFRobot_ST7789_240x204_HW_SPI screen(/*dc=*/TFT_DC,/*cs=*/TFT_CS,/*rst=*/TFT_RST,/*bl=*/TFT_BL);
//DFRobot_ST7789_240x240_HW_SPI screen(/*dc=*/TFT_DC,/*cs=*/TFT_CS,/*rst=*/TFT_RST);
//DFRobot_ST7789_240x320_HW_SPI screen(/*dc=*/TFT_DC,/*cs=*/TFT_CS,/*rst=*/TFT_RST);
DFRobot_ILI9341_240x320_HW_SPI screen(/*dc=*/TFT_DC,/*cs=*/TFT_CS,/*rst=*/TFT_RST);
//DFRobot_ILI9488_320x480_HW_SPI screen(/*dc=*/TFT_DC,/*cs=*/TFT_CS,/*rst=*/TFT_RST);
/* M0 mainboard DMA transfer */
//DFRobot_ST7789_240x204_DMA_SPI screen(/*dc=*/TFT_DC,/*cs=*/TFT_CS,/*rst=*/TFT_RST,/*bl=*/TFT_BL);
//DFRobot_ST7789_240x240_DMA_SPI screen(/*dc=*/TFT_DC,/*cs=*/TFT_CS,/*rst=*/TFT_RST);
//DFRobot_ST7789_240x320_DMA_SPI screen(/*dc=*/TFT_DC,/*cs=*/TFT_CS,/*rst=*/TFT_RST);
//DFRobot_ILI9341_240x320_DMA_SPI screen(/*dc=*/TFT_DC,/*cs=*/TFT_CS,/*rst=*/TFT_RST);
//DFRobot_ILI9488_320x480_DMA_SPI screen(/*dc=*/TFT_DC,/*cs=*/TFT_CS,/*rst=*/TFT_RST);
void setup() {
Serial.begin(115200);
screen.begin();
}
void loop() {
/**
* @brief Paint the screen white
* @param 0xFFFF white parameter
*/
screen.fillScreen(COLOR_RGB565_WHITE );
/**
* @brief Draw monochrome pictures with different drawing orders
* @param x 0 Set the starting point to be at the upper left of the screen, near the left side
* @param y 0 Near the upper side
* @param bitmap gImage_XBitmap The array in the header file XBitmap, the array elements are single bytes
* @param w 240 Picture width
* @param h 240 Picture height
* @param color 0x0000 The black picture part is set to black
*/
screen.drawXBitmap(/*x=*/(screen.width()-240)/2,/*y=*/(screen.height()-240)/2,/*bitmap gImage_Bitmap=*/gImage_XBitmap,/*w=*/240,/*h=*/240,/*color=*/0x0000);
screen.fillScreen(COLOR_RGB565_WHITE);
/**
* @brief Draw colorful picture
* @param x 0 Set the starting point to be at the upper left of the screen, near the left side
* @param y 0 Near the upper side
* @param bitmap gImage_RGBBitmap The array of RGBBitmap header files, the array elements are single bytes, here forced to convert to 2 bytes
* @param w 240 picture width
* @param h 240 Picture height
*/
screen.drawRGBBitmap(/*x=*/(screen.width()-240)/2,/*y=*/(screen.height()-240)/2,/*bitmap gImage_Bitmap=*/(const unsigned uint16_t*)gImage_RGBBitmap,/*w=*/240,/*h=*/240);
/**
* @brief Use the mask as a monochrome picture to draw a monochrome picture
* @param x 0 Set the starting point to be at the upper left of the screen, near the left side
* @param y 0 Near the upper side
* @param bitmap gImage_mask The array in the header mask, the array elements are single bytes
* @param w 240 Picture width
* @param h 240 Picture height
* @param color 0x0000 The black picture part is set to black
*/
screen.drawBitmap(/*x=*/(screen.width()-240)/2,/*y=*/(screen.height()-240)/2,/*bitmap gImage_Bitmap=*/gImage_mask,/*w=*/240,/*h=*/240,/*color=*/0x0000);
/**
* @brief Draw a colorful picture, the white part of the mask is not painted
* @param x 0 Set the starting point to be at the upper left of the screen, near the left side
* @param y 0 Near the upper side
* @param bitmap gImage_RGBBitmap The array of RGBBitmap header files, the array elements are single bytes, here forced to convert to 2 bytes
* @param mask gImage_mask The array in the header mask, the array elements are single bytes
* @param w 240 Picture width
* @param h 240 Picture height
*/
screen.drawRGBBitmap(/*x=*/(screen.width()-240)/2,/*y=*/(screen.height()-240)/2,/*bitmap gImage_Bitmap=*/(const unsigned uint16_t*)gImage_RGBBitmap,/*mask=*/gImage_mask,/*w=*/240,/*h=*/240);
screen.fillScreen(COLOR_RGB565_BLACK);
/**
* @brief Draw a monochrome picture without background circularly, and the color is changing constantly.
* @param x 0 Set the starting point to be at the upper left of the screen, near the left side
* @param y 0 Near the upper side
* @param bitmap gImage_Bitmap The array in the header file Bitmap, the array elements are single bytes
* @param w 240 Picture width
* @param h 240 Picture height
* @param color i Set the black image part to bluish color
*/
for (int16_t i = 0x00ff; ; i+=0x3300) {
screen.drawBitmap(/*x=*/(screen.width()-240)/2,/*y=*/(screen.height()-240)/2,/*bitmap gImage_Bitmap=*/gImage_Bitmap,/*w=*/240,/*h=*/240,/*color=*/i);
}
//screen.drawGrayscaleBitmap(0,0,gImage_GrayscaleBitmap,240,240);//Draw grayscale image, not supported by this screen
//screen.drawGrayscaleBitmap(0,0,gImage_GrayscaleBitmap,gImage_mask,240,240);//Draw grayscale image with mask, not supported by this screen
}
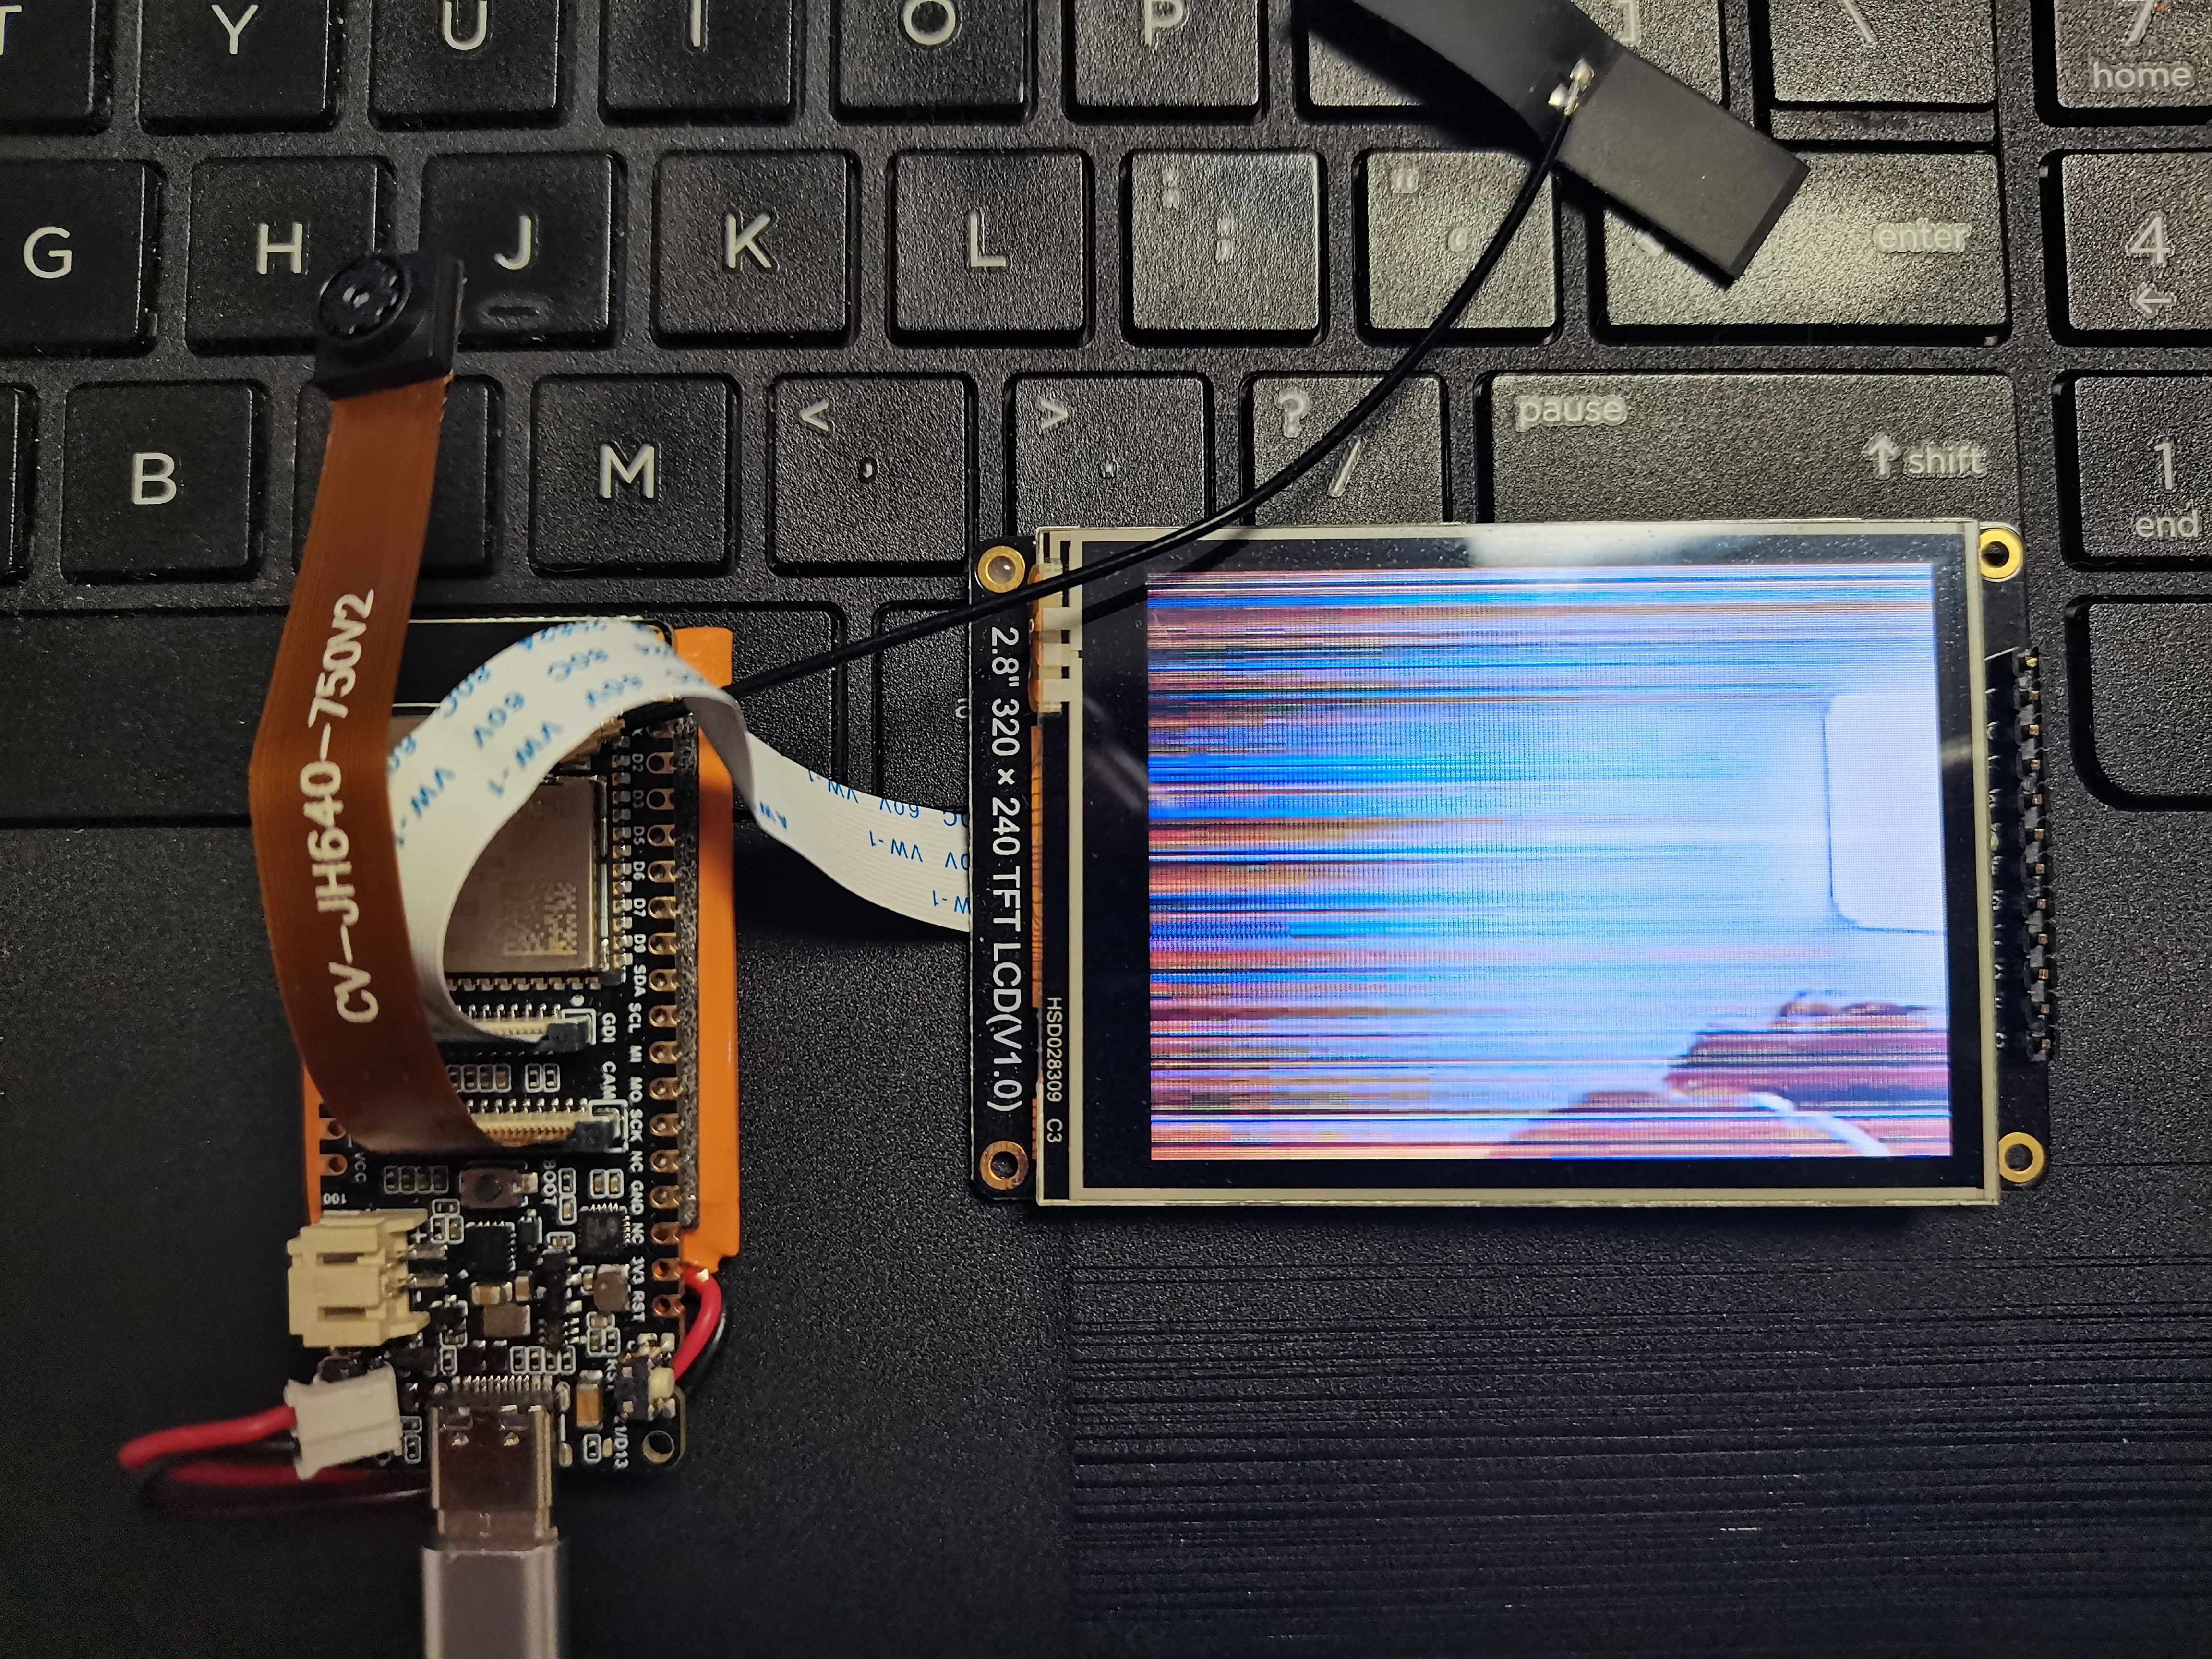
复制代码 二、摄像头与屏幕结合
#define TFT_CS     18
#define TFT_RST  38
#define TFT_DC     3
#define TFT_MOSI   15
#define TFT_SCK    17
#define TFT_MISO   16
#define PIN_BTN 47
复制代码
while (axp.begin() != 0)
  {
    Serial.println("init error");
    delay(1000);
  }
  axp.enableCameraPower(axp.eOV2640);
复制代码
#include <Arduino.h>
#include <Wire.h>
#include <SPI.h>
#include <Adafruit_GFX.h>
#include <Arduino_GFX_Library.h>
#include <TJpg_Decoder.h>
#include "esp_camera.h"
#include "DFRobot_AXP313A.h"

DFRobot_AXP313A axp;

#define CAMERA_MODEL_DFRobot_FireBeetle2_ESP32S3 // Has PSRAM
#define PWDN_GPIO_NUM     -1
#define RESET_GPIO_NUM    -1
#define XCLK_GPIO_NUM     45
#define SIOD_GPIO_NUM     1
#define SIOC_GPIO_NUM     2

#define Y9_GPIO_NUM       48
#define Y8_GPIO_NUM       46
#define Y7_GPIO_NUM       8
#define Y6_GPIO_NUM       7
#define Y5_GPIO_NUM       4
#define Y4_GPIO_NUM       41
#define Y3_GPIO_NUM       40
#define Y2_GPIO_NUM       39
#define VSYNC_GPIO_NUM    6
#define HREF_GPIO_NUM     42
#define PCLK_GPIO_NUM     5

//以下引脚都可以成对配置,根据你的显示屏引脚位置自行选择,注意部分引脚不能混用.320*240

#define TFT_CS     18

#define TFT_RST  38

#define TFT_DC     3

#define TFT_MOSI   15

#define TFT_SCK    17

#define TFT_MISO   16

#define PIN_BTN 47

Arduino_ESP32SPI bus = Arduino_ESP32SPI(TFT_DC, TFT_CS, TFT_SCK, TFT_MOSI, TFT_MISO);

Arduino_ILI9341 tft = Arduino_ILI9341(&bus, TFT_RST);

bool tft_output(int16_t x, int16_t y, uint16_t w, uint16_t h, uint16_t* bitmap)
{
  // Stop further decoding as image is running off bottom of screen
  if ( y >= tft.height() ) return 0;
  tft.draw16bitRGBBitmap(x, y, bitmap, w, h);
  // Return 1 to decode next block
  return 1;

}

void init_camera() {

  camera_config_t config;
  config.ledc_channel = LEDC_CHANNEL_0;
  config.ledc_timer = LEDC_TIMER_0;
  config.pin_d0 = Y2_GPIO_NUM;
  config.pin_d1 = Y3_GPIO_NUM;
  config.pin_d2 = Y4_GPIO_NUM;
  config.pin_d3 = Y5_GPIO_NUM;
  config.pin_d4 = Y6_GPIO_NUM;
  config.pin_d5 = Y7_GPIO_NUM;
  config.pin_d6 = Y8_GPIO_NUM;
  config.pin_d7 = Y9_GPIO_NUM;
  config.pin_xclk = XCLK_GPIO_NUM;
  config.pin_pclk = PCLK_GPIO_NUM;
  config.pin_vsync = VSYNC_GPIO_NUM;
  config.pin_href = HREF_GPIO_NUM;
  config.pin_sccb_sda = SIOD_GPIO_NUM;
  config.pin_sccb_scl = SIOC_GPIO_NUM;
  config.pin_pwdn = PWDN_GPIO_NUM;
  config.pin_reset = RESET_GPIO_NUM;
  config.xclk_freq_hz = 20000000;
  config.frame_size = FRAMESIZE_UXGA;
  config.pixel_format = PIXFORMAT_JPEG; // for streaming
  //config.pixel_format = PIXFORMAT_RGB565; // for face detection/recognition
  config.grab_mode = CAMERA_GRAB_WHEN_EMPTY;
  config.fb_location = CAMERA_FB_IN_PSRAM;
  config.jpeg_quality = 12;
  config.fb_count = 1;

  // if PSRAM IC present, init with UXGA resolution and higher JPEG quality

  //                      for larger pre-allocated frame buffer.
  if (psramFound()) {
    config.frame_size = FRAMESIZE_QVGA;
    config.jpeg_quality = 6;
    config.fb_count = 1;
    Serial.println("PSRAM");
  } else {
    config.frame_size = FRAMESIZE_QVGA;
    config.jpeg_quality = 12;
    config.fb_count = 1;

  }

  // camera init
  while (axp.begin() != 0)
  {
    Serial.println("init error");
    delay(1000);
  }
  axp.enableCameraPower(axp.eOV2640); // 设置摄像头供电
  esp_err_t err = esp_camera_init(&config);
  if (err != ESP_OK) {
    Serial.printf("Camera init failed with error 0x%x", err);
    return;
  }

  sensor_t * s = esp_camera_sensor_get();
  // initial sensors are flipped vertically and colors are a bit saturated

  if (s->id.PID == OV2640_PID) {
    Serial.println("PID");
    s->set_vflip(s, 1); // flip it back
    s->set_brightness(s, 2); // up the brightness just a bit
    s->set_saturation(s, 0);
  }

}
void setup() {
  Serial.begin(9600);
  Serial.println("ESP32-CAM Picture");
  //tft.Init(INITR_BLACKTAB);
  tft.begin();
  tft.setRotation(1);
  tft.fillScreen(MAGENTA);
  init_camera();
  TJpgDec.setJpgScale(1);
    // The decoder must be given the exact name of the rendering function above
  TJpgDec.setCallback(tft_output);

}
void take_picture() {
  Serial.println("Taking picture..");
  camera_fb_t * fb = NULL;
  fb = esp_camera_fb_get();
  if (!fb) {
   Serial.println("Camera capture failed");
  }
  uint16_t w = 0, h = 0;
  TJpgDec.getJpgSize(&w, &h, fb->buf, fb->len);
  Serial.print("- Width = "); Serial.print(fb->width); Serial.print(", height = "); Serial.println(fb->height);
  Serial.print("Width = "); Serial.print(w); Serial.print(", height = "); Serial.println(h);
  // Draw the image, top left at 0,0
  TJpgDec.drawJpg(0, 0, fb->buf, fb->len);
  esp_camera_fb_return(fb);
}

void loop() {
 Serial.println("start");
  while (true) {
      take_picture();
  }
}
复制代码
三、演示视频
四 、使用DF的“DFRobot_GDL”图形库
#include <Arduino.h>
#include <Wire.h>
#include <SPI.h>

#include "esp_timer.h"
#include "esp_camera.h"
#include "DFRobot_AXP313A.h"
#include "DFRobot_GDL.h"

DFRobot_AXP313A axp;
#define TFT_DC  3
#define TFT_CS  18
#define TFT_RST 38
#define TFT_BL  21
DFRobot_ILI9341_240x320_HW_SPI  screen(/*dc=*/TFT_DC,/*cs=*/TFT_CS,/*rst=*/TFT_RST);
#define CAMERA_MODEL_DFRobot_FireBeetle2_ESP32S3 // Has PSRAM
#define PWDN_GPIO_NUM     -1
#define RESET_GPIO_NUM    -1
#define XCLK_GPIO_NUM     45
#define SIOD_GPIO_NUM     1
#define SIOC_GPIO_NUM     2

#define Y9_GPIO_NUM       48
#define Y8_GPIO_NUM       46
#define Y7_GPIO_NUM       8
#define Y6_GPIO_NUM       7
#define Y5_GPIO_NUM       4
#define Y4_GPIO_NUM       41
#define Y3_GPIO_NUM       40
#define Y2_GPIO_NUM       39
#define VSYNC_GPIO_NUM    6
#define HREF_GPIO_NUM     42
#define PCLK_GPIO_NUM     5


void init_camera() {

  camera_config_t config;
  config.ledc_channel = LEDC_CHANNEL_0;
  config.ledc_timer = LEDC_TIMER_0;
  config.pin_d0 = Y2_GPIO_NUM;
  config.pin_d1 = Y3_GPIO_NUM;
  config.pin_d2 = Y4_GPIO_NUM;
  config.pin_d3 = Y5_GPIO_NUM;
  config.pin_d4 = Y6_GPIO_NUM;
  config.pin_d5 = Y7_GPIO_NUM;
  config.pin_d6 = Y8_GPIO_NUM;
  config.pin_d7 = Y9_GPIO_NUM;
  config.pin_xclk = XCLK_GPIO_NUM;
  config.pin_pclk = PCLK_GPIO_NUM;
  config.pin_vsync = VSYNC_GPIO_NUM;
  config.pin_href = HREF_GPIO_NUM;
  config.pin_sscb_sda = SIOD_GPIO_NUM;
  config.pin_sscb_scl = SIOC_GPIO_NUM;
  config.pin_pwdn = PWDN_GPIO_NUM;
  config.pin_reset = RESET_GPIO_NUM;
  config.xclk_freq_hz = 20000000;
  config.frame_size = FRAMESIZE_UXGA;
  //config.pixel_format = PIXFORMAT_JPEG; // for streaming
  config.pixel_format = PIXFORMAT_RGB565; // for face detection/recognition
  config.grab_mode = CAMERA_GRAB_WHEN_EMPTY;
  config.fb_location = CAMERA_FB_IN_PSRAM;
  config.jpeg_quality = 12;
  config.fb_count = 1;

  // if PSRAM IC present, init with UXGA resolution and higher JPEG quality

  //                      for larger pre-allocated frame buffer.
  if (psramFound()) {
    config.frame_size = FRAMESIZE_QVGA;
    config.jpeg_quality = 20;
    config.fb_count = 1;
    Serial.println("PSRAM");
  } else {
    config.frame_size = FRAMESIZE_QVGA;
    config.jpeg_quality = 12;
    config.fb_count = 1;

  }

  // camera init
  while (axp.begin() != 0)
  {
    Serial.println("init error");
    delay(1000);
  }
  axp.enableCameraPower(axp.eOV2640); // 设置摄像头供电
  esp_err_t err = esp_camera_init(&config);
  if (err != ESP_OK) {
    Serial.printf("Camera init failed with error 0x%x", err);
    return;
  }

  sensor_t * s = esp_camera_sensor_get();
  // initial sensors are flipped vertically and colors are a bit saturated

  if (s->id.PID == OV2640_PID) {
    Serial.println("PID");
    s->set_vflip(s, 1); // flip it back
    s->set_brightness(s, 2); // up the brightness just a bit
    s->set_saturation(s, 0);
  }

}
 int64_t last_frame = 0;
void setup() {
  Serial.begin(9600);
  Serial.println("ESP32-CAM Picture");
  //tft.Init(INITR_BLACKTAB);

  init_camera();

  screen.begin();
  screen.fillScreen(COLOR_RGB565_BLACK);
  screen.setRotation(1);

    if(!last_frame) {
        last_frame = esp_timer_get_time();
    }
    screen.setCursor(0, 50);
}


void loop() {
 Serial.println("start");
  while (true) {
    //int64_t fr_end = esp_timer_get_time();
    //int64_t frame_time = fr_end - last_frame;
    //int16_t color = 0x00FF;
    //last_frame = fr_end;
    //frame_time /= 1000;
    //bool s;
    camera_fb_t * fb = NULL;
    fb = esp_camera_fb_get();
    //size_t _jpg_len = 0;
    //uint8_t * _jpg_buf = NULL;
    //s=fmt2jpg(fb->buf,fb->len,fb->width,fb->height,fb->format,80,&_jpg_buf,&_jpg_len);
    //s=frame2jpg(fb,80,&_jpg_buf,&_jpg_len);
    //s=frame2bmp(fb,&_jpg_buf,&_jpg_len);
    screen.drawPIC(0,0,fb->width,fb->height,fb->buf);
    //screen.setCursor(20, 50);
    //screen.setTextColor(color+=0x3000);
    //screen.setTextSize(4);
    //screen.println(String(frame_time));
    esp_camera_fb_return(fb);
    delay(10);
  }
}

复制代码
六、演示视频


 沪公网安备31011502402448
 置顶卡
置顶卡 变色卡
变色卡 千斤顶
千斤顶
 活跃会员
活跃会员
 宣传大使
宣传大使
 牛X认证
牛X认证
 创客造
创客造
 编辑选择奖
编辑选择奖
 志“童”道合
 编辑选择奖
编辑选择奖
 编辑选择奖
编辑选择奖
 编辑选择奖
编辑选择奖
 编辑选择奖
编辑选择奖


