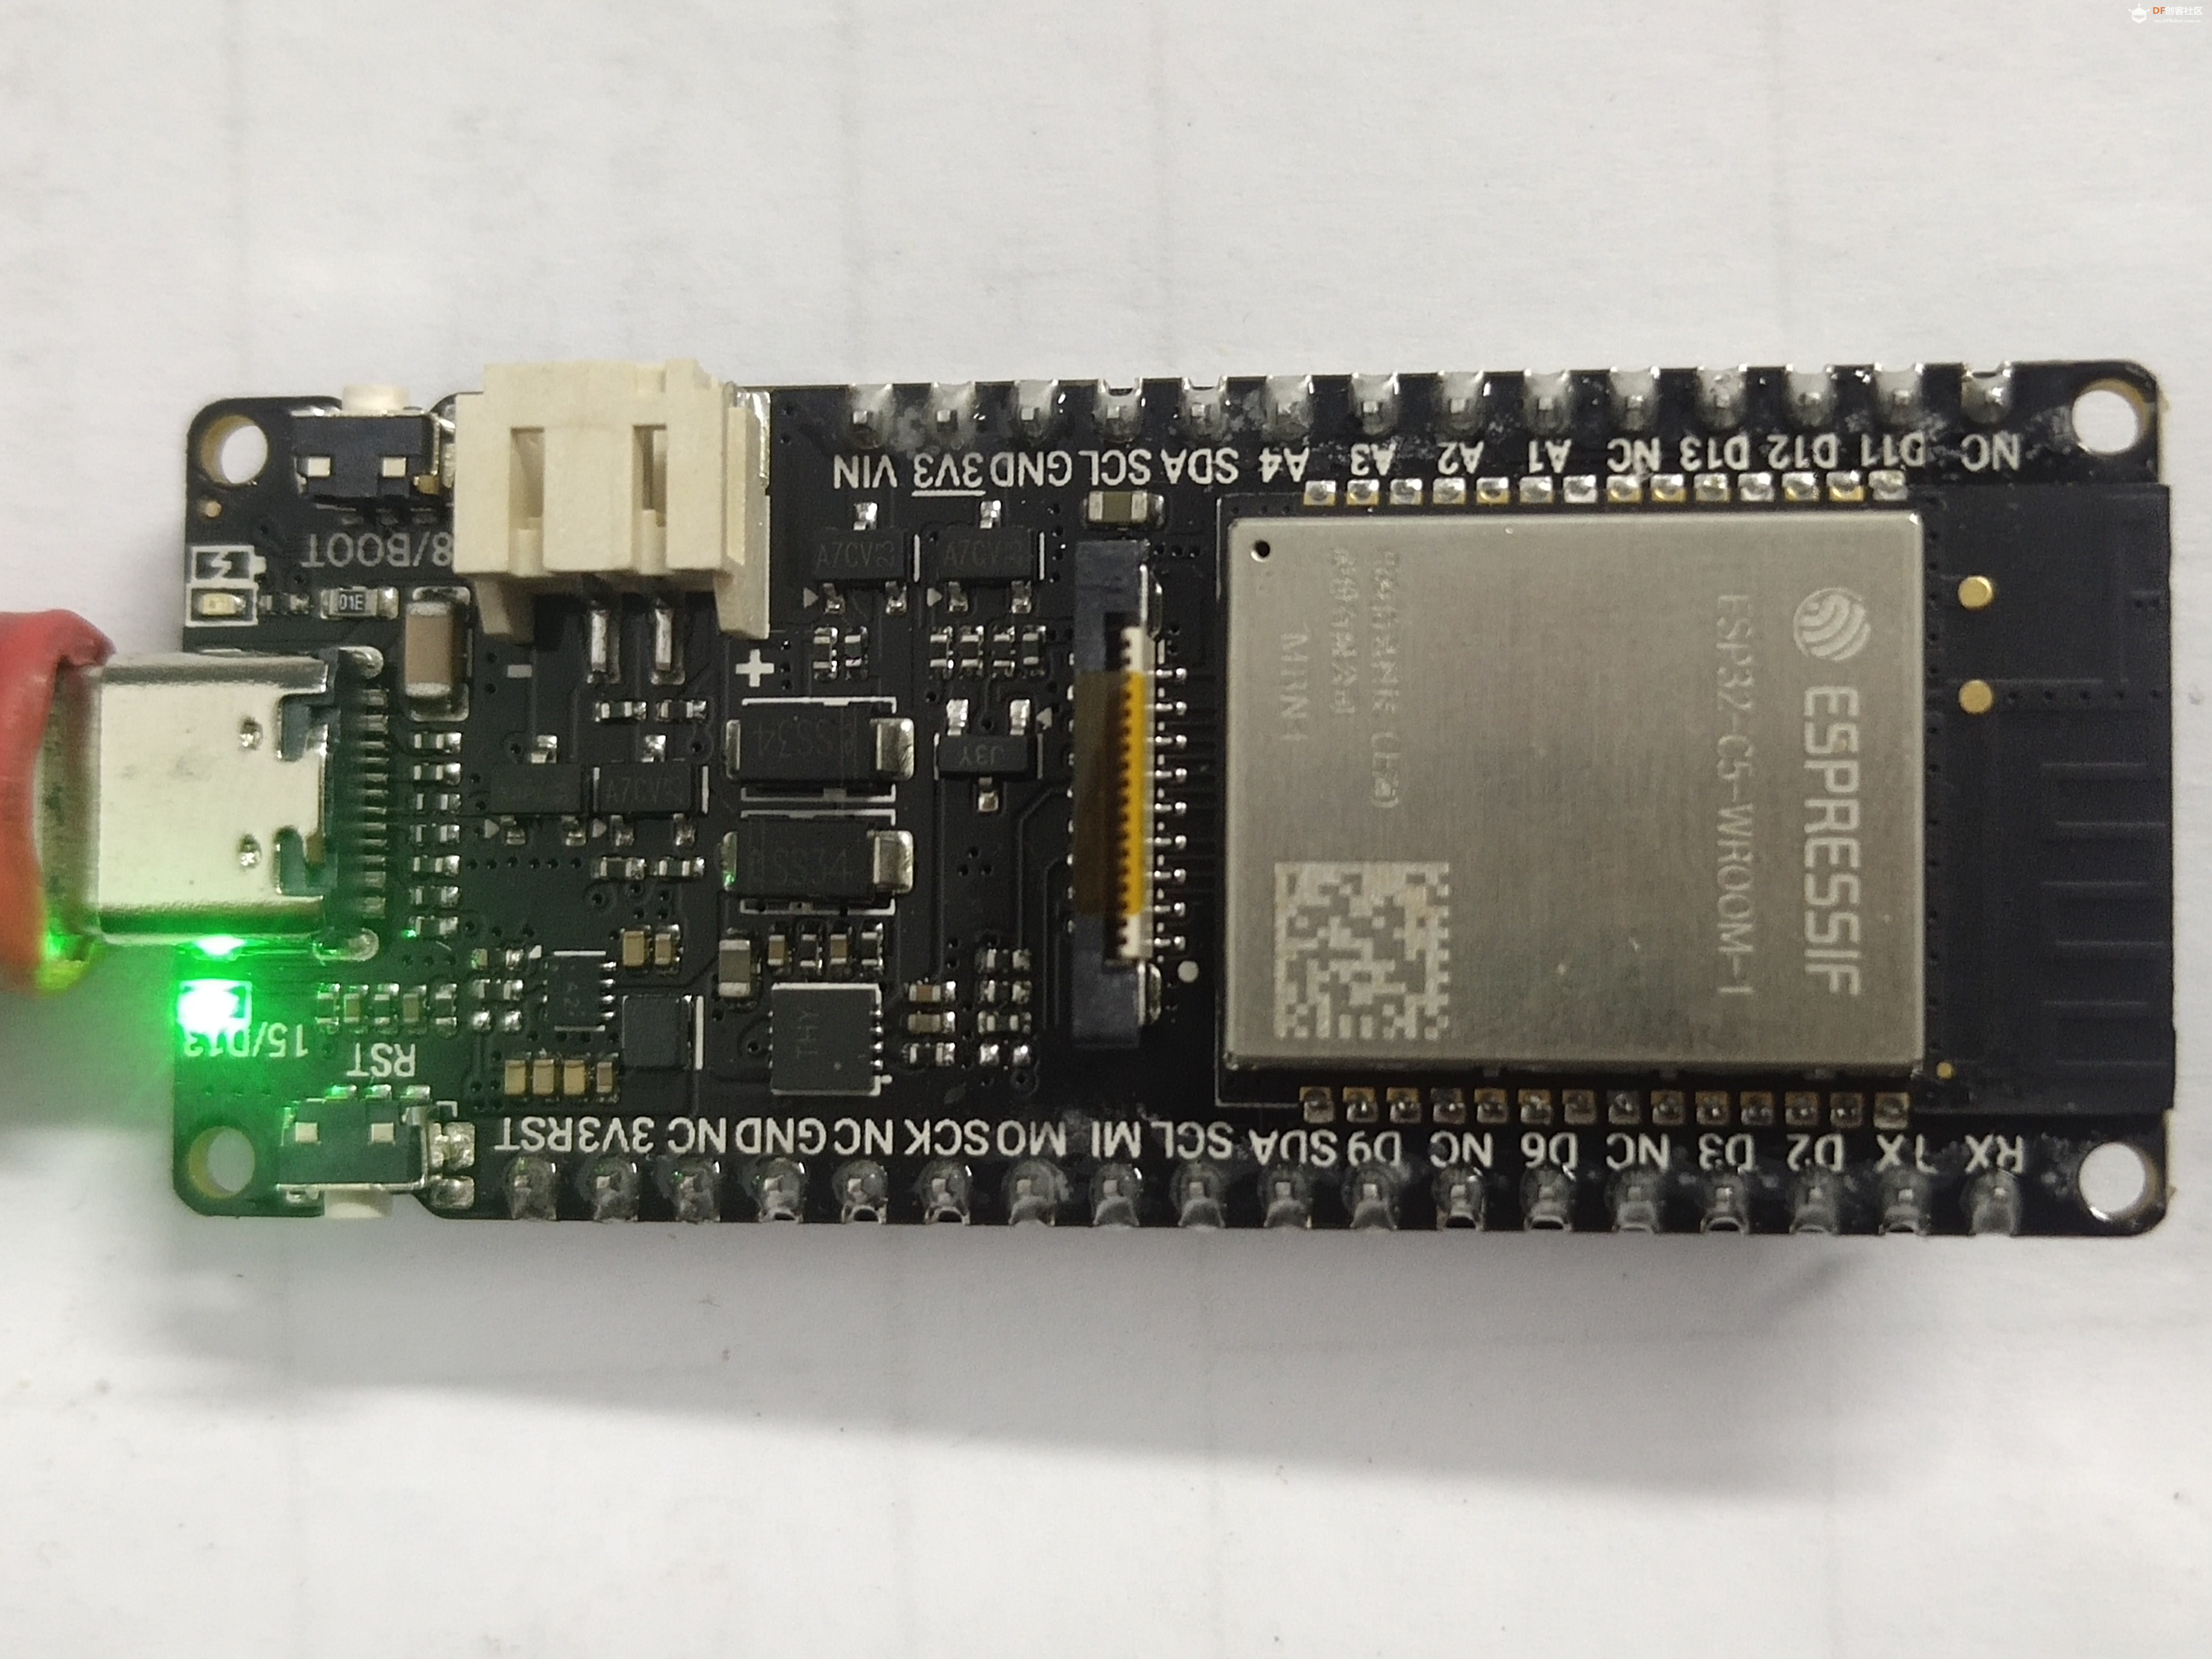
一、Firebeetle 2 ESP32 C5简介
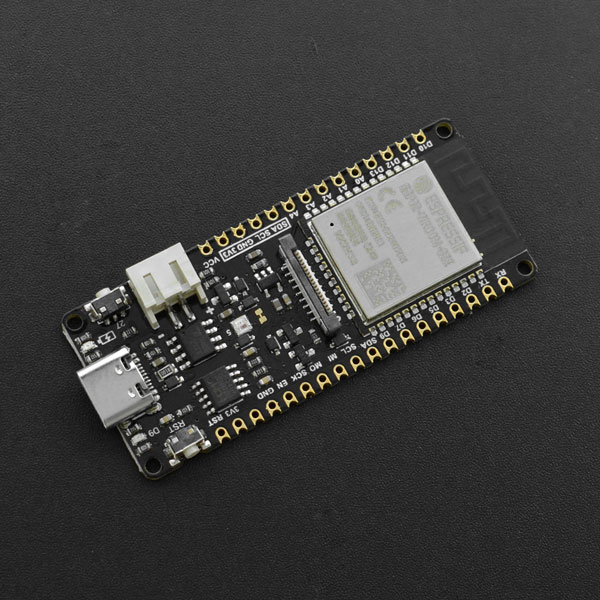
Firebeetle 2 ESP32 C5 Development Board 的亮点主要有以下几点:
高性能处理器:搭载 ESP32-C5-WROOM-1-N4 模组,采用 RISC-V 32 位单核处理器,主频高达 240MHz,能够快速处理各种任务,满足物联网设备的计算需求。
强大的无线连接能力:支持 2.4G 和 5G 双频 Wi-Fi 6,具备更高的传输速率、更低的延迟和更少的干扰,同时 Wi-Fi 6 技术通过 OFDMA 频分复用和目标唤醒时间机制,提升了网络容量并降低了设备功耗。此外,还支持 BLE、Zigbee、Thread 等通讯协议,可构建 Matter Wi-Fi/Thread 终端设备,实现跨平台智能家居设备互联。
高效的电源管理:支持 Type-C、5V DC 及太阳能输入对锂电池充电,解决了无电源场景的部署难题。采用太阳能电源管理模块同款芯片,可最大化发电效率。集成电池电量监测功能,支持低电量预警,并提供一组可控 3.3V 电源输出,可切断外接传感器供电以进一步降低功耗,其 deep-sleep 电流为 23μA。
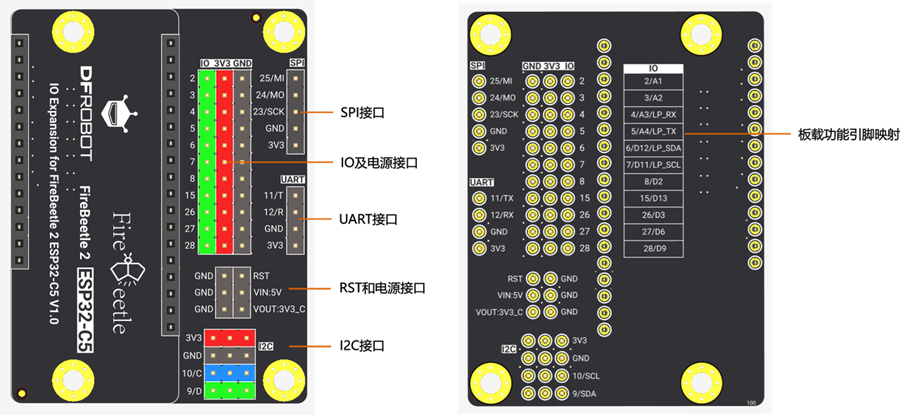
便捷的接口设计:板载 GDI 接口,可轻松连接屏幕,方便进行人机交互。设有 PH2.0 电池接口,方便连接电池。搭配专用 IO 扩展底板,IO 引脚全部引出且做了功能分区,无需焊接即可快速连接各种传感器外设,降低了开发难度和成本。
丰富的编程支持
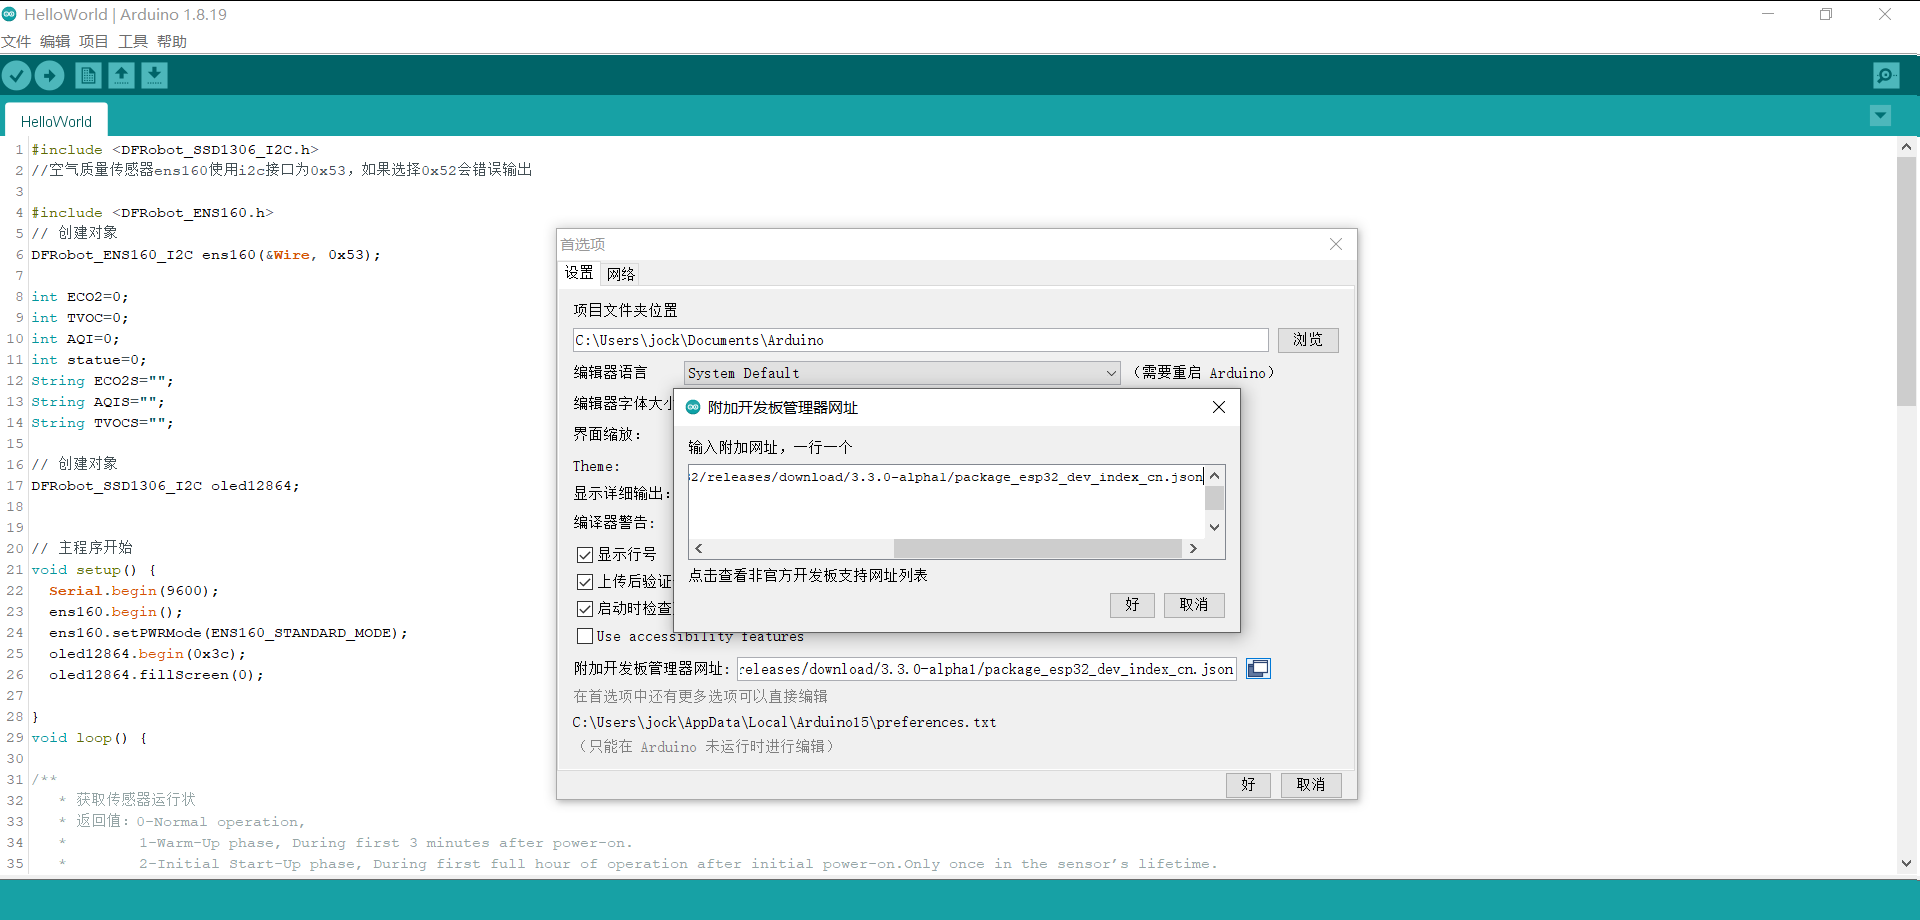
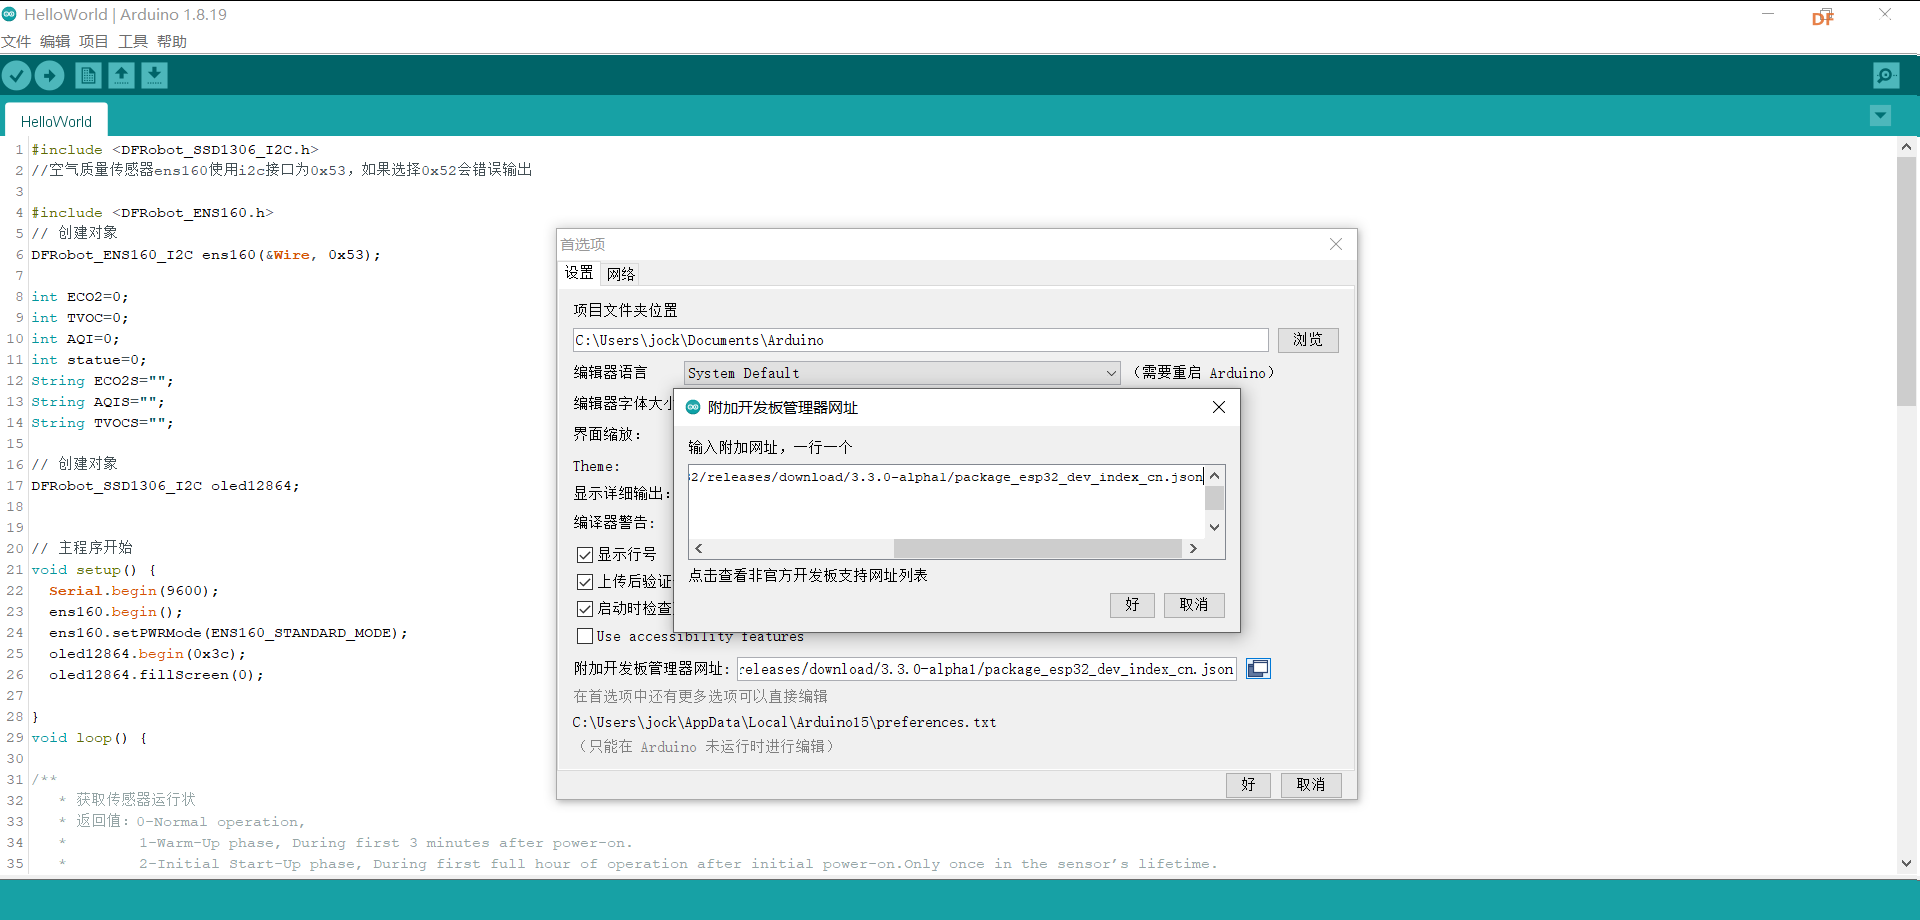
安装了最新版的Arduino v2.3.6后,按照步骤,居然可以找到该版本了。
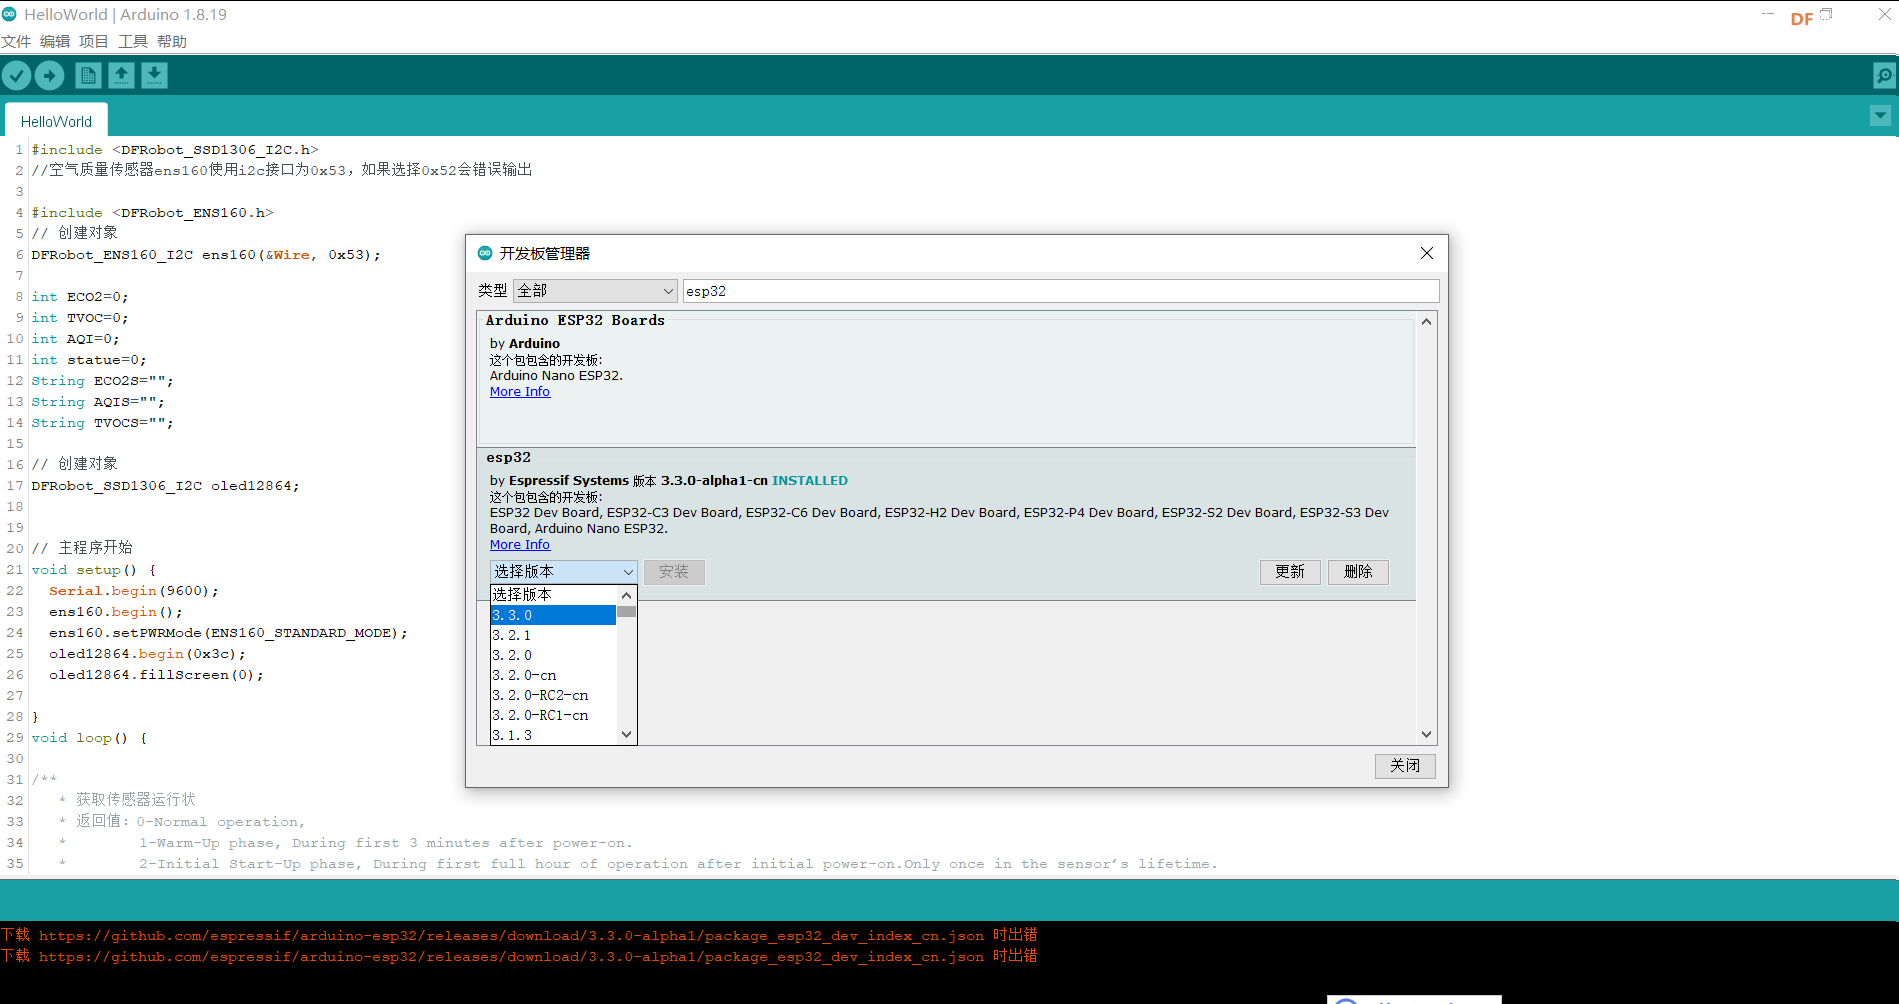
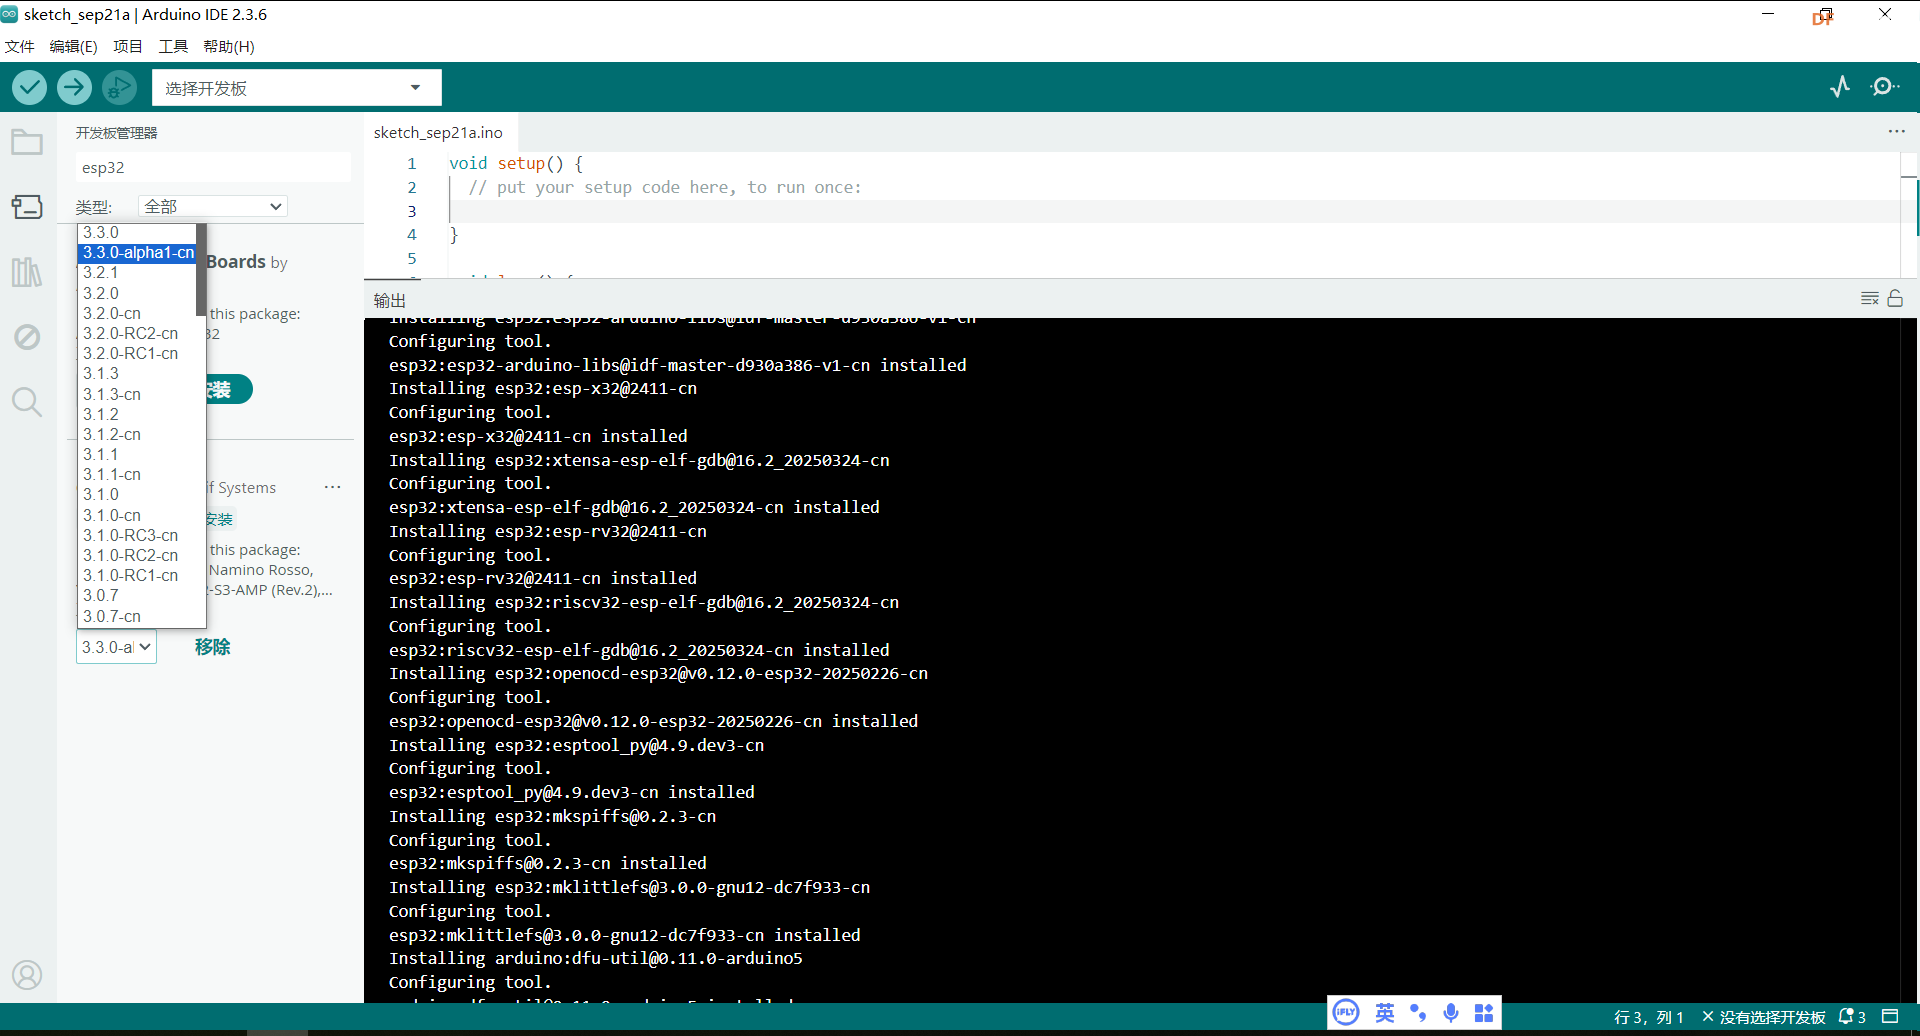
因为试用的Firebeetle 2 ESP32-C5开发板板载ESP32-C5模组为ECO1 版本,在Arduino IDE开发环境中仅esp32 v3.3.0-alpha1分支上支持。所以点击安装esp32 v3.3.0-alpha1版本。安装后如下所示,
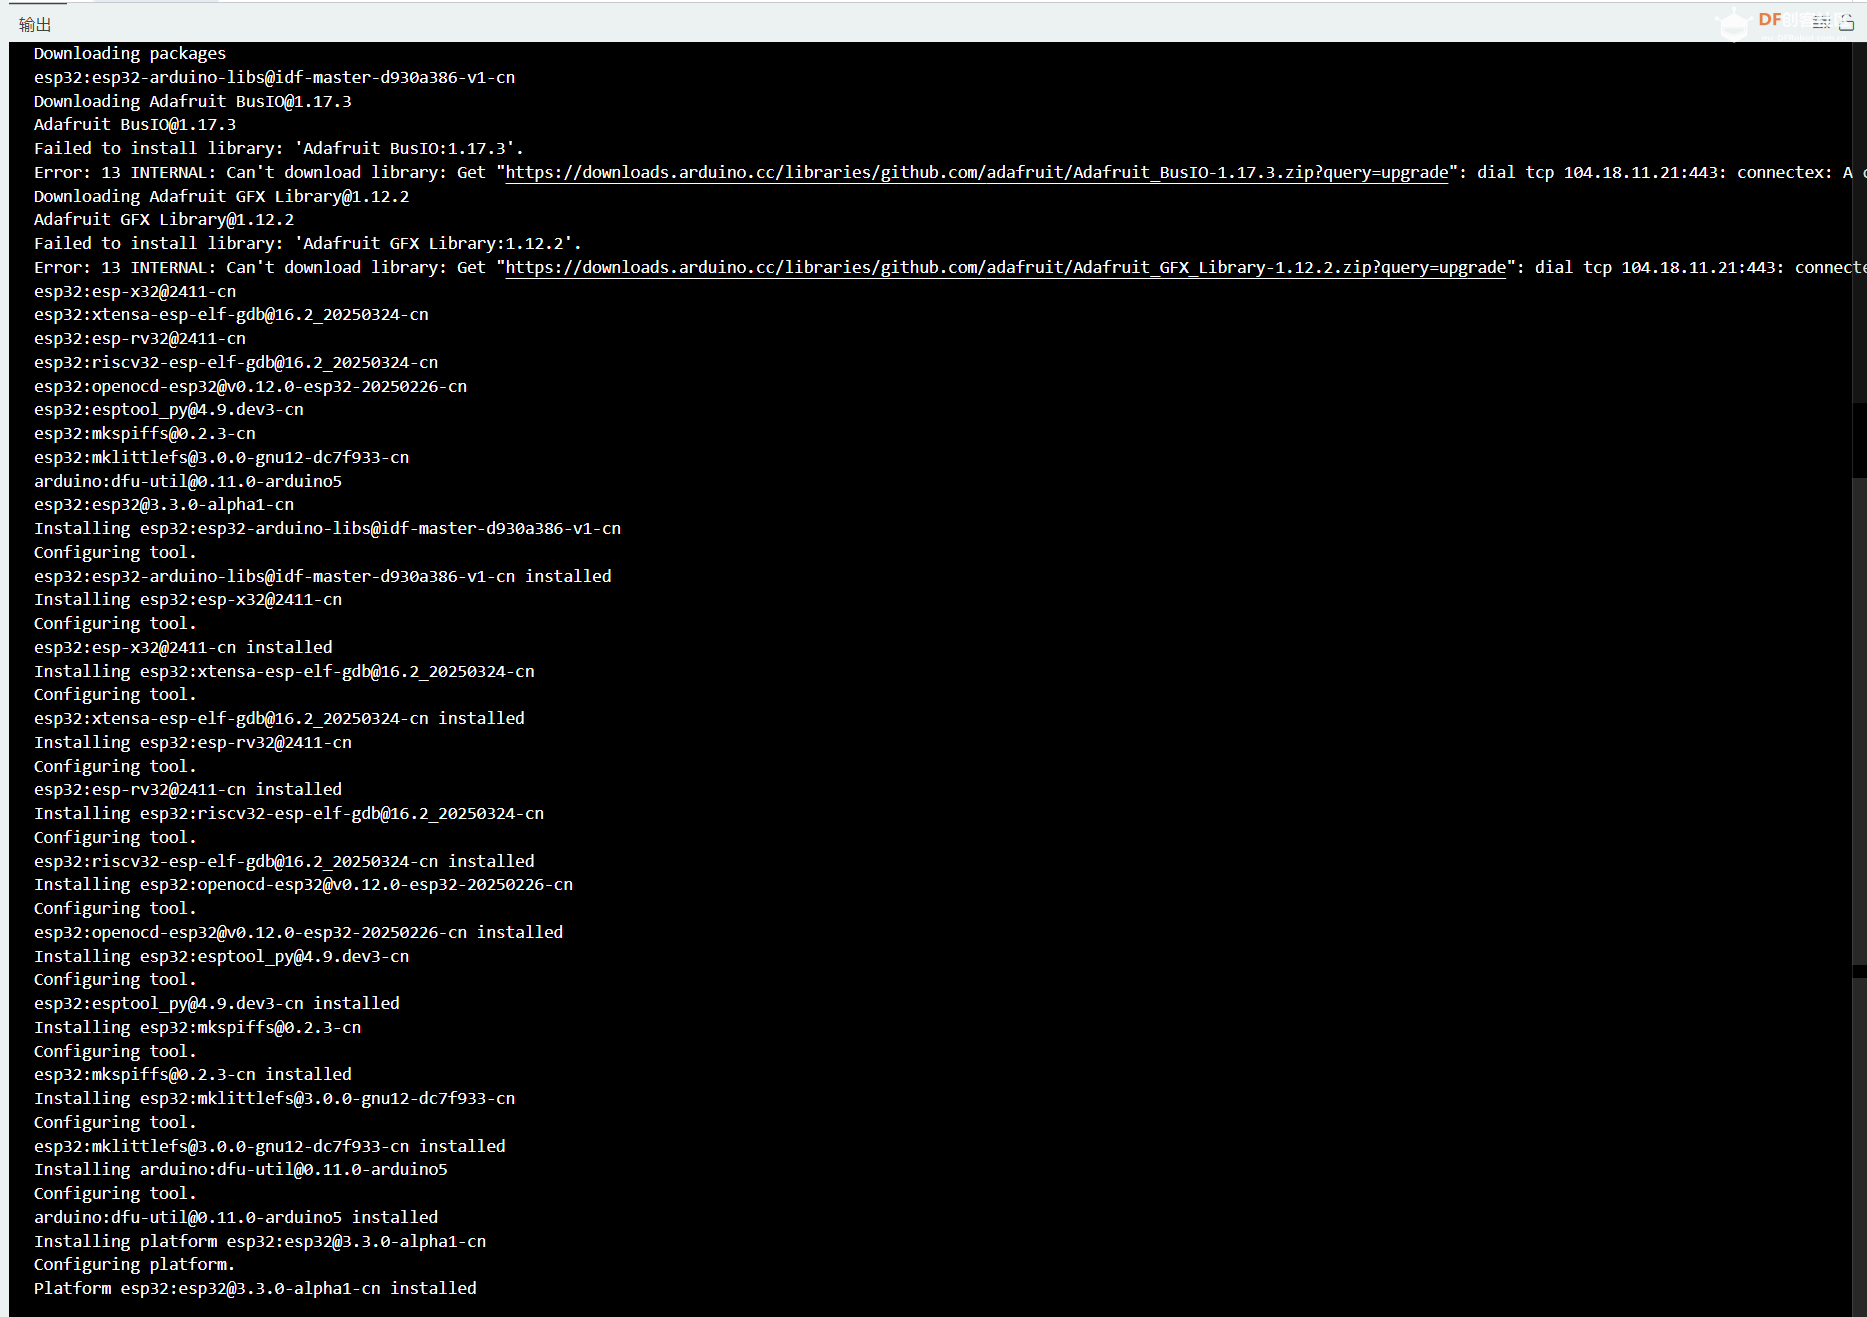
终端显示下载的文件有
Downloading packages
esp32:esp32-arduino-libs@idf-master-d930a386-v1-cn
Downloading Adafruit mailto:BusIO@1.17.3
Adafruit mailto:BusIO@1.17.3
Failed to install library: 'Adafruit BusIO:1.17.3'.
Error: 13 INTERNAL: Can't download library: Get "https://downloads.arduino.cc/libraries/github.com/adafruit/Adafruit_BusIO-1.17.3.zip?query=upgrade": dial tcp 104.18.11.21:443: connectex: A connection attempt failed because the connected party did not properly respond after a period of time, or established connection failed because connected host has failed to respond.
Downloading Adafruit GFX mailto:Library@1.12.2
Adafruit GFX mailto:Library@1.12.2
Failed to install library: 'Adafruit GFX Library:1.12.2'.
Error: 13 INTERNAL: Can't download library: Get "https://downloads.arduino.cc/libraries/github.com/adafruit/Adafruit_GFX_Library-1.12.2.zip?query=upgrade": dial tcp 104.18.11.21:443: connectex: A connection attempt failed because the connected party did not properly respond after a period of time, or established connection failed because connected host has failed to respond.
esp32:esp-x32@2411-cn
esp32:xtensa-esp-elf-gdb@16.2_20250324-cn
esp32:esp-rv32@2411-cn
esp32:riscv32-esp-elf-gdb@16.2_20250324-cn
esp32:openocd-esp32@v0.12.0-esp32-20250226-cn
esp32:esptool_py@4.9.dev3-cn
esp32:mkspiffs@0.2.3-cn
esp32:mklittlefs@3.0.0-gnu12-dc7f933-cn
arduino:dfu-util@0.11.0-arduino5
esp32:esp32@3.3.0-alpha1-cn
Installing esp32:esp32-arduino-libs@idf-master-d930a386-v1-cn
Configuring tool.
esp32:esp32-arduino-libs@idf-master-d930a386-v1-cn installed
Installing esp32:esp-x32@2411-cn
Configuring tool.
esp32:esp-x32@2411-cn installed
Installing esp32:xtensa-esp-elf-gdb@16.2_20250324-cn
Configuring tool.
esp32:xtensa-esp-elf-gdb@16.2_20250324-cn installed
Installing esp32:esp-rv32@2411-cn
Configuring tool.
esp32:esp-rv32@2411-cn installed
Installing esp32:riscv32-esp-elf-gdb@16.2_20250324-cn
Configuring tool.
esp32:riscv32-esp-elf-gdb@16.2_20250324-cn installed
Installing esp32:openocd-esp32@v0.12.0-esp32-20250226-cn
Configuring tool.
esp32:openocd-esp32@v0.12.0-esp32-20250226-cn installed
Installing esp32:esptool_py@4.9.dev3-cn
Configuring tool.
esp32:esptool_py@4.9.dev3-cn installed
Installing esp32:mkspiffs@0.2.3-cn
Configuring tool.
esp32:mkspiffs@0.2.3-cn installed
Installing esp32:mklittlefs@3.0.0-gnu12-dc7f933-cn
Configuring tool.
esp32:mklittlefs@3.0.0-gnu12-dc7f933-cn installed
Installing arduino:dfu-util@0.11.0-arduino5
Configuring tool.
arduino:dfu-util@0.11.0-arduino5 installed
Installing platform esp32:esp32@3.3.0-alpha1-cn
Configuring platform.
Platform esp32:esp32@3.3.0-alpha1-cn installed
我们测试一下,是否能正常工作。结果我们已经成功安装可以完成以下测试了。
三、程序测试
1.点灯大师
描述:点亮开发板自带LED(15)
代码:
int led = 15;
void setup() {
  pinMode(led,OUTPUT);
  digitalWrite(led,HIGH);
}

void loop() {
}
编译上传后效果如下:
2.点灯大师_闪烁led
描述:控制板子自带LED灯闪烁
int led = 15;
void setup() {
  pinMode(led,OUTPUT);

}

void loop() {

  digitalWrite(led,HIGH);
  delay(1000);
  digitalWrite(led,LOW);
  delay(1000);
}
编译上传后效果如下:
3.点灯大师_呼吸灯
描述:控制板载LED完成呼吸灯
// LED 使用的 GPIO 引脚
const uint8_t LED_PIN = 15; // 可以根据你的板子改为其他可用引脚
const uint32_t PWM_FREQ = 5000;  // PWM 频率
const uint8_t PWM_RESOLUTION = 8; // 8 位分辨率(0~255)

void setup() {
  Serial.begin(115200);

  // 初始化 LED PWM
  if (ledcAttach(LED_PIN, PWM_FREQ, PWM_RESOLUTION)) {
    Serial.println("LED PWM attached successfully.");
  }

  // 使用 analogWrite 设置亮度
  analogWrite(LED_PIN, 0);
}

void loop() {
  // 渐亮
  Serial.println("LED fading in...");
  ledcFade(LED_PIN, 0, 255, 2000); // 从 0 到 255,渐变时间 2 秒
  delay(2500);

  // 渐灭
  Serial.println("LED fading out...");
  ledcFade(LED_PIN, 255, 0, 2000); // 从 255 到 0,渐变时间 2 秒
  delay(2500);
}
编译上传后效果如下:
4.点亮I2C LCD1602液晶模块
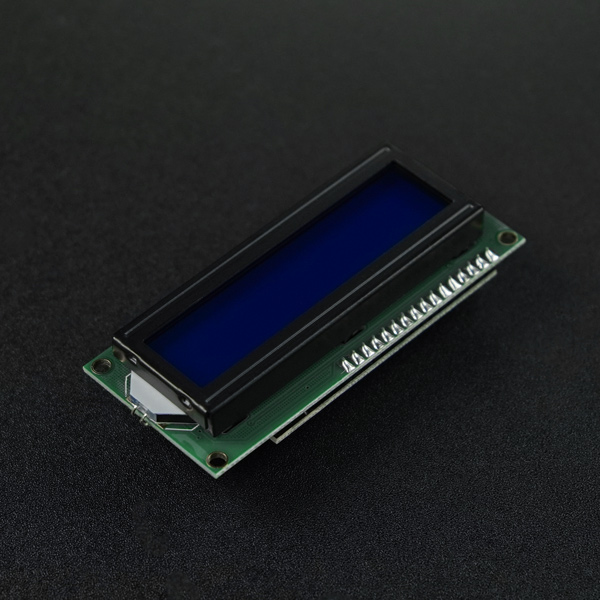
IIC LCD1602 display module 兼容Gadgeteer简介
该液晶显示是I2C接口的LCD显示器,I2C只需两根线就可以实现数据显示,还可以串联多个I2C设备。标准I2C接口,除了Arduino可以使用之外,其他单片机同样可以进行驱动控制。
I2C LCD1602液晶模块,可以显示2行,每行16个字符。对于Arduino初学者来说,不必为繁琐复杂液晶驱动电路连线而头疼了,这款LCD扩展板将电路简化,使用相关文档中的库文件,您只需使用几行简单的Arduino控制代码便能完成LCD控制显示的功能。
I2C LCD1602液晶模块背面的电位器还能提供你调节液晶显示器对比度的功能。
显示屏自带的排线为 Gadgeteer接口专用,正常使用arduino请使用普通杜邦线连接。
此液晶显示屏'''默认地址为0x20 ''',如地址错误会导致屏幕无显示。
参数:
模块供电电压:5v
接口: 1个I2C / TWI 两线数据通讯接口,2个gadgeteer接口
I2C接口通讯地址:0x20-0x27(出厂默认地址0x20)
背光:蓝色,白色字符
可调节对比度
尺寸: 82x35x18mm
重量: 40g
接口定义:
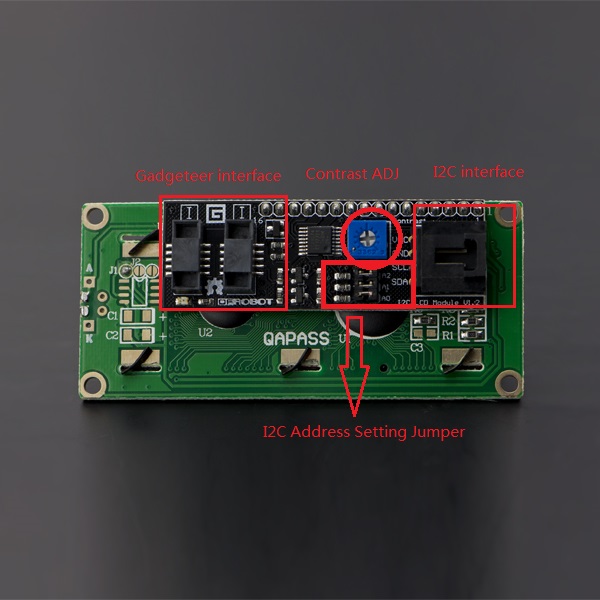
注意:如果屏幕显示不清晰,请使用十字螺丝刀旋转Contrast ADJ以调节屏幕对比度至能看清即可。
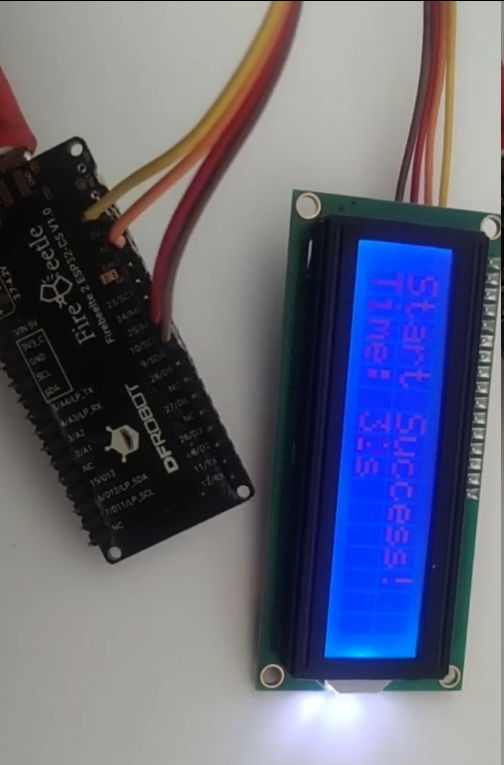
程序描述:点亮屏幕,显示中英文
#include <Wire.h>
#include <LiquidCrystal_I2C.h>

// 保持你实际使用的引脚和地址(关键!不要随意修改)
#define SDA_PIN 9   // 与你的硬件接线一致
#define SCL_PIN 10  // 与你的硬件接线一致
LiquidCrystal_I2C lcd(0x20, 16, 2);  // 已验证的正确地址

void setup() {
  Wire.begin(SDA_PIN, SCL_PIN);
  lcd.init();        // 初始化LCD
  lcd.backlight();   // 打开背光(若想关闭可改为lcd.noBacklight())

  // 初始显示:第一行显示固定内容,第二行留空
  lcd.setCursor(0, 0);  // 光标定位到「第0行第0列」(1602的行/列从0开始计数)
  lcd.print("Start Success!");
  lcd.setCursor(0, 1);
  lcd.print("Time: 0s");
}

// 新增:显示秒数计数(动态更新内容)
unsigned long count = 0;  // 计数变量
unsigned long lastTime = 0;  // 记录上一次更新时间

void loop() {
  // 每1秒更新一次「运行时间」
  if (millis() - lastTime >= 1000) {
    count++;
    lastTime = millis();  // 重置计时起点

    // 先清空第二行的旧内容(避免数字叠加)
    lcd.setCursor(6, 1);  // 定位到「Time: 」后面的位置
    lcd.print("   ");     // 用空格覆盖旧数字

    // 显示新的秒数
    lcd.setCursor(6, 1);
    lcd.print(count);
    lcd.print("s");
  }
}
接线:
| 屏幕 引脚 |
ESP32-C5 引脚 |
说明 |
| VCC |
3.3V |
电源(请勿接 5V,可能烧毁屏幕) |
| GND |
GND |
接地 |
| SDA |
9 |
SPI 数据(MOSI) |
| SCL |
10 |
SPI 时钟 |
编译上传后,效果如下:
5.点亮1.8寸RGB-TFT屏幕
1.8寸RGB-TFT屏幕简介
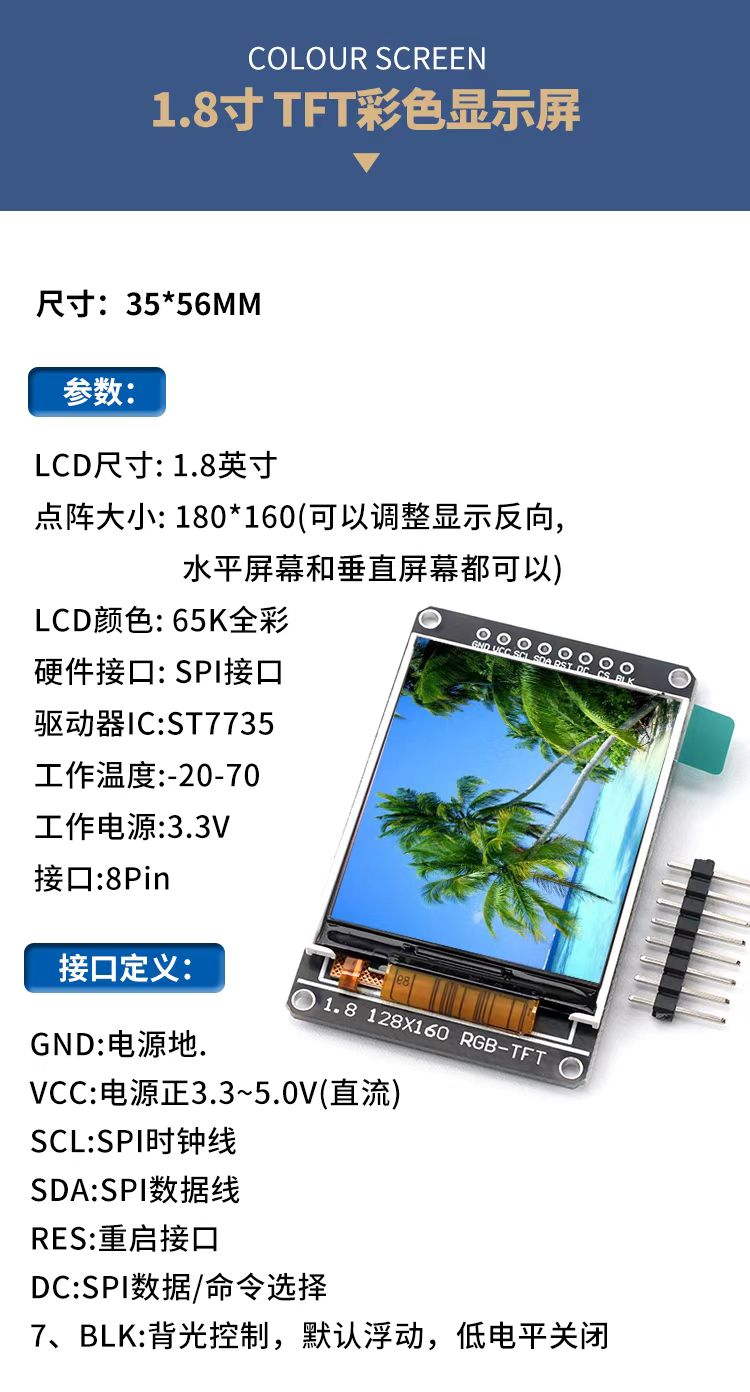
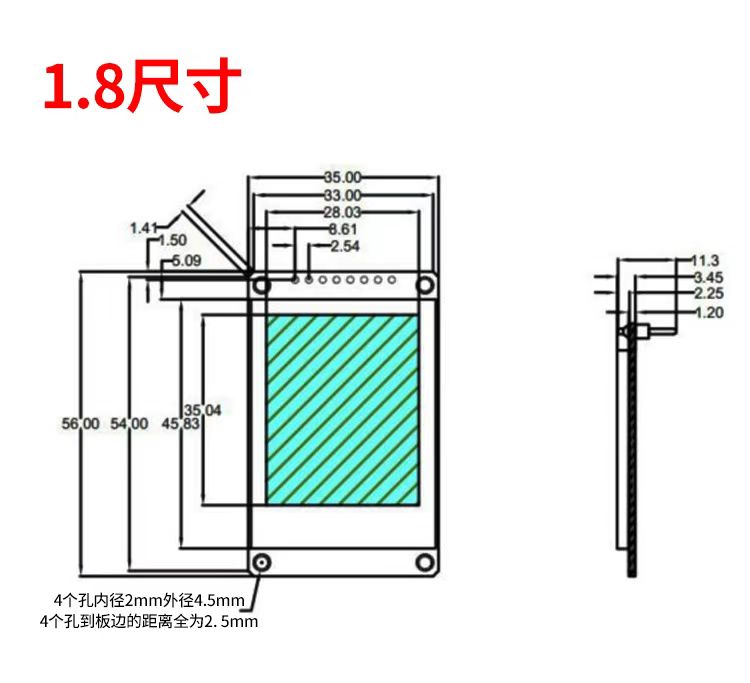
屏幕尺寸:35×56MM
参数:
- LCD尺寸:1.8英寸
- 点阵大小:180*160(可以调整显示反向,水平屏幕和垂直屏幕都可以)
- LCD颜色:65K全彩
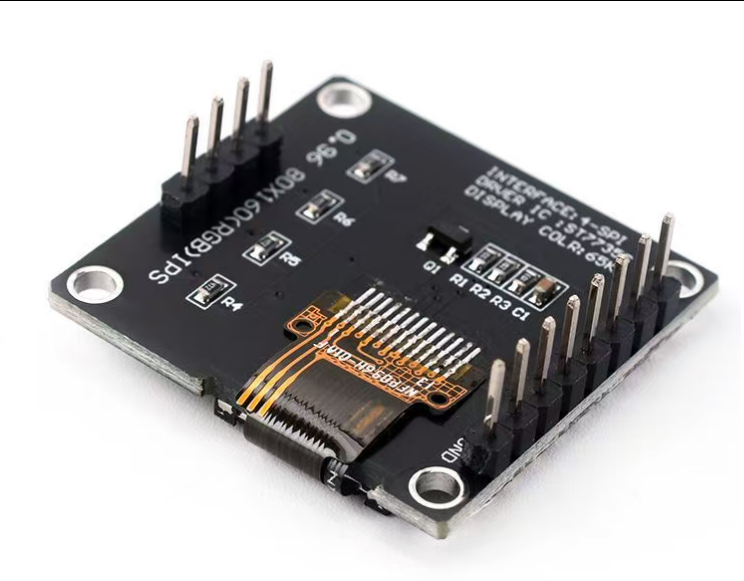
- 硬件接口:SPI接口驱动器IC:ST7735
- 工作温度:-20-70工作电源:3.3V
- 接口:8Pin
接口定义:
- GND:电源地
- RGB-TFT
- VCC:电源正3.3~5.0V(直流)
- SCL:SPI时钟线
- SDA:SPI数据线
- RES:重启接口
- DC:SPI数据/命令选择
- BLK:背光控制,默认浮动,低电平关闭
驱动IC芯片:ST7735S
接线:
屏幕 |
esp32 C5 |
说明 |
| TFT_SCLK |
23 |
SPI时钟 |
| TFT_MOSI |
24 |
SPI主机输出,从机输⼊ |
| TFT_BL |
15 |
显示屏背光 |
| TFT_DC |
8 |
LCD数据/命令 |
| TFT_RST |
26 |
LCD复位 |
| TFT_CS |
27 |
TFT⽚选 |
| TFT_VCC |
3.3V |
供电为3.3V,5.0v会烧坏屏幕 |
| TFT_gnd |
gnd |
共地 |
程序测试:
我们使用TFT-eSPI库中的demo进行测试。
代码如下:
#include "SPI.h"
#include "TFT_eSPI.h"

TFT_eSPI tft = TFT_eSPI();

unsigned long total = 0;
unsigned long tn = 0;
void setup() {
  Serial.begin(9600);
  while (!Serial);

  Serial.println(""); Serial.println("");
  Serial.println("TFT_eSPI library test!");

  tft.init();

  tn = micros();
  tft.fillScreen(TFT_RED);

  // Create a viewport 220 x 300 pixels
  tft.setViewport(0,0,127,159);

  tft.frameViewport(TFT_RED, -1); // 1 pixel wide frame around viewport

  yield(); Serial.println(F("Benchmark                Time (microseconds)"));

  yield(); Serial.print(F("Screen fill              "));
  yield(); Serial.println(testFillScreen());
  //total+=testFillScreen();
  //delay(500);

  yield(); Serial.print(F("Text                     "));
  yield(); Serial.println(testText());
  //total+=testText();
  //delay(3000);

  yield(); Serial.print(F("Lines                    "));
  yield(); Serial.println(testLines(TFT_CYAN));
  //total+=testLines(TFT_CYAN);
  //delay(500);

  yield(); Serial.print(F("Horiz/Vert Lines         "));
  yield(); Serial.println(testFastLines(TFT_RED, TFT_BLUE));
  //total+=testFastLines(TFT_RED, TFT_BLUE);
  //delay(500);

  yield(); Serial.print(F("Rectangles (outline)     "));
  yield(); Serial.println(testRects(TFT_GREEN));
  //total+=testRects(TFT_GREEN);
  //delay(500);

  yield(); Serial.print(F("Rectangles (filled)      "));
  yield(); Serial.println(testFilledRects(TFT_YELLOW, TFT_MAGENTA));
  //total+=testFilledRects(TFT_YELLOW, TFT_MAGENTA);
  //delay(500);

  yield(); Serial.print(F("Circles (filled)         "));
  yield(); Serial.println(testFilledCircles(10, TFT_MAGENTA));
  //total+= testFilledCircles(10, TFT_MAGENTA);

  yield(); Serial.print(F("Circles (outline)        "));
  yield(); Serial.println(testCircles(10, TFT_WHITE));
  //total+=testCircles(10, TFT_WHITE);
  //delay(500);

  yield(); Serial.print(F("Triangles (outline)      "));
  yield(); Serial.println(testTriangles());
  //total+=testTriangles();
  //delay(500);

  yield(); Serial.print(F("Triangles (filled)       "));
  yield(); Serial.println(testFilledTriangles());
  //total += testFilledTriangles();
  //delay(500);

  yield(); Serial.print(F("Rounded rects (outline)  "));
  yield(); Serial.println(testRoundRects());
  //total+=testRoundRects();
  //delay(500);

  yield(); Serial.print(F("Rounded rects (filled)   "));
  yield(); Serial.println(testFilledRoundRects());
  //total+=testFilledRoundRects();
  //delay(500);

  yield(); Serial.println(F("Done!")); yield();
  //Serial.print(F("Total = ")); Serial.println(total);

  //yield();Serial.println(millis()-tn);
}

void loop(void) {
  for (uint8_t rotation = 0; rotation < 4; rotation++) {
    tft.setRotation(rotation);
    tft.resetViewport();       // reset viewport to whole screen
    tft.fillScreen(TFT_BLACK); // so it can be cleared

    // Create a viewport 220 x 300 pixels
    tft.setViewport(10,10,128,160);
    tft.frameViewport(TFT_RED, -1); // 1 pixel wide frame around viewport

    testText();
    delay(2000);
  }
}

unsigned long testFillScreen() {
  unsigned long start = micros();
  tft.fillScreen(TFT_BLACK);
  tft.fillScreen(TFT_RED);
  tft.fillScreen(TFT_GREEN);
  tft.fillScreen(TFT_BLUE);
  tft.fillScreen(TFT_BLACK);
  return micros() - start;
}

unsigned long testText() {
  tft.fillScreen(TFT_BLACK);
  unsigned long start = micros();
  tft.setCursor(0, 0);
  tft.setTextColor(TFT_WHITE);  tft.setTextSize(1);
  tft.println("Hello World!");
  tft.setTextColor(TFT_YELLOW); tft.setTextSize(2);
  tft.println(1234.56);
  tft.setTextColor(TFT_RED);    tft.setTextSize(3);
  tft.println(0xDEADBEEF, HEX);
  tft.println();
  tft.setTextColor(TFT_GREEN);
  tft.setTextSize(5);
  tft.println("Groop");
  tft.setTextSize(2);
  tft.println("I implore thee,");
  //tft.setTextColor(TFT_GREEN,TFT_BLACK);
  tft.setTextSize(1);
  tft.println("my foonting turlingdromes.");
  tft.println("And hooptiously drangle me");
  tft.println("with crinkly bindlewurdles,");
  tft.println("Or I will rend thee");
  tft.println("in the gobberwarts");
  tft.println("with my blurglecruncheon,");
  tft.println("see if I don't!");
  return micros() - start;
}

unsigned long testLines(uint16_t color) {
  unsigned long start, t;
  int           x1, y1, x2, y2,
                w = tft.width(),
                h = tft.height();

  tft.fillScreen(TFT_BLACK);

  x1 = y1 = 0;
  y2    = h - 1;
  start = micros();
  for (x2 = 0; x2 < w; x2 += 6) tft.drawLine(x1, y1, x2, y2, color);
  x2    = w - 1;
  for (y2 = 0; y2 < h; y2 += 6) tft.drawLine(x1, y1, x2, y2, color);
  t     = micros() - start; // fillScreen doesn't count against timing

  tft.fillScreen(TFT_BLACK);

  x1    = w - 1;
  y1    = 0;
  y2    = h - 1;
  start = micros();
  for (x2 = 0; x2 < w; x2 += 6) tft.drawLine(x1, y1, x2, y2, color);
  x2    = 0;
  for (y2 = 0; y2 < h; y2 += 6) tft.drawLine(x1, y1, x2, y2, color);
  t    += micros() - start;

  tft.fillScreen(TFT_BLACK);

  x1    = 0;
  y1    = h - 1;
  y2    = 0;
  start = micros();
  for (x2 = 0; x2 < w; x2 += 6) tft.drawLine(x1, y1, x2, y2, color);
  x2    = w - 1;
  for (y2 = 0; y2 < h; y2 += 6) tft.drawLine(x1, y1, x2, y2, color);
  t    += micros() - start;

  tft.fillScreen(TFT_BLACK);

  x1    = w - 1;
  y1    = h - 1;
  y2    = 0;
  start = micros();
  for (x2 = 0; x2 < w; x2 += 6) tft.drawLine(x1, y1, x2, y2, color);
  x2    = 0;
  for (y2 = 0; y2 < h; y2 += 6) tft.drawLine(x1, y1, x2, y2, color);

  return micros() - start;
}

unsigned long testFastLines(uint16_t color1, uint16_t color2) {
  unsigned long start;
  int           x, y, w = tft.width(), h = tft.height();

  tft.fillScreen(TFT_BLACK);
  start = micros();
  for (y = 0; y < h; y += 5) tft.drawFastHLine(0, y, w, color1);
  for (x = 0; x < w; x += 5) tft.drawFastVLine(x, 0, h, color2);

  return micros() - start;
}

unsigned long testRects(uint16_t color) {
  unsigned long start;
  int           n, i, i2,
                cx = tft.width()  / 2,
                cy = tft.height() / 2;

  tft.fillScreen(TFT_BLACK);
  n     = min(tft.width(), tft.height());
  start = micros();
  for (i = 2; i < n; i += 6) {
    i2 = i / 2;
    tft.drawRect(cx - i2, cy - i2, i, i, color);
  }

  return micros() - start;
}

unsigned long testFilledRects(uint16_t color1, uint16_t color2) {
  unsigned long start, t = 0;
  int           n, i, i2,
                cx = tft.width()  / 2 - 1,
                cy = tft.height() / 2 - 1;

  tft.fillScreen(TFT_BLACK);
  n = min(tft.width(), tft.height());
  for (i = n - 1; i > 0; i -= 6) {
    i2    = i / 2;
    start = micros();
    tft.fillRect(cx - i2, cy - i2, i, i, color1);
    t    += micros() - start;
    // Outlines are not included in timing results
    tft.drawRect(cx - i2, cy - i2, i, i, color2);
  }

  return t;
}

unsigned long testFilledCircles(uint8_t radius, uint16_t color) {
  unsigned long start;
  int x, y, w = tft.width(), h = tft.height(), r2 = radius * 2;

  tft.fillScreen(TFT_BLACK);
  start = micros();
  for (x = radius; x < w; x += r2) {
    for (y = radius; y < h; y += r2) {
      tft.fillCircle(x, y, radius, color);
    }
  }

  return micros() - start;
}

unsigned long testCircles(uint8_t radius, uint16_t color) {
  unsigned long start;
  int           x, y, r2 = radius * 2,
                      w = tft.width()  + radius,
                      h = tft.height() + radius;

  // Screen is not cleared for this one -- this is
  // intentional and does not affect the reported time.
  start = micros();
  for (x = 0; x < w; x += r2) {
    for (y = 0; y < h; y += r2) {
      tft.drawCircle(x, y, radius, color);
    }
  }

  return micros() - start;
}

unsigned long testTriangles() {
  unsigned long start;
  int           n, i, cx = tft.width()  / 2 - 1,
                      cy = tft.height() / 2 - 1;

  tft.fillScreen(TFT_BLACK);
  n     = min(cx, cy);
  start = micros();
  for (i = 0; i < n; i += 5) {
    tft.drawTriangle(
      cx    , cy - i, // peak
      cx - i, cy + i, // bottom left
      cx + i, cy + i, // bottom right
      tft.color565(0, 0, i));
  }

  return micros() - start;
}

unsigned long testFilledTriangles() {
  unsigned long start, t = 0;
  int           i, cx = tft.width()  / 2 - 1,
                   cy = tft.height() / 2 - 1;

  tft.fillScreen(TFT_BLACK);
  start = micros();
  for (i = min(cx, cy); i > 10; i -= 5) {
    start = micros();
    tft.fillTriangle(cx, cy - i, cx - i, cy + i, cx + i, cy + i,
                     tft.color565(0, i, i));
    t += micros() - start;
    tft.drawTriangle(cx, cy - i, cx - i, cy + i, cx + i, cy + i,
                     tft.color565(i, i, 0));
  }

  return t;
}

unsigned long testRoundRects() {
  unsigned long start;
  int           w, i, i2,
                cx = tft.width()  / 2 - 1,
                cy = tft.height() / 2 - 1;

  tft.fillScreen(TFT_BLACK);
  w     = min(tft.width(), tft.height());
  start = micros();
  for (i = 0; i < w; i += 6) {
    i2 = i / 2;
    tft.drawRoundRect(cx - i2, cy - i2, i, i, i / 8, tft.color565(i, 0, 0));
  }

  return micros() - start;
}

unsigned long testFilledRoundRects() {
  unsigned long start;
  int           i, i2,
                cx = tft.width()  / 2 - 1,
                cy = tft.height() / 2 - 1;

  tft.fillScreen(TFT_BLACK);
  start = micros();
  for (i = min(tft.width(), tft.height()); i > 20; i -= 6) {
    i2 = i / 2;
    tft.fillRoundRect(cx - i2, cy - i2, i, i, i / 8, tft.color565(0, i, 0));
  }

  return micros() - start;
}
出现如下情况,这里要说明的是,TFT-eSPI库不支持esp32 C5,我使用的是大佬楚乔修改过的。附件中提供下载,但是结果还是不够理想。因该是部分参数设置的问题。
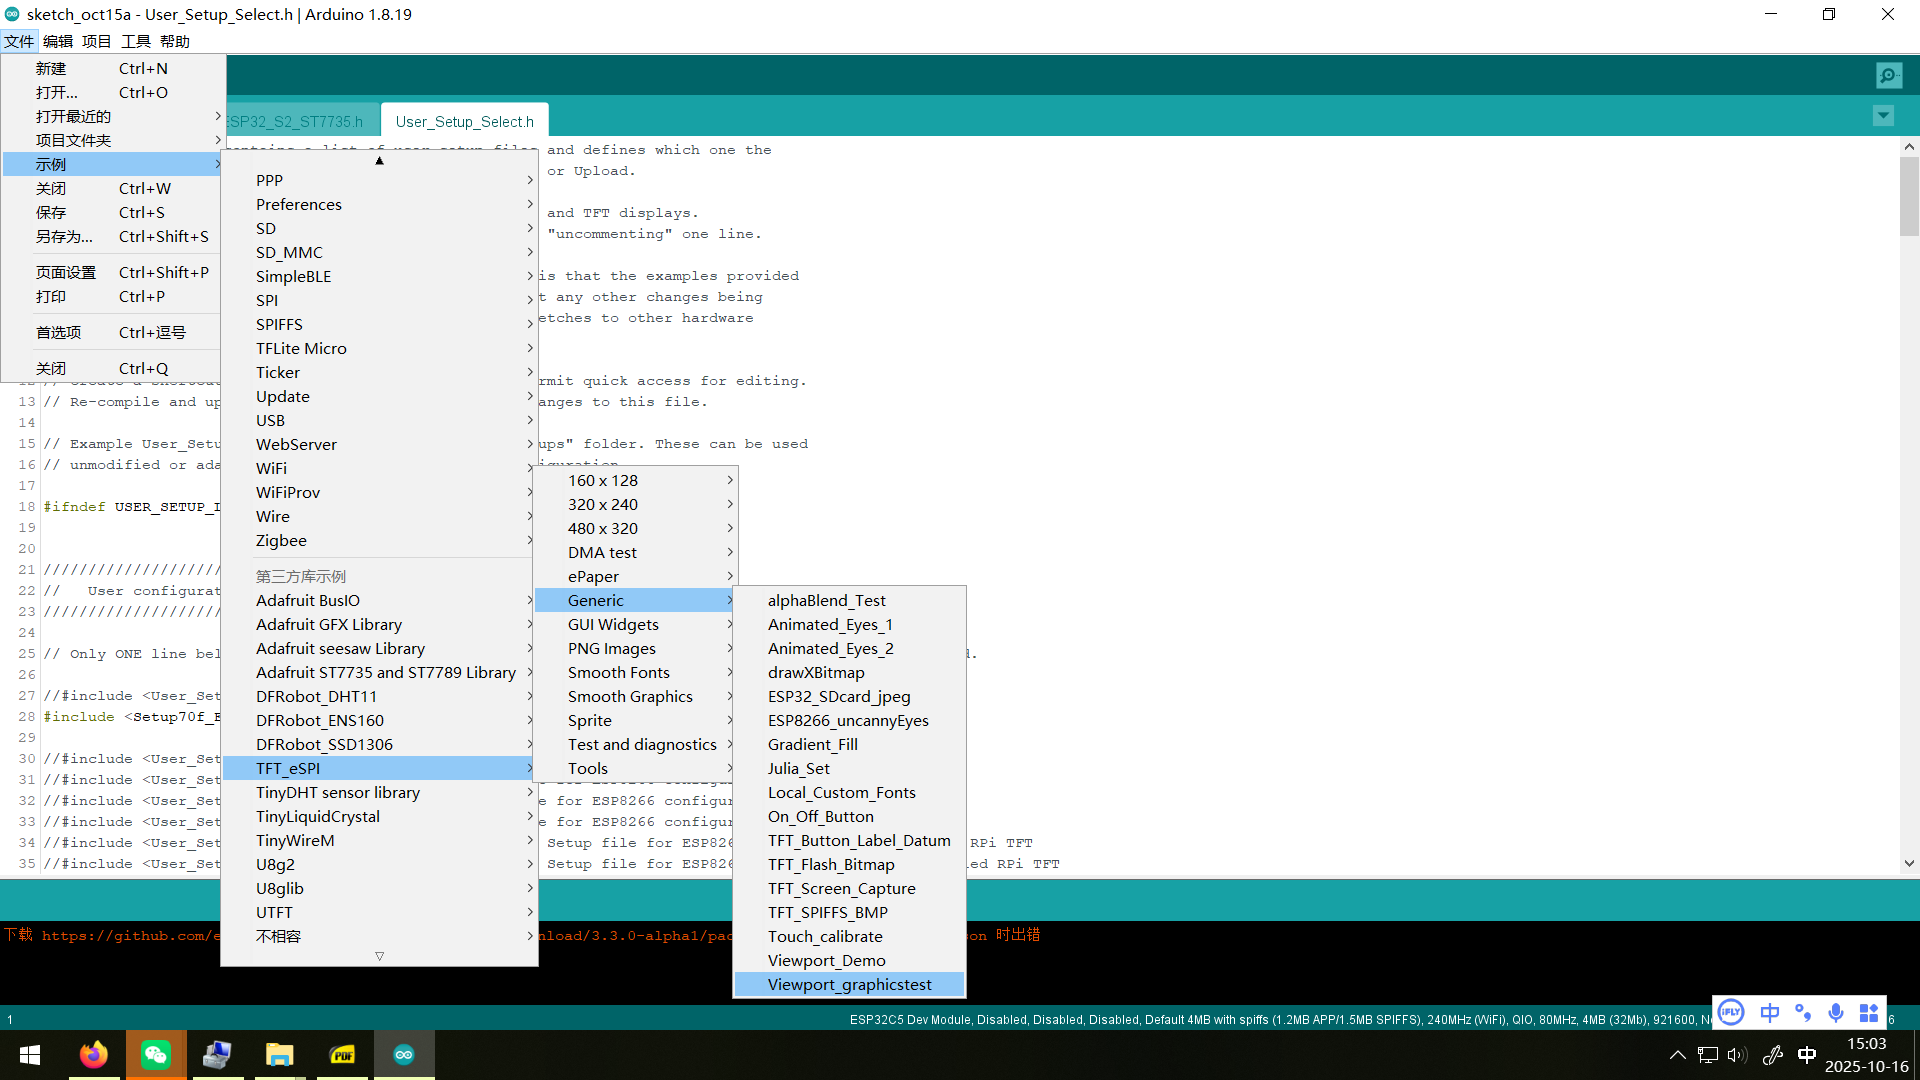
将TFT-eSPI库中文件Setup70f_ESP32_S2_ST7735.h和User_Setup_Select.h提取出来,放到另存demo为新项目的文件夹中,需要修改以下项目:
在User_Setup_Select.h中第27行#include <User_Setup.h>删除,并且加入屏幕驱动#include <Setup70f_ESP32_S2_ST7735.h>,修改后部分效果如下所示:
#ifndef USER_SETUP_LOADED //  Lets PlatformIO users define settings in
                          //  platformio.ini, see notes in "Tools" folder.

///////////////////////////////////////////////////////
//   User configuration selection lines are below    //
///////////////////////////////////////////////////////

// Only ONE line below should be uncommented to define your setup.  Add extra lines and files as needed.

//#include <User_Setup.h>           // Default setup is root library folder
#include <Setup70f_ESP32_S2_ST7735.h>

//#include <User_Setups/Setup1_ILI9341.h>  // Setup file for ESP8266 configured for my ILI9341
//#include <User_Setups/Setup2_ST7735.h>   // Setup file for ESP8266 configured for my ST7735
//#include <User_Setups/Setup3_ILI9163.h>  // Setup file for ESP8266 configured for my ILI9163
//#include <User_Setups/Setup4_S6D02A1.h>  // Setup file for ESP8266 configured for my S6D02A1
//#include <User_Setups/Setup5_RPi_ILI9486.h>        // Setup file for ESP8266 configured for my stock RPi TFT
//#include <User_Setups/Setup6_RPi_Wr_ILI9486.h>     // Setup file for ESP8266 configured for my modified RPi TFT
//#include <User_Setups/Setup7_ST7735_128x128.h>     // Setup file for ESP8266 configured for my ST7735 128x128 display
//#include <User_Setups/Setup8_ILI9163_128x128.h>    // Setup file for ESP8266 configured for my ILI9163 128x128 display
//#include <User_Setups/Setup9_ST7735_Overlap.h>     // Setup file for ESP8266 configured for my ST7735
//#include <User_Setups/Setup10_RPi_touch_ILI9486.h> // Setup file for ESP8266 configured for ESP8266 and RPi TFT with touch

//#include <User_Setups/Setup11_RPi_touch_ILI9486.h> // Setup file configured for ESP32 and RPi TFT with touch
//#include <User_Setups/Setup12_M5Stack_Basic_Core.h>// Setup file for the ESP32 based M5Stack (Basic Core only)
//#include <User_Setups/Setup13_ILI9481_Parallel.h>  // Setup file for the ESP32 with parallel bus TFT
//#include <User_Setups/Setup14_ILI9341_Parallel.h>  // Setup file for the ESP32 with parallel bus TFT
//#include <User_Setups/Setup15_HX8357D.h>           // Setup file for ESP8266 configured for HX8357D
//#include <User_Setups/Setup16_ILI9488_Parallel.h>  // Setup file for the ESP32 with parallel bus TFT
//#include <User_Setups/Setup17_ePaper.h>            // Setup file for ESP8266 and any Waveshare ePaper display
//#include <User_Setups/Setup18_ST7789.h>            // Setup file for ESP8266 configured for ST7789

//#include <User_Setups/Setup19_RM68140_Parallel.h>     // Setup file configured for RM68140 with parallel bus

//#include <User_Setups/Setup20_ILI9488.h>           // Setup file for ESP8266 and ILI9488 SPI bus TFT
//#include <User_Setups/Setup21_ILI9488.h>           // Setup file for ESP32 and ILI9488 SPI bus TFT

//#include <User_Setups/Setup22_TTGO_T4.h>           // Setup file for ESP32 and TTGO T4 version 1.2
//#include <User_Setups/Setup22_TTGO_T4_v1.3.h>      // Setup file for ESP32 and TTGO T4 version 1.3
//#include <User_Setups/Setup23_TTGO_TM.h>           // Setup file for ESP32 and TTGO TM ST7789 SPI bus TFT
//#include <User_Setups/Setup24_ST7789.h>            // Setup file for DSTIKE/ESP32/ESP8266 configured for ST7789 240 x 240
//#include <User_Setups/Setup25_TTGO_T_Display.h>    // Setup file for ESP32 and TTGO T-Display ST7789V SPI bus TFT
//#include <User_Setups/Setup26_TTGO_T_Wristband.h>  // Setup file for ESP32 and TTGO T-Wristband ST7735 SPI bus TFT

//#include <User_Setups/Setup27_RPi_ST7796_ESP32.h>    // ESP32   RPi MHS-4.0 inch Display-B
//#include <User_Setups/Setup28_RPi_ST7796_ESP8266.h>  // ESP8266 RPi MHS-4.0 inch Display-B

//#include <User_Setups/Setup29_ILI9341_STM32.h>          // Setup for Nucleo board
//#include <User_Setups/Setup30_ILI9341_Parallel_STM32.h> // Setup for Nucleo board and parallel display
//#include <User_Setups/Setup31_ST7796_Parallel_STM32.h>  // Setup for Nucleo board and parallel display
//#include <User_Setups/Setup32_ILI9341_STM32F103.h>      // Setup for "Blue/Black Pill"

//#include <User_Setups/Setup33_RPi_ILI9486_STM32.h>      // Setup for Nucleo board

//#include <User_Setups/Setup34_ILI9481_Parallel_STM32.h> // Setup for Nucleo board and parallel display
//#include <User_Setups/Setup35_ILI9341_STM32_Port_Bus.h> // Setup for STM32 port A parallel display

//#include <User_Setups/Setup36_RPi_touch_ST7796.h>      // Setup file configured for ESP32 and RPi ST7796 TFT with touch

//#include <User_Setups/Setup42_ILI9341_ESP32.h>           // Setup file for ESP32 and SPI ILI9341 240x320
//#include <User_Setups/Setup43_ST7735.h>            // Setup file for ESP8266 & ESP32 configured for my ST7735S 80x160
//#include <User_Setups/Setup44_TTGO_CameraPlus.h>   // Setup file for ESP32 and TTGO T-CameraPlus ST7789 SPI bus TFT    240x240
//#include <User_Setups/Setup45_TTGO_T_Watch.h>      // Setup file for ESP32 and TTGO T-Watch ST7789 SPI bus TFT  240x240
//#include <User_Setups/Setup46_GC9A01_ESP32.h>      // Setup file for ESP32 and GC9A01 SPI bus TFT  240x240

//#include <User_Setups/Setup47_ST7735.h>            // Setup file for ESP32 configured for ST7735 128 x 128 animated eyes

//#include <User_Setups/Setup50_SSD1963_Parallel.h>  // Setup file for ESP32 and SSD1963 TFT display

//#include <User_Setups/Setup51_LilyPi_ILI9481.h>    // Setup file for LilyGo LilyPi with ILI9481 display
//#include <User_Setups/Setup52_LilyPi_ST7796.h>     // Setup file for LilyGo LilyPi with ST7796 display

//#include <User_Setups/Setup60_RP2040_ILI9341.h>              // Setup file for RP2040 with SPI ILI9341
//#include <User_Setups/Setup61_RP2040_ILI9341_PIO_SPI.h>      // Setup file for RP2040 with PIO SPI ILI9341
//#include <User_Setups/Setup62_RP2040_Nano_Connect_ILI9341.h> // Setup file for RP2040 with SPI ILI9341

//#include <User_Setups/Setup66_Seeed_XIAO_Round.h>     // Setup file for Seeed XIAO with GC9A01 240x240

//#include <User_Setups/Setup70_ESP32_S2_ILI9341.h>     // Setup file for ESP32 S2 with SPI ILI9341
//#include <User_Setups/Setup70b_ESP32_S3_ILI9341.h>    // Setup file for ESP32 S3 with SPI ILI9341
//#include <User_Setups/Setup70c_ESP32_C3_ILI9341.h>    // Setup file for ESP32 C3 with SPI ILI9341
//#include <User_Setups/Setup70d_ILI9488_S3_Parallel.h> // Setup file for ESP32 S3 with SPI ILI9488

//#include <User_Setups/Setup71_ESP32_S2_ST7789.h>       // Setup file for ESP32 S2 with ST7789
//#include <User_Setups/Setup72_ESP32_ST7789_172x320.h>  // Setup file for ESP32 with ST7789 1.47" 172x320

//#include <User_Setups/Setup100_RP2040_ILI9488_parallel.h> // Setup file for Pico/RP2040 with 8-bit parallel ILI9488
//#include <User_Setups/Setup101_RP2040_ILI9481_parallel.h> // Setup file for Pico/RP2040 with 8-bit parallel ILI9481
//#include <User_Setups/Setup102_RP2040_ILI9341_parallel.h> // Setup file for Pico/RP2040 with 8-bit parallel ILI9341
//#include <User_Setups/Setup103_RP2040_ILI9486_parallel.h> // Setup file for Pico/RP2040 with 8-bit parallel ILI9486
//#include <User_Setups/Setup104_RP2040_ST7796_parallel.h>  // Setup file for Pico/RP2040 with 8-bit parallel ST7796

//#include <User_Setups/Setup105_RP2040_ST7796_16bit_parallel.h>  // Setup file for RP2040 16-bit parallel display
//#include <User_Setups/Setup106_RP2040_ILI9481_16bit_parallel.h> // Setup file for RP2040 16-bit parallel display
//#include <User_Setups/Setup107_RP2040_ILI9341_16bit_parallel.h> // Setup file for RP2040 16-bit parallel display
//#include <User_Setups/Setup108_RP2040_ST7735.h> // Setup file for Waveshare RP2040 board with onboard ST7735 0.96" 160x80 display

//#include <User_Setups/Setup135_ST7789.h>           // Setup file for ESP8266 and ST7789 135 x 240 TFT

//#include <User_Setups/Setup136_LilyGo_TTV.h>       // Setup file for ESP32 and Lilygo TTV ST7789 SPI bus TFT  135x240
//#include <User_Setups/Setup137_LilyGo_TDisplay_RP2040.h>  // Setup file for Lilygo T-Display RP2040 (ST7789 on SPI bus with 135x240 TFT)

//#include <User_Setups/Setup138_Pico_Explorer_Base_RP2040_ST7789.h> // Setup file for Pico Explorer Base by Pimoroni for RP2040 (ST7789 on SPI bus with 240x240 TFT)

//#include <User_Setups/Setup200_GC9A01.h>           // Setup file for ESP32 and GC9A01 240 x 240 TFT

//#include <User_Setups/Setup201_WT32_SC01.h>        // Setup file for ESP32 based WT32_SC01 from Seeed

//#include <User_Setups/Setup202_SSD1351_128.h>      // Setup file for ESP32/ESP8266 based SSD1351 128x128 1.5inch OLED display

//#include <User_Setups/Setup203_ST7789.h>     // Setup file for ESP32/ESP8266 based ST7789 240X280 1.69inch TFT

//#include <User_Setups/Setup204_ESP32_TouchDown.h>     // Setup file for the ESP32 TouchDown based on ILI9488 480 x 320 TFT

//#include <User_Setups/Setup205_ESP32_TouchDown_S3.h>     // Setup file for the ESP32 TouchDown S3 based on ILI9488 480 x 320 TFT

//#include <User_Setups/Setup206_LilyGo_T_Display_S3.h>     // For the LilyGo T-Display S3 based ESP32S3 with ST7789 170 x 320 TFT
//#include <User_Setups/Setup207_LilyGo_T_HMI.h>            // For the LilyGo T-HMI S3 based ESP32S3 with ST7789 240 x 320 TFT
//#include <User_Setups/Setup209_LilyGo_T_Dongle_S3.h>      // For the LilyGo T-Dongle S3 based ESP32 with ST7735 80 x 160 TFT
//#include <User_Setups/Setup210_LilyGo_T_Embed_S3.h>         // For the LilyGo T-Embed S3 based ESP32S3 with ST7789 170 x 320 TFT
//#include <User_Setups/Setup211_LilyGo_T_QT_Pro_S3.h>         // For the LilyGo T-QT Pro S3 based ESP32S3 with GC9A01 128 x 128 TFT
// #include <User_Setups/Setup212_LilyGo_T_PicoPro.h>         // For the LilyGo T-PICO-Pro with ST7796 222 x 480 TFT
// #include <User_Setups/Setup213_LilyGo_T_Beam_Shield.h>         // For the LilyGo T-BEAM V1.x with ST7796 222 x 480 TFT

//#include <User_Setups/Setup250_ESP32_S3_Box_Lite.h>      // For the ESP32 S3 Box Lite
//#include <User_Setups/Setup251_ESP32_S3_Box.h>            // For the ESP32 S3 Box

//#include <User_Setups/Setup301_BW16_ST7735.h>            // Setup file for Bw16-based boards with ST7735 160 x 80 TFT
//#include <User_Setups/Setup302_Waveshare_ESP32S3_GC9A01.h>            // Setup file for Waveshare ESP32-S3-Touch-LCD-1.28 board with GC9A01 240*240 TFT

//#include <User_Setups/SetupX_Template.h>     // Template file for a setup

//#include <User_Setups/Dustin_ILI9488.h>          // Setup file for Dustin Watts PCB with ILI9488
//#include <User_Setups/Dustin_ST7796.h>           // Setup file for Dustin Watts PCB with ST7796
//#include <User_Setups/Dustin_ILI9488_Pico.h>     // Setup file for Dustin Watts Pico PCB with ST7796
//#include <User_Setups/Dustin_ST7789_Pico.h>      // Setup file for Dustin Watts PCB with ST7789 240 x 240 on 3.3V adapter board
//#include <User_Setups/Dustin_GC9A01_Pico.h>      // Setup file for Dustin Watts PCB with GC9A01 240 x 240 on 3.3V adapter board
//#include <User_Setups/Dustin_GC9A01_ESP32.h>     // Setup file for Dustin Watts PCB with GC9A01 240 x 240 on 3.3V adapter board
//#include <User_Setups/Dustin_STT7789_ESP32.h>    // Setup file for Dustin Watts PCB with ST7789 240 x 240 on 3.3V adapter board
//#include <User_Setups/Dustin_ILI9341_ESP32.h>    // Setup file for Dustin Watts PCB with ILI9341
//#include <User_Setups/ILI9225.h>

#endif // USER_SETUP_LOADED
修改Setup70f_ESP32_S2_ST7735.h文件,将接线、屏幕显示模式修改:
注释掉官方推荐接线,并加入我们接线的参数,跟接线连接相对应。
#define TFT_SCLK 23 // SPI时钟
#define TFT_MOSI 24 // SPI主机输出,从机输⼊
#define TFT_BL 15 // 显示屏背光
#define TFT_DC 8 // LCD数据/命令
#define TFT_RST 26 // LCD复位
#define TFT_CS 27 // TFT⽚选
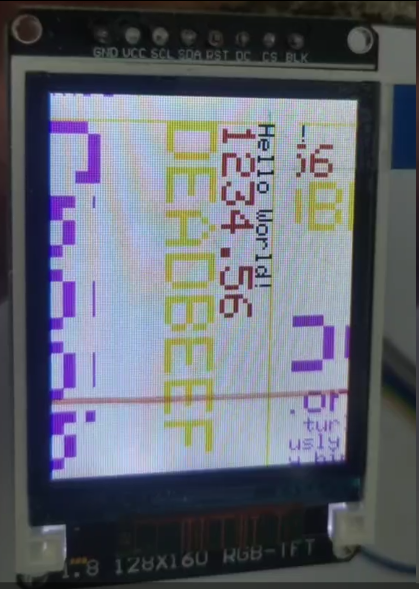
我们的结果有些偏色的问题,根据 ST7735S 数据手册第 9.11.4 节(Memory Data Access Control)和第 10.1.29 节(MADCTL 命令),屏幕的 RGB/BGR 排列由两个关键因素决定:
1. 硬件引脚SRGB的电平状态
手册第 6.3 节(Mode Selection Pin)明确SRGB引脚功能:
SRGB = 0:屏幕滤光片顺序为 S1=R、S2=G、S3=B(默认 RGB 排列);
SRGB = 1:屏幕滤光片顺序为 S1=B、S2=G、S3=R(BGR 排列)。
2. 软件命令MADCTL的RGB位配置
手册第 10.1.29 节(MADCTL 命令,指令代码 0x36)中,D3位(RGB 位)功能:
RGB = 0:驱动输出数据按 RGB 顺序 映射到屏幕(与硬件SRGB=0匹配);
RGB = 1:驱动输出数据按 BGR 顺序 映射到屏幕(与硬件SRGB=1匹配)。
TFT_RGB_ORDER本质是通过库(如TFT_eSPI)自动配置MADCTL的RGB位:
`#define TFT_RGB_ORDER TFT_RGB `→ 库会将MADCTL的RGB位设为 0;
` #define TFT_RGB_ORDER TFT_BGR` → 库会将MADCTL的RGB位设为 1。
通过测试,我们发现应该使用#define TFT_RGB_ORDER TFT_RGB的设置让屏幕颜色正常显示。
还要设置#define TFT_INVERSION_ON和#define ST7735_GREENTAB我们来说一下这两个项目负责参数:
#define TFT_INVERSION_ON指的是 显示反转打开,相反的#define TFT_INVERSION_OFF表示关闭显示反转。根据手册第 10.1.15 节(INVOFF 命令,0x20)和第 10.1.16 节(INVON 命令,0x21):
显示反转(Inversion On):指屏幕像素颜色反转显示(如原本显示黑色的像素显示白色,红色显示青色等),由INVON命令(0x21)开启;
正常显示(Inversion Off):像素颜色按 Frame Memory 中的原始数据显示,由INVOFF命令(0x20)开启;
手册第 9.15 节(Reset Table)明确:硬件复位后默认处于 “显示反转关闭(INVOFF)” 状态,即TFT_INVERSION_OFF(多数库默认配置)。
#include ST7735_GREENTAB 是 TFT_eSPI 库中针对 ST7735S 驱动芯片 的一种预设配置模板,主要用于适配特定规格的 TFT 屏幕(尤其是 1.8 英寸、128×160 分辨率的 RGB 彩色屏幕)。其核心作用是通过预定义屏幕初始化参数、分辨率、显示区域地址等,简化 ST7735S 屏幕的驱动流程。
- 适配的屏幕规格
分辨率:128×160 像素(宽 128 像素,高 160 像素),这是 1.8 英寸 ST7735S 屏幕的最常见规格。
驱动芯片:严格匹配 ST7735S 芯片(支持 SPI 通信,兼容 3 线 / 4 线 SPI 模式)。
硬件特性:默认假设屏幕的 有效显示区域从 Frame Memory 的 (0,0) 地址开始(无偏移),滤光片排列为 RGB 顺序(需配合 TFT_RGB_ORDER 配置)。
- 预定义的关键参数(库配置核心)
显示区域地址范围:
列地址(CASET 命令):起始地址 0,结束地址 127(覆盖 128 列);
行地址(RASET 命令):起始地址 0,结束地址 159(覆盖 160 行);
与 ST7735S 手册第 9.9.3 节定义的 “128RGB×160 分辨率模式” 完全匹配。
初始化序列:包含 ST7735S 手册第 10 章要求的核心命令,如软复位(0x01)、睡眠退出(0x11)、显示开启(0x29)、色彩格式设置(0x3A 配置为 RGB565)等,确保屏幕正确启动。
Gamma 曲线与电源参数:加载适配 128×160 屏幕的默认 Gamma 校正参数(提升色彩还原度)和电源控制参数(稳定显示亮度)。
与#include ST7735_REDTAB相比,不同的地方为:
- 分辨率适配:GREENTAB 专注 128×160 标准分辨率;REDTAB 多用于 132×162 分辨率或存在显示区域偏移的屏幕(需裁剪边缘无效像素)。
- 初始化参数:两者的 Gamma 曲线、电源控制命令参数不同,分别针对不同厂商的屏幕硬件特性优化。
- 适用场景:GREENTAB 是 1.8 英寸 ST7735S 屏幕的 “通用默认模板”,多数主流品牌(如 Waveshare、Adafruit)的 128×160 屏幕优先适配此模板。
- 使用注意事项
确认屏幕规格:仅当屏幕物理分辨率为 128×160 时使用,否则会出现显示错位(如 160×80 屏幕需用 ST7735_GREENTAB160x80)。
配合引脚定义:需在库配置文件(User_Setup.h)中同时正确定义 SPI 引脚(TFT_MOSI、TFT_SCK、TFT_CS 等),确保与实际接线一致。
偏移修正:若屏幕边缘(如左边、上边)存在花屏,可能是硬件存在微小偏移,需在初始化后手动调整 CASET/RASET 命令的地址范围(参考手册第 10.1.20/21 节)。
我们修改后Setup70f_ESP32_S2_ST7735.h的文件的16-22行如下所示:
#define ST7735_GREENTAB

#define TFT_RGB_ORDER TFT_RGB  // Colour order Red-Green-Blue
//#define TFT_RGB_ORDER TFT_BGR  // Colour order Blue-Green-Red

//#define TFT_INVERSION_ON
// #define TFT_INVERSION_OFF
编译上传后效果如下:
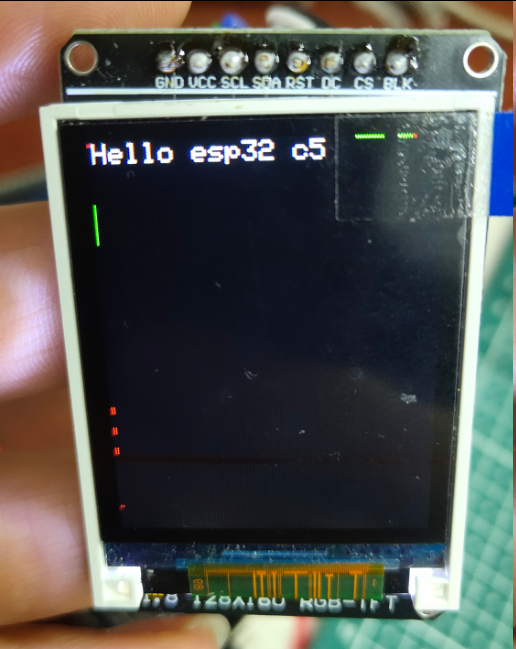
我们试一试显示简单的文字:
编写代码
#include "SPI.h"
#include "TFT_eSPI.h"

TFT_eSPI tft = TFT_eSPI();

unsigned long total = 0;
unsigned long tn = 0;
void setup() {
  Serial.begin(9600);
  while (!Serial);

  Serial.println(""); Serial.println("");
  Serial.println("TFT_eSPI library test!");

  tft.init();
  tft.fillScreen(TFT_BLACK);
  tft.println("hello esp32 c5");

}

void loop(void) {

}
编译上传后效果如下:
TFT_eSPI 库本身默认不包含中文字库,但通过 自定义字体加载 或 字模数组手动绘制 两种方式,可实现中文显示。


 沪公网安备31011502402448

 置顶卡
置顶卡 变色卡
变色卡 千斤顶
千斤顶


