|
6155| 1
|
教程|DIY一个风力唱片机 |
|
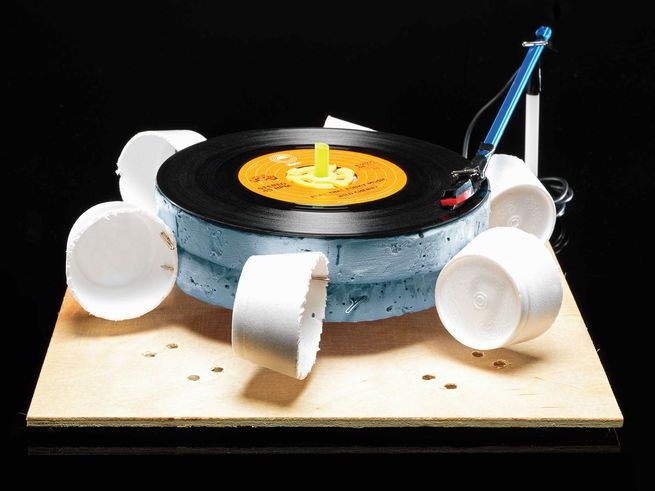
By Thom Leavy November 15, 2016 数字音乐是将比特转变成音调,其中蕴含了大量的技术。但是唱片机就简单多了,我们甚至能自己动手造一台。图中就是一台无需马达的风力唱片机。其成本低廉,但是声音质量完全依赖于风速。为了稳定播放,建议配合风扇使用。 · 时间:两小时 · 成本:35美元 · 难度:中等 工具 · 电钻 · 美工刀 · 剥线器 材料 · 胶合板 · 机用螺钉 · 垫片 · 六角螺母 · 两根细管 · 胶结水泥 · 1英寸厚绝缘泡沫塑料 · 7英寸唱片 · 45 rpm 接合器 · 9平方英寸玻璃纸 · 一盒T字头大头针 · 6个纸杯 · 旧耳机线 · 唱针和机头 · 导电胶 · 图钉 · 音量电池扬声器  1.在胶合板正中间钻一个孔,穿入螺钉,加垫片和六角螺母固定,外面套上一根3英寸细管。用胶结水泥在四角固定胶合板。 2.从绝缘泡沫塑料中切下两个7英寸的圆(按照唱片大小)和一个1.5英寸的圆(按照45 rpm接合器大小)。在正中间钻孔,要紧紧套在细管外,并能旋转。打磨粗糙边缘。从玻璃纸上剪下三个1.5英寸的圆。 3.将六角螺母跟1.5英寸圆形泡沫上的孔对齐,按照螺母形状钻孔。将泡沫套在螺母之上,再套上刚才剪下的三张圆形玻璃纸,两层7英寸圆形泡沫,唱片和接合器。用3个T字头大头针连接下层的7英寸泡沫和上层的7英寸泡沫。 4.将6个纸杯切成1.5英寸高,各自用两个T字头大头针固定在7英寸泡沫边缘,之间相隔3.75英寸。 5.将耳机线剥开0.5英寸,每根内部金属线剥开1mm。将铜接触线分成两支,用电工胶带接在唱片机头的底部搭铁上。滴一滴导电胶,用胶带覆盖。 6.剥开1mm内部金属线,用电工胶带将它们跟机头的顶部相连。用导电胶和胶带封好。 7.用一长段胶带裹住机头末端的耳机线。将线穿过7英寸长的吸管,并用胶带将吸管有凹下去的一端跟机头固定,另一端用T字头大头针固定。 8.将一颗图钉固定在胶合板的一个角落,套上3英寸长的吸管。吸管顶部封上胶带,再将唱臂的T字头大头针穿进去,从而唱臂能够自由移动。将唱针放在唱片上,并接上扬声器。 原文: WIND-POWERED RECORD PLAYER By Thom Leavy November 15, 2016 A strong enough wind can push the cut-down Styrofoam cups into motion. As they pick up speed, they spin the turntable. Photograph by Brian Klutch Digital music relies on unseen technology to translate bits and bytes into tunes. An analog machine like a record player is much easier to understand. To make it even simpler, Popular Science built a motor-free device powered by the wind. This project is cheaper than a real record player, but the sound quality depends on the breeze’s speed, which can easily turn your songs into Alvin and the Chipmunks covers. For a steady source of air, try a fan or even an air-conditioning vent. Stats * Time: 2 hours * Cost: $35 * Difficulty: Medium Tools * Dremel * Box cutter * Wire stripper Materials * 11-by-11-inch plywood board * 1⁄4-by-21⁄2-inch machine screw * AJC washer * 1⁄4-inch hex nut * Two Slurpee straws * Adhesive putty * 1-inch-thick foam insulation sheet * 7-inch record * 45 rpm adapter (ours came attached to the record) * 9 square inches of cellophane * Box of T-pins * Six 8-ounce Styrofoam cups * Old headphone cable * Phonograph needle and cartridge * Conductive wire glue * Pushpin * Loud battery-powered speaker Instructions 1. Drill the exact centre of the plywood board with the Dremel until you can thread the screw through. Tighten it on with the washer and the hex nut, and cover it with a 3-inch piece of the straw. Stabilize the board by placing adhesive putty under its corners. 2. Cut two 7-inch circles (traced from the record) and a 1.5-inch circle (traced from the 45 rpm adapter) from the insulation foam. Drill out the circles’ exact centres so they will fit tightly over the straw and spin with little friction. Sand down rough edges. Cut three 1.5-inch circles from cellophane. 3. Line up the hex nut with the hole in the 1.5-inch foam circle, and drill out its shape. Slide the foam onto the hex nut, followed by the three pieces of cellophane, the 7-inch foam circles, the record, and the adapter. Connect the bottom 7-inch circle to the top one with three T-pins. 4. Cut the six cups to 1.5 inches tall. Use two T-pins apiece to fix them every 3.75 inches along the edge of the 7-inch circles. 5. Strip 1/2 inch of the headphone cable and 1 mm of each coated inner wire. Split the copper contact wire in two and use electrical tape to attach it to the electrical grounds of the phonograph cartridge (the lower two contact posts on the back when the needle faces down). Apply a drop of conductive glue and cover with tape. 6. Strip 1 mm of the headphone cable’s inner wires and use electrical tape to connect them to the cartridge's top two posts. Apply wire glue and reseal the tape. 7. Wrap a long piece of electrical tape from the end of the cartridge around the bundle of wires up to the headphone cable. Slide the bundle through a 7-inch length of Slurpee straw and tape the straw’s scoop end over the cartridge. Push a T-pin through the straw’s opposite end. This is the tonearm. 8. Fix a pushpin into one corner of the plywood and cover with a 3-inch length of the straw. Top the straw with tape and push the tone arm’s T-pin through it so the arm can move freely. Set the needle on the record and plug into a speaker. |
 沪公网安备31011502402448
© 2013-2026 Comsenz Inc. Powered by Discuz! X3.4 Licensed