|
6347| 6
|
【自制无人机】“辛”路历程(七)L289N_PWM MPU6050模块 |
|
【前言】 由于淘的桨叶还没有到, 就不用无刷电机来试了。准备用普通电机+L289N电机驱动板+闺女的玩具无人机上的桨叶(无人机已被我偷偷拆了,拆解视频以后放出,上面的飞控还没有研究)。 关于 L289N的使用,请参考下面的帖子: Arduino利用三种方法产生PWM波使用L298N驱动电机(附电路连接图和pwm详解) 【测试一】 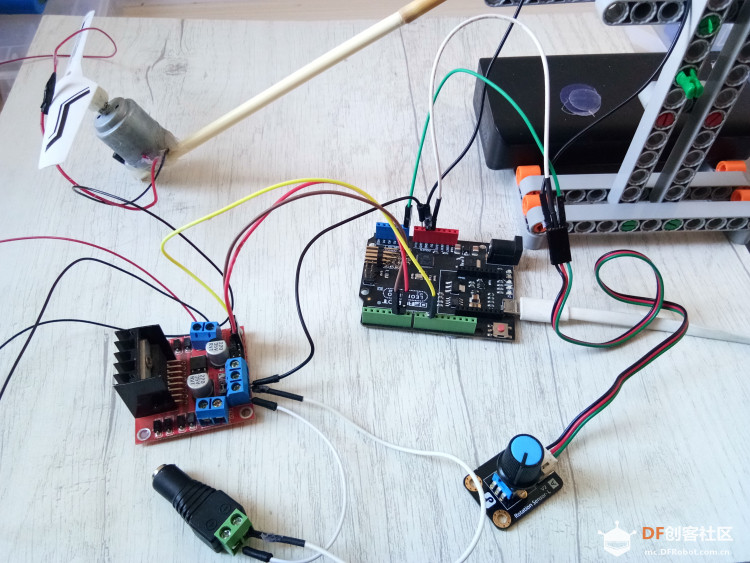 利用角度传感器,测试Leonardo+L289N,利用PWM控制电机转速。 (一只手操作,我好难!) [mw_shl_code=java,false]int input1 = 5; // 定义uno的pin 5 向 input1 输出 int input2 = 6; // 定义uno的pin 6 向 input2 输出 int enA = 10; // 定义uno的pin 10 向 输出A使能端输出 int val; void setup() { pinMode(input1,OUTPUT); pinMode(input2,OUTPUT); pinMode(enA,OUTPUT); Serial.begin(9600); } void loop() { digitalWrite(input1,HIGH); //给高电平 digitalWrite(input2,LOW); //给低电平 val=analogRead(A0); val=map(val,0,1023,0,254); analogWrite(enA,val); Serial.println(val); }[/mw_shl_code] 【测试二】 Arduino Leonardo与Arduino Uno外形相同。Arduino Uno配备的是ATmega385芯片,而Leonardo配备了atmega32u4芯片。它有20个数字输入/输出引脚,20个引脚中,7个引脚可作为PWM输出,12个引脚可作为模拟输入,同时它板载了一个微型USB接口,一个电源插口,一个ICSP端口和一个复位按钮。 连接Arduino Leonardo和MPU6050 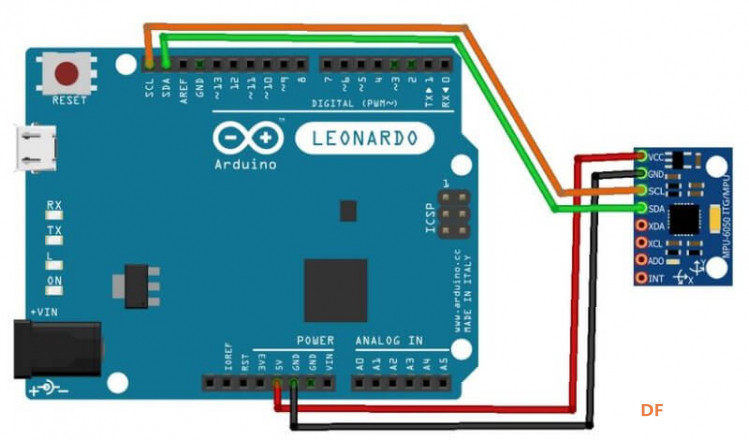 Arduino uno与mpu6050接线图  [mw_shl_code=java,false]//calibrate_air_mouse #include <Wire.h> #include <I2Cdev.h> #include <MPU6050.h> MPU6050 mpu; int16_t ax, ay, az, gx, gy, gz; int vx, vy; void setup() { Serial.begin(9600); Wire.begin(); mpu.initialize(); if (!mpu.testConnection()) { while (1); } } void loop() { mpu.getMotion6(&ax, &ay, &az, &gx, &gy, &gz); vx = (gx+300)/150; // change 300 from 0 to 355 vy = -(gz-100)/150; // same here about "-100" from -355 to 0 Serial.print("gx = "); Serial.print(gx); Serial.print(" | gz = "); Serial.print(gz); Serial.print(" | X = "); Serial.print(vx); Serial.print(" | Y = "); Serial.println(vy); delay(20); }[/mw_shl_code] 使用MPU6050模块,如果arduino编译时 找不到I2Cdev.h,一直提示出现说fatal error: I2Cdev.h: No such file or directory,请按如下方法处理: 1、在github上下载并解压i2cdevlib后打开文件夹 2、打开里面的arduino文件夹 3、在那个arduino文件夹里还有一个名字叫i2cdev的文件夹,那个才是真正的库 4、把那个库添加到arduino的库里就能用了 编译时 找不到MPU6050.h同理 如果网站github访问不了或比较慢,可以使用修改Hosts方法,根据以下目录,用记事本打开hosts文件,将--------下面的内容粘贴到文件中,保存后,在运行(win键+R),输入CMD,命令行中输入ipconfig /flushdns,回车,完成刷新DNS网页缓存: Windows hosts目录:C:\windows\system32\drivers\etc\ DNS网页缓存刷新CMD指令:ipconfig /flushdns ---------------------------------------------------------------------------- # Github 192.30.253.113 github.com 151.101.185.194 github.global.ssl.fastly.net 203.98.7.65 gist.github.com 13.229.189.0 codeload.github.com 185.199.109.153 desktop.github.com 185.199.108.153 guides.github.com 185.199.108.153 blog.github.com 18.204.240.114 status.github.com 185.199.108.153 developer.github.com 185.199.108.153 services.github.com 192.30.253.175 enterprise.github.com 34.195.49.195 education.github.com 185.199.108.153 pages.github.com 34.196.237.103 classroom.github.com 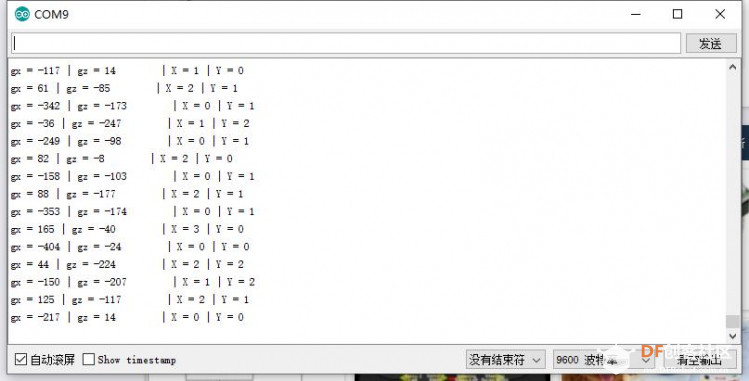 【测试三】 可以测试一下,它提供的MPU6050有线控制电脑鼠标。代码测试有效。 [mw_shl_code=java,false]//calibrate_air_mouse #include <Wire.h> #include <I2Cdev.h> #include <MPU6050.h> #include <Mouse.h> MPU6050 mpu; int16_t ax, ay, az, gx, gy, gz; int vx, vy; void setup() { Serial.begin(9600); Wire.begin(); mpu.initialize(); if (!mpu.testConnection()) { while (1); } } void loop() { mpu.getMotion6(&ax, &ay, &az, &gx, &gy, &gz); vx = (gx+300)/150; // change 300 from 0 to 355 vy = -(gz-100)/150; // same here about "-100" from -355 to 0 Serial.print("gx = "); Serial.print(gx); Serial.print(" | gz = "); Serial.print(gz); Serial.print(" | X = "); Serial.print(vx); Serial.print(" | Y = "); Serial.println(vy); Mouse.move(vx, vy); delay(20); }[/mw_shl_code] |


 沪公网安备31011502402448
© 2013-2026 Comsenz Inc. Powered by Discuz! X3.4 Licensed

 置顶卡
置顶卡 变色卡
变色卡 千斤顶
千斤顶


 活跃会员
活跃会员
 宣传大使
宣传大使
 牛X认证
牛X认证
 创客造
创客造
 编辑选择奖
编辑选择奖
 志“童”道合
 编辑选择奖
编辑选择奖
 编辑选择奖
编辑选择奖
 编辑选择奖
编辑选择奖
 编辑选择奖
编辑选择奖


