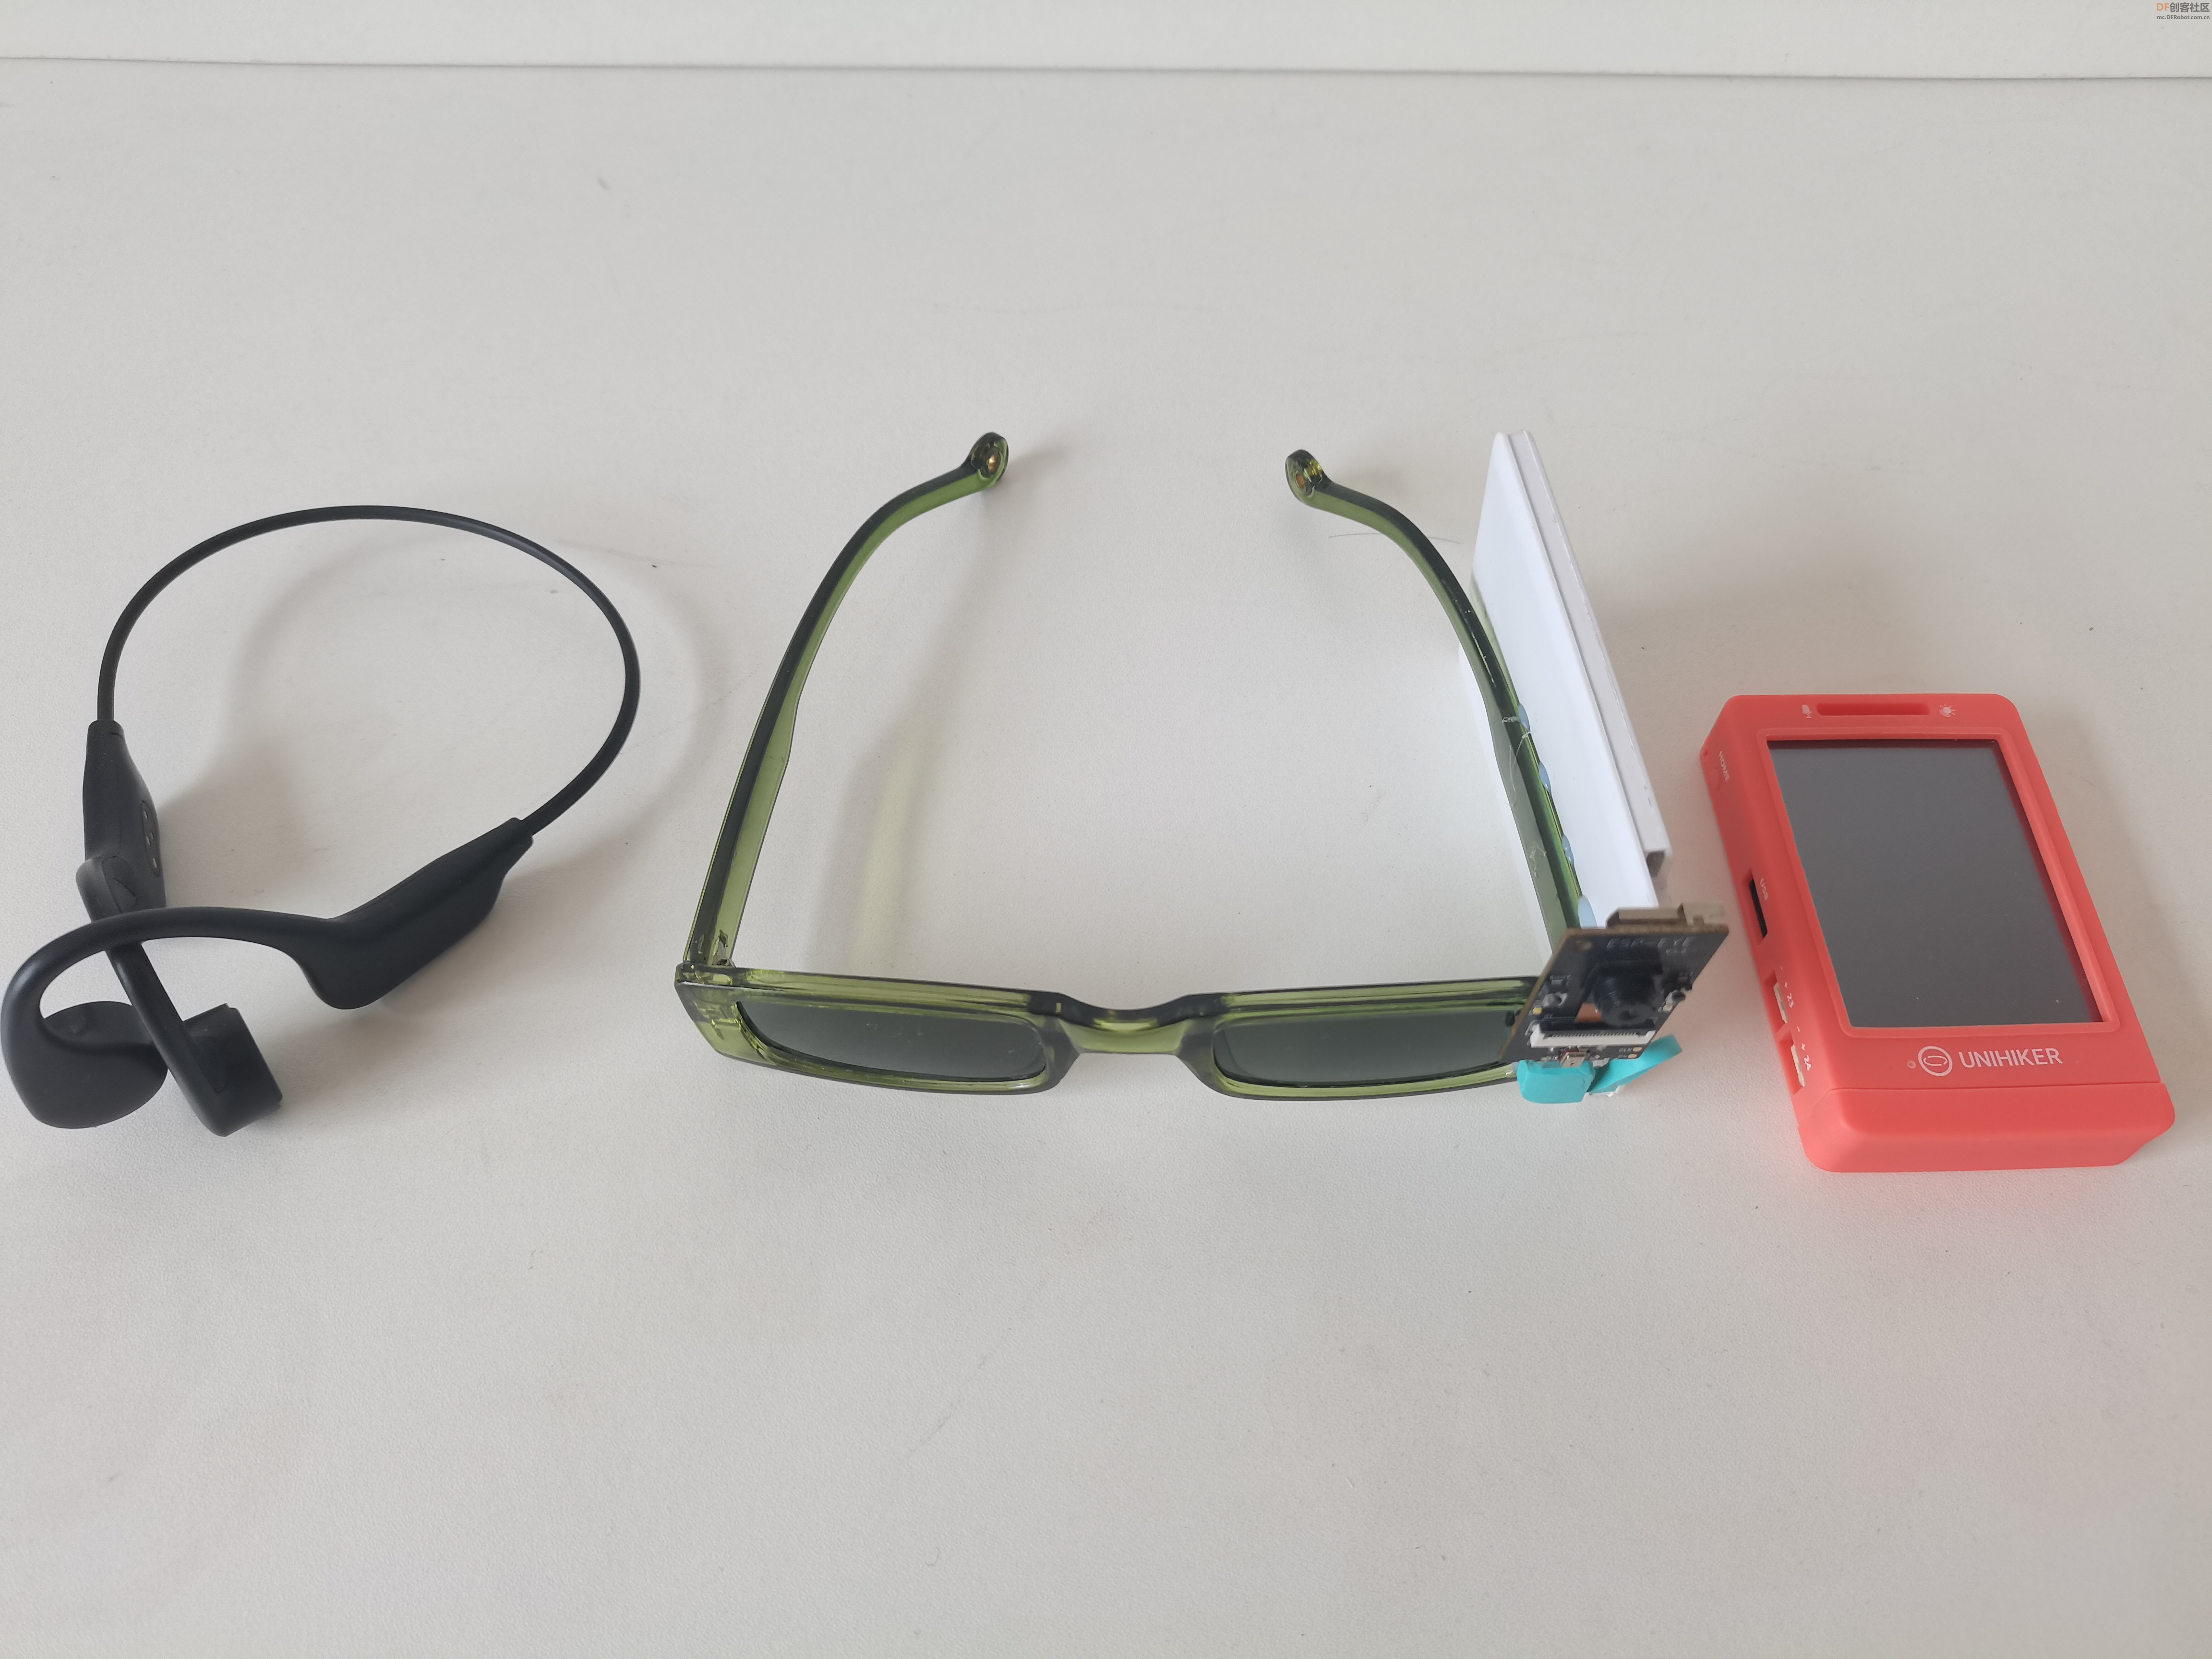
【项目背景】 【项目设计】 【项目硬件】 【ESP32 EYE程序代码】 Arduino IDE中修改ESP32摄像头示例:// 用于上传照片的服务器地址,行空板IP地址
const char *serverName = "http://192.168.43.120:9000/upload"; 复制代码 EspMQTTClient client(
"wifi名",
"wifi密码",
"182.254.130.180", // MQTT Broker server ip
"X8jykxFnR", // Iot_id(user)
"u8jskbFngz", // Iot_pwd(password)
"yuntian365", // Client name that uniquely identify your device
1883 // The MQTT port, default to 1883.
); 复制代码 void onConnectionEstablished()
{
// Subscribe to "mytopic/wildcardtest/#" and display received message to Serial
client.subscribe("1DXAmWJ4g", [](const String & topic, const String & payload) {
Serial.println("(From wildcard) topic: " + topic + ", payload: " + payload);
if(payload=="a"){
bs=1;
}
if(payload=="b"){
bs=0;
}
}); 复制代码 void loop() {
if(bs==1){
// 拍摄照片
camera_fb_t *fb = esp_camera_fb_get();
if (!fb)
{
Serial.println("获取摄像头帧缓冲失败");
return;
}
// 建立HTTP客户端
HTTPClient http;
// 将照片上传到服务器
http.begin(serverName);
http.addHeader("Content-Type", "image/jpeg");
int httpResponseCode = http.POST(fb->buf, fb->len);
if (httpResponseCode > 0)
{
Serial.printf("照片上传成功,服务器返回代码:%d\n", httpResponseCode);
// 再闪一下提示上传成功
}
else
{
Serial.printf("照片上传失败,错误代码:%s\n", http.errorToString(httpResponseCode).c_str());
}
http.end();
// 释放帧缓冲
esp_camera_fb_return(fb);
}
client.loop();
} 复制代码 #include "esp_camera.h"
#include <WiFi.h>
#include <HTTPClient.h>
// 用于上传照片的服务器地址,行空板IP地址
const char *serverName = "http://192.168.43.120:9000/upload";
// ===================
// Select camera model
#define CAMERA_MODEL_ESP_EYE // Has PSRAM
#include "camera_pins.h"
#include "EspMQTTClient.h"
EspMQTTClient client(
"sxs",
"smj080823",
"182.254.130.180", // MQTT Broker server ip
"X8jykxFnR", // Can be omitted if not needed
"u8jskbFngz", // Can be omitted if not needed
"yuntian365", // Client name that uniquely identify your device
1883 // The MQTT port, default to 1883. this line can be omitted
);
// ===========================
// Enter your WiFi credentials
// ===========================
const char* ssid = "sxs";
const char* password = "smj080823";
int bs;
void setup() {
Serial.begin(115200);
Serial.setDebugOutput(true);
Serial.println();
camera_config_t config;
config.ledc_channel = LEDC_CHANNEL_0;
config.ledc_timer = LEDC_TIMER_0;
config.pin_d0 = Y2_GPIO_NUM;
config.pin_d1 = Y3_GPIO_NUM;
config.pin_d2 = Y4_GPIO_NUM;
config.pin_d3 = Y5_GPIO_NUM;
config.pin_d4 = Y6_GPIO_NUM;
config.pin_d5 = Y7_GPIO_NUM;
config.pin_d6 = Y8_GPIO_NUM;
config.pin_d7 = Y9_GPIO_NUM;
config.pin_xclk = XCLK_GPIO_NUM;
config.pin_pclk = PCLK_GPIO_NUM;
config.pin_vsync = VSYNC_GPIO_NUM;
config.pin_href = HREF_GPIO_NUM;
config.pin_sccb_sda = SIOD_GPIO_NUM;
config.pin_sccb_scl = SIOC_GPIO_NUM;
config.pin_pwdn = PWDN_GPIO_NUM;
config.pin_reset = RESET_GPIO_NUM;
config.xclk_freq_hz = 20000000;
config.frame_size = FRAMESIZE_UXGA;
config.pixel_format = PIXFORMAT_JPEG; // for streaming
//config.pixel_format = PIXFORMAT_RGB565; // for face detection/recognition
config.grab_mode = CAMERA_GRAB_WHEN_EMPTY;
config.fb_location = CAMERA_FB_IN_PSRAM;
config.jpeg_quality = 12;
config.fb_count = 1;
// if PSRAM IC present, init with UXGA resolution and higher JPEG quality
// for larger pre-allocated frame buffer.
if(config.pixel_format == PIXFORMAT_JPEG){
if(psramFound()){
config.jpeg_quality = 10;
config.fb_count = 2;
config.grab_mode = CAMERA_GRAB_LATEST;
} else {
// Limit the frame size when PSRAM is not available
config.frame_size = FRAMESIZE_SVGA;
config.fb_location = CAMERA_FB_IN_DRAM;
}
} else {
// Best option for face detection/recognition
config.frame_size = FRAMESIZE_240X240;
#if CONFIG_IDF_TARGET_ESP32S3
config.fb_count = 2;
#endif
}
#if defined(CAMERA_MODEL_ESP_EYE)
pinMode(13, INPUT_PULLUP);
pinMode(14, INPUT_PULLUP);
#endif
// camera init
esp_err_t err = esp_camera_init(&config);
if (err != ESP_OK) {
Serial.printf("Camera init failed with error 0x%x", err);
return;
}
sensor_t * s = esp_camera_sensor_get();
// initial sensors are flipped vertically and colors are a bit saturated
if (s->id.PID == OV3660_PID) {
s->set_vflip(s, 1); // flip it back
s->set_brightness(s, 1); // up the brightness just a bit
s->set_saturation(s, -2); // lower the saturation
}
// drop down frame size for higher initial frame rate
if(config.pixel_format == PIXFORMAT_JPEG){
s->set_framesize(s, FRAMESIZE_QVGA);
}
#if defined(CAMERA_MODEL_M5STACK_WIDE) || defined(CAMERA_MODEL_M5STACK_ESP32CAM)
s->set_vflip(s, 1);
s->set_hmirror(s, 1);
#endif
#if defined(CAMERA_MODEL_ESP32S3_EYE)
s->set_vflip(s, 1);
#endif
WiFi.begin(ssid, password);
WiFi.setSleep(false);
while (WiFi.status() != WL_CONNECTED) {
delay(500);
Serial.print(".");
}
Serial.println("");
Serial.println("WiFi connected");
bs=0;
client.enableDebuggingMessages(); // Enable debugging messages sent to serial output
client.enableHTTPWebUpdater(); // Enable the web updater. User and password default to values of MQTTUsername and MQTTPassword. These can be overridded with enableHTTPWebUpdater("user", "password").
client.enableOTA(); // Enable OTA (Over The Air) updates. Password defaults to MQTTPassword. Port is the default OTA port. Can be overridden with enableOTA("password", port).
client.enableLastWillMessage("MNpA1p_4R", "I am going offline"); // You can activate the retain flag by setting the third parameter to true
}
void onConnectionEstablished()
{
// Subscribe to "mytopic/wildcardtest/#" and display received message to Serial
client.subscribe("1DXAmWJ4g", [](const String & topic, const String & payload) {
Serial.println("(From wildcard) topic: " + topic + ", payload: " + payload);
if(payload=="a"){
bs=1;
}
if(payload=="b"){
bs=0;
}
});
// Publish a message to "mytopic/test"
client.publish("k_eT7HUVR", "This is a message"); // You can activate the retain flag by setting the third parameter to true
// Execute delayed instructions
client.executeDelayed(5 * 1000, []() {
client.publish("k_eT7HUVR", "This is a message sent 5 seconds later");
});
}
void loop() {
if(bs==1){
// 拍摄照片
camera_fb_t *fb = esp_camera_fb_get();
if (!fb)
{
Serial.println("获取摄像头帧缓冲失败");
return;
}
// 建立HTTP客户端
HTTPClient http;
// 将照片上传到服务器
http.begin(serverName);
http.addHeader("Content-Type", "image/jpeg");
int httpResponseCode = http.POST(fb->buf, fb->len);
if (httpResponseCode > 0)
{
Serial.printf("照片上传成功,服务器返回代码:%d\n", httpResponseCode);
// 再闪一下提示上传成功
}
else
{
Serial.printf("照片上传失败,错误代码:%s\n", http.errorToString(httpResponseCode).c_str());
}
http.end();
// 释放帧缓冲
esp_camera_fb_return(fb);
}
client.loop();
}
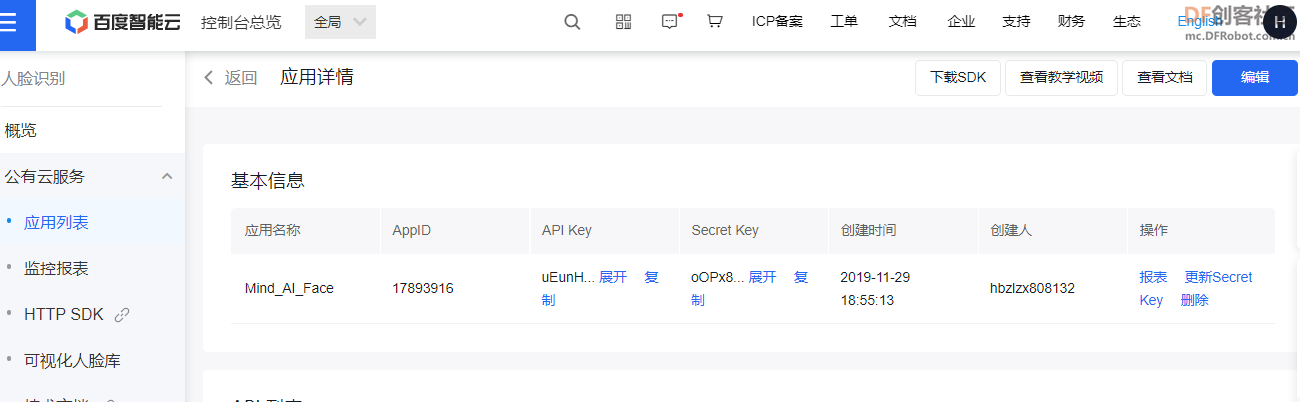
复制代码 【百度智能云】
from aip import AipFace
""" 你的 APPID AK SK """
APP_ID = '17893916'
API_KEY = 'uEunHuOhiSTeYHfZcdcUIq60'
SECRET_KEY = 'oOPx8FerIBGx4wVOYE3khD9rNLzPRGGy'
client = AipFace(APP_ID, API_KEY, SECRET_KEY)
image = "37c0a46ef66c11b09452956dfd653820"
imageType = "FACE_TOKEN"
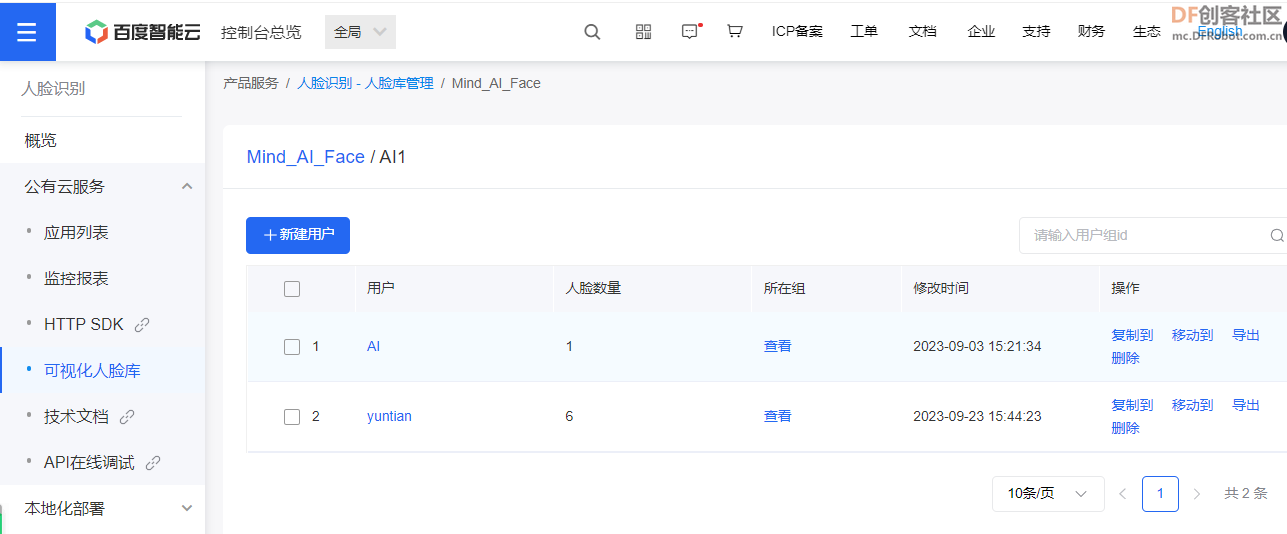
groupId = "AI1"
userId = "yuntian"
options = {}
options["user_info"] = "yuntian"
""" 调用人脸更新 """
res=client.updateUser(image, imageType, groupId, userId, options)
print(res)
复制代码 【行空板程序】
from aip import AipFace
import myimg

from flask import Flask, request
from unihiker import GUI
import siot
import time
import base64
u_gui=GUI()
i=0
显图=u_gui.draw_image(image="back.png",h=320,x=0,y=0)
app = Flask(__name__)
@app.route('/upload', methods=['POST'])
def upload():
   try:
        image = request.data
        # 保存照片到指定目录

        with open('base.png', 'wb') as f:
            f.write(image)
            f.close()
        显图.config(image="base.png")
        return "照片上传成功", 200

   except Exception as e:
       return "照片上传失败", 500

# 事件回调函数
def on_buttona_click_callback():
    global i
    if i==0:
       i=1
       siot.publish(topic="1DXAmWJ4g", data="a")
# 事件回调函数
def on_buttonb_click_callback():
    global i
    if i==1:
       i=0

       siot.publish(topic="1DXAmWJ4g", data="b")


       with open('base.png', 'rb') as f:
            encoded_string = base64.b64encode(f.read())
            encoded_string = encoded_string.decode("utf-8")
            f.close()
       image = encoded_string
       """ 调用人脸检测 """
       imageType = "BASE64"
       res=client.detect(image, imageType);
       print(res)
       if(res['error_code']==0):
        if(res['result']['face_num']==1):
            print(res['result']['face_list'][0]['face_token'])
            print(res['result']['face_list'][0]['location'])
       显图.config(image="base.png")
"""https://ai.baidu.com/ai-doc/FACE/ek37c1qiz"""
""" 你的 APPID AK SK """
APP_ID = '17893916'
API_KEY = 'uEunHuOhiSTeYHfZcdcUIq60'
SECRET_KEY = 'oOPx8FerIBGx4wVOYE3khD9rNLzPRGGy'

client = AipFace(APP_ID, API_KEY, SECRET_KEY)

if __name__ == '__main__':
    siot.init(client_id="yuntian367",server="iot.dfrobot.com.cn",port=1883,user="X8jykxFnR",password="u8jskbFngz")
    siot.connect()
    siot.loop()

    u_gui.on_a_click(on_buttona_click_callback)
    u_gui.on_b_click(on_buttonb_click_callback)
    try:
       app.run(host='192.168.31.71', port=9000)
    except Exception as e:
       print("照片上传失败:", str(e))
复制代码
from aip import AipFace
import myimg

from flask import Flask, request
from unihiker import GUI
import siot
import time
import base64
import cv2
u_gui=GUI()
i=0
显图=u_gui.draw_image(image="back.png",h=320,x=0,y=0)
画框=u_gui.draw_rect(x=0,y=0,w=0,h=0,width=4,color="#0000FF")
app = Flask(__name__)
@app.route('/upload', methods=['POST'])
def upload():
   try:
        image = request.data
        # 保存照片到指定目录

        with open('base.png', 'wb') as f:
            f.write(image)

            f.close()
        img = cv2.imread('base.png')
        #img_re = cv2.resize(img, (240, 320))
        height, width = img.shape[:2]
        rotation_matrix = cv2.getRotationMatrix2D((120,120), -90, 1)
        rotated_image = cv2.warpAffine(img, rotation_matrix, (240,320))
        cv2.imwrite("base.png",rotated_image)
        显图.config(image="base.png")
        return "照片上传成功", 200

   except Exception as e:
       print(str(e))
       return "照片上传失败", 500

# 事件回调函数
def on_buttona_click_callback():
    global i
    if i==0:
       i=1

       画框.config(width=0)
       siot.publish(topic="1DXAmWJ4g", data="a")
# 事件回调函数
def on_buttonb_click_callback():
    global i
    if i==1:
       i=0

       siot.publish(topic="1DXAmWJ4g", data="b")


       with open('base.png', 'rb') as f:
            encoded_string = base64.b64encode(f.read())
            encoded_string = encoded_string.decode("utf-8")
            f.close()
       image = encoded_string
       """ 调用人脸检测 """
       imageType = "BASE64"
       res=client.detect(image, imageType);
       print(res)
       if(res['error_code']==0):
        if(res['result']['face_num']==1):
            print(res['result']['face_list'][0]['face_token'])
            print(res['result']['face_list'][0]['location'])
            left=res['result']['face_list'][0]['location']['left']
            top=res['result']['face_list'][0]['location']['top']
            width=res['result']['face_list'][0]['location']['width']
            height=res['result']['face_list'][0]['location']['height']
            显图.config(image="base.png")
            画框.config(width=3)
            画框.config(x=left-height)
            画框.config(y=top)
            画框.config(w=height)
            画框.config(h=width)

"""https://ai.baidu.com/ai-doc/FACE/ek37c1qiz"""
""" 你的 APPID AK SK """
APP_ID = '17893916'
API_KEY = 'uEunHuOhiSTeYHfZcdcUIq60'
SECRET_KEY = 'oOPx8FerIBGx4wVOYE3khD9rNLzPRGGy'

client = AipFace(APP_ID, API_KEY, SECRET_KEY)

if __name__ == '__main__':
    siot.init(client_id="yuntian367",server="iot.dfrobot.com.cn",port=1883,user="X8jykxFnR",password="u8jskbFngz")
    siot.connect()
    siot.loop()

    u_gui.on_a_click(on_buttona_click_callback)
    u_gui.on_b_click(on_buttonb_click_callback)
    try:
       app.run(host='192.168.31.71', port=9000)
    except Exception as e:
       print("照片上传失败:", str(e))
复制代码
from aip import AipFace
import name

from flask import Flask, request
from unihiker import GUI
import siot
import time
import base64
import cv2
u_gui=GUI()
i=0
显图=u_gui.draw_image(image="back.png",h=320,x=0,y=0)
画框=u_gui.draw_rect(x=0,y=0,w=0,h=0,width=4,color="#0000FF")
app = Flask(__name__)
@app.route('/upload', methods=['POST'])
def upload():
   try:
        image = request.data
        # 保存照片到指定目录

        with open('base.png', 'wb') as f:
            f.write(image)

            f.close()
        img = cv2.imread('base.png')
        #img_re = cv2.resize(img, (240, 320))
        height, width = img.shape[:2]
        rotation_matrix = cv2.getRotationMatrix2D((120,120), -90, 1)
        rotated_image = cv2.warpAffine(img, rotation_matrix, (240,320))
        cv2.imwrite("base.png",rotated_image)
        显图.config(image="base.png")
        return "照片上传成功", 200

   except Exception as e:
       print(str(e))
       return "照片上传失败", 500

# 事件回调函数
def on_buttona_click_callback():
    global i
    if i==0:
       i=1

       画框.config(width=0)
       siot.publish(topic="1DXAmWJ4g", data="a")
# 事件回调函数
def on_buttonb_click_callback():
    global i
    if i==1:
       i=0

       siot.publish(topic="1DXAmWJ4g", data="b")


       with open('base.png', 'rb') as f:
            encoded_string = base64.b64encode(f.read())
            encoded_string = encoded_string.decode("utf-8")
            f.close()
       image = encoded_string
       """ 调用人脸检测 """
       imageType = "BASE64"
       res=client.detect(image, imageType);
       print(res)
       if(res['error_code']==0):
        if(res['result']['face_num']==1):
            print(res['result']['face_list'][0]['face_token'])
            print(res['result']['face_list'][0]['location'])
            left=res['result']['face_list'][0]['location']['left']
            top=res['result']['face_list'][0]['location']['top']
            width=res['result']['face_list'][0]['location']['width']
            height=res['result']['face_list'][0]['location']['height']
            显图.config(image="base.png")
            画框.config(width=3)
            画框.config(x=abs(height-left))
            画框.config(y=top)
            画框.config(w=height)
            画框.config(h=width)

            image=res['result']['face_list'][0]['face_token']
            groupIdList = "AI1"
            imageType = "FACE_TOKEN"
            """ 如果有可选参数 """
            options = {}
            options["match_threshold"] = 70
            options["quality_control"] = "NORMAL"
            options["liveness_control"] = "LOW"

            options["max_user_num"] =1

            """ 带参数调用人脸搜索 """
            res1=client.search(image, imageType, groupIdList, options)

            if(res1['error_code']==0):
                user_id=res1['result']['user_list'][0]['user_id']
                if(user_id in name.name_id):
                    print(name.name_id[user_id])

"""https://ai.baidu.com/ai-doc/FACE/ek37c1qiz"""
""" 你的 APPID AK SK """
APP_ID = '17893916'
API_KEY = 'uEunHuOhiSTeYHfZcdcUIq60'
SECRET_KEY = 'oOPx8FerIBGx4wVOYE3khD9rNLzPRGGy'

client = AipFace(APP_ID, API_KEY, SECRET_KEY)
if __name__ == '__main__':
    siot.init(client_id="yuntian367",server="iot.dfrobot.com.cn",port=1883,user="X8jykxFnR",password="u8jskbFngz")
    siot.connect()
    siot.loop()

    u_gui.on_a_click(on_buttona_click_callback)
    u_gui.on_b_click(on_buttonb_click_callback)
    try:
       app.run(host='192.168.31.71', port=9000)
    except Exception as e:
       print("照片上传失败:", str(e))
复制代码
#可以通过bluetoothctl实现,蓝牙设备之间的配对,bluetoothctl工具,类似一个shell工具,提供许多子命令集合。
#使用命令 agent on (推荐)选择要连接的设备类型或者去选择一个特定的类型: 如果你在 agent 命令后按下两次tab键, 你应该看到一些可以使用的类型列表,比如DisplayOnly KeyboardDisplay NoInputNoOutput DisplayYesNo KeyboardOnly off on.
#使用命令 default-agent 去确认并完成要连接的设备类型
#power on蓝牙适配器上电,打开蓝牙,蓝牙默认是关闭的,重启后默认也是关闭的
#scan on/off开启蓝牙适配的扫描过程,扫描周边的蓝牙设备。
bluetoothctl
agent on
default-agent
power on
#依次键入以下命令,进行设备配对,trust 授信蓝牙设备,pair配对设备,connect连接设备
trust 41:42:48:46:68:C7
pair 41:42:48:46:68:C7
connect 41:42:48:46:68:C7
#退出
exit
复制代码
from aip import AipFace
import name

from flask import Flask, request
from unihiker import GUI
import siot
import time
import base64
import cv2
#语音播放
import pyttsx3

u_gui=GUI()
i=0
显图=u_gui.draw_image(image="back.png",h=320,x=0,y=0)
画框=u_gui.draw_rect(x=0,y=0,w=0,h=0,width=4,color="#0000FF")
app = Flask(__name__)
@app.route('/upload', methods=['POST'])
def upload():
   try:
        image = request.data
        # 保存照片到指定目录

        with open('base.png', 'wb') as f:
            f.write(image)


        img = cv2.imread('base.png')
        #img_re = cv2.resize(img, (240, 320))
        height, width = img.shape[:2]
        rotation_matrix = cv2.getRotationMatrix2D((120,120), -90, 1)
        rotated_image = cv2.warpAffine(img, rotation_matrix, (240,320))
        cv2.imwrite("base.png",rotated_image)
        显图.config(image="base.png")
        return "照片上传成功", 200

   except Exception as e:
       print(str(e))
       return "照片上传失败", 500

# 事件回调函数
def on_buttona_click_callback():
    global i
    if i==0:
       i=1

       画框.config(width=0)
       siot.publish(topic="1DXAmWJ4g", data="a")
# 事件回调函数
def on_buttonb_click_callback():
    global i
    if i==1:
       i=0

       siot.publish(topic="1DXAmWJ4g", data="b")


       with open('base.png', 'rb') as f:
            encoded_string = base64.b64encode(f.read())
            encoded_string = encoded_string.decode("utf-8")

       image = encoded_string
       """ 调用人脸检测 """
       imageType = "BASE64"
       res=client.detect(image, imageType);
       print(res)
       if(res['error_code']==0):
        if(res['result']['face_num']==1):
            print(res['result']['face_list'][0]['face_token'])
            print(res['result']['face_list'][0]['location'])
            left=res['result']['face_list'][0]['location']['left']
            top=res['result']['face_list'][0]['location']['top']
            width=res['result']['face_list'][0]['location']['width']
            height=res['result']['face_list'][0]['location']['height']
            显图.config(image="base.png")
            画框.config(width=3)
            画框.config(x=abs(height-left))
            画框.config(y=top)
            画框.config(w=height)
            画框.config(h=width)

            image=res['result']['face_list'][0]['face_token']
            groupIdList = "AI1"
            imageType = "FACE_TOKEN"
            """ 如果有可选参数 """
            options = {}
            options["match_threshold"] = 70
            options["quality_control"] = "NORMAL"
            options["liveness_control"] = "LOW"

            options["max_user_num"] =1

            """ 带参数调用人脸搜索 """
            res1=client.search(image, imageType, groupIdList, options)
            print(res1)
            if(res1['error_code']==0):
                user_id=res1['result']['user_list'][0]['user_id']
                score=res1['result']['user_list'][0]['score']
                if score>60:
                 print(user_id)
                 if user_id in name.name_id:
                    print(name.name_id[user_id])
                    pyttsx3.speak("这个人是:"+name.name_id[user_id])

                else:
                    pyttsx3.speak("请重新识别")
            elif res1['error_code']==223120:
                pyttsx3.speak("请不要使用照片进行识别")
"""https://ai.baidu.com/ai-doc/FACE/ek37c1qiz"""
""" 你的 APPID AK SK """
APP_ID = '17893916'
API_KEY = 'uEunHuOhiSTeYHfZcdcUIq60'
SECRET_KEY = 'oOPx8FerIBGx4wVOYE3khD9rNLzPRGGy'

client = AipFace(APP_ID, API_KEY, SECRET_KEY)
if __name__ == '__main__':
    siot.init(client_id="yuntian367",server="iot.dfrobot.com.cn",port=1883,user="X8jykxFnR",password="u8jskbFngz")
    siot.connect()
    siot.loop()

    u_gui.on_a_click(on_buttona_click_callback)
    u_gui.on_b_click(on_buttonb_click_callback)
    try:
       app.run(host='192.168.31.70', port=9000)
    except Exception as e:
       print("照片上传失败:", str(e))
复制代码


 沪公网安备31011502402448
 置顶卡
置顶卡 变色卡
变色卡 千斤顶
千斤顶
 活跃会员
活跃会员
 宣传大使
宣传大使
 牛X认证
牛X认证
 创客造
创客造
 编辑选择奖
编辑选择奖
 志“童”道合
 编辑选择奖
编辑选择奖
 编辑选择奖
编辑选择奖
 编辑选择奖
编辑选择奖
 编辑选择奖
编辑选择奖


