项目代码
- #include <WiFi.h>
- #include <NeoPixelBus.h>
- #include <Husarnet.h>
-
- // Which pin on the Arduino is connected to the NeoPixels?
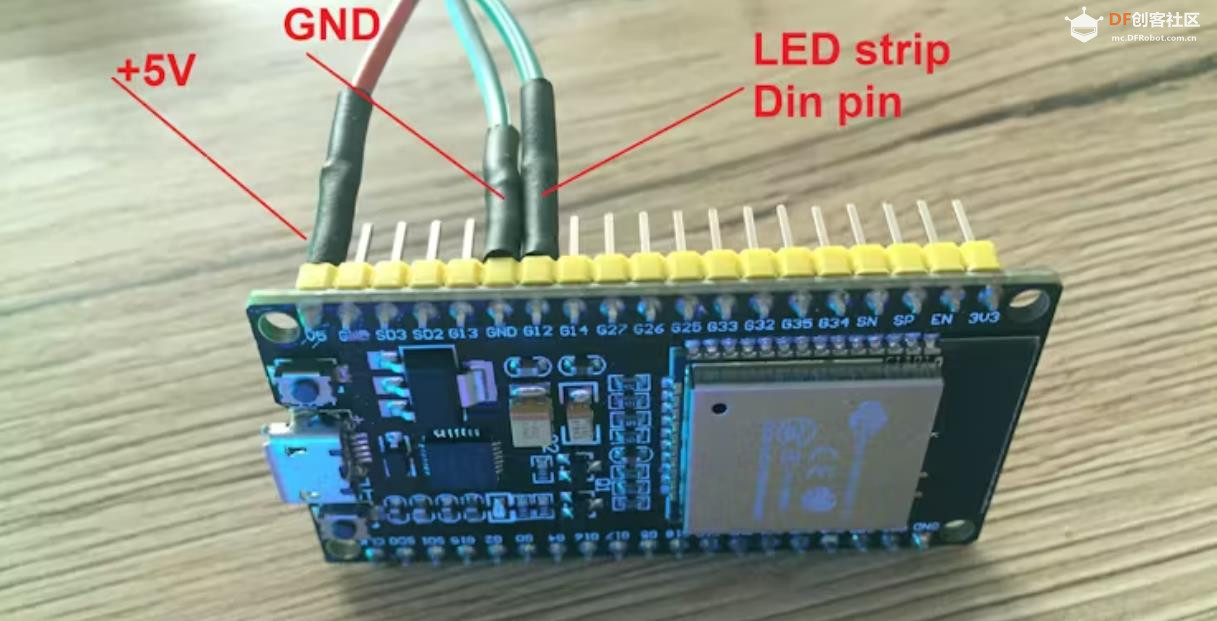
- #define PIN 12
-
- // How many NeoPixels are attached to the Arduino?
- #define NUMPIXELS 60
-
- NeoPixelBus<NeoGrbFeature, Neo800KbpsMethod> strip(NUMPIXELS, PIN);
-
- uint8_t red = 0;
- uint8_t green = 0;
- uint8_t blue = 0;
-
- int j = 0;
-
- #define NUM_NETWORKS 4
-
- // Add your networks credentials here
- const char* ssidTab[NUM_NETWORKS] = {
- "wifi-network-1",
- "wifi-network-2",
- "wifi-network-3",
- "wifi-network-4"
- };
- const char* passwordTab[NUM_NETWORKS] = {
- "wifi-pass-1",
- "wifi-pass-2",
- "wifi-pass-3",
- "wifi-pass-4"
- };
-
- HusarnetServer server(8000);
-
- String header;
-
- void setup() {
- Serial.begin(115200);
-
- strip.Begin();
- strip.Show();
-
- bool connectedSuccess = 0;
- for (int i = 0; i < NUM_NETWORKS; i++) {
- Serial.print("Connecting to ");
- Serial.println(ssidTab[i]);
- WiFi.begin(ssidTab[i], passwordTab[i]);
- for (int j = 0; j < 10; j++) {
- if (WiFi.status() != WL_CONNECTED) {
- delay(500);
- Serial.print(".");
- } else {
- connectedSuccess = true;
- }
- }
- Serial.println("");
- if (connectedSuccess == true) {
- break;
- }
- }
- if (connectedSuccess == false) {
- Serial.println("WiFi network unreachable");
- while (1) {
- ;
- }
- }
-
- Serial.println("");
- Serial.println("WiFi connected.");
- Serial.println("IP address: ");
- Serial.println(WiFi.localIP());
-
- Husarnet.selfHostedSetup("default");
- // Husarnet.join(husarnetJoinCode, hostName); // alternative way, to clicking a link from a terminal. Visit app.husarnet.com -> network -> add element -> join code tab.
- Husarnet.start();
-
- server.begin();
-
- xTaskCreate(
- taskLED, /* Task function. */
- "taskLED", /* String with name of task. */
- 10000, /* Stack size in bytes. */
- NULL, /* Parameter passed as input of the task */
- 2, /* Priority of the task. */
- NULL); /* Task handle. */
-
- xTaskCreate(
- taskWifi, /* Task function. */
- "taskWifi", /* String with name of task. */
- 10000, /* Stack size in bytes. */
- NULL, /* Parameter passed as input of the task */
- 1, /* Priority of the task. */
- NULL); /* Task handle. */
- }
-
- void rainbow(int j) {
- int k = 0;
- int l = 0;
- int m = 0;
-
- for (int i = 0; i < NUMPIXELS; i++) {
- if ( ( i >= 0 ) && ( i < NUMPIXELS * 1 / 3 ) ) {
- red = 255 * k / (NUMPIXELS / 3);
- green = 0;
- blue = 255 - (255 * k / (NUMPIXELS / 3) );
- k++;
- }
- if ( ( i >= NUMPIXELS * 1 / 3 ) && ( i < NUMPIXELS * 2 / 3 ) ) {
- red = 255 - (255 * l / (NUMPIXELS / 3) );
- green = 255 * l / (NUMPIXELS / 3);
- blue = 0;
- l++;
- }
- if ( ( i >= NUMPIXELS * 2 / 3 ) && ( i < NUMPIXELS * 3 / 3 ) ) {
- red = 0;
- green = 255 - (255 * m / (NUMPIXELS / 3) );
- blue = 255 * m / (NUMPIXELS / 3);
- m++;
- }
-
- strip.SetPixelColor((i + j) % NUMPIXELS, RgbColor(red, green, blue));
- }
-
- strip.Show();
- delay(50);
- }
-
- void white_shine(int j) {
- int k = 0;
- int l = 0;
- int m = 0;
-
- for (int i = 0; i < NUMPIXELS; i++) {
- if ( ( i >= 0 ) && ( i < NUMPIXELS * 1 / 3 ) ) {
- red = 255 * k / (NUMPIXELS / 3);
- green = 255 * k / (NUMPIXELS / 3);
- blue = 255 * k / (NUMPIXELS / 3);
- k++;
- }
- if ( ( i >= NUMPIXELS * 1 / 3 ) && ( i < NUMPIXELS * 2 / 3 ) ) {
- red = 255 - (255 * l / (NUMPIXELS / 3) );
- green = 255 - (255 * l / (NUMPIXELS / 3) );
- blue = 255 - (255 * l / (NUMPIXELS / 3) );
- l++;
- }
- if ( ( i >= NUMPIXELS * 2 / 3 ) && ( i < NUMPIXELS * 3 / 3 ) ) {
- red = 0;
- green = 0;
- blue = 0;
- m++;
- }
- Serial.printf("\r\n[R,G,B] = [%d,%d,%d]", red, green, blue);
- strip.SetPixelColor((i + j) % NUMPIXELS, RgbColor(red, green, blue));
- }
- strip.Show();
- delay(40);
- }
-
- void red_shine(int j) {
- int k = 0;
- int l = 0;
- int m = 0;
-
- for (int i = 0; i < NUMPIXELS; i++) {
- if ( ( i >= 0 ) && ( i < NUMPIXELS * 1 / 3 ) ) {
- red = 255;
- green = 255 - 255 * k / (NUMPIXELS / 3);
- blue = 255 - 255 * k / (NUMPIXELS / 3);
- k++;
- }
- if ( ( i >= NUMPIXELS * 1 / 3 ) && ( i < NUMPIXELS * 2 / 3 ) ) {
- red = 255;
- green = (255 * l / (NUMPIXELS / 3) );
- blue = (255 * l / (NUMPIXELS / 3) );
- l++;
- }
- if ( ( i >= NUMPIXELS * 2 / 3 ) && ( i < NUMPIXELS * 3 / 3 ) ) {
- red = 255;
- green = 255;
- blue = 255;
- m++;
- }
- strip.SetPixelColor((i + j) % NUMPIXELS, RgbColor(red, green, blue));
- }
- strip.Show();
- delay(40);
- }
-
- void led_white()
- {
- for (int i = 0; i < NUMPIXELS; i++) {
- red = 255;
- green = 255;
- blue = 255;
- strip.SetPixelColor((i + j) % NUMPIXELS, RgbColor(red, green, blue));
- }
- delay(5);
- strip.Show();
- }
-
- void led_off() {
- for (int i = 0; i < NUMPIXELS; i++) {
- red = 0;
- green = 0;
- blue = 0;
- strip.SetPixelColor((i + j) % NUMPIXELS, RgbColor(red, green, blue));
- }
- delay(100);
- strip.Show();
- }
-
-
- char* getModeName(uint8_t modeNo) {
- switch (modeNo) {
- case 0:
- return "rainbow";
- case 1:
- return "white shine";
- case 2:
- return "red shine";
- case 3:
- return "only white";
- case 4:
- return "off";
- }
- return "error";
- }
-
- uint8_t modeRGB = 0;
- void taskLED( void * parameter )
- {
- while (1) {
- switch (modeRGB) {
- case 0:
- rainbow(j++);
- break;
- case 1:
- white_shine(j++);
- break;
- case 2:
- red_shine(j++);
- break;
- case 3:
- led_white();
- break;
- case 4:
- led_off();
- break;
- default:
- rainbow(j++);
- break;
- }
- if (j >= NUMPIXELS) {
- j = 0;
- }
- }
-
- Serial.println("Ending task LED");
- vTaskDelete( NULL );
- }
-
- void loop() {
- while (1) {
- delay(1000);
- }
- }
-
- static const char* htmlHead = R"rawText(
- <head>
- <meta name="viewport" content="width=device-width, initial-scale=1">
- <link rel="icon" href="data:,">
- <style>
- html {
- font-family: Helvetica;
- display: inline-block;
- margin: 0px auto;
- text-align: center;
- }
-
- .button {
- background:
- linear-gradient(to right, #FB6060 0%, #EC305D 100%);
- border: none;
- text-decoration: none;
- margin: 2px;
- padding: 25px 25px;
- width: 300px;
- border-radius: 12px;
- color: white;
- font-size: 30px;
- cursor: pointer;
- }
- </style>
- </head>
- )rawText";
-
- void taskWifi( void * parameter ) {
-
-
-
- while (1) {
- HusarnetClient client = server.available();
-
- if (client) {
- Serial.println("New Client.");
- String currentLine = "";
- Serial.printf("connected: %d\n", (int)client.connected());
- while (client.connected()) {
-
- if (client.available()) {
- char c = client.read();
- // Serial.write(c);
- header += c;
- if (c == '\n') {
- if (currentLine.length() == 0) {
- client.println("HTTP/1.1 200 OK");
- client.println("Content-type:text/html");
- client.println("Connection: close");
- client.println();
-
- if (header.indexOf("GET /0") >= 0) {
- modeRGB = 1;
- }
- if (header.indexOf("GET /1") >= 0) {
- modeRGB = 2;
- }
- if (header.indexOf("GET /2") >= 0) {
- modeRGB = 3;
- }
- if (header.indexOf("GET /3") >= 0) {
- modeRGB = 4;
- }
- if (header.indexOf("GET /4") >= 0) {
- modeRGB = 0;
- }
-
- // Head
- client.println("<!DOCTYPE html><html>");
- client.println(htmlHead);
- // Body
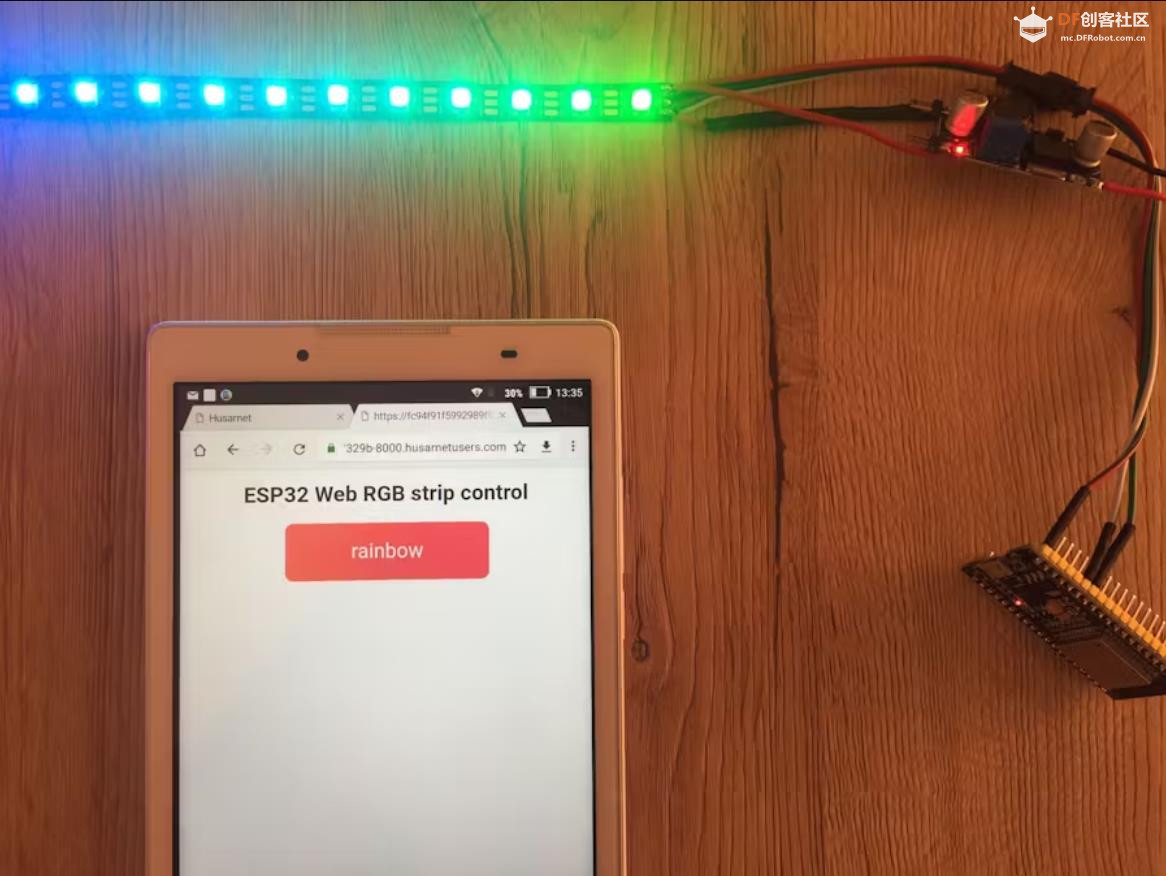
- client.println("<body><h1>ESP32 Web RGB strip control</h1>");
- client.print("<p><a href="/");
- client.print(modeRGB);
- client.print(""><button class="button">");
- client.print(getModeName(modeRGB));
- client.println("</button></a></p>");
- client.println("</body></html>");
-
- client.println();
- break;
- } else {
- currentLine = "";
- }
- } else if (c != '\r') {
- currentLine += c;
- }
- }
- }
-
- header = "";
-
- client.stop();
- Serial.println("Client disconnected.");
- Serial.println("");
- }
- }
- }
| 


 沪公网安备31011502402448
 置顶卡
置顶卡 变色卡
变色卡 千斤顶
千斤顶
 萌萌哒新人
萌萌哒新人
 活跃会员
活跃会员
 宣传大使
宣传大使
 牛X认证
牛X认证
 创作达人
创作达人
 ARD DAY
 摸鱼团员
摸鱼团员
 志“童”道合
 编辑选择奖
编辑选择奖


