|
【项目背景】 平时缺乏锻炼,爱好各种美食,没有管理好热量输入的人,身材也容易随着年龄的增长而发胖,身体健康也会更容易出现问题。 健身锻炼是预防肥胖的有效手段,还能帮你强化体能,提高自身免疫力。很多人总是等到胖起来才想到要锻炼,但是这个时候,你的体能素质已经直线下降,很多运动是无法驾驭得了的,这个时候你更容易放弃健身,选择中途而废。 不过,很多人出于各种生活、工作的原因,没有时间锻炼,无法在户外锻炼或者去健身房锻炼,只能利用琐碎时间在家锻炼。 很多人之所以健身锻炼不久就放弃了,绝大多数就是因为太枯燥了,要是能够采取丰富多彩的训练方式,相信很多人一定可以坚持下来的。 【项目设计】 本项目以使用哑铃健身为例。通过AI识别人体姿态,灯光响应完成度,增加锻炼趣味性,让健身者乐于锻炼。 【锻炼工具哑铃】 哑铃是一种用于增强肌肉力量训练的简单器材。很多朋友在健身或者锻炼的时候,都会使用到哑铃。 如:单臂弯举 目标肌群:肱二头肌、肱肌和肱桡肌。动作要领:稳坐于长凳上,保持大腿与地面平行,低手抓握哑铃,肘部靠近大腿内侧,并高于膝盖位置,手肘靠在大腿内侧做弯举动作。如果哑铃重量比较重,切记不要用甩的方式,避免手臂受伤。 【Mediapipe+Pinpong库安装】 MediaPipe 是一款由 Google Research 开发并开源的多媒体机器学习模型应用框架。在谷歌,一系列重要产品,如 YouTube、Google Lens、ARCore、Google Home 以及 Nest,都已深度整合了 MediaPipe。
安装过程请参考:https://mc.dfrobot.com.cn/thread-311477-1-1.html
【姿态识别测试】 使用Mediapipe开源代码,对网络跳舞视频进行姿态识别测试。 测试代码:
- <font face="微软雅黑">
- import cv2
- import mediapipe as mp
- mp_drawing = mp.solutions.drawing_utils
-
- mp_pose = mp.solutions.pose
-
- # For webcam input:
- cap = cv2.VideoCapture("wudao4.mp4")
- with mp_pose.Pose(
- min_detection_confidence=0.5,
- min_tracking_confidence=0.5) as pose:
- while cap.isOpened():
- success, image = cap.read()
- if not success:
- print("Ignoring empty camera frame.")
- # If loading a video, use 'break' instead of 'continue'.
- continue
-
- # To improve performance, optionally mark the image as not writeable to
- # pass by reference.
- image.flags.writeable = False
- image = cv2.cvtColor(image, cv2.COLOR_BGR2RGB)
- results = pose.process(image)
-
- # Draw the pose annotation on the image.
- image.flags.writeable = True
- image = cv2.cvtColor(image, cv2.COLOR_RGB2BGR)
- mp_drawing.draw_landmarks(
- image,
- results.pose_landmarks,
- mp_pose.POSE_CONNECTIONS)
- # Flip the image horizontally for a selfie-view display.
- cv2.imshow('MediaPipe Pose', cv2.flip(image, 1))
- if cv2.waitKey(5) & 0xFF == 27:
- break
- cap.release()
- </font>
测试视频
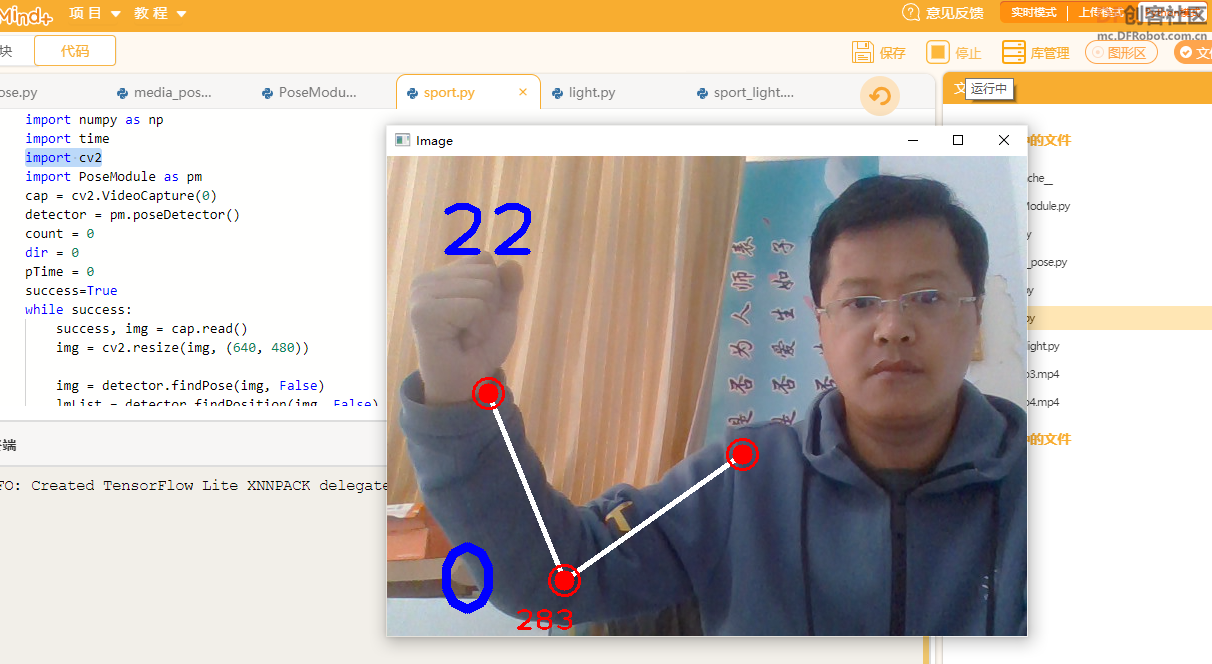
【手臂姿态测试】
在“PoseModule.py”文件中定义类“poseDetector”状态检测,代码如下:
- <font face="微软雅黑">
- import math
- import mediapipe as mp
- import cv2
- class poseDetector():
-
- def __init__(self, mode=False, upBody=False, smooth=True,
- detectionCon=0.5, trackCon=0.5):
-
- self.mode = mode
- self.upBody = upBody
- self.smooth = smooth
- self.detectionCon = detectionCon
- self.trackCon = trackCon
-
- self.mpDraw = mp.solutions.drawing_utils
- self.mpPose = mp.solutions.pose
- self.pose = self.mpPose.Pose(self.mode, self.upBody, self.smooth,
- self.detectionCon, self.trackCon)
-
- def findPose(self, img, draw=True):
- imgRGB = cv2.cvtColor(img, cv2.COLOR_BGR2RGB)
- self.results = self.pose.process(imgRGB)
- if self.results.pose_landmarks:
- if draw:
- self.mpDraw.draw_landmarks(img, self.results.pose_landmarks,
- self.mpPose.POSE_CONNECTIONS)
- return img
-
- def findPosition(self, img, draw=True):
- self.lmList = []
- if self.results.pose_landmarks:
- for id, lm in enumerate(self.results.pose_landmarks.landmark):
- h, w, c = img.shape
- # print(id, lm)
- cx, cy = int(lm.x * w), int(lm.y * h)
- self.lmList.append([id, cx, cy])
- if draw:
- cv2.circle(img, (cx, cy), 5, (255, 0, 0), cv2.FILLED)
- return self.lmList
-
- def findAngle(self, img, p1, p2, p3, draw=True):
-
- # Get the landmarks
- x1, y1 = self.lmList[p1][1:]
- x2, y2 = self.lmList[p2][1:]
- x3, y3 = self.lmList[p3][1:]
-
- # Calculate the Angle
- angle = math.degrees(math.atan2(y3 - y2, x3 - x2) -
- math.atan2(y1 - y2, x1 - x2))
- if angle < 0:
- angle += 360
-
- # print(angle)
-
- # Draw
- if draw:
- cv2.line(img, (x1, y1), (x2, y2), (255, 255, 255), 3)
- cv2.line(img, (x3, y3), (x2, y2), (255, 255, 255), 3)
- cv2.circle(img, (x1, y1), 10, (0, 0, 255), cv2.FILLED)
- cv2.circle(img, (x1, y1), 15, (0, 0, 255), 2)
- cv2.circle(img, (x2, y2), 10, (0, 0, 255), cv2.FILLED)
- cv2.circle(img, (x2, y2), 15, (0, 0, 255), 2)
- cv2.circle(img, (x3, y3), 10, (0, 0, 255), cv2.FILLED)
- cv2.circle(img, (x3, y3), 15, (0, 0, 255), 2)
- cv2.putText(img, str(int(angle)), (x2 - 50, y2 + 50),
- cv2.FONT_HERSHEY_PLAIN, 2, (0, 0, 255), 2)
- return angle
- </font>
测试手臂姿态代码:
- <font face="微软雅黑">
- import numpy as np
- import time
- import PoseModule as pm
- import cv2
- cap = cv2.VideoCapture(0)
- detector = pm.poseDetector()
- count = 0
- dir = 0
- pTime = 0
- success=True
- while success:
- success, img = cap.read()
- img = cv2.resize(img, (640, 480))
-
- img = detector.findPose(img, False)
- lmList = detector.findPosition(img, False)
-
- if len(lmList) != 0:
- # 右臂
- angle = detector.findAngle(img, 12, 14, 16)
- # 左臂
- #angle = detector.findAngle(img, 11, 13, 15,False)
- per = np.interp(angle, (210, 310), (0, 100))
- light = int(np.interp(angle, (220, 310), (119, 0)))
- # print(angle, per)
- # 计算个数
-
- if per == 100:
-
- if dir == 0:
- count += 0.5
- dir = 1
- if per == 0:
-
- if dir == 1:
- count += 0.5
- dir = 0
- #print(count)
- cv2.putText(img, str(int(count)), (45, 460), cv2.FONT_HERSHEY_PLAIN, 7,(255, 0, 0), 8)
- cTime = time.time()
- fps = 1 / (cTime - pTime)
- pTime = cTime
- cv2.putText(img, str(int(fps)), (50, 100), cv2.FONT_HERSHEY_PLAIN, 5,(255, 0, 0), 5)
- cv2.imshow("Image", img)
- cv2.waitKey(1)
- </font>
【Pinpong库测试】
测试代码:- <font face="微软雅黑">
- # -*- coding: utf-8 -*-
-
- #实验效果:控制WS2812单线RGB LED灯
- #接线:使用windows或linux电脑连接一块microbit主控板,ws2812灯接到D9口
- import time
- from pinpong.board import Board,Pin,NeoPixel
-
- NEOPIXEL_PIN = Pin.P0
- PIXELS_NUM = 120 #灯数
-
- Board("microbit").begin() #初始化,选择板型和端口号,不输入端口号则进行自动识别
- #Board("microbit","COM36").begin() #windows下指定端口初始化
- #Board("microbit","/dev/ttyACM0").begin() #linux下指定端口初始化
- #Board("microbit","/dev/cu.usbmodem14101").begin() #mac下指定端口初始化
-
- np = NeoPixel(Pin(NEOPIXEL_PIN), PIXELS_NUM)
-
- while True:
- np[0] = (0, 255 ,0) #设置第一个灯RGB亮度
- np[1] = (255, 0, 0) #设置第二个灯RGB亮度
- np[2] = (0, 0, 255) #设置第三个灯RGB亮度
- np[3] = (255, 0, 255) #设置第四个灯RGB亮度
- time.sleep(1)
-
- np[1] = (0, 255, 0)
- np[2] = (255, 0, 0)
- np[3] = (255, 255, 0)
- np[0] = (0, 0, 255)
- time.sleep(1)
-
- np.rainbow(0,PIXELS_NUM,0,0x0000FF)
- time.sleep(1)
- for i in range(PIXELS_NUM):
- np.rotate(1)
- time.sleep(1)
-
- for i in range(PIXELS_NUM):
- np.shift(1)
- time.sleep(1)
-
- np.clear()
- time.sleep(1)
-
- np.range_color(0,PIXELS_NUM,0xFF0000)
- time.sleep(1)
- np.range_color(0,PIXELS_NUM,0x00FF00)
- time.sleep(1)
- np.range_color(0,PIXELS_NUM,0x0000FF)
- time.sleep(1)
-
- np.clear()
- time.sleep(1)
-
- </font>

【完整程序】
- <font face="微软雅黑">
- import numpy as np
- import time
- import PoseModule as pm
- import cv2
- import time
- from pinpong.board import Board,Pin,NeoPixel
- NEOPIXEL_PIN = Pin.P0
- PIXELS_NUM = 120 #灯数
- Board("microbit").begin() #初始化
- cap = cv2.VideoCapture(0)
- detector = pm.poseDetector()
- count = 0
- dir = 0
- pTime = 0
- npX = NeoPixel(Pin(NEOPIXEL_PIN), PIXELS_NUM)
- success=True
- npX.clear()
- time.sleep(1)
- while success:
- success, img = cap.read()
- img = cv2.resize(img, (640, 480))
-
- img = detector.findPose(img, False)
- lmList = detector.findPosition(img, False)
-
- if len(lmList) != 0:
- # 右臂
- angle = detector.findAngle(img, 12, 14, 16)
- # 左臂
- #angle = detector.findAngle(img, 11, 13, 15,False)
- per = np.interp(angle, (210, 310), (0, 100))
- light = int(np.interp(angle, (220, 310), (119, 0)))
- # print(angle, per)
- # 计算个数
-
- if per == 100:
-
- if dir == 0:
- count += 0.5
- dir = 1
- if per == 0:
-
- if dir == 1:
- count += 0.5
- dir = 0
- #print(count)
- #npX.range_color(light,119,0x000000)
- #npX.range_color(0,light,0xFF0000)
- print(light)
- npX.range_color(light,119,0x000000)
- npX.rainbow(0,light,0,0x0000FF)
- cv2.putText(img, str(int(count)), (45, 460), cv2.FONT_HERSHEY_PLAIN, 7,(255, 0, 0), 8)
- cTime = time.time()
- fps = 1 / (cTime - pTime)
- pTime = cTime
- cv2.putText(img, str(int(fps)), (50, 100), cv2.FONT_HERSHEY_PLAIN, 5,(255, 0, 0), 5)
- cv2.imshow("Image", img)
- cv2.waitKey(1)
- </font>
【演示视频】
|


 沪公网安备31011502402448
 置顶卡
置顶卡 变色卡
变色卡 千斤顶
千斤顶


 活跃会员
活跃会员
 宣传大使
宣传大使
 牛X认证
牛X认证
 创客造
创客造
 编辑选择奖
编辑选择奖
 志“童”道合
 编辑选择奖
编辑选择奖
 编辑选择奖
编辑选择奖
 编辑选择奖
编辑选择奖
 编辑选择奖
编辑选择奖


