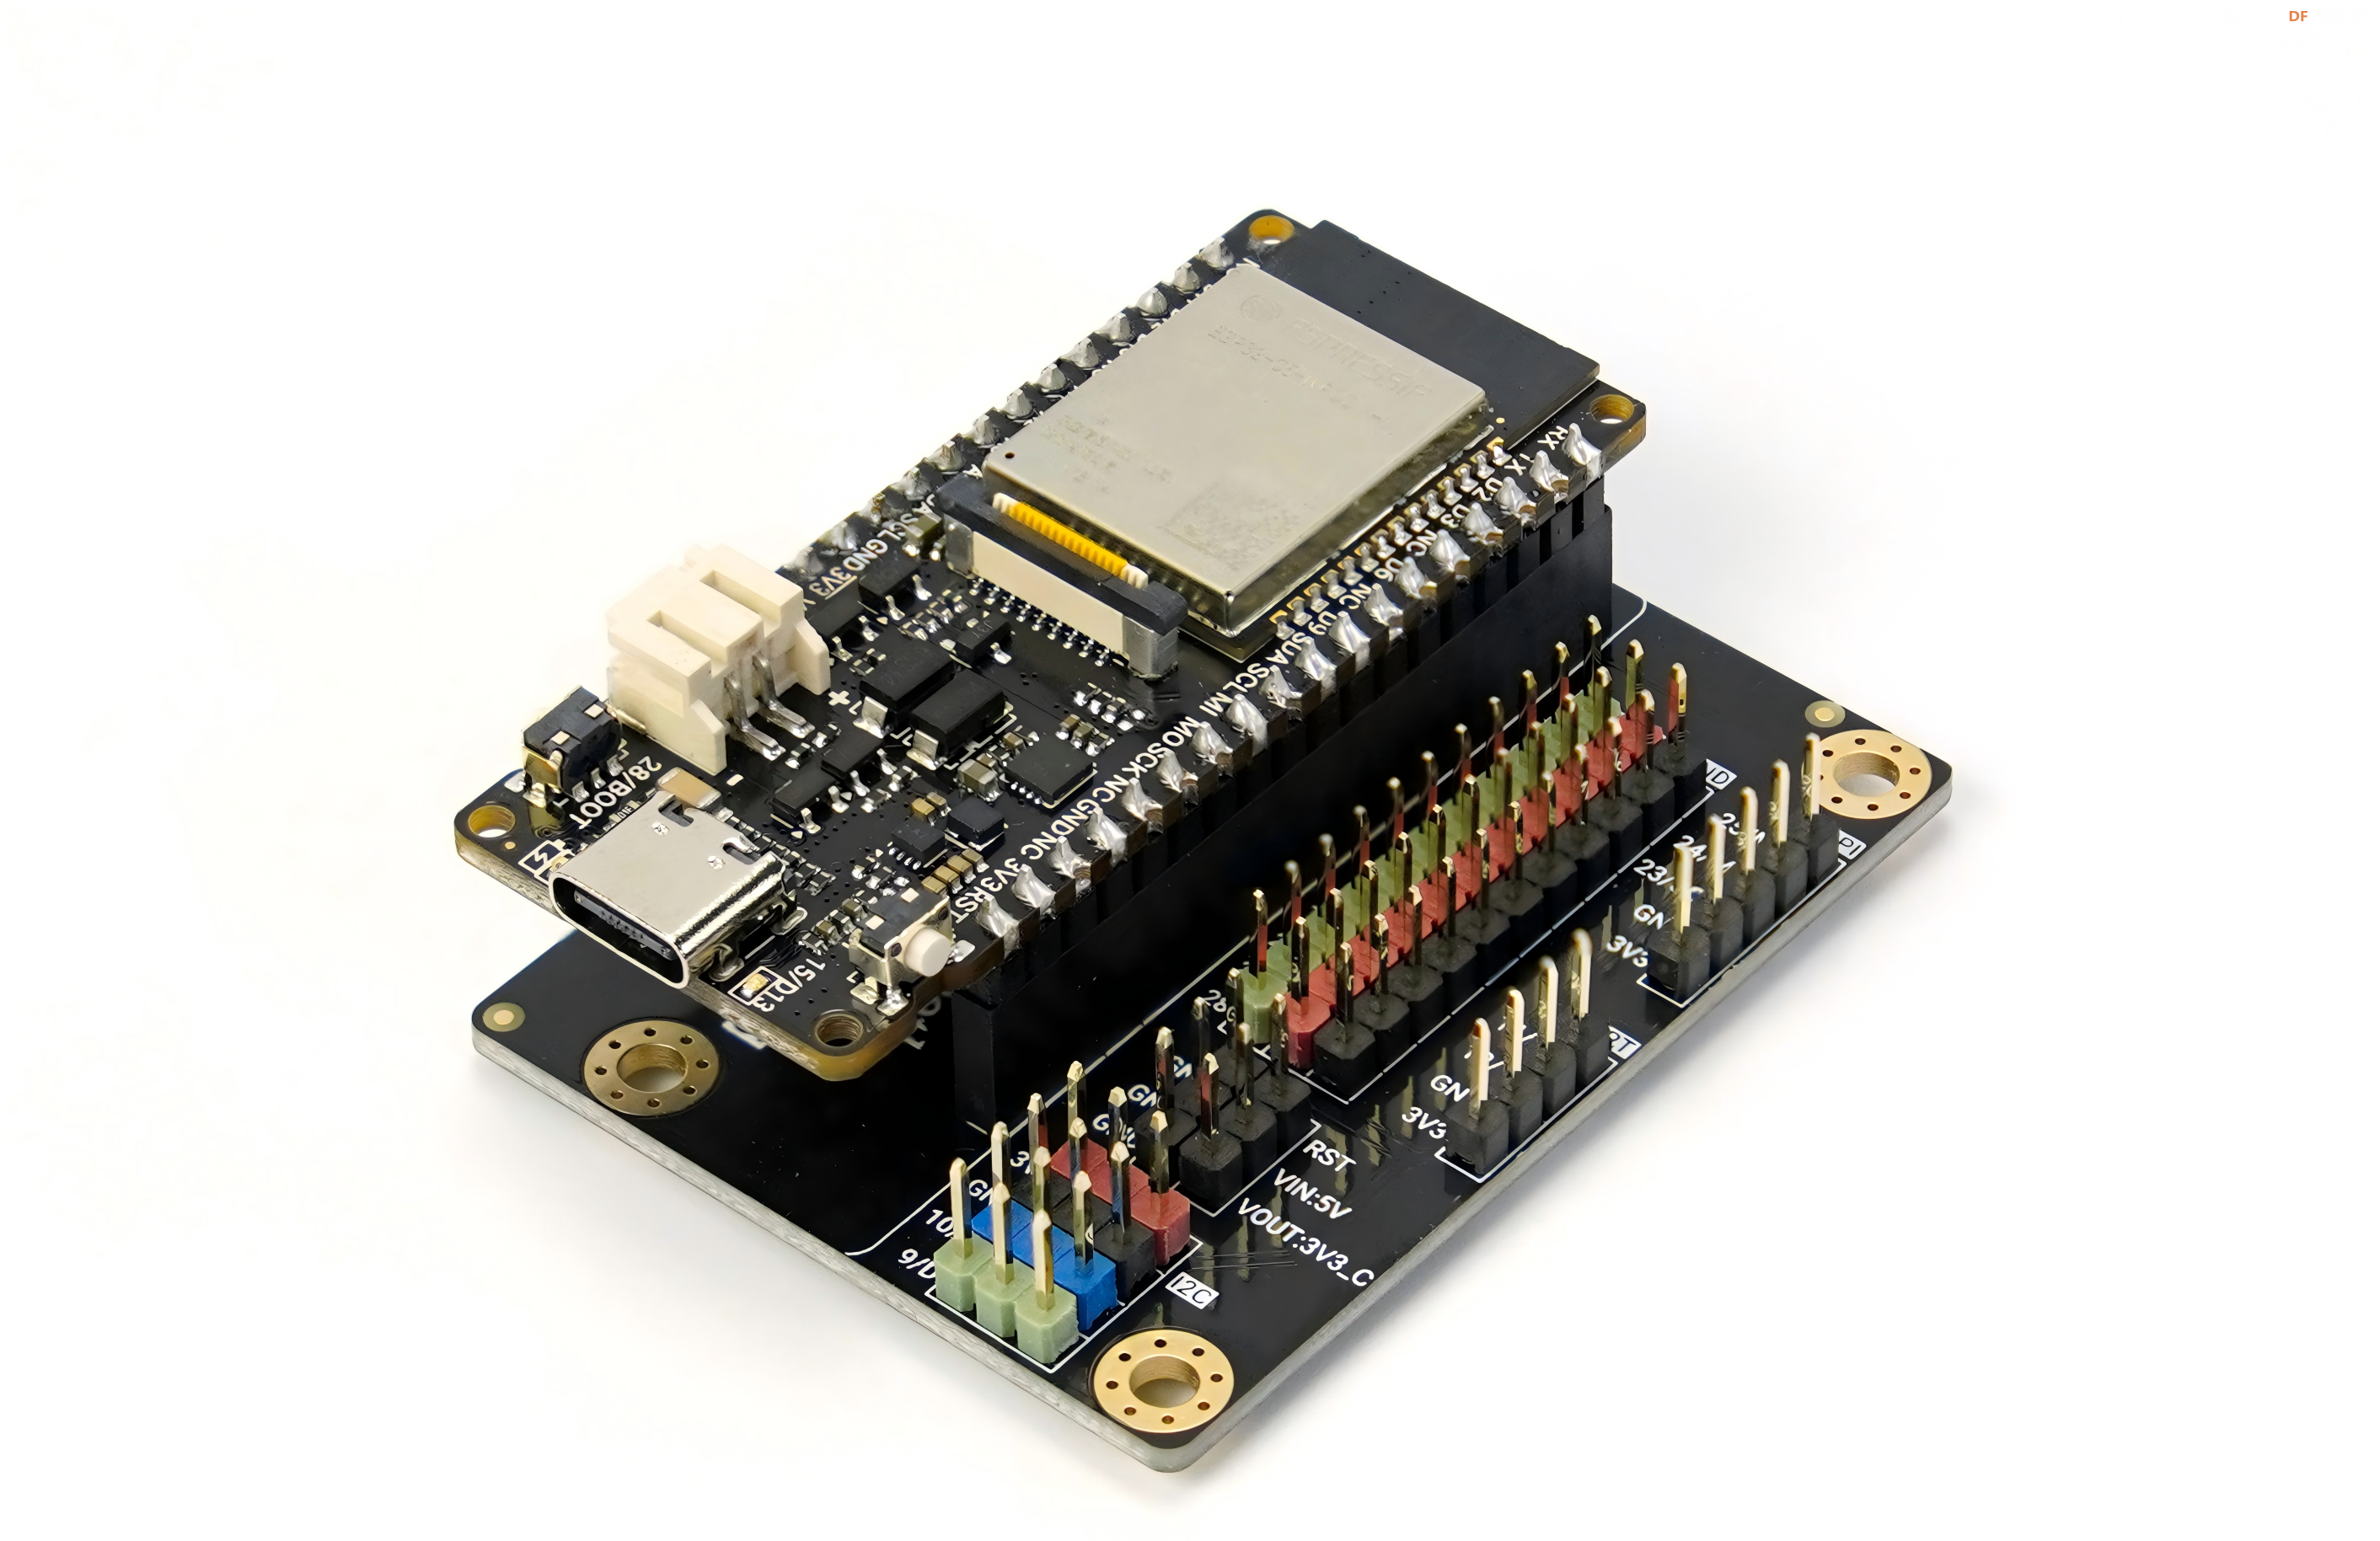
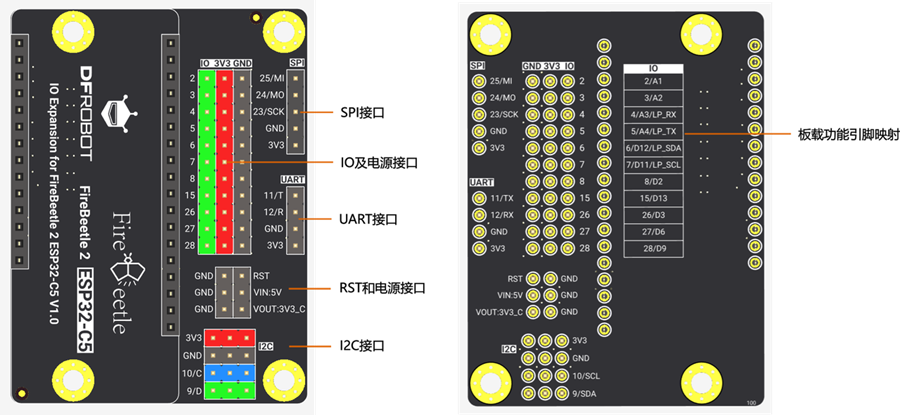
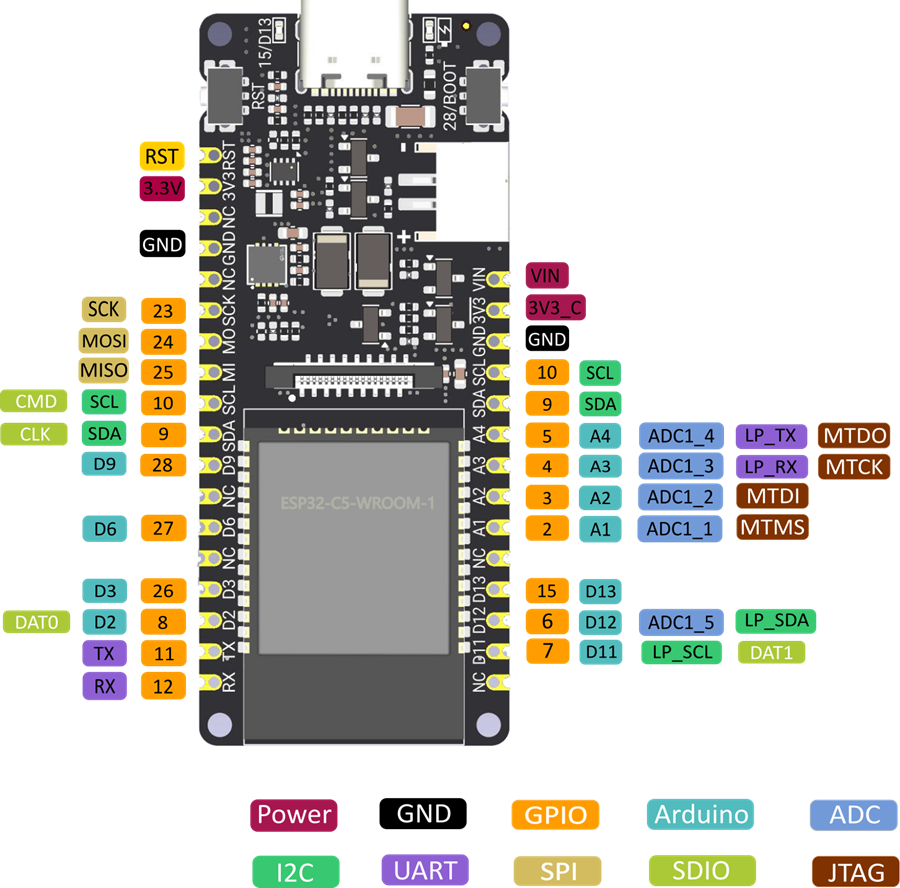
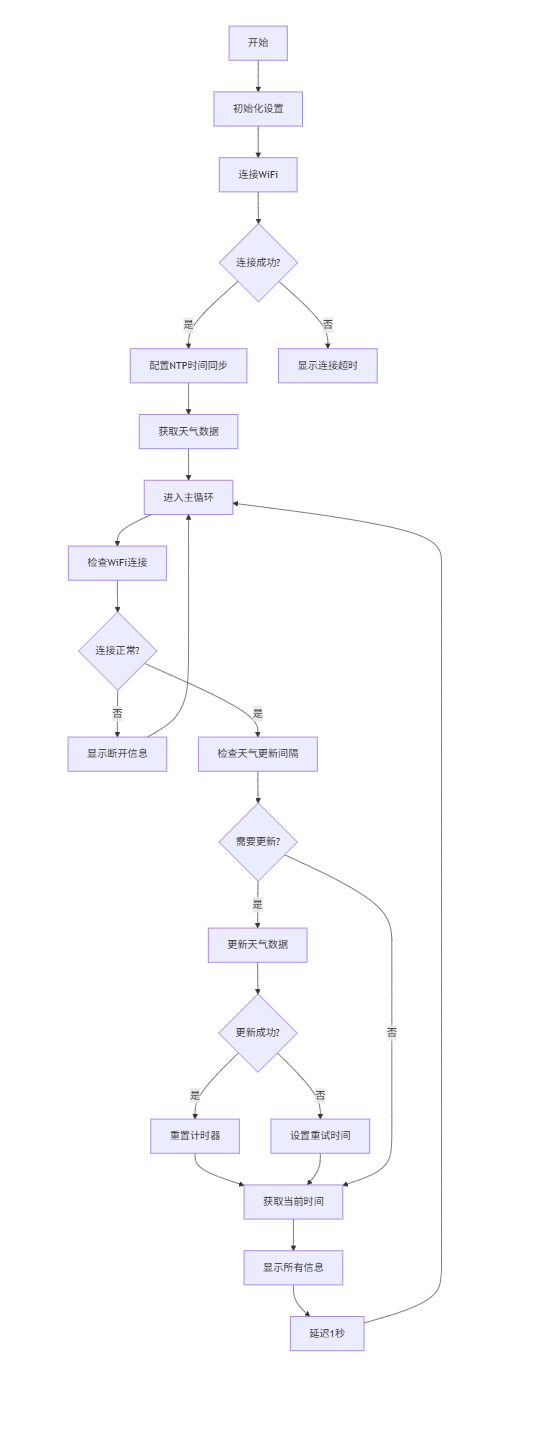
一、设计思路主控芯片:FireBeetle 2 ESP32-C5(RISC-V架构,支持WiFi和蓝牙) 显示屏:0.96英寸OLED(SSD1306驱动,128x64分辨率,I2C接口) 连接方式:使用ESP32-C5的专用I2C引脚(SDA:9, SCL:10)连接OLED
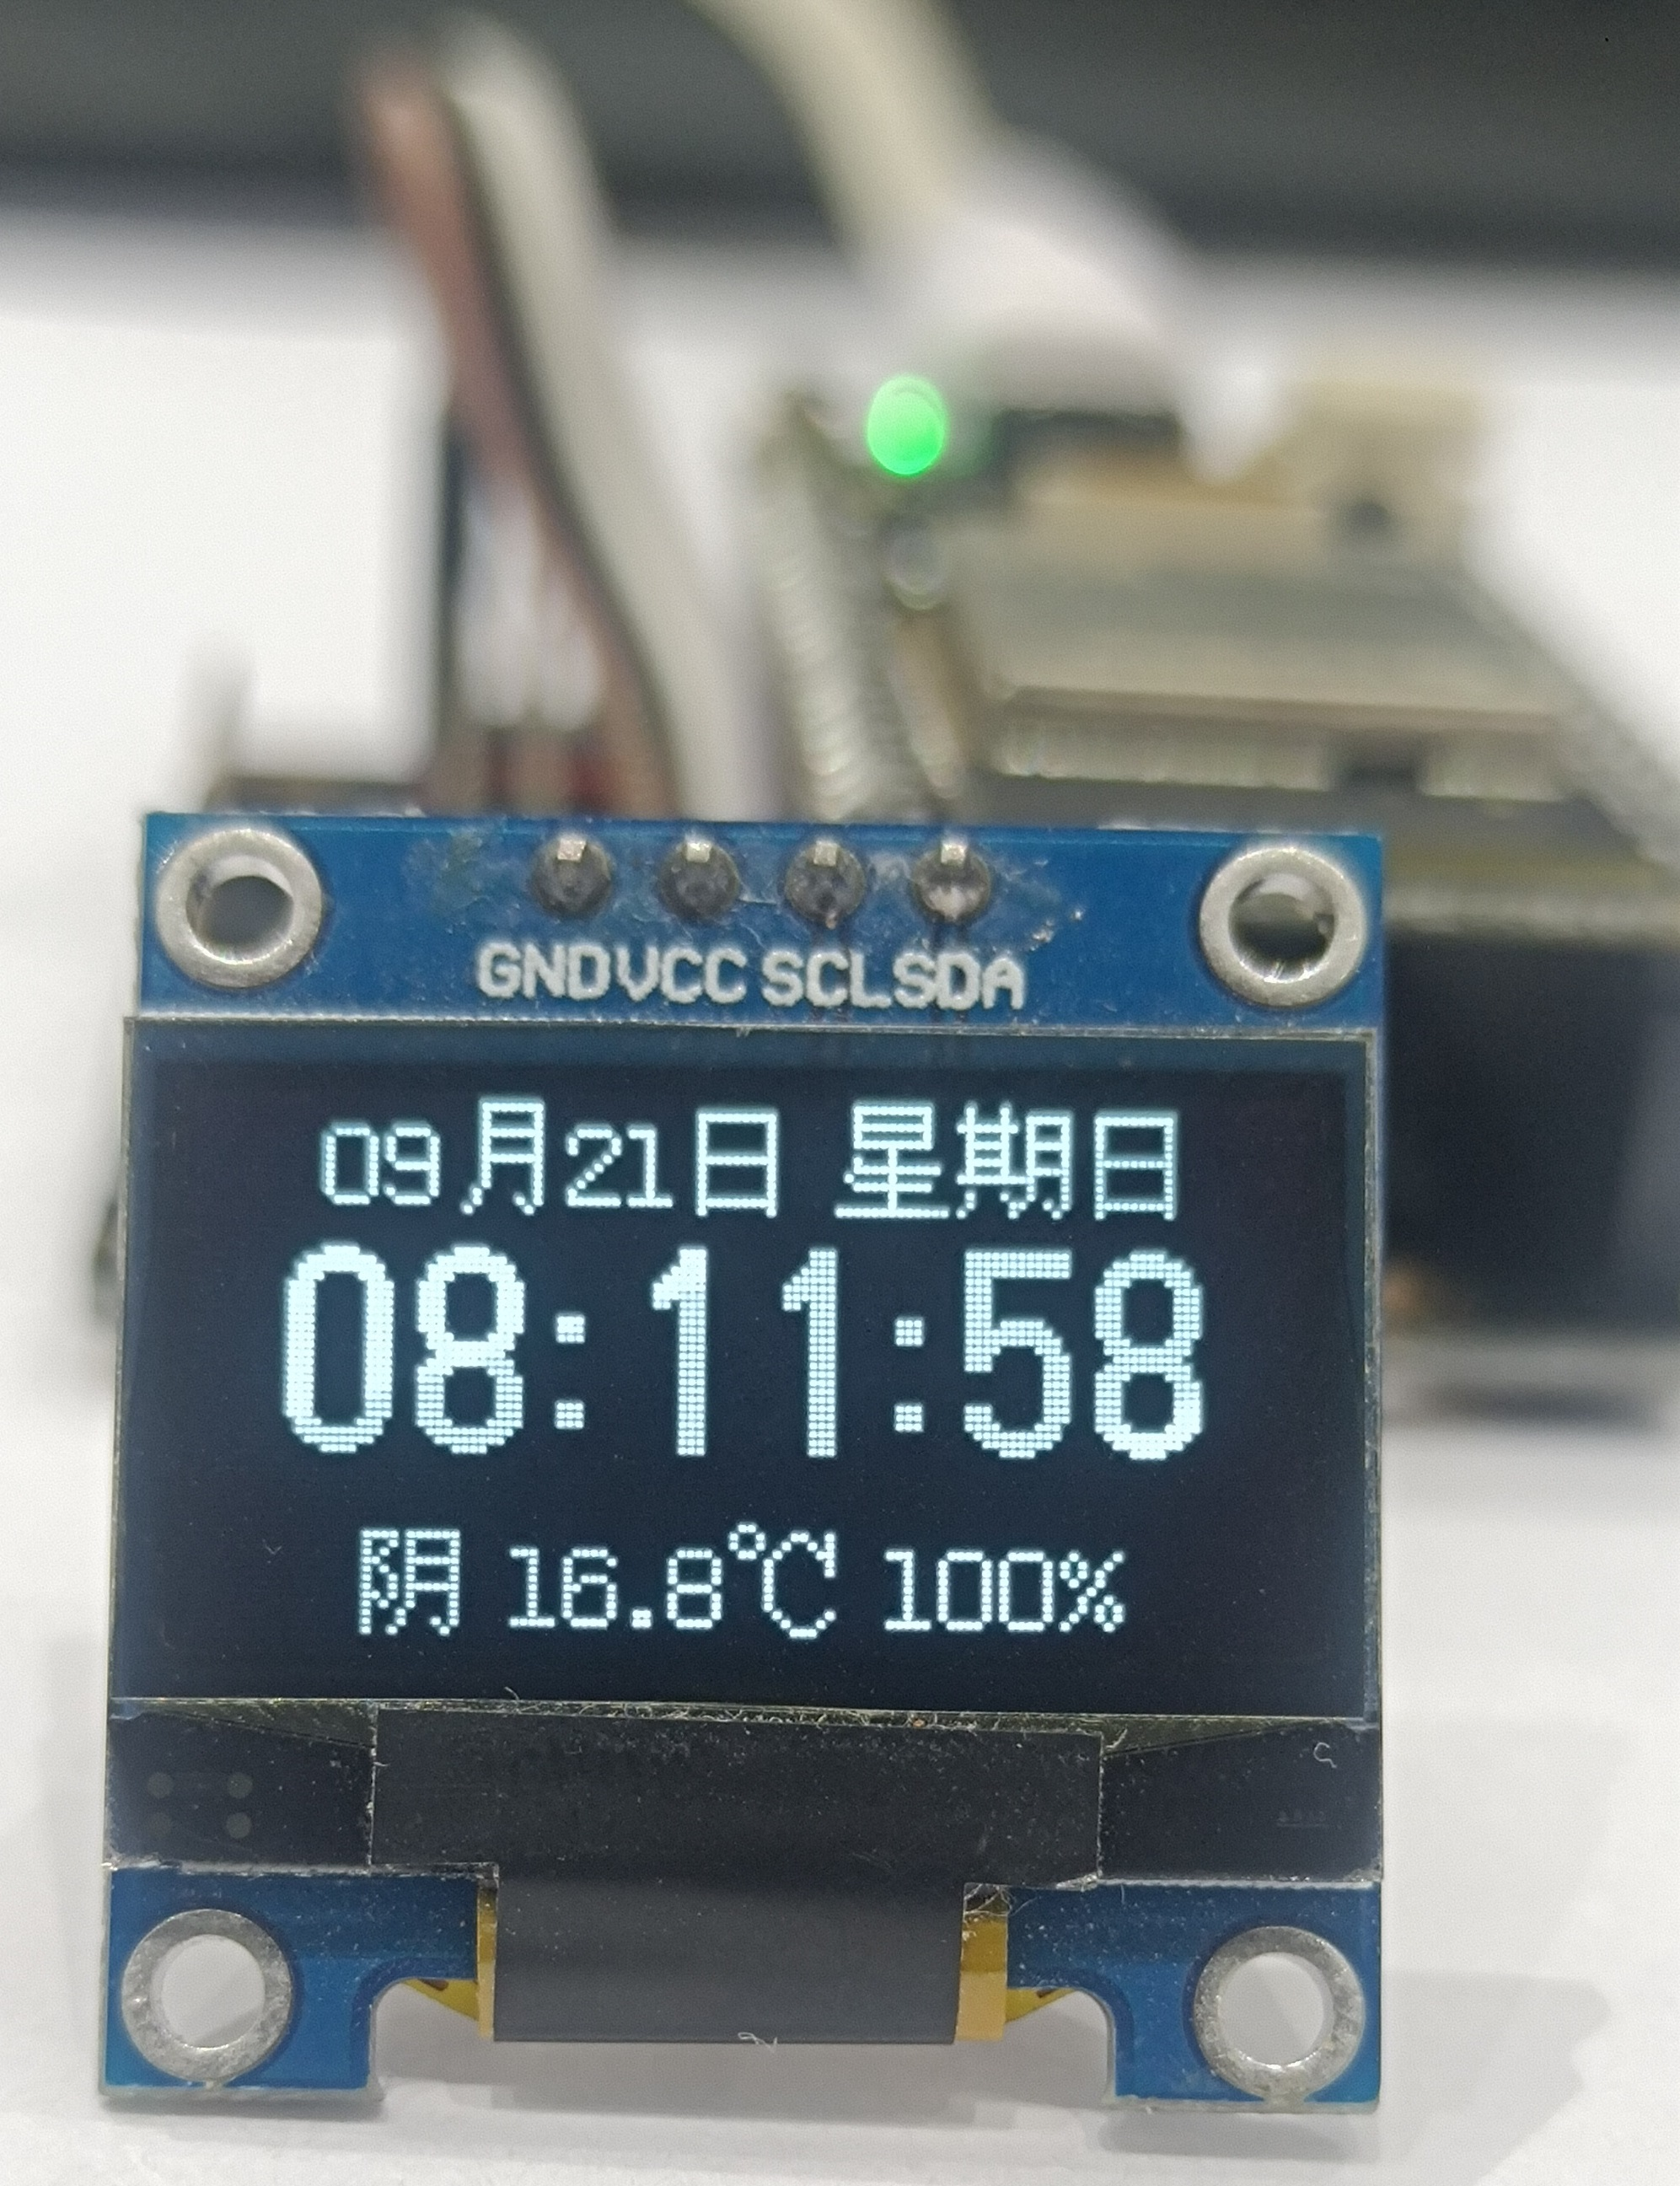
第一行(顶部):显示日期和星期,格式:MM月DD日 星期X(例如:09月21日 星期六) 第二行(中部):显示时间,格式:HH:MM:SS(例如:07:53:30) 第三行(底部):显示天气信息,格式:天气状况 温度℃ 湿度(例如:晴 25.5℃ 50%)
二、硬件介绍
1. 主控芯片:FireBeetle 2 ESP32-C5开发板核心模组:乐鑫ESP32-C5(试用版为ECO1,正式版为ECO2),是一款支持Wi-Fi 6和蓝牙5.0的RISC-V单核芯片,兼具高性能与低功耗特性。 丰富资源:内置4MB Flash,512KB SRAM,提供充足的程序存储和运行空间。 开发优势:兼容Arduino IDE,开发便捷,生态丰富。
2. 扩展板:FireBeetle 2 ESP32-C5专用IO扩展板3. 显示设备:0.96英寸OLED显示屏三、引脚及说明四、流程图五、项目制作过程
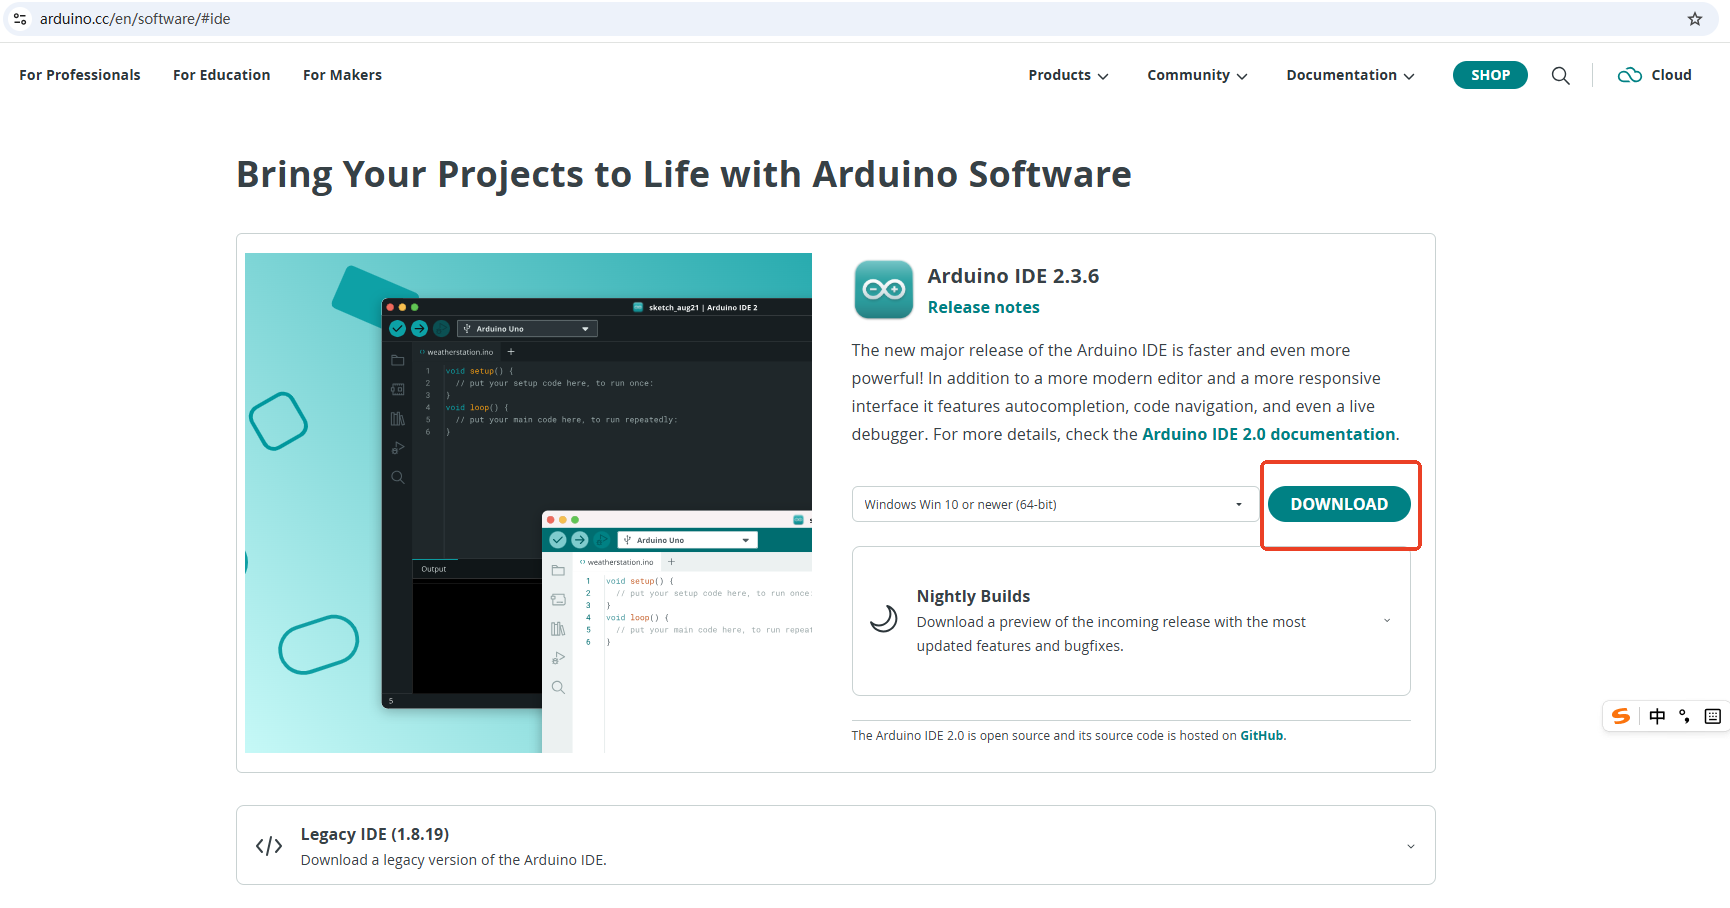
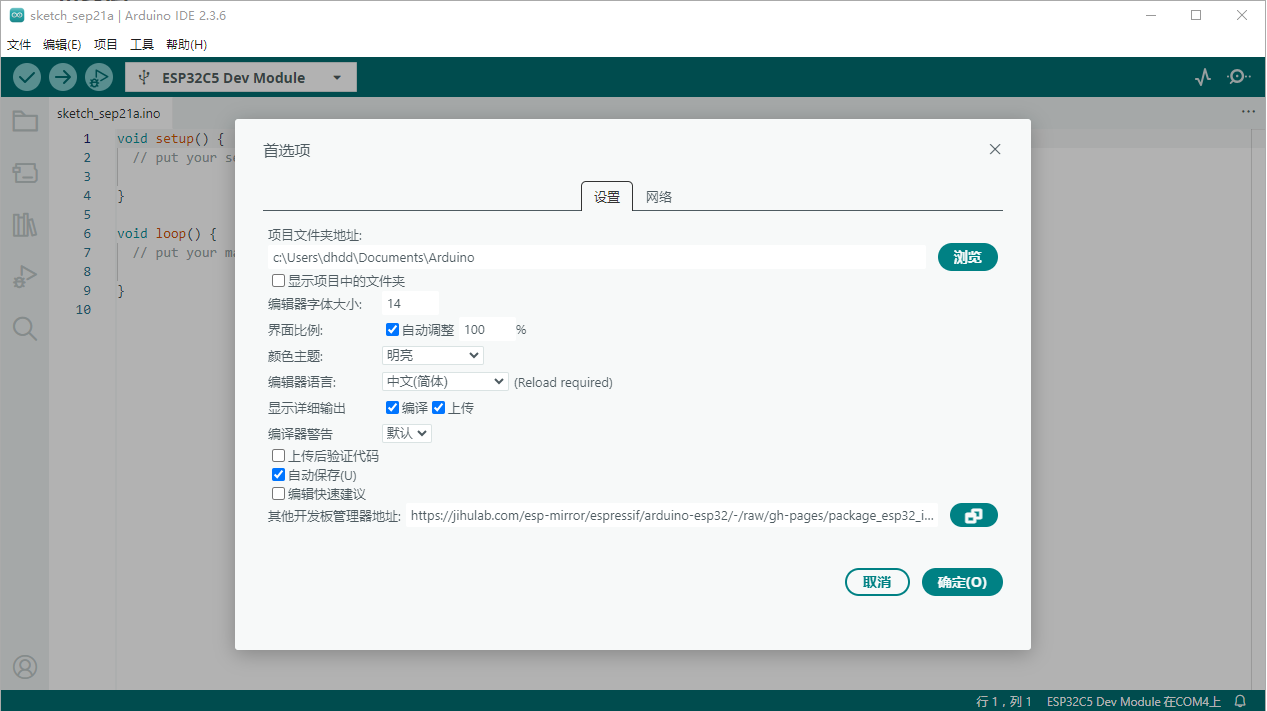
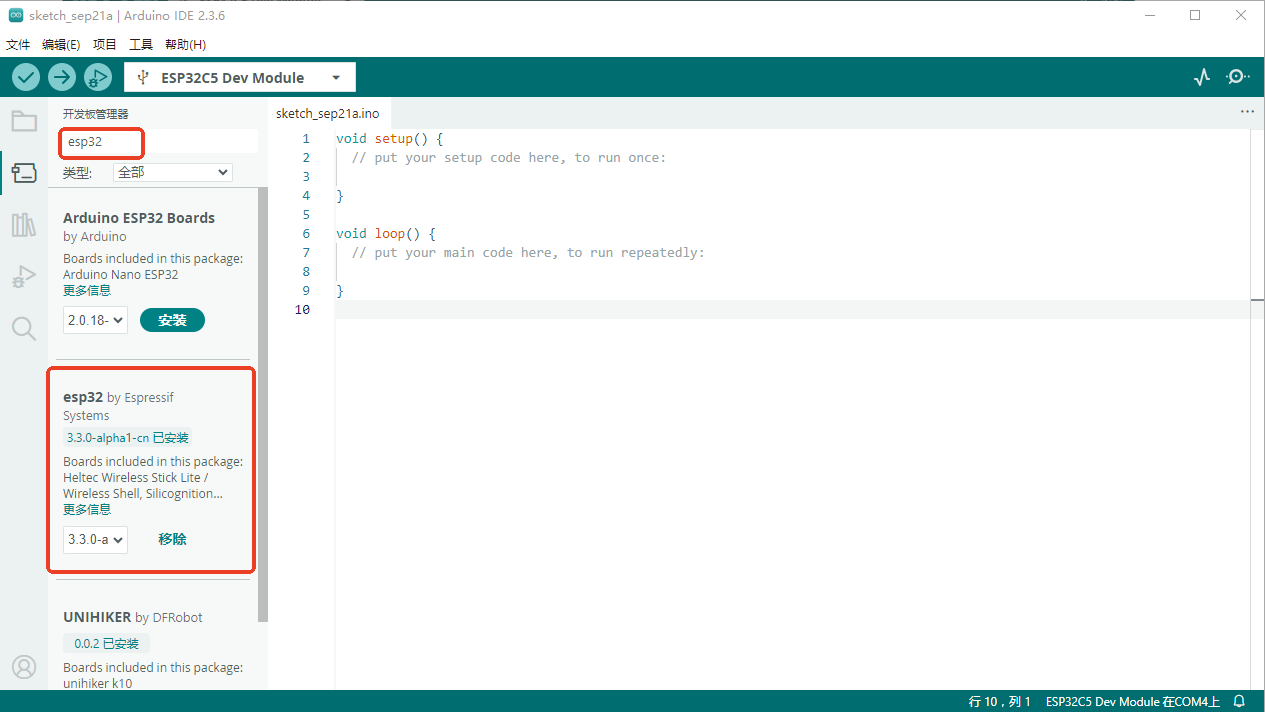
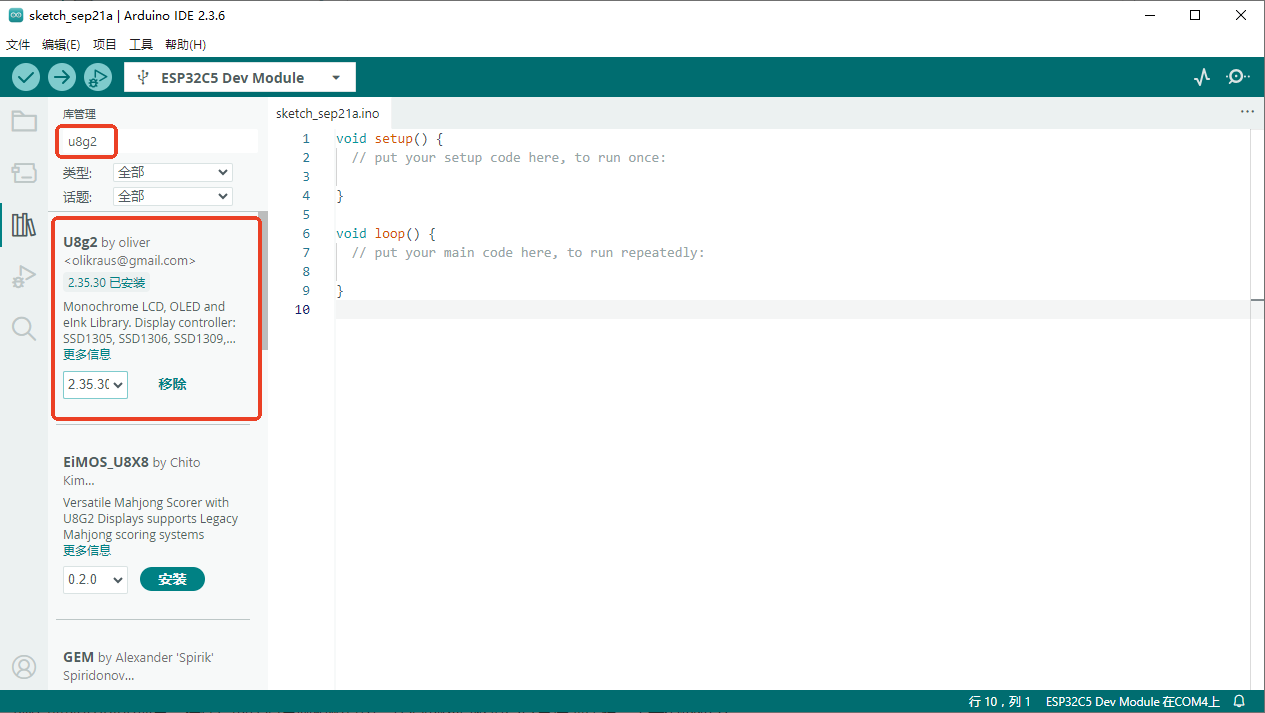
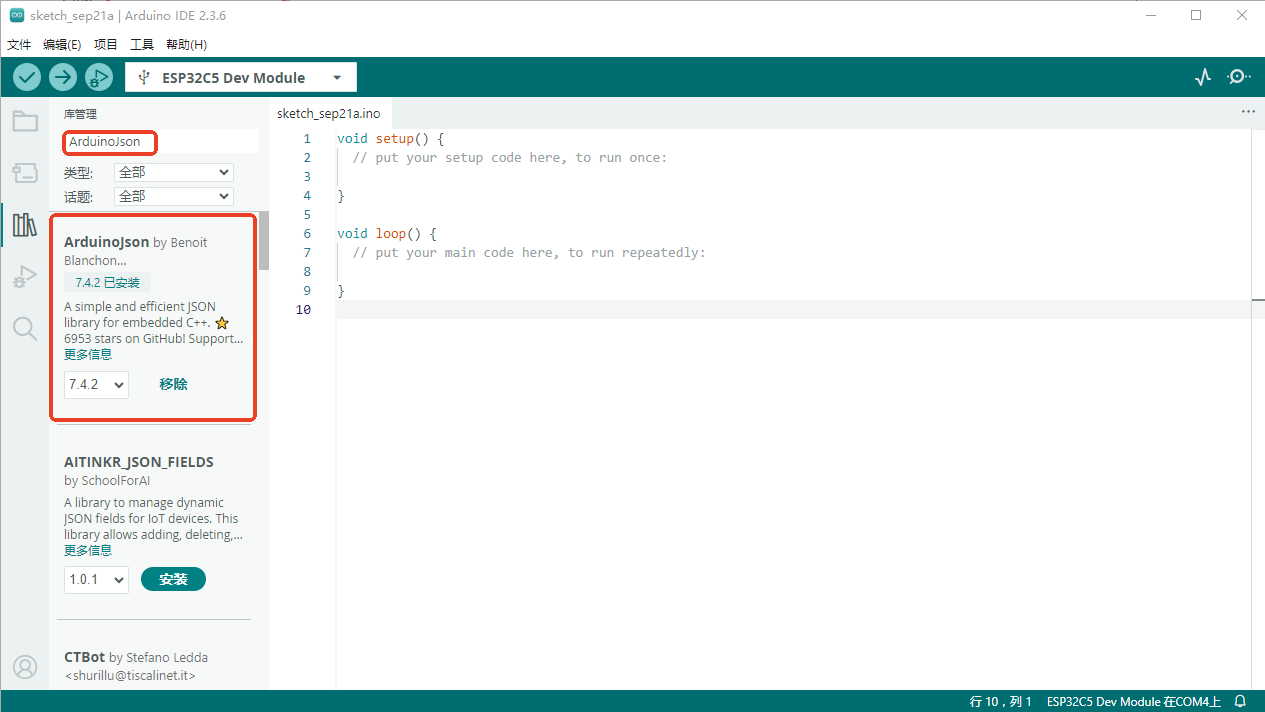
1. 安装Arduino IDE打开Arduino IDE安装包,按默认选项,点击下一步进行安装。 2. 安装ESP32开发板支持包2、打开工具 -> 开发板 -> 开发板管理器,搜索esp32。 3、在开发板管理器中,找到**esp32 by Espressif Systems**,点击版本下拉菜单,选择 3.3.0-alpha1-cn 进行安装。 3. 安装相应的库1、U8g2库:用于驱动OLED屏幕,功能强大,支持大量显示控件和字体。通过项目 -> 加载库 -> 管理库搜索U8g2安装。 2、ArduinoJson库:用于解析从天气API返回的JSON数据。同样通过库管理器搜索ArduinoJson安装(v7.x版本)。 4. 编写代码 创建新的Arduino项目,并编写代码:
- <font face="微软雅黑">#include <Arduino.h>
- #include <U8g2lib.h>
- #include "WiFiMulti.h"
- #include <time.h>
- #include <WiFiClient.h>
- #include <ArduinoJson.h>
-
- // -------------------------- 1. 硬件与配置参数 --------------------------
- #define I2C_SDA 9 // ESP32-C5专用I2C引脚
- #define I2C_SCL 10
- const char* WIFI_SSID = "你的WiFi名称"; // 你的WiFi名称
- const char* WIFI_PWD = "你的WiFi密码"; // 你的WiFi密码
- const char* YT_APPID = "易天API APPID"; // 易天API APPID
- const char* YT_APPSECRET = "易天API密钥"; // 易天API密钥
- const char* YT_API_URL = "v1.yiketianqi.com";
- const char* YT_CITYID = "101110101"; // 西安城市ID
-
- // NTP服务器配置
- const char* ntpServer1 = "pool.ntp.org";
- const char* ntpServer2 = "time.nist.gov";
- const char* ntpServer3 = "ntp.aliyun.com";
-
- // 时区配置(东8区,无夏令时)
- const long gmtOffset_sec = 8 * 3600;
- const int daylightOffset_sec = 0;
-
- WiFiMulti wifiMulti;
- WiFiClient httpClient;
-
- // 初始化OLED屏幕
- U8G2_SSD1306_128X64_NONAME_F_SW_I2C u8g2(U8G2_R0, /* clock=*/ I2C_SCL, /* data=*/ I2C_SDA, /* reset=*/ U8X8_PIN_NONE);
-
- // 天气数据结构体
- struct WeatherInfo {
- String city; // 城市名
- String condition; // 天气状况
- float temp; // 实时温度(℃)
- String humidity; // 湿度
- String wind; // 风向和风力
- bool isValid; // 数据是否有效
- };
- WeatherInfo g_weather = {"未知", "未知", 0, "未知", "未知", false};
-
- // 天气更新计时器
- unsigned long g_lastWeatherUpdate = 0;
- const unsigned long WEATHER_UPDATE_INTERVAL = 300000; // 5分钟
-
- // -------------------------- 函数声明 --------------------------
- void initWiFiConn();
- void initNTPTime();
- bool updateWeather();
- bool parseWeatherResponse(const String& response);
- String getWeekdayCN(int wday, bool fullFormat = true); // 在这里指定默认参数
- void printLocalTime();
- void logDebug(const String& msg);
- void drawCenteredString(int y, const String &str, const uint8_t *font = u8g2_font_wqy14_t_gb2312);
-
- // -------------------------- 主函数 --------------------------
- void setup() {
- Serial.begin(115200);
-
- // 初始化OLED屏幕
- u8g2.begin();
- u8g2.enableUTF8Print(); // 启用UTF8打印支持
-
- Serial.println();
- Serial.println("开始连接WiFi...");
-
- WiFi.mode(WIFI_STA);
- wifiMulti.addAP(WIFI_SSID, WIFI_PWD);
-
- // 显示连接提示
- u8g2.firstPage();
- do {
- u8g2.setFont(u8g2_font_wqy14_t_gb2312);
- u8g2.setCursor(10, 30);
- u8g2.print("连接WiFi中...");
- } while (u8g2.nextPage());
-
- // 等待WiFi连接
- unsigned long startTime = millis();
- while (wifiMulti.run() != WL_CONNECTED) {
- delay(500);
- Serial.print(".");
-
- // 超时处理(30秒)
- if (millis() - startTime > 30000) {
- Serial.println("WiFi连接超时");
- u8g2.firstPage();
- do {
- u8g2.setFont(u8g2_font_wqy14_t_gb2312);
- u8g2.setCursor(10, 30);
- u8g2.print("WiFi连接超时");
- } while (u8g2.nextPage());
- delay(2000);
- break;
- }
- }
-
- if (WiFi.status() == WL_CONNECTED) {
- Serial.println();
- Serial.println("WiFi连接成功!");
- Serial.print("IP地址: ");
- Serial.println(WiFi.localIP());
-
- // 显示连接成功
- u8g2.firstPage();
- do {
- u8g2.setFont(u8g2_font_wqy14_t_gb2312);
- u8g2.setCursor(10, 30);
- u8g2.print("WiFi连接成功");
- u8g2.setCursor(10, 50);
- u8g2.print("IP: ");
- u8g2.print(WiFi.localIP().toString());
- } while (u8g2.nextPage());
- delay(1000);
-
- // 配置NTP时间同步
- configTime(gmtOffset_sec, daylightOffset_sec, ntpServer1, ntpServer2, ntpServer3);
- Serial.println("NTP配置完成,等待时间同步...");
-
- // 显示同步提示
- u8g2.firstPage();
- do {
- u8g2.setFont(u8g2_font_wqy14_t_gb2312);
- u8g2.setCursor(10, 30);
- u8g2.print("同步时间中...");
- } while (u8g2.nextPage());
-
- // 等待时间同步完成
- struct tm timeinfo;
- startTime = millis();
- while (!getLocalTime(&timeinfo)) {
- delay(500);
- Serial.print(".");
-
- // 超时处理(15秒)
- if (millis() - startTime > 15000) {
- Serial.println("时间同步超时");
- u8g2.firstPage();
- do {
- u8g2.setFont(u8g2_font_wqy14_t_gb2312);
- u8g2.setCursor(10, 30);
- u8g2.print("时间同步超时");
- } while (u8g2.nextPage());
- delay(2000);
- break;
- }
- }
-
- if (getLocalTime(&timeinfo)) {
- Serial.println("时间同步成功");
- printLocalTime();
- }
-
- // 首次获取天气
- updateWeather();
- g_lastWeatherUpdate = millis();
- }
- }
-
- void loop() {
- // 检查WiFi连接
- if (wifiMulti.run() != WL_CONNECTED) {
- u8g2.firstPage();
- do {
- u8g2.setFont(u8g2_font_wqy14_t_gb2312);
- u8g2.setCursor(10, 30);
- u8g2.print("WiFi已断开");
- } while (u8g2.nextPage());
- delay(1000);
- return;
- }
-
- // 定时更新天气(每5分钟)
- if (millis() - g_lastWeatherUpdate >= WEATHER_UPDATE_INTERVAL) {
- if (updateWeather()) {
- g_lastWeatherUpdate = millis();
- } else {
- // 如果更新失败,10秒后重试
- g_lastWeatherUpdate = millis() - WEATHER_UPDATE_INTERVAL + 10000;
- }
- }
-
- // 获取当前时间并显示
- struct tm timeinfo;
- if (!getLocalTime(&timeinfo)) {
- u8g2.firstPage();
- do {
- u8g2.setFont(u8g2_font_wqy14_t_gb2312);
- u8g2.setCursor(10, 30);
- u8g2.print("时间获取失败");
- } while (u8g2.nextPage());
- delay(1000);
- return;
- }
-
- // 在OLED上显示所有信息
- u8g2.firstPage();
- do {
- // 第一行:日期和星期
- char dateStr[12];
- sprintf(dateStr, "%02d月%02d日", timeinfo.tm_mon + 1, timeinfo.tm_mday);
- String dateWeekStr = String(dateStr) + " " + getWeekdayCN(timeinfo.tm_wday, true); // 明确指定参数
- drawCenteredString(13, dateWeekStr);
-
- // 第二行:时间(大字体)
- char timeStr[9];
- sprintf(timeStr, "%02d:%02d:%02d",
- timeinfo.tm_hour,
- timeinfo.tm_min,
- timeinfo.tm_sec);
-
- // 居中显示时间
- drawCenteredString(42, timeStr, u8g2_font_logisoso24_tn);
-
- // 第三行:天气信息
- if (g_weather.isValid) {
- String weatherStr = g_weather.condition + " " + String(g_weather.temp, 1) + "℃ " + g_weather.humidity;
- drawCenteredString(62, weatherStr);
- } else {
- // 居中显示"天气获取中..."
- drawCenteredString(62, "天气获取中...");
- }
- } while (u8g2.nextPage());
-
- delay(1000);
- }
-
- // -------------------------- 功能函数 --------------------------
- bool updateWeather() {
- Serial.println("开始更新天气数据...");
-
- // 连接服务器
- if (!httpClient.connect(YT_API_URL, 80)) {
- Serial.println("天气服务器连接失败");
- g_weather.isValid = false;
- return false;
- }
-
- // 发送API请求
- String request = "GET /free/day?appid=" + String(YT_APPID) +
- "&appsecret=" + String(YT_APPSECRET) +
- "&cityid=" + String(YT_CITYID) +
- "&unescape=1 HTTP/1.1\r\n" +
- "Host: " + YT_API_URL + "\r\n" +
- "Connection: close\r\n\r\n";
-
- httpClient.print(request);
-
- // 等待响应
- unsigned long startTime = millis();
- while (!httpClient.available() && millis() - startTime < 5000) {
- delay(100);
- }
-
- if (!httpClient.available()) {
- Serial.println("天气响应超时");
- httpClient.stop();
- g_weather.isValid = false;
- return false;
- }
-
- // 读取HTTP状态行
- String statusLine = httpClient.readStringUntil('\n');
- Serial.println("HTTP状态: " + statusLine);
-
- // 检查HTTP状态码
- if (statusLine.indexOf("200") == -1) {
- Serial.println("HTTP错误: " + statusLine);
- httpClient.stop();
- g_weather.isValid = false;
- return false;
- }
-
- // 跳过HTTP头部
- while (httpClient.available()) {
- String line = httpClient.readStringUntil('\n');
- if (line == "\r") {
- break; // 头部结束
- }
- }
-
- // 读取JSON响应
- String response = "";
- while (httpClient.available()) {
- response += httpClient.readString();
- }
- httpClient.stop();
-
- // 打印响应前200字符用于调试
- Serial.println("响应内容: " + response.substring(0, 200));
-
- // 处理空响应
- if (response.isEmpty()) {
- Serial.println("天气响应为空");
- g_weather.isValid = false;
- return false;
- }
-
- // 解析天气数据
- if (parseWeatherResponse(response)) {
- Serial.println("天气更新成功: " + g_weather.city + " " + g_weather.condition + " " + String(g_weather.temp, 1) + "℃ " + g_weather.humidity);
- return true;
- } else {
- Serial.println("天气解析失败");
- g_weather.isValid = false;
- return false;
- }
- }
-
- bool parseWeatherResponse(const String& response) {
- // 清理响应中的可能存在的非法字符
- String cleanResponse = response;
- cleanResponse.trim();
-
- // 检查响应是否以{开头,以}结尾(基本JSON验证)
- if (!cleanResponse.startsWith("{") || !cleanResponse.endsWith("}")) {
- Serial.println("响应不是有效的JSON格式");
-
- // 尝试找到JSON开始和结束位置
- int jsonStart = cleanResponse.indexOf('{');
- int jsonEnd = cleanResponse.lastIndexOf('}');
-
- if (jsonStart >= 0 && jsonEnd > jsonStart) {
- cleanResponse = cleanResponse.substring(jsonStart, jsonEnd + 1);
- Serial.println("提取的JSON: " + cleanResponse);
- } else {
- return false;
- }
- }
-
- JsonDocument doc;
- DeserializationError error = deserializeJson(doc, cleanResponse);
-
- if (error) {
- Serial.println("JSON解析错误: " + String(error.c_str()));
- return false;
- }
-
- // 检查核心字段
- if (doc["city"].isNull() || doc["wea"].isNull() || doc["tem"].isNull()) {
- Serial.println("JSON字段缺失");
-
- // 打印所有可用字段用于调试
- Serial.println("可用字段:");
- for (JsonPair kv : doc.as<JsonObject>()) {
- Serial.printf(" %s: %s\n", kv.key().c_str(), kv.value().as<String>().c_str());
- }
-
- return false;
- }
-
- // 根据API响应格式更新解析逻辑
- g_weather.city = doc["city"].as<String>();
- g_weather.condition = doc["wea"].as<String>();
-
- // 温度字段可能是字符串,需要转换为整数
- String tempStr = doc["tem"].as<String>();
- g_weather.temp = tempStr.toFloat();
-
- // 添加湿度信息
- if (!doc["humidity"].isNull()) {
- g_weather.humidity = doc["humidity"].as<String>();
- } else {
- g_weather.humidity = "未知";
- }
-
- // 添加风力信息
- if (!doc["win"].isNull() && !doc["win_speed"].isNull()) {
- g_weather.wind = doc["win"].as<String>() + doc["win_speed"].as<String>();
- } else {
- g_weather.wind = "未知";
- }
-
- g_weather.isValid = true;
-
- return true;
- }
-
- // 修改函数定义,移除默认参数
- String getWeekdayCN(int wday, bool fullFormat) {
- const char* fullDays[] = {"星期日", "星期一", "星期二", "星期三", "星期四", "星期五", "星期六"};
- const char* shortDays[] = {"日", "一", "二", "三", "四", "五", "六"};
- if (wday < 0 || wday > 6) {
- return fullFormat ? "未知" : "?";
- }
- return fullFormat ? fullDays[wday] : shortDays[wday];
- }
-
- void printLocalTime() {
- struct tm timeinfo;
- if (!getLocalTime(&timeinfo)) {
- Serial.println("获取时间失败");
- return;
- }
- Serial.printf("当前时间: %04d-%02d-%02d %02d:%02d:%02d 星期%s\n",
- timeinfo.tm_year + 1900, timeinfo.tm_mon + 1,
- timeinfo.tm_mday, timeinfo.tm_hour,
- timeinfo.tm_min, timeinfo.tm_sec,
- getWeekdayCN(timeinfo.tm_wday, false).c_str());
- }
-
- void logDebug(const String& msg) {
- struct tm timeinfo;
- if (getLocalTime(&timeinfo)) {
- char timeBuf[20];
- strftime(timeBuf, sizeof(timeBuf), "[%H:%M:%S] ", &timeinfo);
- Serial.println(String(timeBuf) + msg);
- } else {
- Serial.println("[未知时间] " + msg);
- }
- }
-
- // 居中显示文本的辅助函数
- void drawCenteredString(int y, const String &str, const uint8_t *font) {
- u8g2.setFont(font);
- int width = u8g2.getUTF8Width(str.c_str());
- int x = (128 - width) / 2;
- u8g2.setCursor(x, y);
- u8g2.print(str);
- }</font>
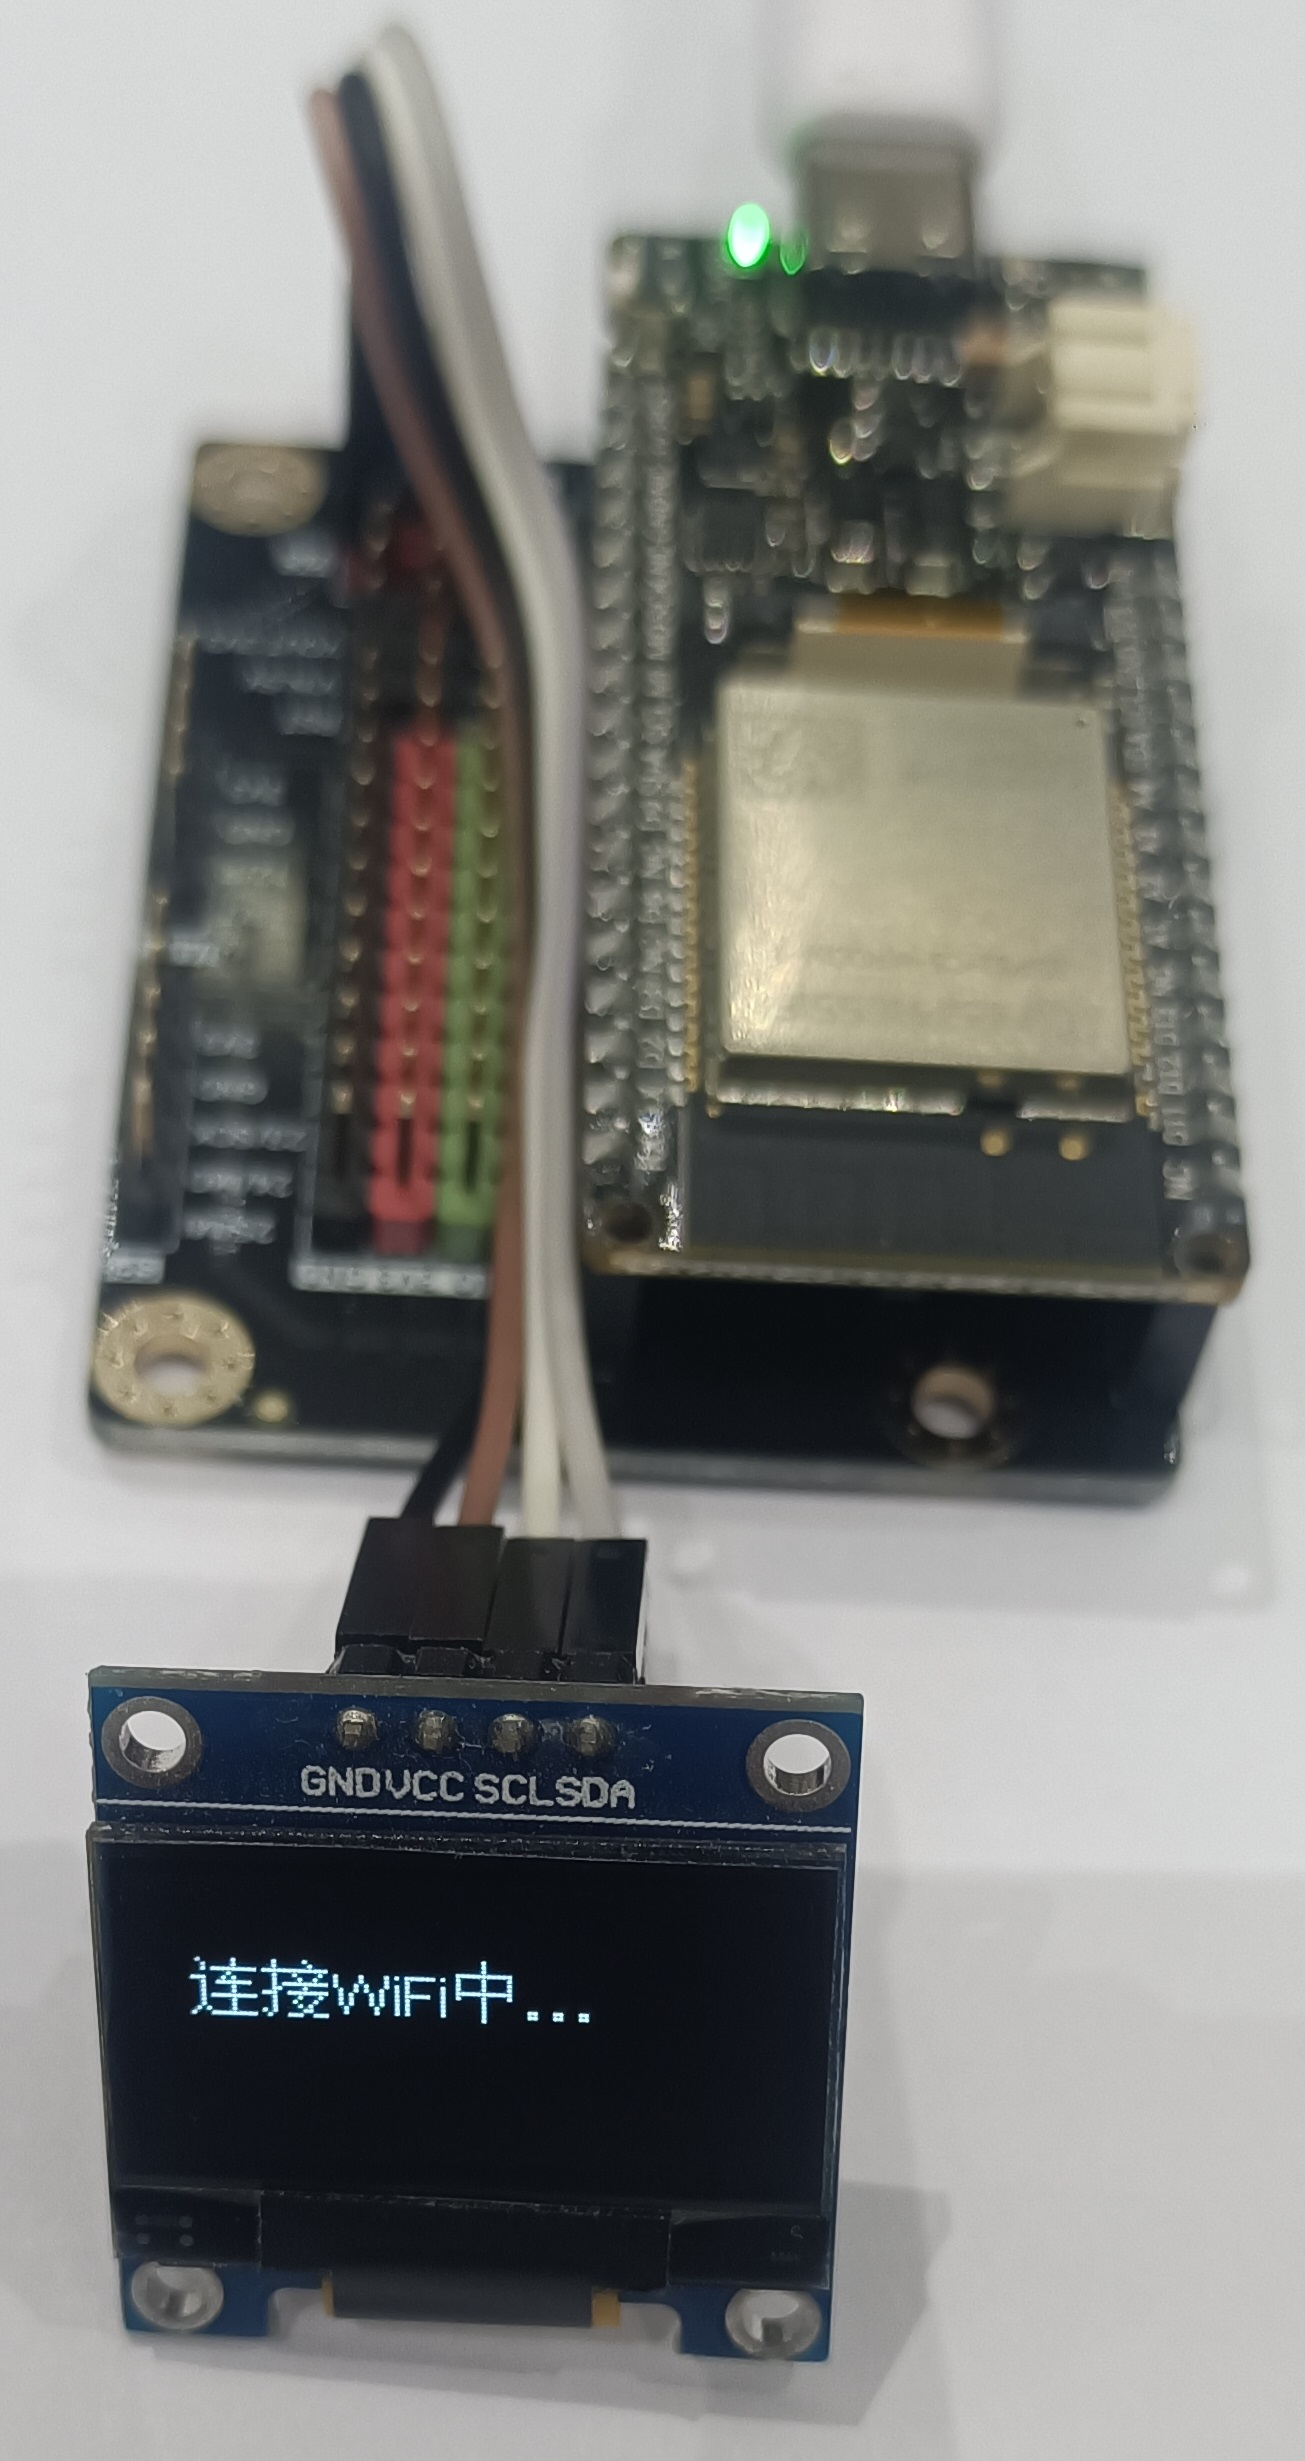
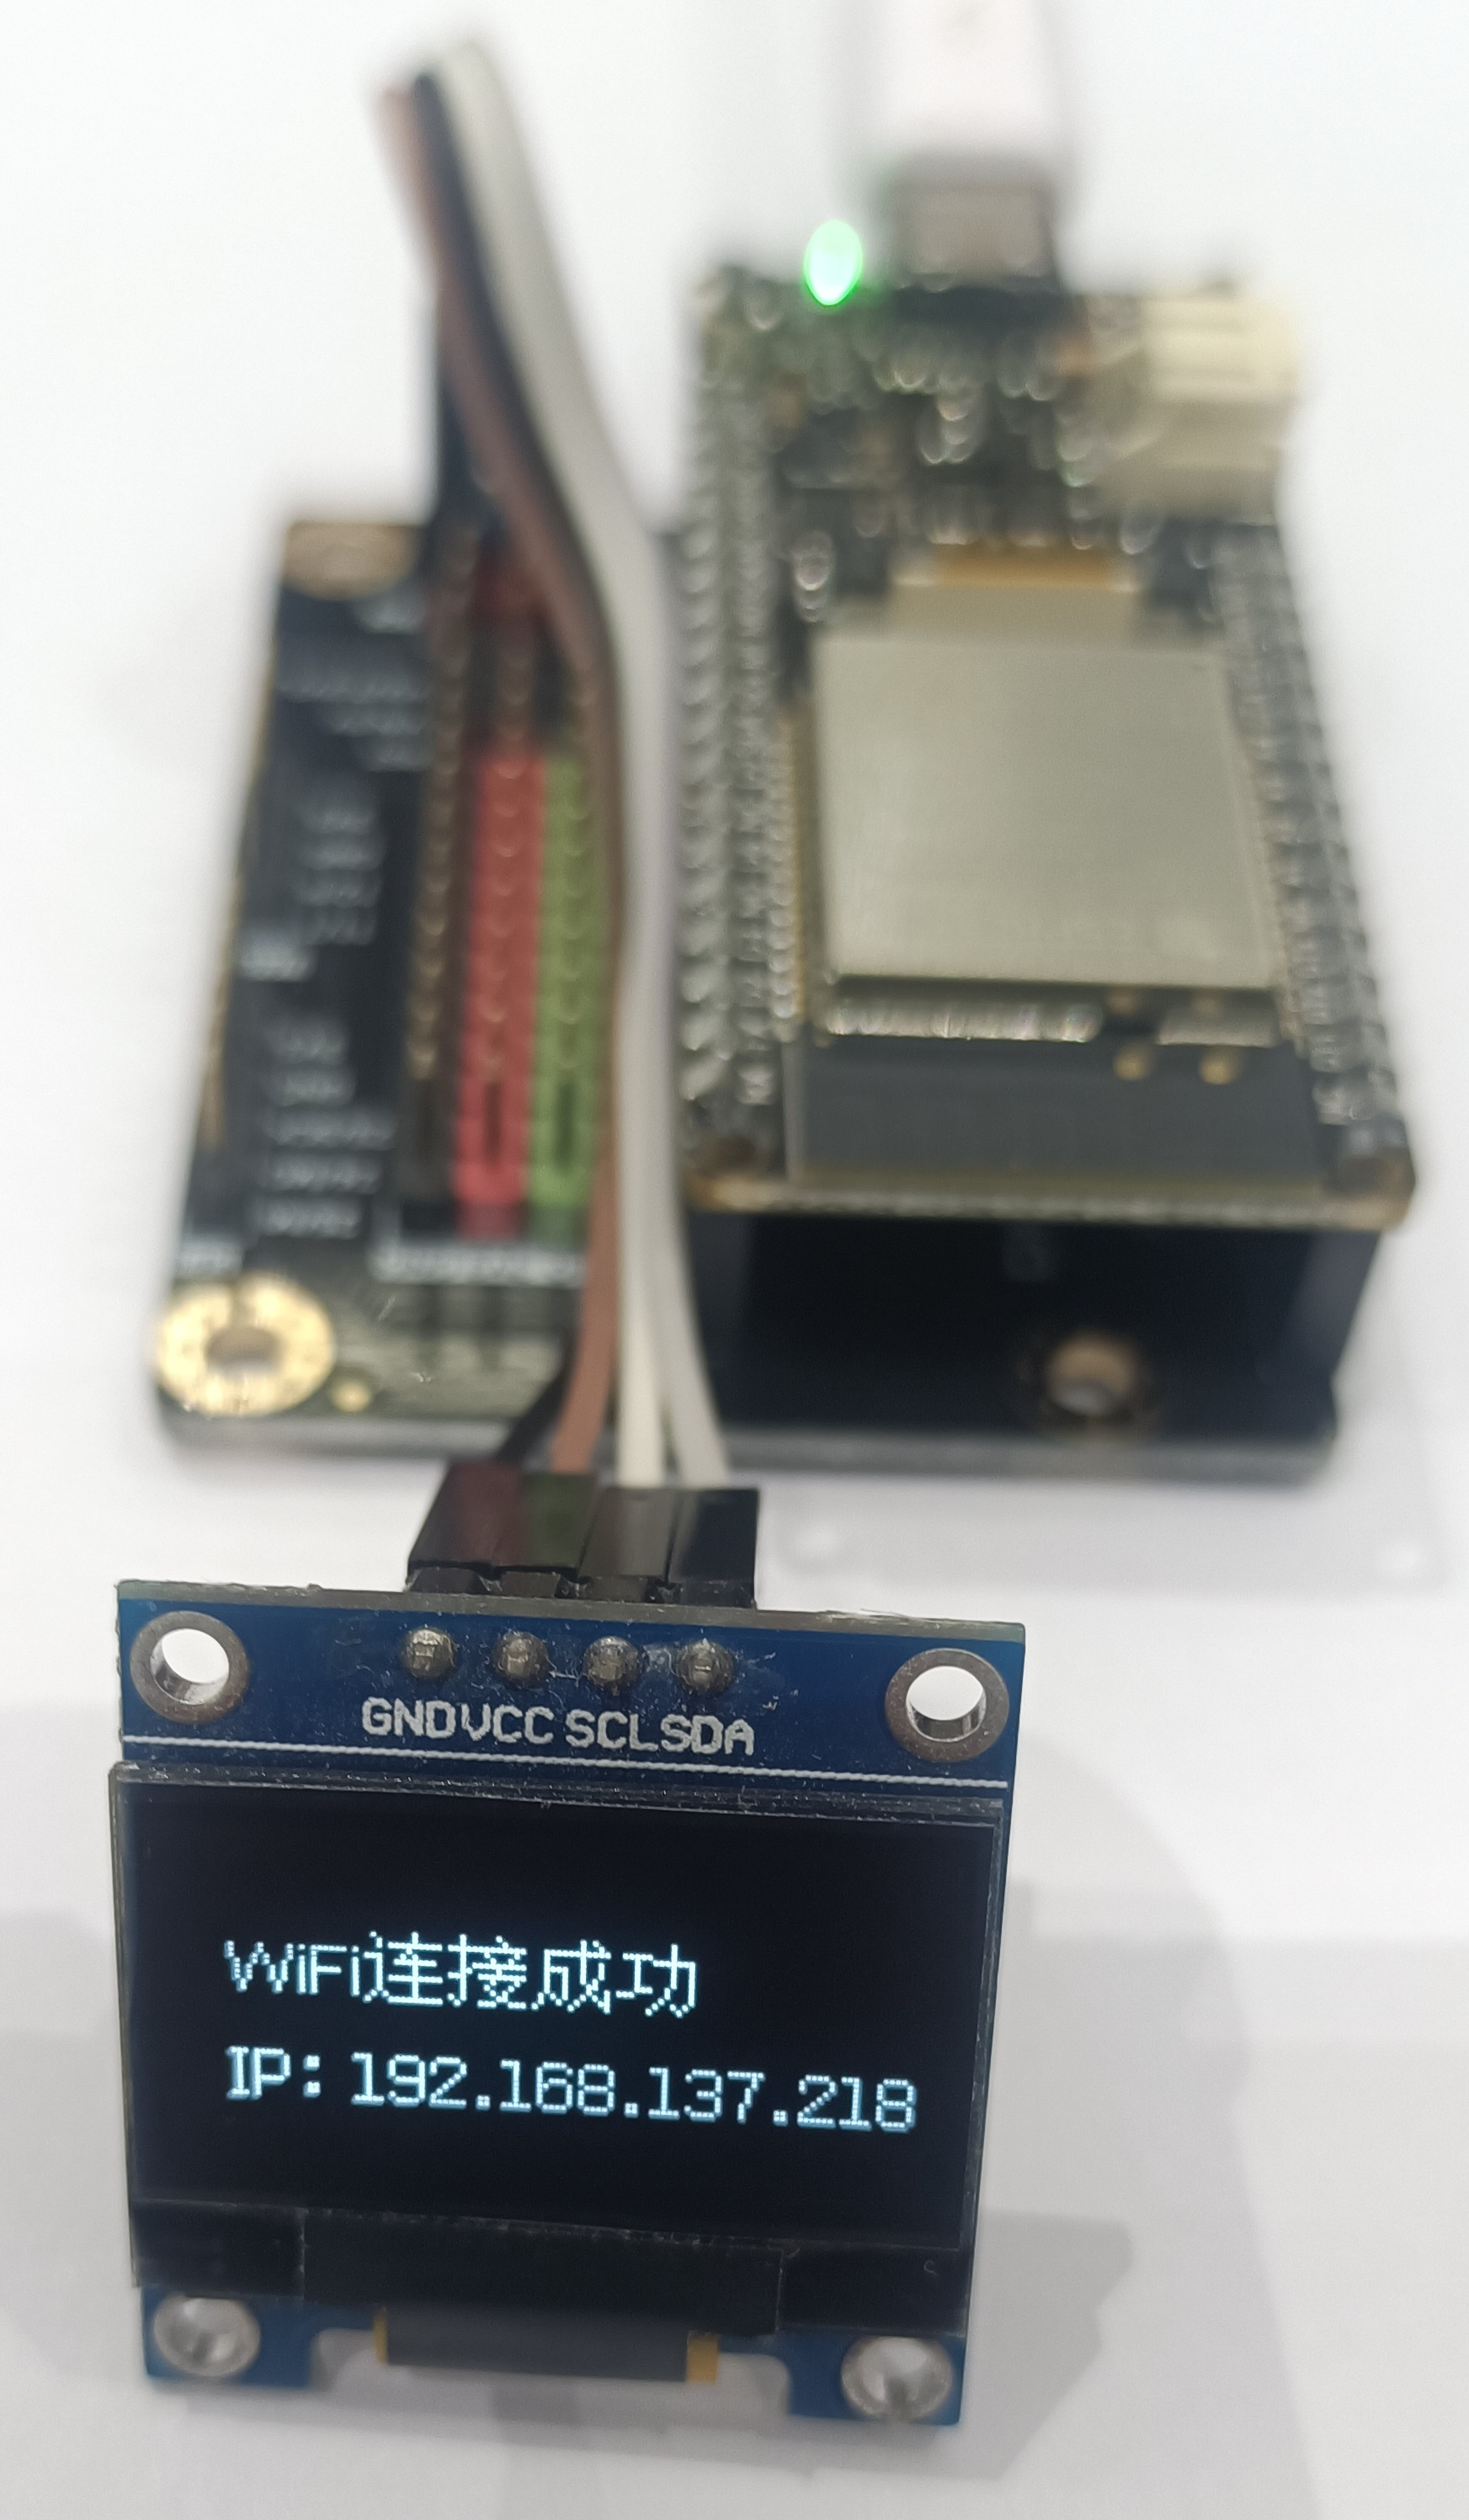
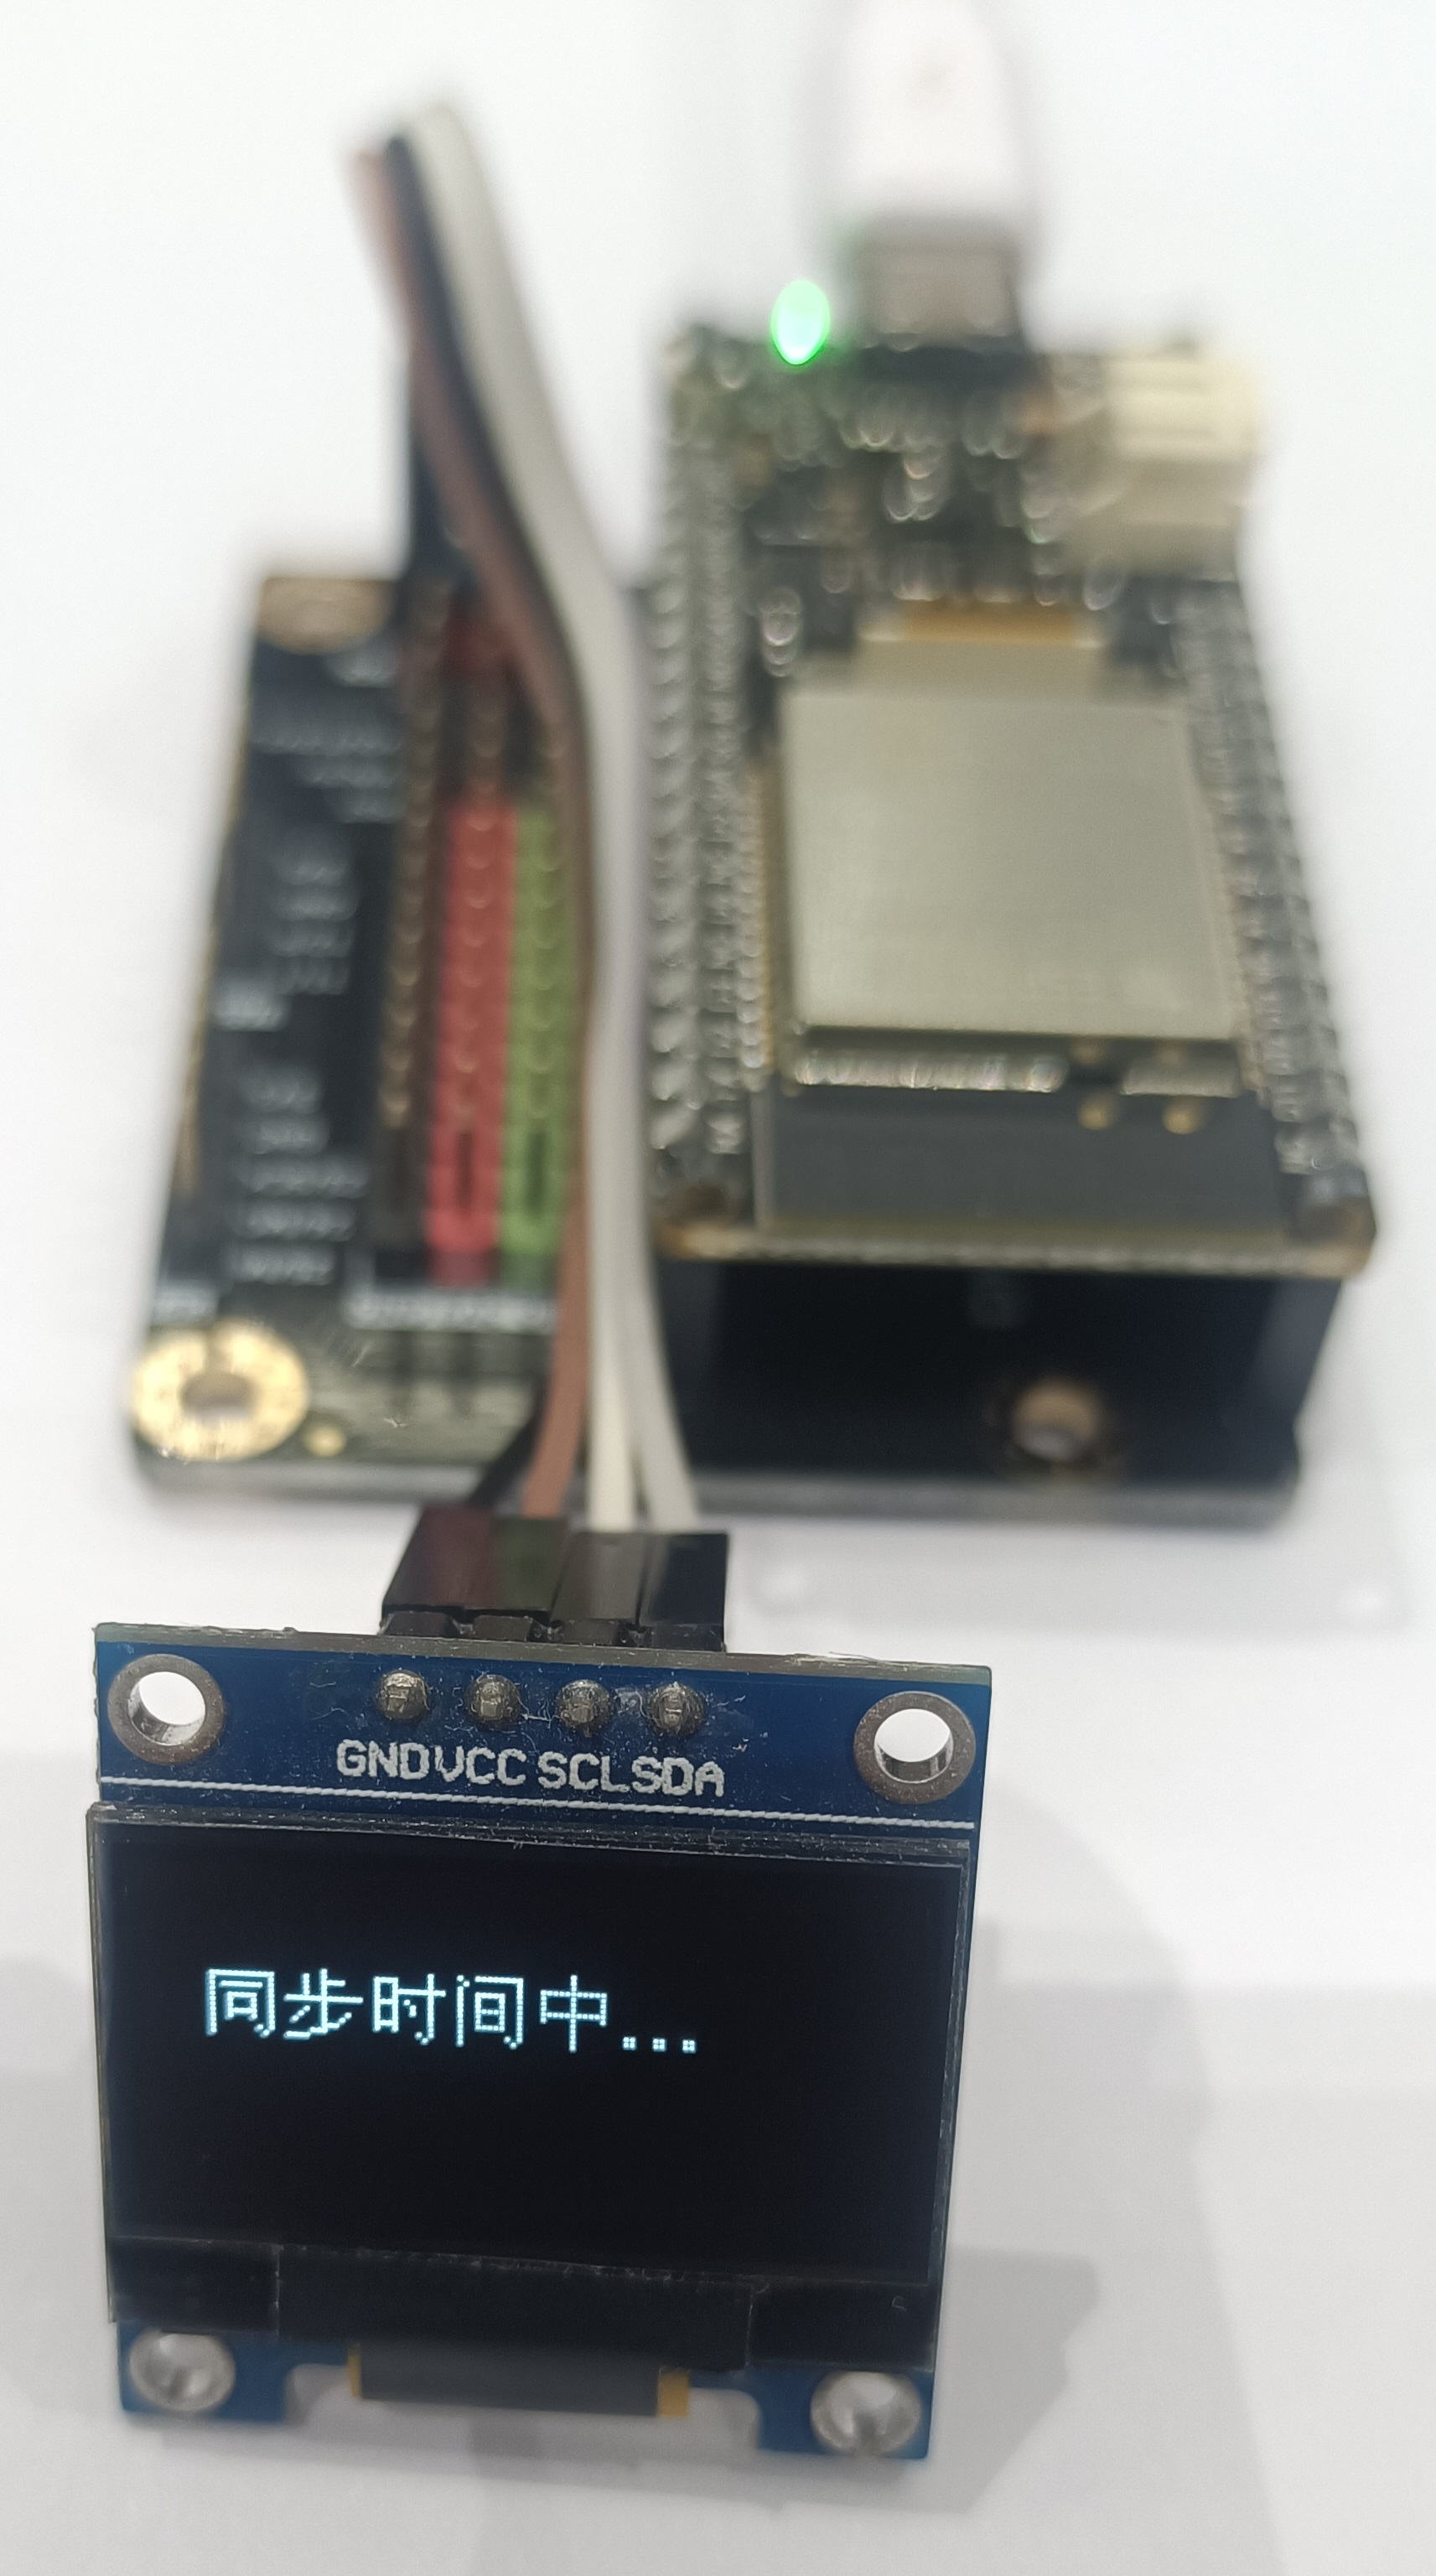
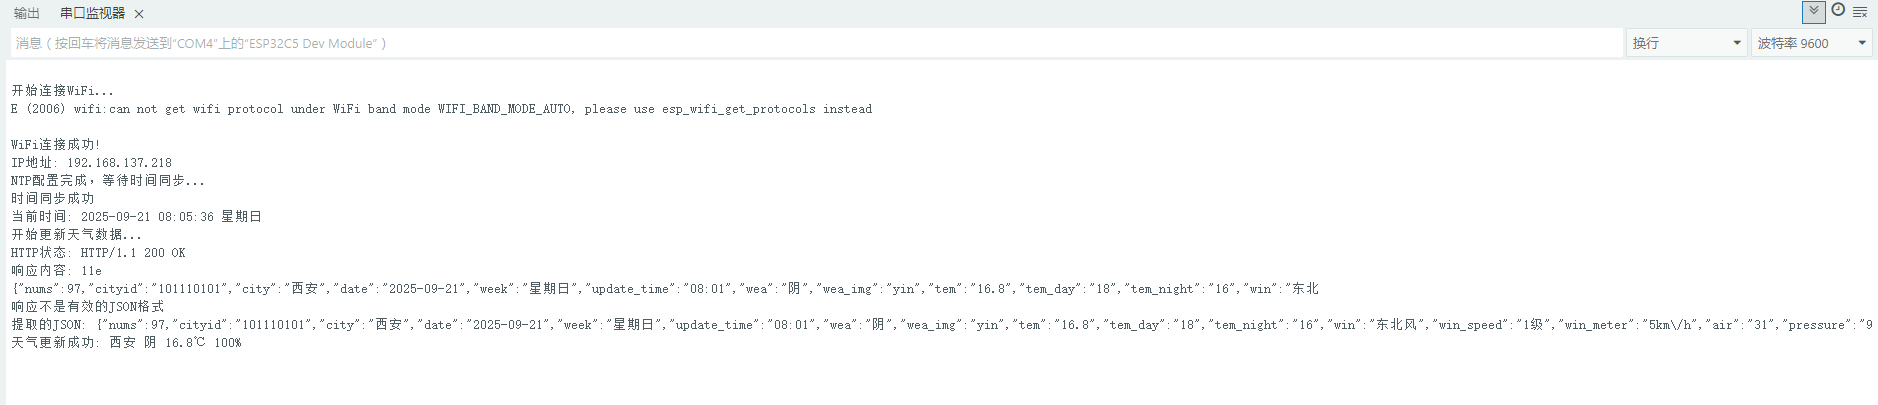
5. 编译与上传6. 运行与测试 上传成功后,开发板将自动重启。OLED屏幕将依次显示“连接WiFi中...”、“WiFi连接成功”、"同步时间中...",最后进入主界面,显示时间、日期和天气信息。观察屏幕显示是否正常,并通过串口监视器(波特率115200)查看详细的调试日志,以便在出现问题时进行排查。 六、主要代码及说明
1. 硬件配置与库引入- <font face="微软雅黑">#include <Arduino.h>
- #include <U8g2lib.h>
- #include "WiFiMulti.h"
- #include <time.h>
- #include <WiFiClient.h>
- #include <ArduinoJson.h>
-
- // 硬件引脚定义
- #define I2C_SDA 9 // ESP32-C5专用I2C引脚
- #define I2C_SCL 10
-
- // 网络和API配置
- const char* WIFI_SSID = "你的WiFi名称"; // 你的WiFi名称
- const char* WIFI_PWD = "你的WiFi密码"; // 你的WiFi密码
- const char* YT_APPID = "易天API APPID"; // 易天API APPID
- const char* YT_APPSECRET = "易天API密钥"; // 易天API密钥
- const char* YT_API_URL = "v1.yiketianqi.com";
- const char* YT_CITYID = "101110101"; // 西安城市ID
-
- // NTP服务器配置
- const char* ntpServer1 = "pool.ntp.org";
- const char* ntpServer2 = "time.nist.gov";
- const char* ntpServer3 = "ntp.aliyun.com";
-
- // 时区配置(东8区)
- const long gmtOffset_sec = 8 * 3600;
- const int daylightOffset_sec = 0;</font>
说明: 引入了必要的库文件,包括显示驱动、网络连接、时间处理和JSON解析等功能 定义了ESP32-C5专用的I2C引脚(9和10),这与常见的ESP32引脚不同 配置了WiFi连接信息和天气API参数,需要根据实际环境修改 设置了多个NTP服务器以提高时间同步的可靠性 配置了东8区时区,无夏令时
2. 对象初始化与数据结构- <font face="微软雅黑">// 初始化网络和显示对象
- WiFiMulti wifiMulti;
- WiFiClient httpClient;
- U8G2_SSD1306_128X64_NONAME_F_SW_I2C u8g2(U8G2_R0, I2C_SCL, I2C_SDA, U8X8_PIN_NONE);
-
- // 天气数据结构体
- struct WeatherInfo {
- String city; // 城市名
- String condition; // 天气状况
- float temp; // 实时温度(℃)
- String humidity; // 湿度
- String wind; // 风向和风力
- bool isValid; // 数据是否有效
- };
- WeatherInfo g_weather = {"未知", "未知", 0, "未知", "未知", false};
-
- // 天气更新计时器
- unsigned long g_lastWeatherUpdate = 0;
- const unsigned long WEATHER_UPDATE_INTERVAL = 300000; // 5分钟</font>
说明: 创建了WiFi多连接管理对象、HTTP客户端和OLED显示对象 定义了WeatherInfo结构体来组织天气数据,使代码更加清晰 使用全局变量g_weather存储当前天气信息,并初始化默认值 设置了天气更新间隔为5分钟,避免频繁请求API
3. 初始化设置- <font face="微软雅黑">void setup() {
- Serial.begin(115200);
-
- // 初始化OLED屏幕
- u8g2.begin();
- u8g2.enableUTF8Print(); // 启用UTF8打印支持
-
- // WiFi连接设置
- WiFi.mode(WIFI_STA);
- wifiMulti.addAP(WIFI_SSID, WIFI_PWD);
-
- // 显示连接提示
- u8g2.firstPage();
- do {
- u8g2.setFont(u8g2_font_wqy14_t_gb2312);
- u8g2.setCursor(10, 30);
- u8g2.print("连接WiFi中...");
- } while (u8g2.nextPage());
-
- // 等待WiFi连接(含超时处理)
- // ...
-
- // 配置NTP时间同步
- configTime(gmtOffset_sec, daylightOffset_sec, ntpServer1, ntpServer2, ntpServer3);
-
- // 首次获取天气
- updateWeather();
- g_lastWeatherUpdate = millis();
- }</font>
说明: 4. 主循环- <font face="微软雅黑">void loop() {
- // 检查WiFi连接
- if (wifiMulti.run() != WL_CONNECTED) {
- // 显示断开信息
- // ...
- delay(1000);
- return;
- }
-
- // 定时更新天气(每5分钟)
- if (millis() - g_lastWeatherUpdate >= WEATHER_UPDATE_INTERVAL) {
- if (updateWeather()) {
- g_lastWeatherUpdate = millis();
- } else {
- // 如果更新失败,10秒后重试
- g_lastWeatherUpdate = millis() - WEATHER_UPDATE_INTERVAL + 10000;
- }
- }
-
- // 获取并显示当前时间
- struct tm timeinfo;
- if (!getLocalTime(&timeinfo)) {
- // 显示时间获取失败
- // ...
- delay(1000);
- return;
- }
-
- // 在OLED上显示所有信息
- u8g2.firstPage();
- do {
- // 显示日期和星期(居中)
- // 显示时间(大字体,居中)
- // 显示天气信息(居中)
- } while (u8g2.nextPage());
-
- delay(1000); // 每秒更新一次
- }</font>
说明: 5. 天气更新功能- <font face="微软雅黑">bool updateWeather() {
- // 连接天气API服务器
- if (!httpClient.connect(YT_API_URL, 80)) {
- Serial.println("天气服务器连接失败");
- g_weather.isValid = false;
- return false;
- }
-
- // 构建并发送HTTP请求
- String request = "GET /free/day?appid=" + String(YT_APPID) +
- "&appsecret=" + String(YT_APPSECRET) +
- "&cityid=" + String(YT_CITYID) +
- "&unescape=1 HTTP/1.1\r\n" +
- "Host: " + YT_API_URL + "\r\n" +
- "Connection: close\r\n\r\n";
- httpClient.print(request);
-
- // 等待和读取响应
- // ...
-
- // 解析天气数据
- if (parseWeatherResponse(response)) {
- Serial.println("天气更新成功");
- return true;
- } else {
- Serial.println("天气解析失败");
- g_weather.isValid = false;
- return false;
- }
- }</font>
说明: 建立与天气API服务器的HTTP连接 构建符合API要求的GET请求,包含必要的参数 处理HTTP响应,包括状态码检查和头部跳过 调用解析函数处理返回的JSON数据 提供详细的错误处理和日志输出,便于调试
6. JSON数据解析- <font face="微软雅黑">bool parseWeatherResponse(const String& response) {
- // 清理响应中的可能存在的非法字符
- String cleanResponse = response;
- cleanResponse.trim();
-
- // 检查JSON格式有效性
- if (!cleanResponse.startsWith("{") || !cleanResponse.endsWith("}")) {
- // 尝试提取有效JSON部分
- // ...
- }
-
- // 使用ArduinoJson解析JSON
- JsonDocument doc;
- DeserializationError error = deserializeJson(doc, cleanResponse);
-
- if (error) {
- Serial.println("JSON解析错误: " + String(error.c_str()));
- return false;
- }
-
- // 提取并存储天气信息
- g_weather.city = doc["city"].as<String>();
- g_weather.condition = doc["wea"].as<String>();
-
- String tempStr = doc["tem"].as<String>();
- g_weather.temp = tempStr.toFloat(); // 转换为浮点数
-
- // 提取其他可选字段
- if (!doc["humidity"].isNull()) {
- g_weather.humidity = doc["humidity"].as<String>();
- }
-
- g_weather.isValid = true;
- return true;
- }</font>
说明: 7. 工具函数- <font face="微软雅黑">// 统一的星期获取函数
- String getWeekdayCN(int wday, bool fullFormat) {
- const char* fullDays[] = {"星期日", "星期一", "星期二", "星期三", "星期四", "星期五", "星期六"};
- const char* shortDays[] = {"日", "一", "二", "三", "四", "五", "六"};
-
- if (wday < 0 || wday > 6) {
- return fullFormat ? "未知" : "?";
- }
-
- return fullFormat ? fullDays[wday] : shortDays[wday];
- }
-
- // 居中显示文本的辅助函数
- void drawCenteredString(int y, const String &str, const uint8_t *font) {
- u8g2.setFont(font);
- int width = u8g2.getUTF8Width(str.c_str());
- int x = (128 - width) / 2;
- u8g2.setCursor(x, y);
- u8g2.print(str);
- }
-
- // 带时间戳的调试输出
- void logDebug(const String& msg) {
- struct tm timeinfo;
- if (getLocalTime(&timeinfo)) {
- char timeBuf[20];
- strftime(timeBuf, sizeof(timeBuf), "[%H:%M:%S] ", &timeinfo);
- Serial.println(String(timeBuf) + msg);
- } else {
- Serial.println("[未知时间] " + msg);
- }
- }</font>
说明: getWeekdayCN函数将数字表示的星期几转换为中文名称,支持完整和简写两种格式 drawCenteredString函数实现了文本居中显示功能,简化了显示代码 logDebug函数提供带时间戳的调试信息,有助于问题排查和运行状态监控
七、效果展示
1. 连接Wifi中2. Wifi连接成功3. 同步时间中4. 显示天气与时钟5. 串口输出八、 总结 本项目成功实现了一个功能完整的网络天气时钟。FireBeetle 2 ESP32-C5凭借其强大的网络功能和兼容性,使得开发过程非常顺畅。 需要注意的是:1、 由于目前的测试版的Firebeetle 2 ESP32-C5开发板板载ESP32-C5模组为ECO1 版本,Arduino IDE开发环境中esp32必须选择3.3.0-alpha1,选择其他版本会出现无法正常上传程序的问题。2、需要串口打印输出时,需要将Arduino IDE工具里的USB CDC on Boot选项修改为Enabled(启用),默认值是Disabled(关闭)。 未来,可在本项目的基础上进一步完善:1、增加空气质量、最高气温、最低气温等预报信息的显示;2、增加天气图标显示;3、显示未来7天的天气预报。
|