|
75757| 70
|
[项目] 【Arduino】168种传感器模块系列实验(158)---QMC5883L三轴罗盘 |
|
【Arduino】168种传感器模块系列实验(资料代码+图形编程+仿真编程) 实验一百五十八:QMC5883L电子指南针罗盘模块 三轴磁场传感器GY-271 项目十一:使用Adafruit库的HMC5883 磁力计测试 实验开源代码 |
|
【Arduino】168种传感器模块系列实验(资料代码+图形编程+仿真编程) 实验一百五十八:QMC5883L电子指南针罗盘模块 三轴磁场传感器GY-271 项目之十:根据当前位置来校正磁偏角 实验开源代码 |
|
【Arduino】168种传感器模块系列实验(资料代码+图形编程+仿真编程) 实验一百五十八:QMC5883L电子指南针罗盘模块 三轴磁场传感器GY-271 项目十三:尝试不使用驱动库来读取XYZ 实验开源代码 |
|
本帖最后由 驴友花雕 于 2021-9-29 11:00 编辑 Arduino 系列传感器和执行器模块实验目录清单: 一块扩展板完成Arduino的10类37项实验(代码+图形+仿真) https://mc.dfrobot.com.cn/thread-280845-1-1.html 连杆形式的腿机构十一种:盘点机器人行走背后的机械原理 https://mc.dfrobot.com.cn/thread-308097-1-1.html 【花雕动手做】超低成本,尝试五十元的麦克纳姆轮小车! https://mc.dfrobot.com.cn/thread-307863-1-1.html 【花雕动手做】超迷你哦,用徽商香烟盒做个智能小车! https://mc.dfrobot.com.cn/thread-307907-1-1.html 【花雕动手做】太搞笑啦,一支胶管制成二只蠕动机器人 https://mc.dfrobot.com.cn/thread-308046-1-1.html 【花雕动手做】快餐盒盖,极低成本搭建机器人实验平台 https://mc.dfrobot.com.cn/thread-308063-1-1.html 【花雕动手做】特别苗条,使用微波传感器控制的纤细小车 https://mc.dfrobot.com.cn/thread-308866-1-1.html 【花雕动手做】脑洞大开、五花八门的简易机器人66种 https://mc.dfrobot.com.cn/thread-307900-1-1.html 实验一百五十八:QMC5883L电子指南针罗盘模块 三轴磁场传感器GY-271 https://mc.dfrobot.com.cn/thread-308195-1-1.html 实验一百六十三:BMI160 6轴惯性运动传感器 16位3轴加速度+超低功耗3轴陀螺仪 I2C/SPI 14LGA https://mc.dfrobot.com.cn/thread-310371-1-1.html 实验一百六十五:2.4 英寸 TFT LCD 触摸屏模块 XPT2046 PCB ILI9341 240x320 像素 8 位 SPI 串口显示器 300mA https://mc.dfrobot.com.cn/thread-309803-1-1.html 实验一百七十六:6mm大尺寸8x8LED方块方格点阵模块 可级联 红绿蓝白色 可选8级亮度 https://mc.dfrobot.com.cn/thread-309845-1-1.html 实验一百八十一:1.3寸OLED液晶屏 I2C IIC通信 4针模块 1106/1306驱动 128*64像素 https://mc.dfrobot.com.cn/thread-311123-1-1.html 实验一百八十三:GY-530 VL53L0X 激光测距 ToF测距 飞行时间测距传感器模块 IIC通信协议 https://mc.dfrobot.com.cn/thread-310273-1-1.html 实验一百八十五:MAX4466声音传感器 驻极体话筒放大器 麦克风可调功放模块 microphone https://mc.dfrobot.com.cn/thread-310193-1-1.html 实验一百八十九:TDA1308 硅麦克风 数字咪头放大模块 拾音器放大板 楼氏SUNLEPHANT https://mc.dfrobot.com.cn/thread-310246-1-1.html 实验一百九十三:TCS34725颜色识别传感器 RGB IIC明光感应模块 ColorSensor https://mc.dfrobot.com.cn/thread-310209-1-1.html 实验二百:RCWL-0515微波雷达感应开关 人体感应 智能感应探测传感器 12-15米远距离2.7G微波检测模块 https://mc.dfrobot.com.cn/thread-310313-1-1.html 实验二百零三:Air724UG合宙 Cat14G模块 DTU物联网UART串口通信数据TCP透传 核心板组合套餐 https://mc.dfrobot.com.cn/thread-310342-1-1.html 实验二百零七:I2C红色8*8LED点阵模块ht16k33驱动1088BS树莓派物联网可扩展编程 https://mc.dfrobot.com.cn/thread-310951-1-1.html 实验二百零九:Gravity: I2C & UART BC20 NB-IoT & GNSS通信模块 NB-IoT广域低功耗无线通信 GPS/北斗精准定位 https://mc.dfrobot.com.cn/thread-310433-1-1.html |
|
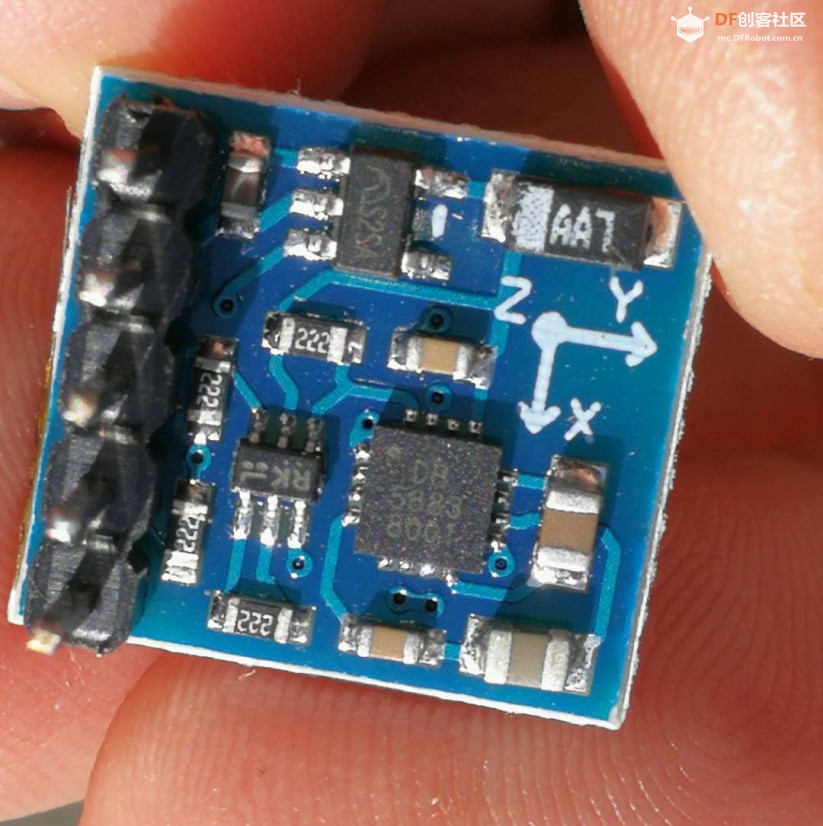
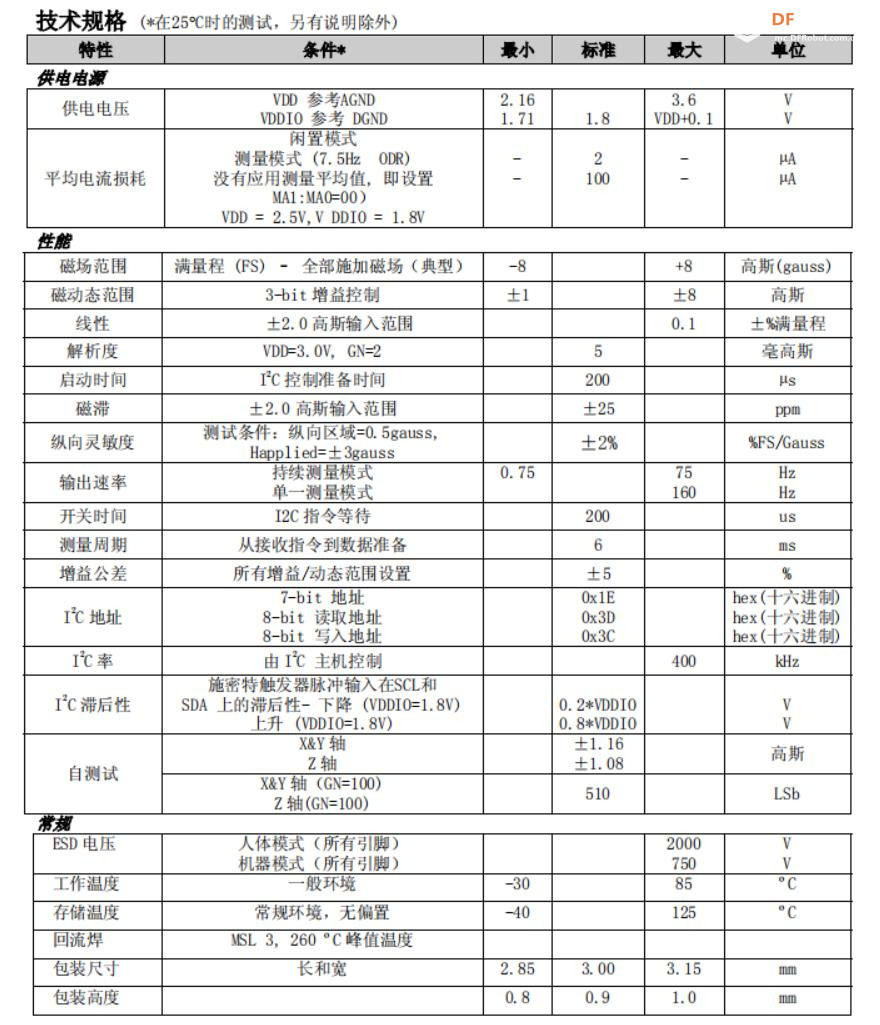
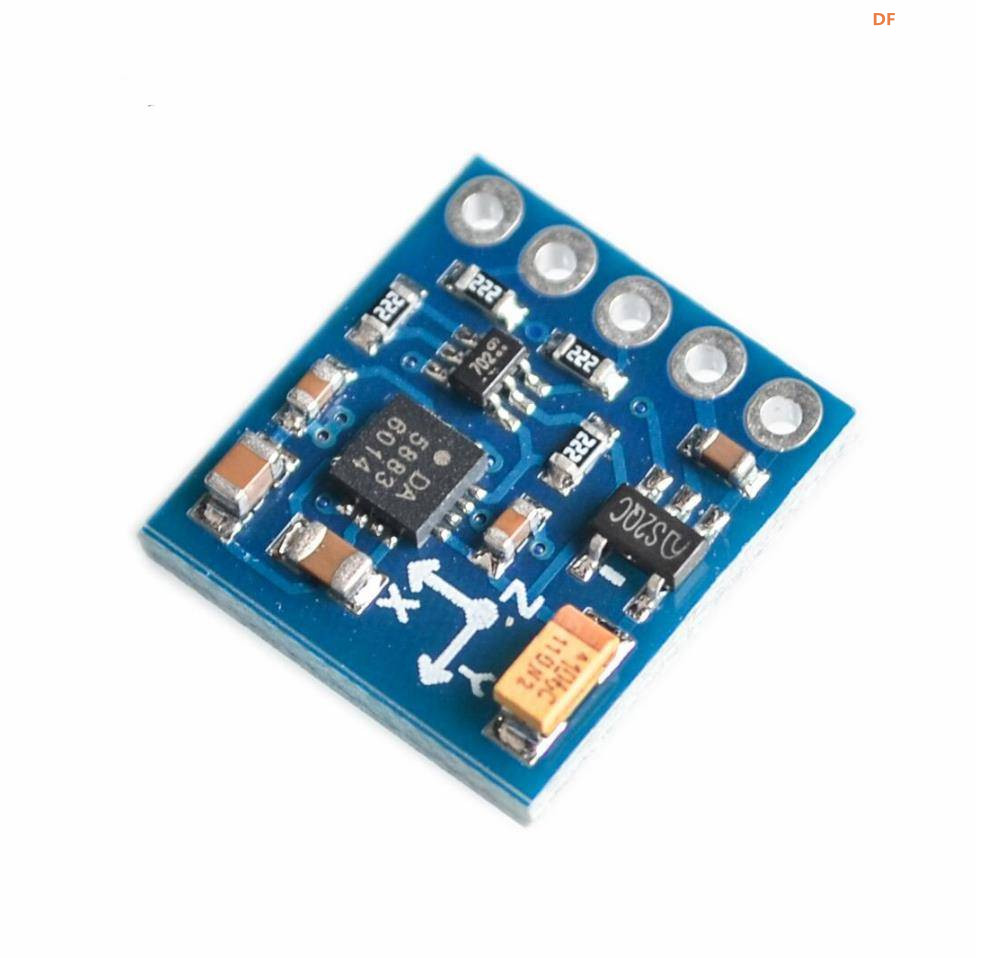
QMC5883L特征 (1)霍尼韦尔(中国)QMC5883L是一款表面贴装多芯片模块,设计用于具有数字接口的低场磁感应,适用于低成本指南针和磁力计等应用 (2)结合低噪声AMR传感器的12位ADC在±8高斯场中实现5毫高斯场分辨率 (3)低电压运行,低功耗; 支持内置的自检 (4)内置式皮带驱动电路,I2C数字接口,宽磁场范围(+/- 8 oe) (5)工作电压:3.3v-5v; PCB尺寸:1.3 x 2.3厘米(QMC5883L尺寸:3.0 x 3.0 x 0.9毫米),带有16引脚无铅芯片载体(LCC) 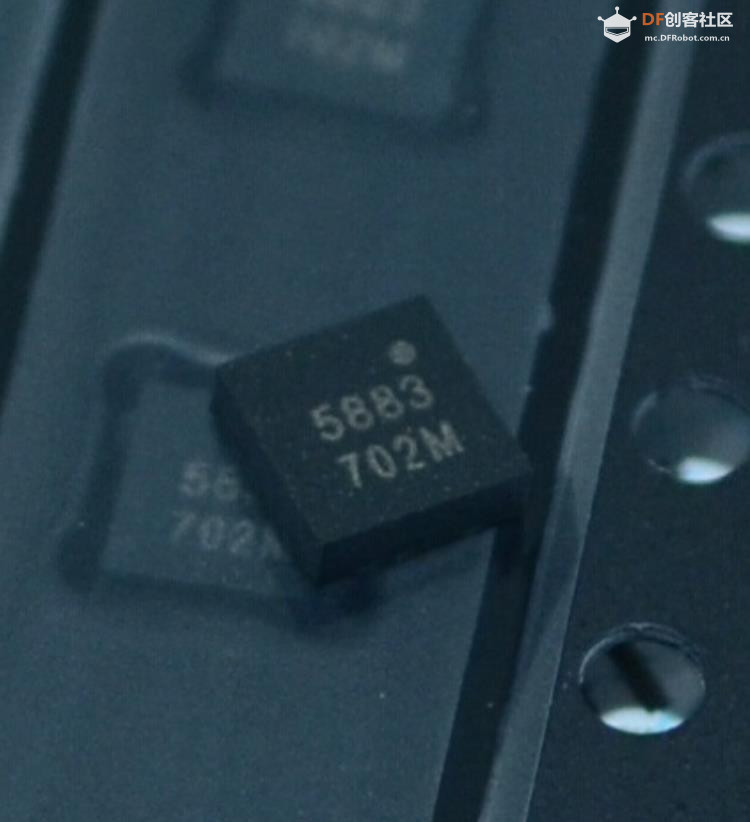 |
|
QMC5883L是一款多芯片三轴磁传感器。 这个表面贴装的小尺寸芯片集成了磁传感器信号条件ASIC,面向高精度应用,例如无人机,机器人,移动设备中的指南针,导航和游戏个人手持设备。 QMC5883L基于最新的高分辨率,霍尼韦尔AMR技术授权的磁阻技术。结合定制设计的16位ADC ASIC,它具有以下优势:低噪声,高精度,低功耗,偏移消除和温度补偿。 QMC5883L启用1°至2°指南针航向精度。 I2C串行总线可简化接口。QMC5883L位于3x3x0.9mm3中表面贴装16针焊盘栅格阵列(LGA)封装。 功能 1、3x3x0.9 mm3中的3轴磁阻传感器陆地栅格阵列封装(LGA),保证在扩展的温度范围内工作-40°C至+85°C。 2、具有低噪声AMR传感器的16位ADC实现2毫高斯场分辨率。 3、宽磁场范围(±8高斯)。 4、温度补偿数据输出和温度输出。 5、具有标准模式和快速模式的I2C接口。 6、宽范围工作电压(2.16V至3.6V)和低功耗(75uA)。 7、无铅封装构造。 8、提供软件和算法支持。 优点 1、体积小,适用于高度集成的产品。 信号有已数字化和校准。 2、启用1°至2°度的罗盘航向精度,允许导航和LBS应用。 3、最大化传感器的完整动态范围和分辨率。 4、在宽广的范围内自动保持传感器的灵敏度工作温度范围。 5、用于快速数据通信的高速接口,最大200Hz数据输出速率。 6、兼容电池供电的应用。 7、符合RoHS标准。 8、可获得罗盘航向、硬磁、软磁以及自动校准库。 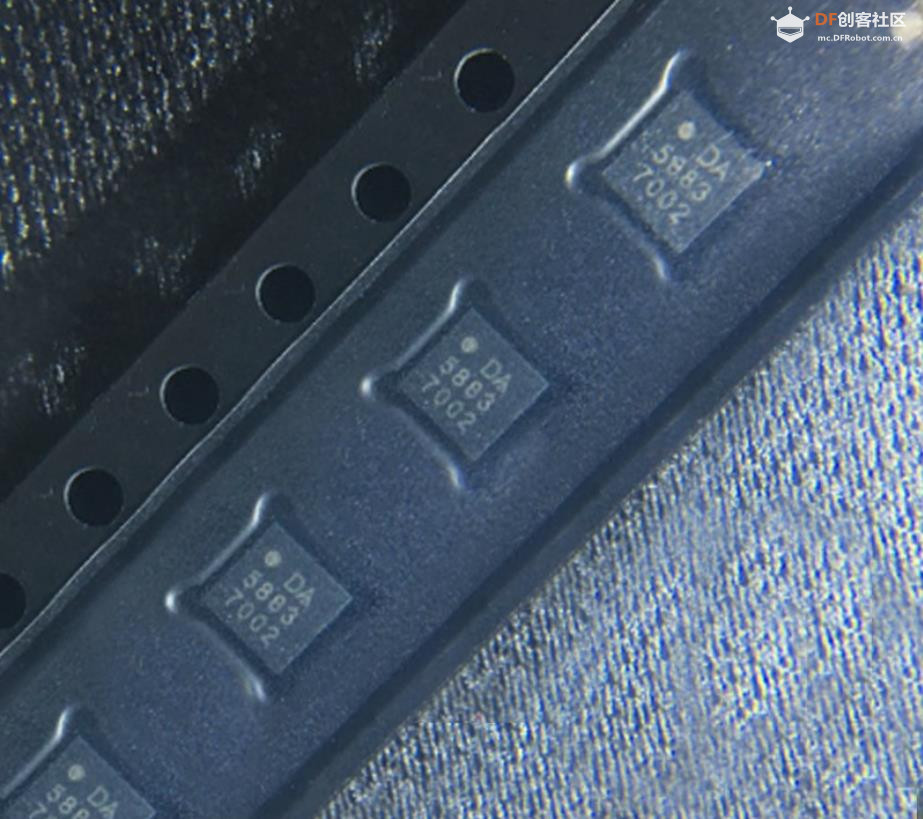 |
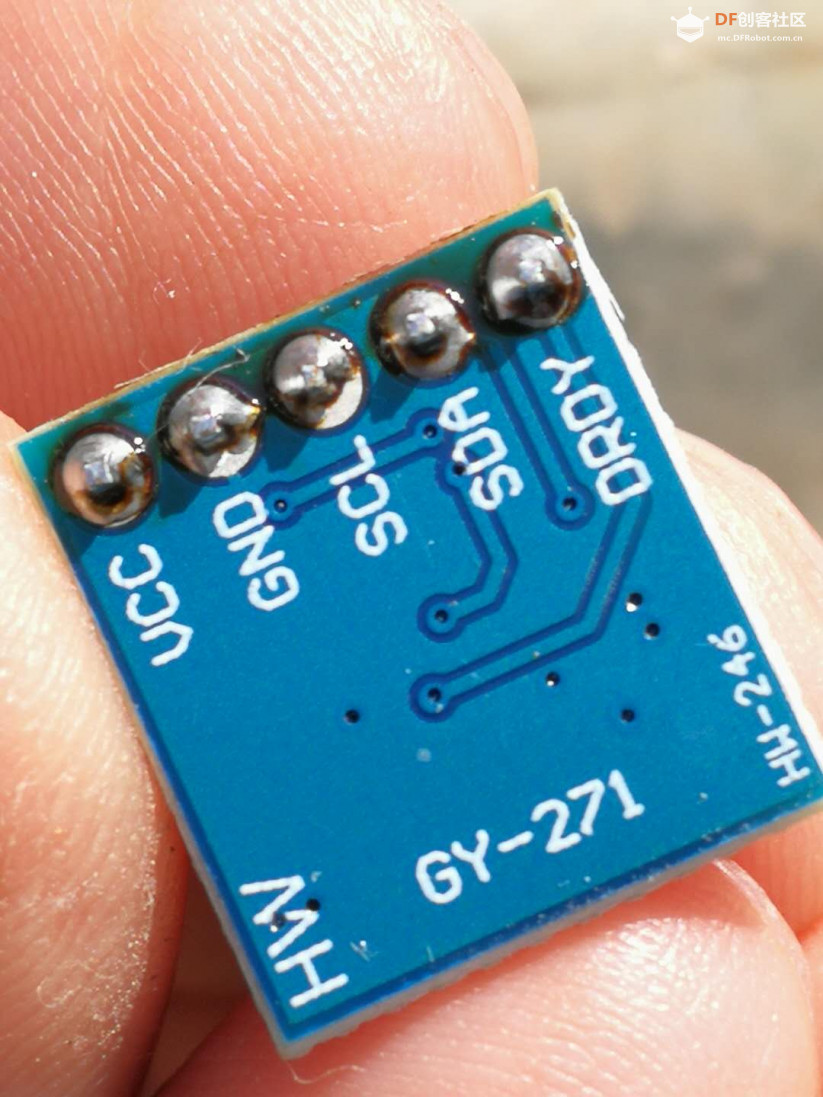
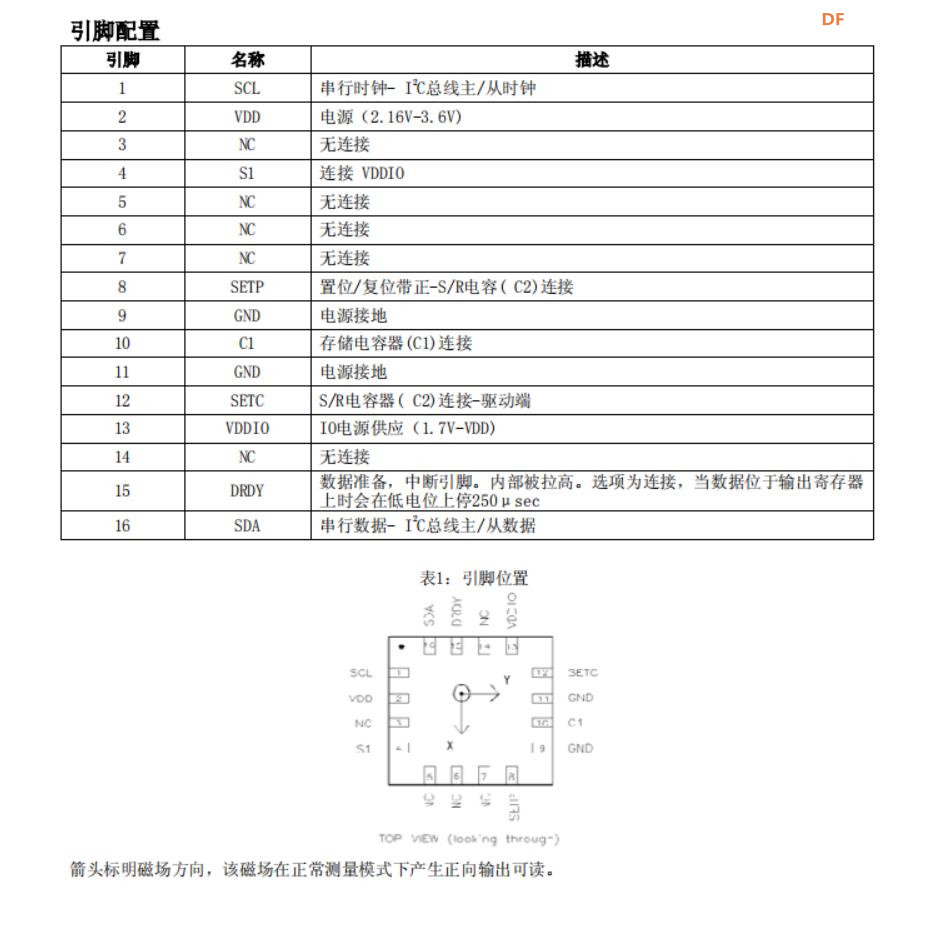
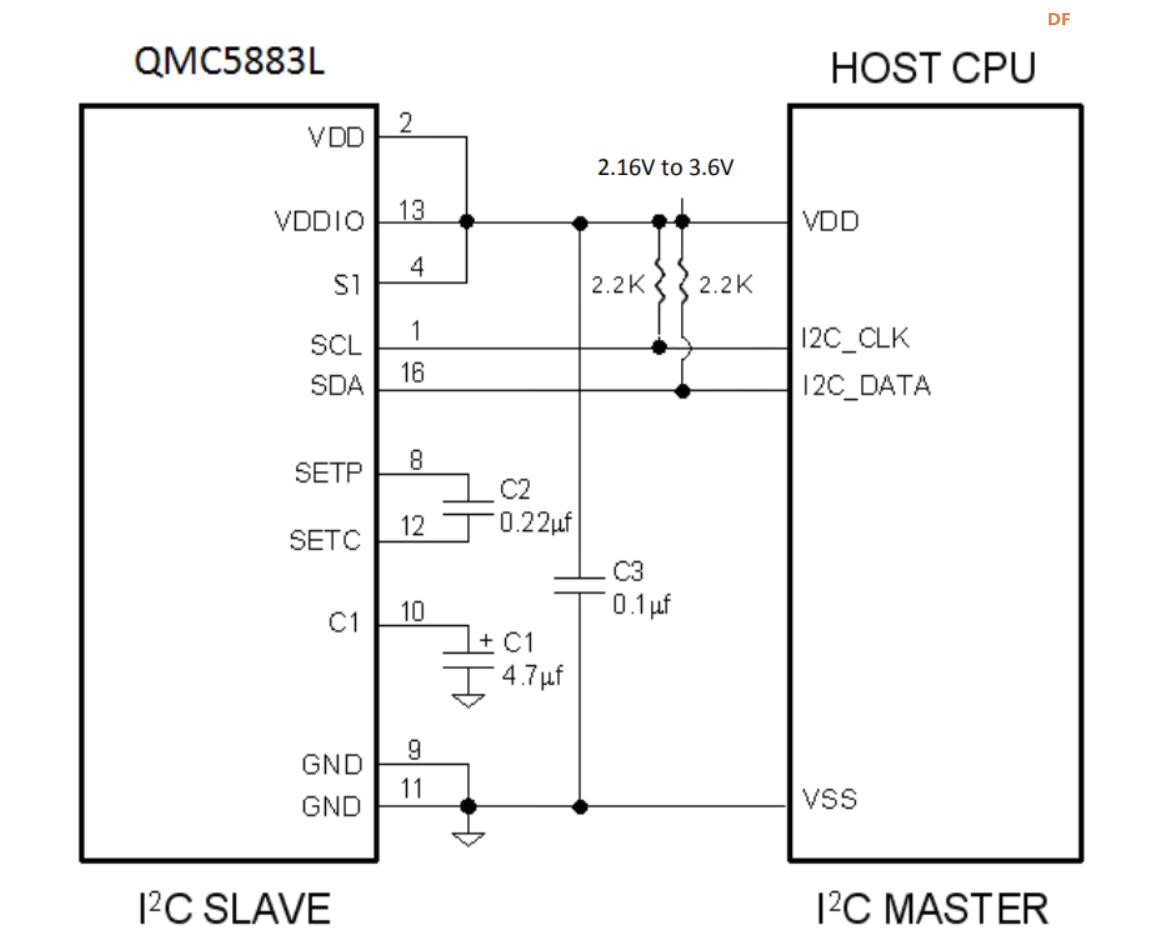
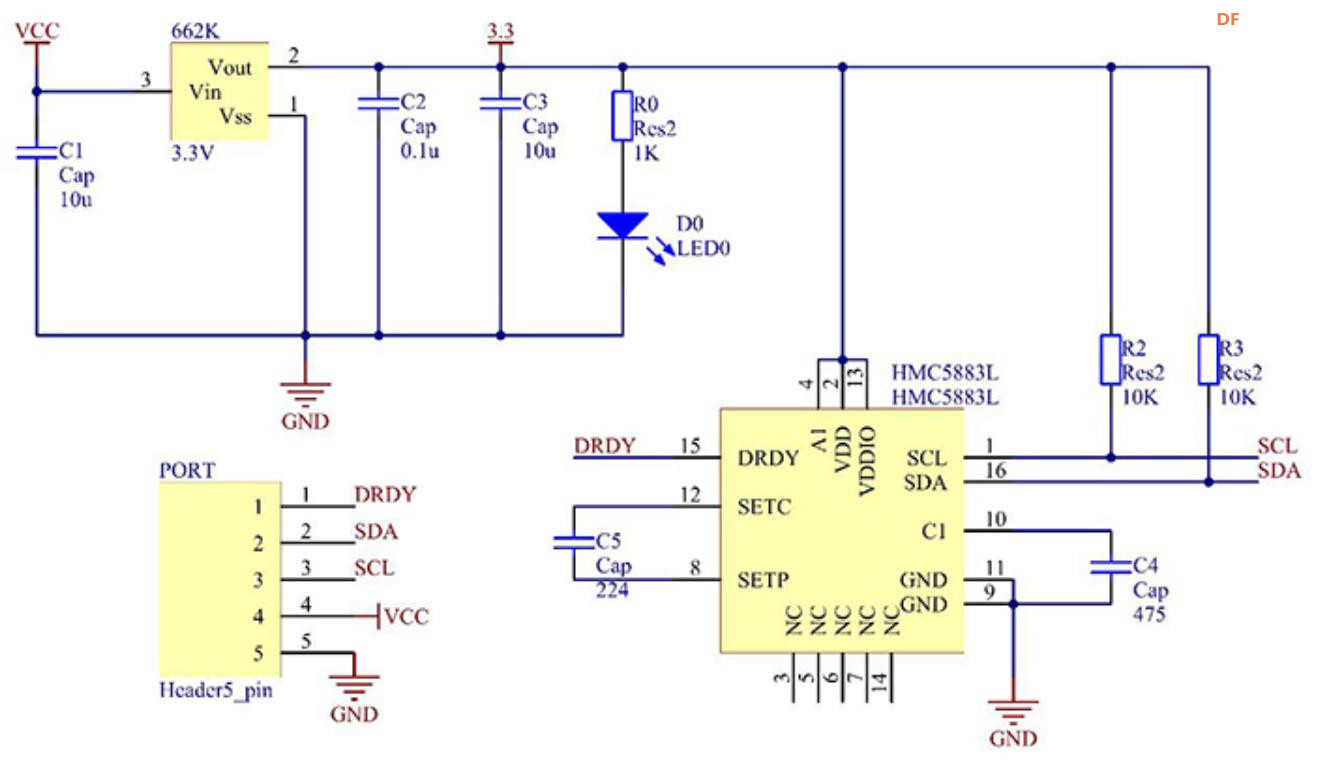
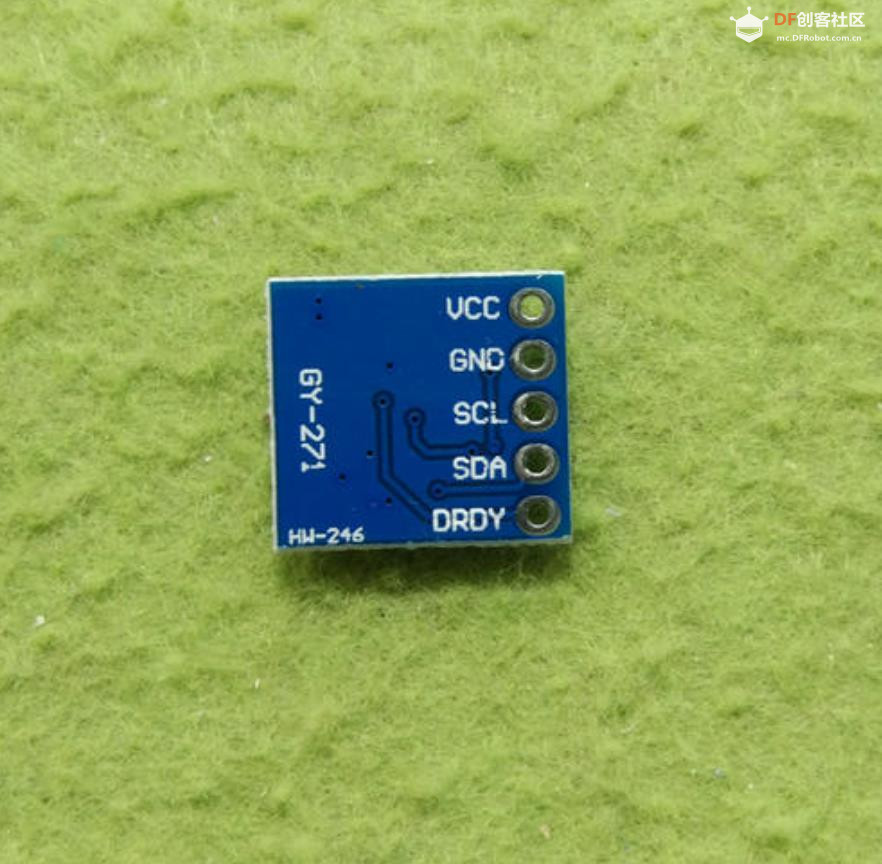 引脚功能 VCC + 5V-电源引脚,给它3.3v-5VDC。 对于Arduino,建议5v GND-接地引脚 SDA和SCL-这些是I2C数据和时钟引脚,用于从模块向微控制器发送和接收数据。 这些引脚上有1万上拉至3.3v引脚。 您可以将这些引脚连接到5V I2C线路,板上有电平转换器,可将引脚安全降低到3V DRDY-这是“数据就绪”引脚输出。 如果要高速流传输数据(每秒超过100次),则可以在准备好读取数据时收听此引脚。 有关使用DRDY引脚的更多详细信息,请参见数据表,我们不使用它,因为我们读得不快! Build the circuit QMC5883L--------------- Uno/Mega2560 VCC------------------- 5V GND------------------- GND SCL------------------- A5/ pin21 mega2560 SDA------------------- A4/pin20 mega2560 DRDY------------------ N/C |
|
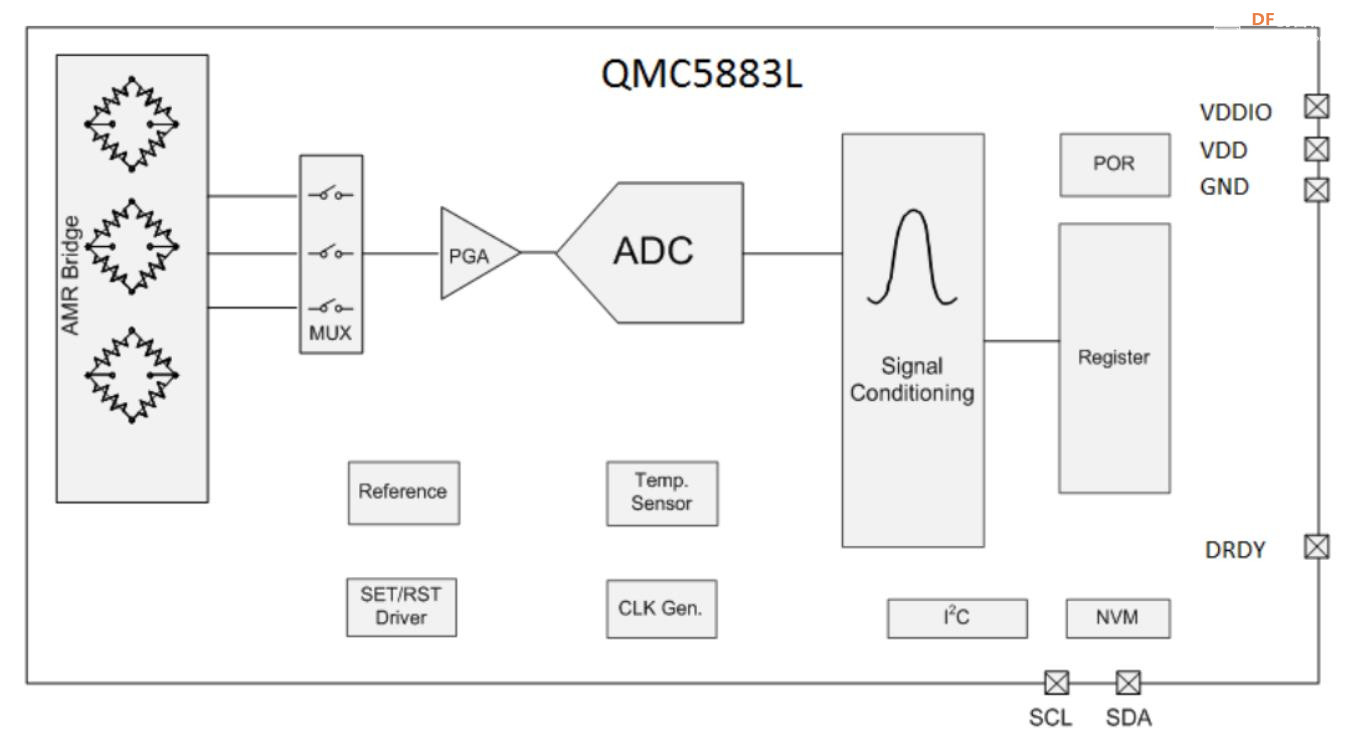
QMC5883L模块的几个定义: AMR Bridge:三轴磁性传感器 MUX:多路复用通道 PGA:可编程控制的传感器信号增益放大器 Signal Conditioning:进行磁场信号校正及补偿的数字模块 ADC:16位的模数转换器 I2C:总线形式 NVM:用于校正的非易失性存储器 SET/RST Driver:用于初始化磁性传感器的内部驱动 Reference:用于内部偏移的电压/电流基准 Clock Gen.:内部振荡器,用于内部操作 POR:上电复位 Temperature Sensor:用于内部精度/偏移的温度传感器,也可以用于测量温度并输出 QMC5883L有两种工作模式:连续测量模式和待命模式。 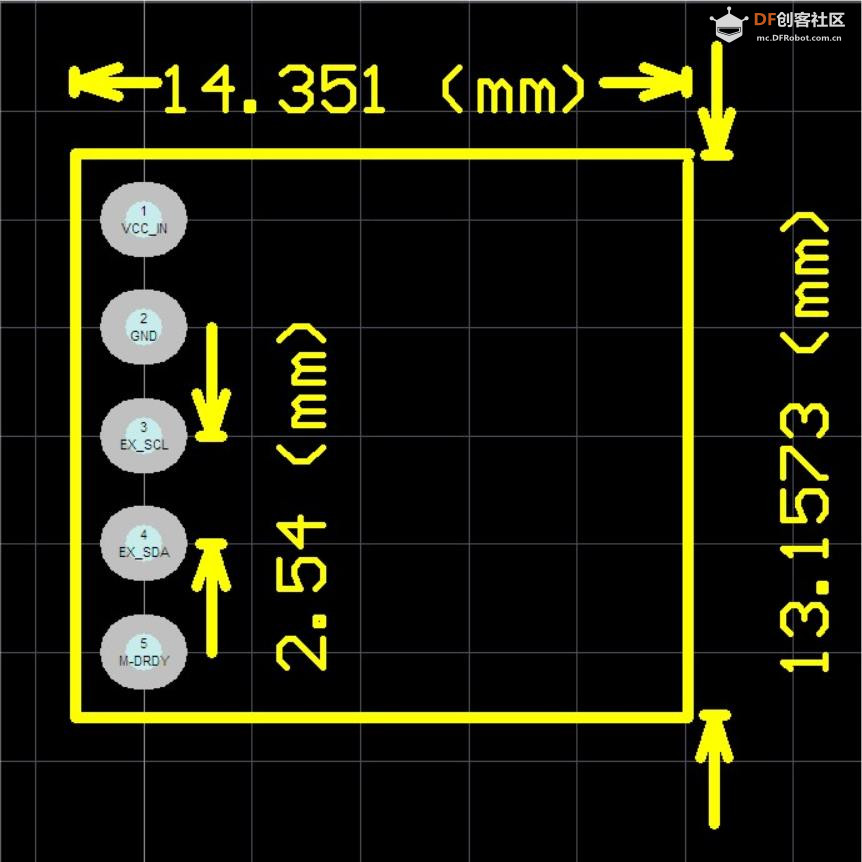 |


 沪公网安备31011502402448
© 2013-2026 Comsenz Inc. Powered by Discuz! X3.4 Licensed

 置顶卡
置顶卡 变色卡
变色卡 千斤顶
千斤顶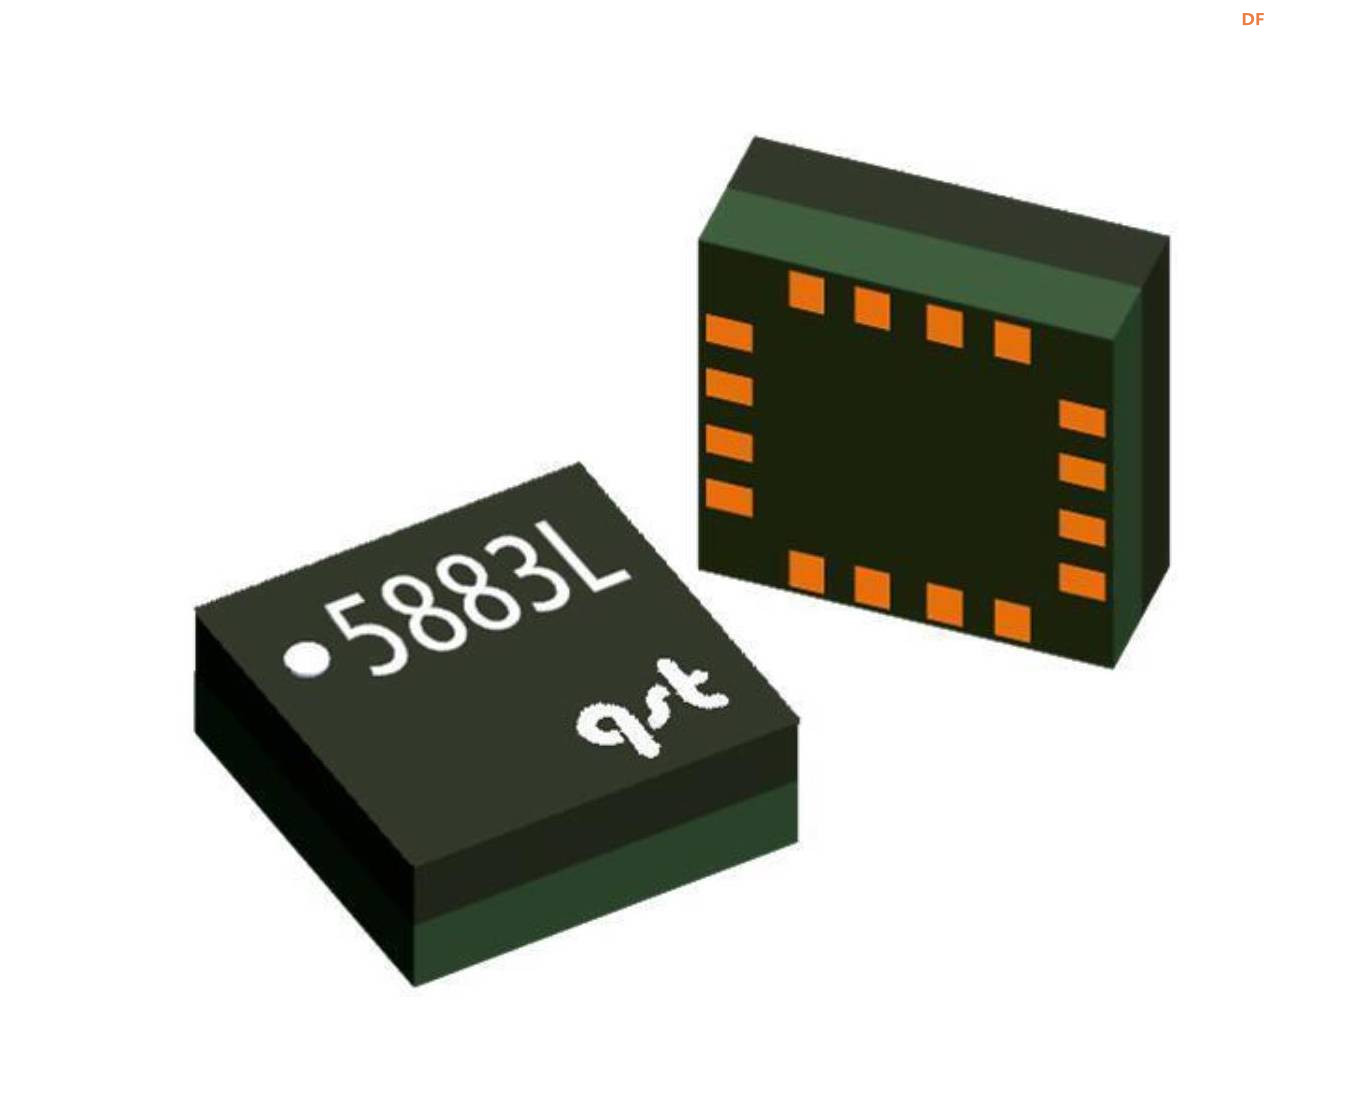


 萌萌哒新人
萌萌哒新人
 活跃会员
活跃会员
 宣传大使
宣传大使
 牛X认证
牛X认证
 创作达人
创作达人
 ARD DAY
 摸鱼团员
摸鱼团员
 志“童”道合
 编辑选择奖
编辑选择奖


